
On this page
Start here
Quick answer
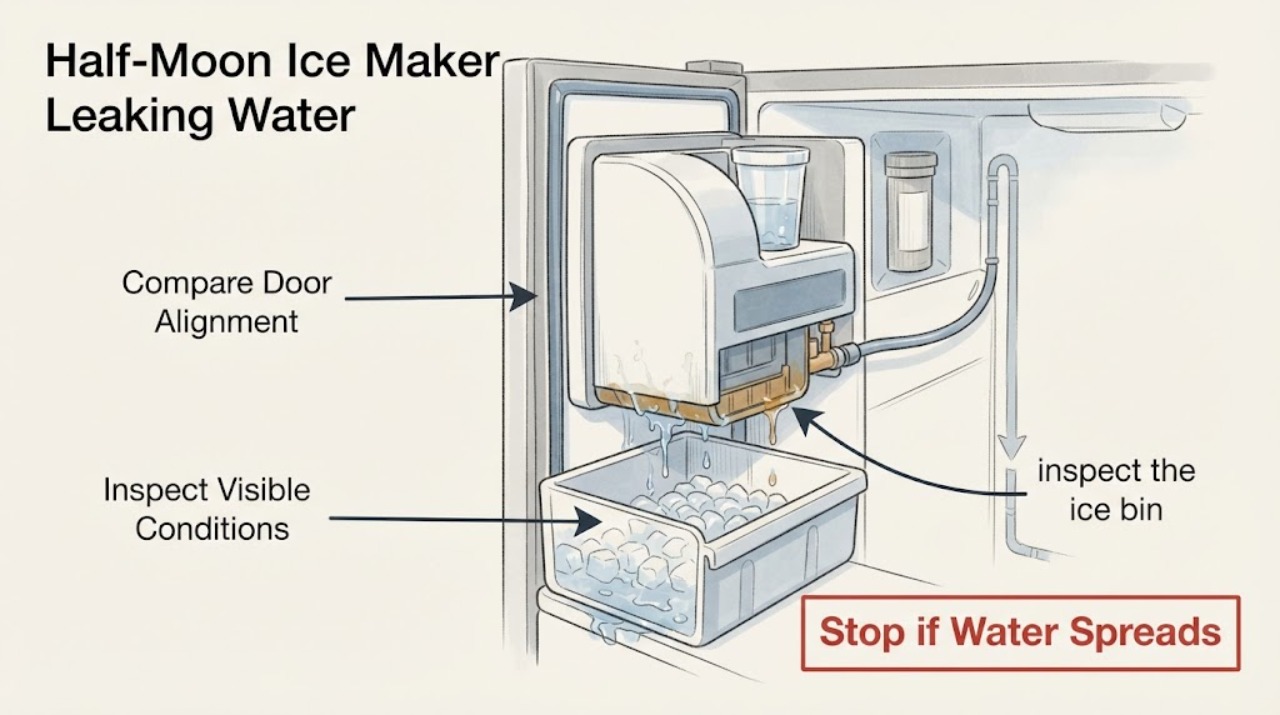
A Whirlpool half-moon ice maker that leaks does not automatically need a new ice-maker module or water valve. First identify whether water is in the ice bin, coming through the dispenser or chute, pooling inside the refrigerator, or reaching the floor from the rear. Whirlpool identifies jammed ice clumps, a loose water connection, an unlevel refrigerator or ice maker, and a fill spigot that misses the fill cup as possible causes; its refrigerator guidance also calls out an incorrectly installed or damaged water filter. Turn ice production off and protect the floor if the leak is active, then make only visible checks for a clump, filter seal, hose connection, level, fill-cup alignment, or accessible defrost-drain blockage. If water continues, reaches electrical parts, or the source is behind a panel, close the water supply if safely accessible and arrange Whirlpool or qualified appliance service instead of guessing a part.
Work through in order
Diagnostic checks
Use only checks that match the exact appliance or system and its official guide.
-
Check 1
If water is actively leaking, turn the ice maker off using the exact refrigerator control or shutoff arm described by the owner's manual, place a towel or shallow container under the drip, and identify the first wet location: ice bin, dispenser chute, refrigerator compartment or hinge area, rear water connection, or floor.
Expected result: The leak stops when ice production is stopped, water continues without an ice-making cycle, or the water is visibly near an electrical connection.
Next step: For a continuous leak, close the household water valve only if it is safely accessible and keep the refrigerator off as needed; arrange qualified service. For a drip limited to the bin or chute, continue with the ice-clump and fill-path checks below.
Why this matters
Why: A leak tied to an ice-making or melt event is different from a continuous supply-line leak. Water near electrical parts is a stop-use hazard and should not be tested by restarting the ice maker.
-
Check 2
With the ice maker and dispenser stopped, inspect the ice bin and chute for a clump or bridge of ice. Remove only loose ice or the removable bin as the model manual permits; if a clump is lodged, let it thaw naturally over a towel or use a long nonmetallic handle without prying against the housing.
Expected result: A clump is blocking the chute, the bin is wet but the chute is clear, or there is no ice obstruction.
Next step: After the loose ice has thawed and the bin is dry, reinstall it correctly and observe one normal ice-making cycle. If the leak returns with no obstruction, continue tracing the fill and water paths; do not force the auger or dismantle the ice maker.
Why this matters
Why: Whirlpool says a clump can contact warmer air in the chute, melt, and leak. Water in the bin without a chute obstruction points toward the fill, level, filter, or water-supply path rather than proving a failed ice-maker module.
-
Check 3
From the user-accessible area, inspect the fill cup directly below the water spigot and look for water landing outside the cup. Use the owner's manual to identify the cup and the permitted viewing position; do not remove the ice-maker housing to realign it.
Expected result: The spigot is visibly centered over the cup, water has pooled below or beside the cup, or the cup cannot be identified or accessed safely.
Next step: If the misalignment is not a user-adjustable condition in the matching manual, keep ice production off and request model-specific service. Do not bend the spigot or order a replacement ice maker from the shape alone.
Why this matters
Why: Whirlpool says a misaligned spigot and fill cup can let water pool and leak before it freezes. A cup that cannot be aligned externally is not evidence that a particular valve or module is defective.
-
Check 4
Inspect the water filter and accessible water-line connections without pulling panels: verify the filter is the correct one for the refrigerator, fully locked, and sealing; look for moisture at the filter housing, hinge area, rear connection, and any visible kinked line. Do not loosen a pressurized fitting.
Expected result: The filter is loose or damaged, moisture is present at a visible connection, the line is kinked, or all accessible connections are dry.
Next step: Re-seat or replace the filter only according to the exact model instructions and with the water supply controlled as directed. If a fitting or line leaks, isolate the water and arrange service instead of tightening an inaccessible or pressurized connection.
Why this matters
Why: Whirlpool says an improperly installed or damaged filter can reduce flow and cause leaks, and that loose connections can drip in the compartment, hinge area, or rear. Dry visible connections move the likely source toward the fill, drain, or internal path but do not identify a part.
-
Check 5
Check the refrigerator and ice-maker floor for level from the outside, and if water is pooling at the freezer bottom or door seal, locate the defrost drain only through the exact manual. Inspect for a visible food particle or ice formation; do not probe a hidden drain or remove sealed-system panels.
Expected result: The refrigerator or ice-maker floor is visibly out of level, a drain opening has a visible blockage, or the ice maker and drain area are not safely accessible.
Next step: Correct leveling only as the model manual permits and clear only an accessible blockage without sharp tools or forced heat. If the drain or leveling requires removing panels, or water returns after the visible check, arrange service.
Why this matters
Why: Whirlpool says an unlevel ice maker can let meltwater pool rather than reach the intended drain, while a defrost-drain blockage can send water into the compartment or onto the floor. These observations do not confirm a broken ice-maker assembly.
Use your observations
Decision map
Find the observation that best matches what you see, then follow the next safe action.
-
PATH 01Next step
What you see
Water appears only in the ice bin or dispenser chute and a solid ice clump is found.
Do this next
Allow the removable bin or chute obstruction to thaw safely, dry and reinstall the bin, then observe whether the leak returns. Request service if the clump reforms without an obvious cause.
Why this path and its safety boundary
Why it matters: The documented pattern is consistent with meltwater from a jammed ice clump, not proof of a failed valve or ice-maker module.
-
PATH 02Next step
What you see
Water appears below or beside the ice maker immediately after a fill, while the fill spigot is visibly missing the cup.
Do this next
Use the exact refrigerator manual to determine whether alignment is user-adjustable; otherwise keep ice production off and arrange model-specific service. Do not bend or replace the valve based only on this observation.
Why this path and its safety boundary
Why it matters: Whirlpool identifies a misaligned fill spigot and cup as a way for water to pool before freezing and leak out.
-
PATH 03Next step
What you see
Moisture is found at the filter housing, hinge area, rear water connection, or a visible kinked supply line, and the leak continues independently of ice dispensing.
Do this next
Control the water supply safely, reseat only a model-approved filter, and arrange service for a leaking fitting or line. Do not loosen a pressurized or inaccessible connection.
Why this path and its safety boundary
Why it matters: The source is more consistent with the refrigerator water path than with a half-moon mold shape; Whirlpool specifically directs checks of filter installation and water connections.
-
PATH 04Next step
What you see
The ice maker or refrigerator is out of level, or water pools at the freezer bottom or door seal with a visible drain obstruction.
Do this next
Follow the matching manual for leveling or clearing an accessible drain opening. Escalate if the drain is hidden, the refrigerator needs panel removal, or the puddle returns.
Why this path and its safety boundary
Why it matters: The pattern is consistent with meltwater not reaching its intended drain, or with a defrost-drain blockage, rather than a confirmed ice-maker-module failure.
-
PATH 05Next step
What you see
The leak is continuous, reaches electrical connections, returns after visible checks, or cannot be localized without removing panels.
Do this next
Keep ice production off, isolate the household water supply if safely accessible, avoid wet electrical areas, and arrange Whirlpool or qualified appliance service with the model and leak location.
Why this path and its safety boundary
Why it matters: The user-level evidence is insufficient to identify a safe component or repair path, and continued water or electrical exposure can worsen damage.
Helpful context
Understand the symptom
Find the leak's path before calling the ice maker broken
The task identifies a Whirlpool home ice maker by a half-moon description but supplies no refrigerator model. That shape is not enough to identify a particular replacement module. Whirlpool's official leak guide separates water in the ice bin from water on the floor and points to different observations: an ice clump can melt in the chute, a loose hose can wet the refrigerator compartment or rear, and a fill spigot that misses its cup can let water pool before freezing. Start with the first wet location and the timing of the drip rather than ordering a valve or ice maker by appearance.
Keep the visible checks model-safe
Use the refrigerator's exact model number to locate the owner's manual before removing an ice bin, filter, or drain cover. Whirlpool says the filter must be locked and sealed, and that loose water connections can be found at the compartment, hinge area, or household connection. A filter or hose check is different from opening the ice-maker housing or reaching a valve. Do not use a knife, screwdriver, heat gun, or forced tool to break a frozen obstruction, and do not remove panels while water is reaching electrical connections.
A continuing leak needs a service boundary
Whirlpool's refrigerator guidance recommends service when the basic water-supply and filter checks do not resolve the concern. A puddle that returns after the ice bin is dry, a leak behind the refrigerator, a fill cup that cannot be aligned from the user-accessible area, or water near electrical parts cannot be narrowed safely to one component from a generic half-moon description. Preserve the model number, where the water first appeared, whether the ice maker was filling, and whether the leak stopped when ice production and the water supply were isolated.
When checks do not resolve it
Need a professional?
Arrange Whirlpool or qualified appliance service when the leak continues after the visible bin, fill-cup, filter, connection, level, and accessible-drain checks; when water is behind a panel or near electrical parts; or when a fitting, water line, valve, or ice-maker housing would need internal diagnosis. Do not select a replacement part from the half-moon shape alone.
Common questions
FAQ
Does the classic half-moon shape identify the replacement Whirlpool ice maker?
No. The shape is not enough to establish model fit or prove which component is leaking. Confirm the refrigerator model and trace the water path first; Whirlpool's leak guidance includes clumps, connections, level, fill-cup alignment, filters, and drains.
Why is water collecting in the ice bin?
Whirlpool identifies a fill spigot that misses the fill cup, an unlevel refrigerator or ice maker, and loose water connections as possible reasons. A clump in the bin or chute can also melt and leak. Observe the first wet point before choosing a repair.
Can a water filter cause an ice-maker leak?
Yes. Whirlpool says an incorrectly installed or damaged filter can reduce water flow and cause leaks from the filter housing or related ice-maker concerns. Verify the exact model filter is locked and sealed before considering internal repair.
What should I do if water keeps leaking onto the floor?
Turn ice production off, protect the floor, and isolate the household water supply if safely accessible. If the leak continues, reaches an electrical area, comes from behind a panel, or cannot be localized by visible checks, keep the appliance off and arrange qualified service.
Read the exact guide
Official sources
- Ice Maker Leaking Water: Causes and FixesWhirlpool · Official Whirlpool refrigerator ice-maker guidance; it supports symptom-path checks but does not identify a model-specific replacement part for the assigned half-moon description.
- Ice Maker Troubleshooting: How to Fix an Ice MakerWhirlpool · Official Whirlpool refrigerator ice-maker troubleshooting context; does not establish exact model or part compatibility for the assigned half-moon description.
- Leaking from the Ice Maker - Side by Side RefrigeratorWhirlpool Product Help · Whirlpool side-by-side branch only; used to support filter seal and connection observations, not to assume the assigned refrigerator is side-by-side.
- Ice Maker Not Working - TroubleshootingWhirlpool Product Help · Official Whirlpool refrigerator ice-maker family guidance used for accessible supply and filter checks; exact refrigerator model instructions govern removal and reset steps.
Community feedback
Share a repair observation
Share a plain-text repair observation. Accepted observations are published automatically; this page may take a moment to update.