
On this page
Start here
Quick answer
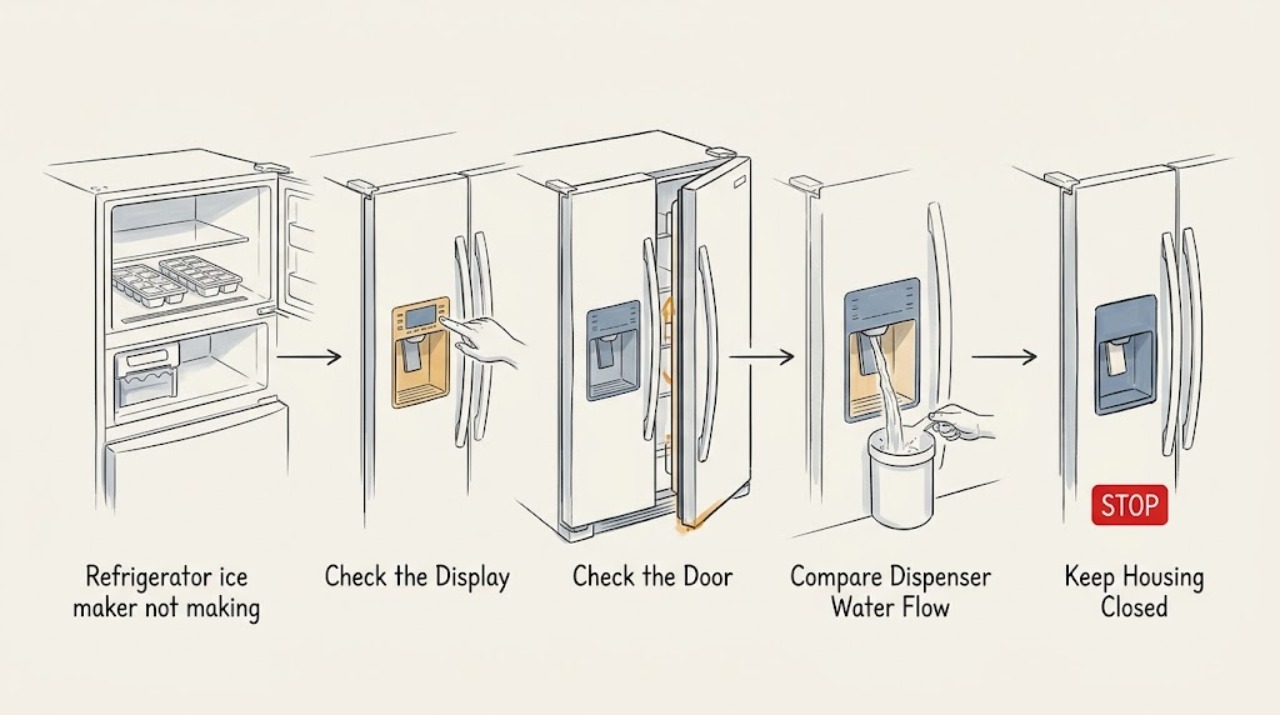
When a Kenmore refrigerator stops making ice, first confirm that ice making is turned on, the ice bin or shutoff arm is not signaling full, the freezer door closes, and the freezer is cold enough according to the exact owner's manual. Then check for a kinked water line, a restricted or recently changed filter, a frozen-looking fill opening, and whether the water dispenser is also weak. Do not reach into the ice maker, force an ejector arm, remove a fill tube, test energized wiring, or replace a valve or ice-maker assembly by appearance. Kenmore refrigerators use different designs and may be built with different platform components, so the full model number is essential. If the ice maker is silent after the basic checks, the freezer is warm, water leaks, the line or valve is inaccessible, or the ice maker requires disassembly or electrical testing, stop and arrange qualified appliance service.
Work through in order
Diagnostic checks
Use only checks that match the exact appliance or system and its official guide.
-
Check 1
From the normal user-accessible area, confirm that the ice maker is enabled according to the Kenmore manual and that the ice bin is seated correctly. If the model has a mechanical shutoff arm or a visible sensor area, check that it is not raised, jammed, or blocked by ice; do not force it.
Expected result: The ice maker is off, the bin is out of position, the shutoff arm or sensor is blocked, or the control is enabled and the bin is seated normally.
Next step: Correct only the harmless control or bin position shown in the manual and allow normal production time. If the control will not change, the arm will not move freely, or ice is packed around the mechanism, stop and arrange service.
Stop if: Stop for a broken arm, jammed ejector, inaccessible sensor, loose wiring, or any need to reach into the ice maker or remove its cover.
Why this matters
Why: An off control, full-bin signal, blocked arm, or mis-seated bin can pause production without a failed part. Normal control and bin position move the check toward freezer temperature, water delivery, or the ice-maker mechanism.
-
Check 2
Check that the freezer door or drawer closes fully and that the gasket contacts the cabinet. Without blocking vents or moving shelves, note whether frozen food is firm and whether the freezer has a temperature alarm, broad frost, or other cooling symptom.
Expected result: The door is held open, the gasket has a gap, the freezer is warmer than the model guidance, frost blocks airflow, or the freezer is cold with no related cooling symptom.
Next step: Remove only harmless door or vent obstructions and use the exact manual's temperature guidance. Arrange appliance service for persistent warmth, heavy frost, an alarm, or a door that cannot seal; do not remove panels.
Stop if: Stop for food warming, a damaged gasket or hinge, exposed wiring, a fan blocked by ice, or any need to test a cooling component.
Why this matters
Why: Ice production can pause when the freezer is too warm or the door is not sealing. Broad frost or poor cooling points toward a refrigerator cooling or defrost issue rather than an isolated ice-maker failure. A cold, well-sealed freezer keeps the water and harvest checks in focus.
-
Check 3
If the refrigerator has a water dispenser, use it normally for a brief observation and compare the flow with its usual behavior. Do not disconnect the water line, pull the refrigerator across a wet floor, or operate an unknown shutoff.
Expected result: The dispenser is also weak or dry, the dispenser works normally while the ice maker does not fill, or the refrigerator has no dispenser.
Next step: Record the comparison and model-specific filter status. Keep water and ice functions off for a leak or inaccessible connection, and call service if water delivery requires line disassembly or pressure testing.
Stop if: Stop for a leak, water near electrical equipment, a bulging or damaged line, a seized shutoff, or any need to disconnect a water connection.
Why this matters
Why: Weak water at both outlets makes a household supply, filter, kinked line, or inlet-valve path more likely. Normal dispenser flow narrows the focus toward the ice-maker branch, fill tube, valve outlet, or ice-maker control, but does not prove any one part.
-
Check 4
Using the Kenmore manual, note whether the refrigerator has a replaceable water filter and whether it was recently installed or overdue. Inspect only the visible ice-maker fill opening and surrounding area for a frost plug or obvious obstruction; do not pry ice, remove a tube, or use direct heat.
Expected result: The filter is overdue or not seated as the manual describes, flow changed after filter replacement, or the visible fill area is iced while the rest of the water system appears normal.
Next step: Follow only the model manual's filter procedure and exterior fill-area guidance. Arrange service for a recurring frozen fill path, a leaking filter housing, or any access that requires removing the tube or panel.
Stop if: Stop for a cracked filter housing, water leak, inaccessible fill tube, sharp ice, or any need to use a knife, heater, hair dryer, or tool inside the freezer mechanism.
Why this matters
Why: A restricted or incorrectly installed filter can reduce ice-maker fill, while a frozen fill opening can prevent water from reaching the mold. A visible fill issue does not prove the inlet valve or ice maker is defective, and direct heat can damage the appliance.
-
Check 5
Without initiating a forced test cycle or removing the ice maker, observe the mold and ejector area during normal operation over a safe period. Note whether the mold stays dry, partially fills, freezes cubes that remain in the mold, or contains cubes that are not being released.
Expected result: No water reaches the mold, water reaches it but does not freeze, cubes freeze but are not harvested, or the ice maker is completely silent with the freezer otherwise cold.
Next step: Record the pattern and stop before electrical tests or disassembly. Use the exact model manual and have appliance service diagnose a valve, fill path, motor, heater, sensor, or assembly.
Stop if: Stop for a jammed ejector, exposed heater or wiring, unusual heat or smell, or any need to bridge contacts, probe voltage, or remove the ice maker.
Why this matters
Why: A dry mold points toward water delivery, fill-valve, frozen-fill, or control issues. Water that does not freeze points toward freezer temperature or cooling. Frozen cubes that remain point toward the harvest motor, heater, ejector, or ice-maker assembly. Silence with proper temperature and controls makes a control or assembly fault more likely.
-
Check 6
Write down the full Kenmore model number, refrigerator style, ice-maker control type, freezer temperature symptoms, bin and arm position, dispenser-flow comparison, filter history, fill-area observation, and whether the mold was dry or held frozen cubes. Keep the ice maker off if testing has revealed a leak or jam.
Expected result: The notes distinguish a control/bin issue, warm freezer, restricted water path, no-fill symptom, non-harvest symptom, and any leak or electrical warning.
Next step: Provide the notes and photos to qualified appliance service or Kenmore customer care. Protect food if the freezer is warming and do not continue testing to make more ice.
Stop if: Stop for water on the floor, food-safety temperature loss, smoke, burning odor, repeated electrical trips, or any need to open a panel.
Why this matters
Why: A complete symptom sequence lets service identify whether the refrigerator needs water-system, cooling, or ice-maker diagnosis without repeating unsafe tests or guessing a part.
Use your observations
Decision map
Find the observation that best matches what you see, then follow the next safe action.
-
PATH 01Next step
What you see
The ice maker is off, the bin is not seated, the shutoff arm is raised, or a visible sensor path is blocked, while the freezer is otherwise cold and sealed.
Do this next
Correct only the harmless position shown in the model manual and allow normal production time. Call service if the arm, sensor, or control will not operate normally or is physically damaged.
-
PATH 02Next step
What you see
The freezer is warm, the door or gasket does not seal, frost blocks airflow, or food is soft while the ice maker has stopped.
Do this next
Correct only harmless door or loading obstructions and follow the exact manual's temperature guidance. Arrange appliance service for persistent warmth, heavy frost, or a door that cannot close; do not remove panels.
-
PATH 03Next step
What you see
The ice maker produces no ice and the water dispenser is also weak or dry, or a recent filter change was followed by reduced flow.
Do this next
Check only the model manual's filter seating and visible line routing. Keep the refrigerator water function off for a leak or inaccessible connection and call service for line, valve, or pressure diagnosis.
-
PATH 04Next step
What you see
The dispenser has normal flow, the freezer is cold, the ice control and bin are normal, but no water reaches the ice mold.
Do this next
Do not pry or heat the fill path. Record the dry-mold pattern and have service check the model-specific fill system and valve with safe power and water isolation.
-
PATH 05Next step
What you see
The mold contains frozen cubes, the freezer is cold, but the cubes remain in place or the ejector does not complete a normal harvest.
Do this next
Keep hands and tools out of the mechanism and arrange appliance service for the exact model. Do not force the ejector or run an improvised test cycle.
-
PATH 06Next step
What you see
Water leaks at the fill area or filter housing, the refrigerator trips power, the ice maker smells hot, wiring is visible, or the control remains silent after normal settings and temperature are confirmed.
Do this next
Stop using the ice maker and call qualified appliance service. Protect food if cooling is affected; do not restore power repeatedly, probe wiring, or remove the assembly.
Helpful context
Understand the symptom
No ice can be a control, temperature, water, or harvest problem
An ice maker needs an enabled control, a freezer cold enough for its model, a usable water supply, and a harvest mechanism that releases the frozen cubes. A full bin, raised shutoff arm, open door, restricted filter, kinked line, frozen fill path, inlet-valve problem, or failed ice-maker assembly can stop production at different points. If the mold is dry, focus first on water delivery and the ice-maker control; if ice is present but never ejects, the harvest side is more relevant. Do not assume that a Kenmore refrigerator's exterior layout identifies its internal platform.
Use the full model number before interpreting a switch or arm
Kenmore sells refrigerators with different door, bin, sensor, switch, filter, and ice-maker arrangements. The same-looking control can have a different meaning across models. Find the model label without removing panels, then use the Kenmore manual or customer-care resources for the exact control position, temperature guidance, filter procedure, and safe reset instructions. A model-specific diagram is more useful than a generic test cycle or a guessed part number.
Keep power, water, and moving parts outside the homeowner test
Kenmore's opened ice-maker assembly information calls for unplugging the refrigerator and shutting off the water before installing an assembly, while its motor-and-gear information also treats the component as a powered repair part. Those are repair boundaries, not an invitation to probe live wiring or remove the ice maker during diagnosis. Keep hands and tools out of the ice-maker and dispenser mechanisms, and use qualified service when the water path, wiring, valve, or assembly must be opened.
Safety boundary
Stop conditions
- Stop and arrange appliance service for a water leak, food warming, heavy freezer frost, a door that will not seal, repeated power trips, smoke, burning odor, or a blocked fan or ice-maker mechanism.
- Keep hands, utensils, and tools out of the ice maker, ejector, dispenser, and fill opening. Do not force an arm or ejector, bridge contacts, probe voltage, or remove a panel as a homeowner test.
- Do not use a knife, ice pick, hair dryer, heater, or direct heat to clear a fill tube or frost. Do not disconnect a water line or remove the ice maker with water or power isolation uncertain.
- Do not order a valve, motor, filter, or ice-maker assembly by appearance. Use the full Kenmore model number and model-specific manual or qualified service.
Only after diagnosis
Potential parts
- Kenmore refrigerator water filter
Consider this only when the model manual identifies a replaceable filter and water flow to both the dispenser and ice maker is reduced or changed after the filter became restricted or was installed incorrectly.
Match the full Kenmore model and filter designation, and follow the model manual for seating and flushing; a filter cannot repair a failed inlet valve or ice-maker harvest mechanism. - refrigerator water inlet valve
A technician may consider this when the freezer is cold, controls are normal, the mold stays dry, and the water path and filter are not restricted, or when dispenser and ice-maker flow symptoms point to the valve.
Confirm the full model, valve outlets, connector, tubing arrangement, and diagnosis before replacement; the valve is a powered water component. - ice-maker fill tube or fill-path component
Consider this only when the mold is dry and service confirms a frozen, damaged, or misaligned fill path after supply and valve causes are separated.
Match the model's tube routing, heater or insulation arrangement, and access procedure; do not pry or heat a frozen tube as a generic repair. - ice-maker motor or gear assembly
This category applies when cubes freeze but are not ejected and service confirms a harvest motor or gear fault.
Kenmore identifies motor and gear assemblies as model-specific repair parts; verify the exact model and isolate power before any installation. - complete ice-maker assembly
Consider a complete assembly only when the freezer, controls, bin, water supply, filter, and fill path are acceptable and service confirms an internal ice-maker fault.
Use the full Kenmore model and the manufacturer's fit information. Kenmore's assembly guidance calls for power and water isolation before installation; do not substitute a similar-looking unit.
When checks do not resolve it
Need a professional?
Call qualified appliance service when the freezer is cold and the ice maker remains enabled but the mold stays dry, frozen cubes will not harvest, the fill path repeatedly freezes, the water dispenser comparison shows a supply problem, or any diagnosis would require electrical testing, line disconnection, panel removal, or an ice-maker assembly. Call promptly for a water leak, food warming, smoke, burning odor, or power trips. Kenmore's official manuals and customer-care resources can help identify the correct model-specific procedure.
Have this ready
- Full Kenmore model number and refrigerator style
- Ice-maker switch, arm, sensor, and bin position
- Freezer temperature symptoms, door-seal condition, and frost pattern
- Water dispenser flow compared with normal behavior, if present
- Filter change history and visible fill-area observation
- Whether the mold is dry, partially filled, frozen but not harvested, or completely silent
- Photos of the visible ice maker and any water leak without removing covers
Common questions
FAQ
Why is my Kenmore refrigerator not making ice when the freezer is cold?
Check the ice-maker control, bin or shutoff arm, water flow, filter, visible fill path, and whether the mold is dry or contains frozen cubes. A cold freezer removes one possibility but does not distinguish a water-fill problem from a harvest or control failure.
If the water dispenser works, why does the ice maker not fill?
The dispenser and ice maker can use different branches or valve outlets. Normal dispenser flow makes a whole-house supply problem less likely, but an ice-maker fill tube, valve outlet, control, or assembly can still fail. Use the full model manual and stop before line or electrical disassembly.
Should I force the ice-maker arm down or pry out an ice cube?
No. A shutoff arm or ejector can break, and a tool can damage the mechanism or create an electrical hazard. Check only whether the arm is visibly raised or blocked; arrange service for a jam or frozen cube that will not release normally.
Can a water filter stop a Kenmore ice maker?
A restricted or incorrectly seated filter can reduce water flow, especially when the dispenser is also weak. Confirm the filter procedure for the exact Kenmore model. Do not assume a filter is the cause when the dispenser is normal and the ice mold stays dry.
Can I thaw a frozen ice-maker fill tube with a hair dryer?
Avoid improvised direct heat. It can damage the liner, wiring, or plastic parts and does not identify why the tube froze. Do not pry or heat the tube; use model-specific service when the fill path repeatedly freezes.
When should I replace the whole ice-maker assembly?
Only after the model, freezer temperature, control, bin, water supply, filter, fill path, and valve have been considered and service confirms an internal assembly fault. Kenmore lists model-specific assemblies and motor or gear parts, so a similar-looking unit is not enough for fitment.
Read the exact guide
Official sources
- Kenmore ManualsKenmore · Kenmore model-specific owner manuals and product resources for refrigerators, freezers, and ice makers
- Customer CareKenmore · Kenmore customer care, manuals, safety and compliance, parts, and appliance repair resources
- Refrigerator Ice Maker Motor and Gear Assembly Genuine Original Equipment Manufacturer (OEM) partKenmore · Kenmore refrigerator ice-maker motor and gear assembly repair-part context
- Refrigerator Ice Maker Assembly Genuine Original Equipment Manufacturer (OEM) partKenmore · Kenmore model-specific refrigerator ice-maker assembly and power and water isolation before installation
Community feedback
Share a repair observation
Share a plain-text repair observation. Accepted observations are published automatically; this page may take a moment to update.