
On this page
Start here
Quick answer
When a GE refrigerator ice maker stops making ice, first confirm that the ice maker is turned on for the exact model, the feeler arm or paddle can move, the freezer is cold enough for an ice-making cycle, and the water supply and filter are not restricting fill. A stuck rake or clumped ice can stop a cycle, while a frozen fill tube, weak water flow, or a water-valve problem needs service-level diagnosis. Check the dispenser or other water outlet only if your model has one, and do not touch a mold during a harvest test because GE warns it may become hot. If the ice maker remains empty after the power, temperature, arm, water, and filter checks, or if the unit leaks, has a flashing diagnostic light, or requires removing the ice maker, arrange qualified GE appliance service.
Before you begin
Safety first
- This article supports ordinary-access control, temperature, bin, feeler-arm, water-supply, filter, and model-manual checks. Do not touch a hot mold, jumper terminals, access live wiring, remove the ice maker, thaw internal tubing with heat, or disconnect water lines.
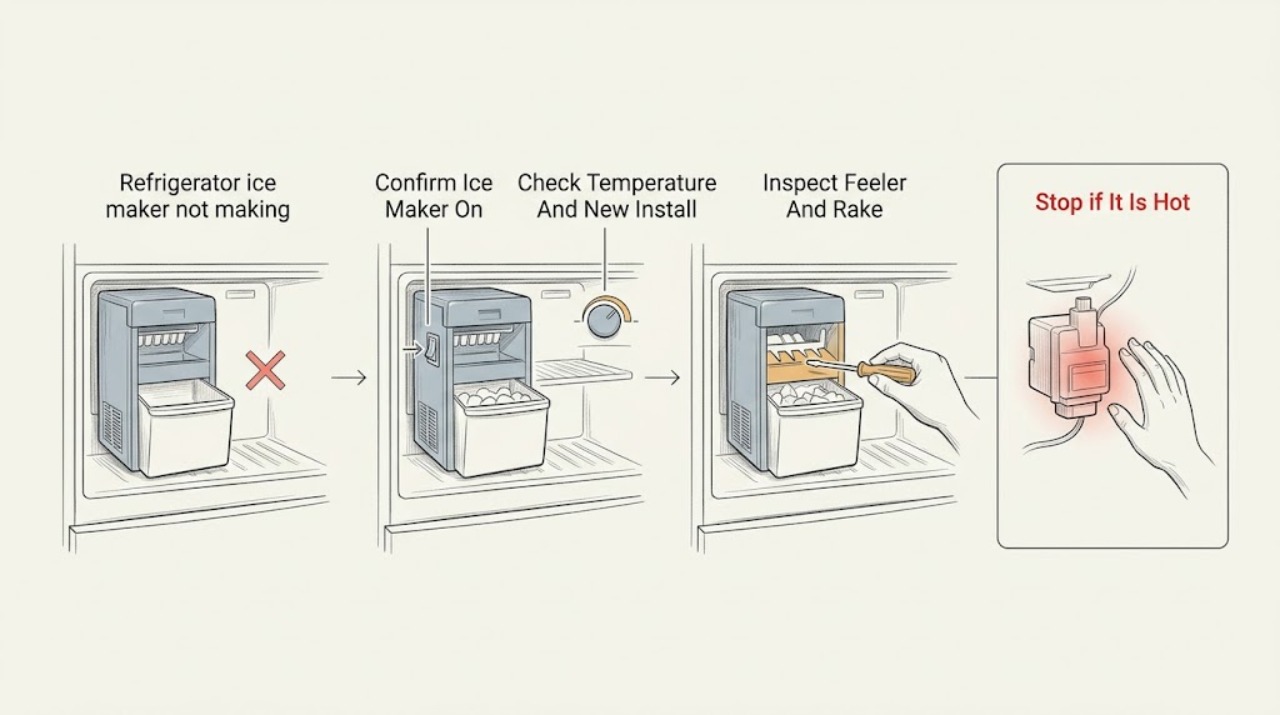
Work through in order
Diagnostic checks
Use only checks that match the exact appliance or system and its official guide.
-
Check 1
Use the GE owner's manual or the clearly labeled refrigerator control to confirm that the ice maker is turned on; check the ice-bin area from ordinary access without removing wiring or an ice-maker cover.
Expected result: Record whether the ice maker is off, on with no indicator, on with a warning or flashing light, or controlled by an unfamiliar panel; note whether the model has a wire feeler arm or paddle.
Next step: Turn the ice maker on only through the model-authorized control, clear no parts by force, and continue to temperature and arm checks when the model is identified; arrange service for a persistent fault indication.
Stop if: Stop for exposed wiring, a loose ice-maker assembly, a hot mold, sparking, a burning odor, or any need to remove a cover or reach into the mechanism.
Why this matters
Why: An off control or an arm/paddle held in the stop position can pause production without a failed component. A flashing diagnostic light or an unfamiliar control requires the exact GE procedure rather than a generic reset.
-
Check 2
Check the freezer's displayed setting and actual cooling behavior against the GE manual; note whether the refrigerator or ice maker was recently installed, powered off, or loaded with unusually little food.
Expected result: The freezer is not reaching the model's ice-making condition, the temperature is stable and cold, the unit is newly installed or recently restarted, or food and other frozen items are also soft or warming.
Next step: Follow the model manual for the correct temperature setting and stabilization period, keep the freezer adequately loaded without blocking airflow, and arrange service if the freezer remains warm or ice production does not begin after stabilization.
Stop if: Do not dismantle the cooling system, change sealed-system parts, or keep using the appliance when food is not maintaining a safe frozen condition.
Why this matters
Why: GE says ice production depends on freezer temperature and that a newly installed or restarted unit may need time to cool before cycling. Soft frozen food or a warm freezer points to a broader cooling problem rather than the ice maker alone.
-
Check 3
From ordinary access and only when the ice maker is not in a harvest motion, look for clumped cubes blocking the bin or rake and check that the feeler arm or paddle can move freely without forcing it or touching the mold.
Expected result: The bin is full or clumped, the arm or paddle is held up by ice, the rake is visibly blocked, or the mold and mechanism are empty and unobstructed.
Next step: Use only the model manual's bin-cleaning or loose-cube procedure, then allow a normal cycle; arrange service if the rake, arm, or paddle will not move normally or jams again.
Stop if: Do not pry cubes, pull the arm, rotate the rake, touch a mold during harvest, or reach into a moving or hot ice maker.
Why this matters
Why: GE explains that a full bin, ice blocking the arm or paddle, or a stuck rake can pause production or prevent the cycle from completing. An empty unobstructed mold shifts the check toward temperature, water delivery, or the ice-maker mechanism.
-
Check 4
Check the refrigerator's accessible water-supply valve and filter status without moving the appliance or loosening tubing; if the exact manual permits a filter bypass check, follow that manual rather than installing an unverified part.
Expected result: The supply valve is closed or partly closed, dispenser flow is slow, the filter is overdue or restricted, water flow improves with the model-approved bypass, or the supply and filter appear normal while the mold remains empty.
Next step: Restore only an accessible valve that operates normally, replace a filter only with the exact model-compatible procedure, and arrange service for a frozen fill tube, internal valve, leak, or unresolved no-fill condition.
Stop if: Do not remove the ice maker, thaw a fill tube with direct heat, disconnect water tubing, force a valve, or continue if water is leaking behind the refrigerator.
Why this matters
Why: GE identifies a restricted filter or water supply as a cause of insufficient ice-maker fill. If the filter and supply are normal but the ice maker still receives no water, a frozen fill tube, inlet valve, or internal control becomes more likely and may require service.
-
Check 5
After the power, temperature, arm, and water checks are complete, use only the exact GE manual's normal test or diagnostic procedure for the installed ice maker; keep hands away from the mold and stop if the procedure does not match the model.
Expected result: The ice maker completes a cycle and fills, the rake moves but no water enters, the arm or rake does not move, a diagnostic light remains abnormal, or the mold becomes hot or the test stops unexpectedly.
Next step: Leave the ice maker out of service and arrange qualified GE appliance diagnosis for no fill, no movement, persistent fault indication, or any test that becomes hot or abnormal; provide the exact model and observed sequence.
Stop if: Do not jumper terminals, measure live voltage, touch the mold during harvest, bypass the feeler arm, or repeat a hot or abnormal test.
Why this matters
Why: A completed cycle with water supports normal ice-maker mechanics and shifts attention to temperature or storage. Movement without fill points toward water delivery, while no movement or a persistent fault light points toward the ice maker, motor, heater, or control and needs service.
Use your observations
Decision map
Find the observation that best matches what you see, then follow the next safe action.
-
PATH 01Safety boundary
What you see
The GE ice maker is off, the bin is full, or the feeler arm or paddle is held in the stop position by ice.
Do this next
Use the model-authorized control or loose-cube/bin procedure, then allow a normal cycle and monitor; request service if the arm cannot move freely or the stop condition returns.
Why this path and its safety boundary
Why it matters: Production is more likely paused by a control or bin condition than by a failed motor or water valve.
Safety stop: Do not pull the arm, pry the mechanism, or reach into a moving or hot mold.
-
PATH 02Safety boundary
What you see
The freezer or other frozen food is warmer than expected, the ice maker never reaches its cycle condition, or the unit was recently installed or restarted.
Do this next
Follow the exact GE manual for temperature setting and stabilization, protect food, and arrange appliance service if the freezer remains warm or ice production does not resume.
Why this path and its safety boundary
Why it matters: A broader cooling or stabilization issue is more likely than an isolated ice-maker failure.
Safety stop: Do not open the sealed cooling system or continue storing food that is not safely frozen.
-
PATH 03Safety boundary
What you see
The dispenser is slow, the filter is restricted or overdue, the supply valve is not fully open, or a model-approved bypass check improves water flow.
Do this next
Use the exact model filter and bypass procedure, restore only a normally operating valve, and allow normal cycles; arrange service if fill remains absent or a leak is present.
Why this path and its safety boundary
Why it matters: Insufficient water delivery is a plausible reason the timed ice-maker fill is empty or incomplete.
Safety stop: Do not force the valve, disconnect tubing, or run the refrigerator with a water leak behind it.
-
PATH 04Safety boundary
What you see
The dispenser works but the ice mold stays empty, and the accessible supply and filter checks are normal.
Do this next
Do not remove the ice maker or apply heat. Arrange qualified service to inspect the fill tube, inlet valve, and ice-maker control.
Why this path and its safety boundary
Why it matters: GE notes that a frozen ice-maker fill tube can stop ice-maker water while the dispenser still works; an internal valve or control issue is also possible.
Safety stop: Do not thaw internal tubing with a heat source, pull panels, or disconnect the water system.
-
PATH 05Safety boundary
What you see
Cubes block the rake, the rake does not complete its movement, or a model-specific diagnostic light remains flashing after the manual procedure.
Do this next
Use only the model-authorized loose-cube procedure and stop; arrange qualified service for a returning jam, abnormal light, no movement, or an ice maker that becomes hot.
Why this path and its safety boundary
Why it matters: A jammed cube may pause the cycle, but persistent no movement or a fault indication can involve the ice-maker motor, heater, control, or assembly.
Safety stop: Do not pry the rake, bridge terminals, touch the mold during harvest, or repeatedly run a hot diagnostic cycle.
-
PATH 06Safety boundary
What you see
The ice maker completes a fill and harvest cycle, but cubes are absent from the bin or production stops after the ice is made.
Do this next
Inspect the bin and storage path from ordinary access using the exact manual; arrange service if the ice maker leaks, overfills, jams, or repeatedly fails to transfer cubes.
Why this path and its safety boundary
Why it matters: The maker may be producing ice while the rake, bin, dispenser, clumping, or storage path prevents usable ice from accumulating.
Safety stop: Do not reach into the dispenser or rake path while operating, force a jam, or continue if water leaks into the freezer.
Helpful context
Understand the symptom
Start by separating no cycle from no water
An empty ice mold does not identify one failed part. The ice maker may be off, waiting for the freezer to become cold enough, paused by a full bin or blocked feeler arm, unable to receive water through a restricted filter or supply, or unable to complete its rake cycle. First record whether the mold is empty, partly filled, frozen with cubes, or blocked by clumped ice. That observation determines whether the next check is control and temperature, water delivery, or a service boundary.
Use the GE model manual for controls and timing
GE uses different ice-maker switches, control panels, feeler arms, paddles, dispenser arrangements, and diagnostic lights across refrigerator models. A newly installed ice maker also needs time to cool and may need the water line purged. Do not apply a switch position, reset sequence, or mold test from another model simply because the housing looks similar. Record the model number and follow the matching manual before touching the ice maker.
Water flow and the ice maker are linked but not identical
A dispenser that still works does not prove that the ice maker fill path is clear: GE notes that the fill tube can freeze while the dispenser continues to work. Conversely, a clogged filter can restrict flow enough that a timed ice-maker fill is incomplete even when some dispenser water comes out. Check accessible supply and filter conditions, but leave fill-tube removal and valve or wiring diagnosis to a technician.
Treat a diagnostic harvest test as a hot-part test
Some GE ice makers with a particular switch and flashing LED have a model-specific diagnostic sequence. GE warns that the ice-maker body may become very hot during the harvest state. Only use that sequence when the exact model instructions match; do not reach into the mold, stop a rake, bypass a guard, or improvise a jumper or live electrical test.
Safety boundary
Stop conditions
- Do not touch the ice-maker mold during a harvest or diagnostic cycle; GE warns that the mold body may become hot.
- Do not jumper terminals, measure live voltage, bypass the feeler arm, remove the ice maker, or access wiring as a user test.
- Do not apply direct heat to a frozen fill tube or internal ice, pry the rake, force clumped cubes, or reach into a moving mechanism.
- Stop for water leaking behind the refrigerator, exposed wiring, sparking, burning odor, a hot cabinet, or unsafe freezer temperatures.
- Arrange qualified GE appliance service for an unresolved no-fill or no-cycle condition after the model-specific power, temperature, arm, water, and filter checks.
Only after diagnosis
Potential parts
- GE refrigerator water filter
Consider this category only when the model-authorized filter or bypass check shows restricted water flow and the filter is the diagnosed cause of incomplete ice-maker fill.
Confirm the exact GE refrigerator model and filter design; a filter change does not correct a closed supply, frozen fill tube, valve fault, or internal leak. - GE refrigerator ice-maker assembly
Consider this category only when a qualified diagnosis finds that the ice-maker motor, heater, rake, control, or assembly fails the model-specific cycle test after temperature and water checks pass.
Confirm the exact GE model, ice-maker style, connector, and manual procedure before ordering or replacing; do not infer fit from housing appearance. - GE refrigerator water inlet valve or fill-tube component
Consider this category only when service confirms that the ice maker requests a fill but water does not arrive because of a valve, fill tube, or internal water-path fault.
Confirm the exact GE model and diagnosed water-path component; fill-tube removal and water-line service are not ordinary user checks.
When checks do not resolve it
Need a professional?
Arrange qualified GE appliance service when the ice maker remains empty after the exact model's power, temperature, feeler-arm, water-supply, and filter checks; when the dispenser works but the ice-maker fill tube may be frozen; when the rake or motor does not move; when a diagnostic light remains abnormal; or when the ice maker leaks, overfills, or requires removal. Request prompt help for water behind the refrigerator, exposed wiring, burning odor, a hot cabinet, or unsafe freezer temperatures. Provide the GE model, ice-maker control type, mold and bin state, freezer behavior, arm or rake observation, dispenser and filter result, supply-valve result, and any diagnostic sequence performed.
Safety scope: This article supports ordinary-access control, temperature, bin, feeler-arm, water-supply, filter, and model-manual checks. Do not touch a hot mold, jumper terminals, access live wiring, remove the ice maker, thaw internal tubing with heat, or disconnect water lines.
Common questions
FAQ
Why is my GE refrigerator ice maker not making ice when the freezer seems cold?
Confirm the ice maker is on, the feeler arm or paddle moves, the filter and water supply are not restricted, and no rake or cube is stuck. A frozen fill tube, water valve, control, or ice-maker assembly can still prevent filling even when the freezer feels cold.
Can a GE ice maker stop working because of the water filter?
Yes. GE says a clogged or partially clogged filter can restrict the timed fill enough to reduce or stop ice production. Use the exact model's filter or bypass procedure, and arrange service if flow remains restricted or the ice maker still does not fill.
Why does the GE dispenser work but the ice maker does not fill?
GE notes that the ice-maker fill tube can freeze while the dispenser continues to work. A valve or control problem is also possible. Do not remove the ice maker or thaw internal tubing with heat; arrange qualified service for the fill path.
Is it safe to touch the GE ice-maker mold during a test?
No. GE warns that the mold body may become very hot during a harvest diagnostic. Only use a procedure that matches the exact model, keep hands away from the mechanism, and stop for heat, abnormal movement, or a fault indication.
Read the exact guide
Official sources
- Refrigerator - Icemaker Not Producing IceGE Appliances · Use for general GE refrigerator ice-maker checks; control layouts and owner-manual procedures vary by model.
- Refrigerator - Icemaker Does Not Fill With WaterGE Appliances · Use for the arm, supply, filter, and service boundary; exact model controls and test procedures remain governed by the owner manual.
- Refrigerator - Green Light on Icemaker Flashing (Icemaker Diagnostic)GE Appliances · Use only for GE ice makers with the specified on/off switch and LED; it does not authorize applying the sequence to other models.
- Refrigerator - Icemaker Doesn't Fill With WaterGE Appliances · Use for distinguishing no water fill from no ice production; the page states that fill-tube removal should be checked by a service technician.
Community feedback
Share a repair observation
Share a plain-text repair observation. Accepted observations are published automatically; this page may take a moment to update.