
On this page
Start here
Quick answer
Uneven cooking in a KitchenAid oven can come from rack position, pan material or placement, overcrowding, incomplete preheating, opening the door, blocked airflow, calibration, a temperature sensor, or a damaged heating element. Start by describing the pattern—top versus bottom, front versus back, one side, or a general temperature offset—using one recipe and a fully preheated oven. Keep space around the pan, use the rack position and bakeware recommended for the recipe, and do not cover the oven bottom or an entire rack with foil. A consistent overall result that is too hot or too cool may justify the model-specific calibration procedure; isolated hot or cold areas, a visibly damaged exposed element, a sensor that is out of position, or a hidden element issue requires service. KitchenAid says not to use a thermometer to judge a cycling oven's temperature on one support page, so use its model-specific bake-performance guidance rather than inventing a thermometer threshold. Do not remove panels or elements while energized or hot.
Before you begin
Safety first
- This article supports controlled cooking observations, safe rack and bakeware changes, visible cool-component inspection, and the exact model's calibration evaluation. It does not authorize energized testing, panel or element removal, sensor bending, wiring work, door adjustment, or operation with smoke, arcing, electrical odor, or an unsafe door.
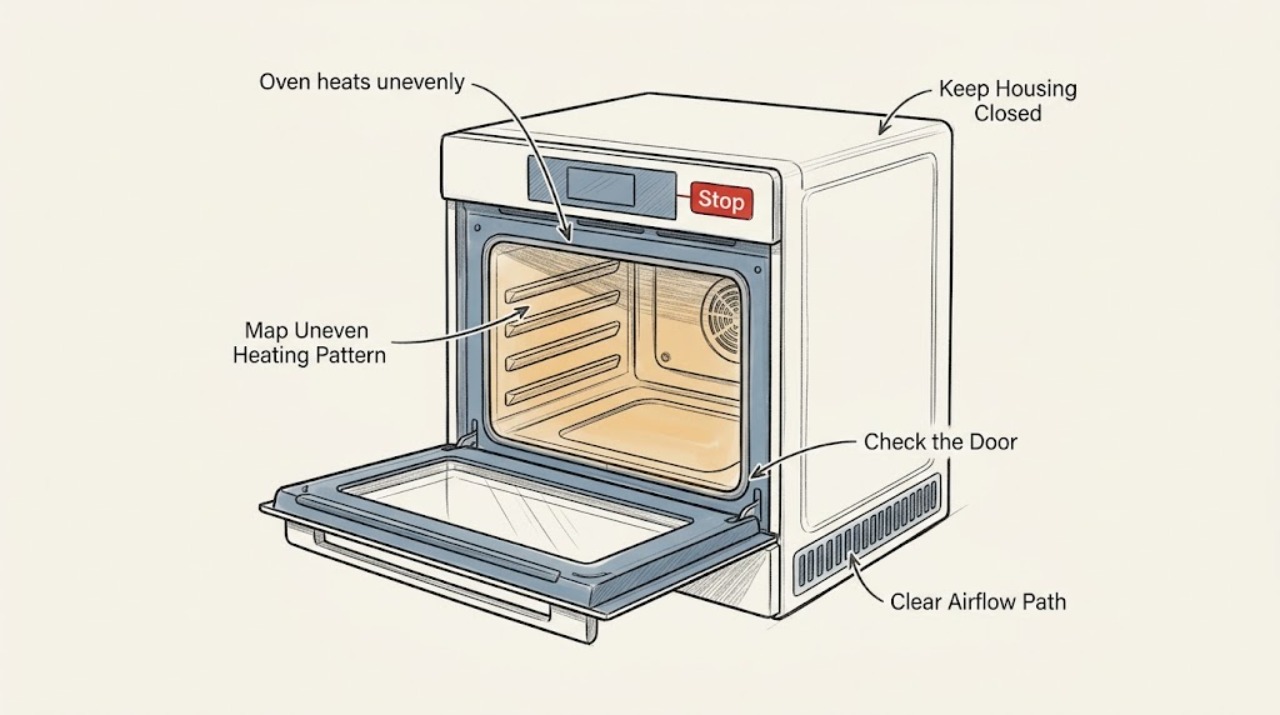
Work through in order
Diagnostic checks
Use only checks that match the exact appliance or system and its official guide.
-
Check 1
Use one familiar recipe or a model-appropriate bake-performance test and record the mode, rack position, pan material, preheat completion, cooking time, and where the food is underdone or over-browned. Compare the pattern across one repeat instead of changing several variables at once.
Expected result: The top is dark while the bottom is pale, the back or one side browns faster, multiple racks differ, the whole dish is uniformly too hot or cool, or the pattern is not repeatable.
Next step: Keep the recorded setup and continue with the rack, airflow, and preheat checks. Use a controlled calibration test only if the result is consistently offset throughout the cavity.
Stop if: Stop using the oven if there is smoke from a component, a burning electrical odor, arcing, an exposed damaged element, or a door that will not close or seal normally.
Why this matters
Why: Top/bottom and front/back patterns often change with rack, pan, airflow, or door use. A repeatable whole-cavity offset keeps calibration, sensor, or heating control in consideration; an inconsistent result may be recipe or bakeware variation.
-
Check 2
With the oven off and cool, use the rack position suited to the recipe, center the pan, leave the clearance recommended by KitchenAid around the pan and oven walls, distribute multiple pans or racks for airflow, and remove foil from the entire rack or oven bottom.
Expected result: A pan touches a wall or another pan, the oven is crowded, foil blocks a rack or bottom, the rack is not suited to the food, or the setup already has open airflow and correct placement.
Next step: Retest the same recipe after correcting only the setup. If the same hot or cold area remains, record it and continue to the preheat and component observations.
Stop if: Do not place foil on the oven floor or across an entire rack, and do not move racks or pans while hot food or exposed heating elements create a burn risk.
Why this matters
Why: Crowding, blocked airflow, pan contact, and rack placement can create local hot spots or uneven browning without an appliance fault. An open, correctly arranged setup makes an element, sensor, calibration, or control issue more plausible if the pattern repeats.
-
Check 3
Preheat fully according to the KitchenAid model's indicator or manual, place the food promptly, keep the door closed during preheat and baking, and use the oven light and window for visual checks when available.
Expected result: The food was placed before preheat completed, the door was opened repeatedly, the door or gasket does not close normally, or preheat and door use were normal.
Next step: Repeat the controlled bake without opening the door until the recipe's normal check point. If the door, gasket, or latch is abnormal, stop using the oven and arrange service.
Stop if: Do not force the door, adjust hinges, or continue using the oven if the door is warped, the gasket is damaged, or heat escapes abnormally.
Why this matters
Why: Incomplete preheating and heat loss from an open door can produce a top-heavy or underdone result that resembles uneven heating. A door that cannot close or seal normally can cause continuing heat loss and may require service.
-
Check 4
After the oven is off and fully cool, inspect only visible bake or broil elements and the accessible temperature sensor for a break, blister, obvious damage, or a sensor that is visibly displaced. Do not remove panels, bend the sensor, or touch wiring.
Expected result: An exposed element has a break or blister, the sensor is visibly out of position, the element is hidden, or all visible parts look intact.
Next step: Keep the oven off and arrange qualified service for any visible damage, displaced sensor, hidden element concern, or persistent uneven pattern. Do not attempt an energized component test.
Stop if: Do not bend, unplug, remove, scrape, or electrically test an element or sensor, and do not use the oven with exposed damage or arcing.
Why this matters
Why: KitchenAid identifies breaks or blisters as signs that an exposed element may need repair, and says sensor position can affect heat distribution. A hidden element or intact visible surface does not rule out an internal heating or control fault.
-
Check 5
If the oven is safe to use, the setup is correct, and the problem is a consistent overall offset rather than one hot spot, follow KitchenAid's model-specific bake-performance or calibration evaluation. Its published test uses evenly spaced biscuits on the recommended pan and middle rack, with the oven fully preheated and the door kept closed until the package check point.
Expected result: The controlled bake finishes evenly within the recipe's stated time range, is uniformly early or late or too dark or light, or remains uneven in a particular area.
Next step: Use only the exact owner's manual calibration method when the test supports it, then repeat the same test. Arrange service for a localized fault, a failed test after calibration, or any uncertainty about the controls.
Stop if: Do not apply a generic temperature offset, calibrate repeatedly to chase one recipe, or use a thermometer threshold that conflicts with the model's instructions.
Why this matters
Why: An evenly completed test makes a broad calibration problem less likely. A repeatable overall offset may justify the model's calibration procedure; a persistent localized difference points more toward airflow, element, sensor, or control service than calibration alone.
-
Check 6
After the setup and model-specific test, document the repeatable pattern, mode, rack, pan, preheat behavior, door condition, visible element or sensor finding, and any error or unusual sound. Keep the oven out of service if the fault involves a damaged component or unsafe door, and do not remove a panel to continue testing.
Expected result: The oven remains uneven after correct setup, calibration does not resolve a broad offset, an element or sensor is damaged, the door leaks heat, or an internal or hidden component is suspected.
Next step: Arrange qualified KitchenAid appliance service and provide the test setup and results. Do not continue cooking around a damaged element, unstable door, burning odor, or electrical symptom.
Stop if: Stop immediately for smoke, arcing, a burning electrical odor, a damaged or glowing component outside normal operation, repeated breaker trips, or a door that will not seal.
Why this matters
Why: A repeatable fault after controlled setup needs diagnosis of the heating element, temperature sensor, fan or airflow, control, wiring, or door system. The visible symptom cannot safely identify a replacement part.
Use your observations
Decision map
Find the observation that best matches what you see, then follow the next safe action.
-
PATH 01Next step
What you see
The top browns quickly while the bottom remains pale or underdone, especially when the oven was not fully preheated or the rack is high.
Do this next
Fully preheat, use the model-recommended rack and bakeware, keep the door closed, and repeat once. Escalate if the same pattern persists with a controlled setup.
Why this path and its safety boundary
Why it matters: Incomplete preheat, rack position, pan reflectivity, or heat loss from door opening is more likely than a failed part. A controlled repeat is needed before service is inferred.
-
PATH 02Next step
What you see
One side, rear area, or rack position repeatedly cooks faster while the same pan and recipe are used.
Do this next
Correct clearance and rack placement, then repeat without changing the recipe. Arrange service if the localized pattern remains or a visible element or sensor problem is found.
Why this path and its safety boundary
Why it matters: Pan placement, airflow, rack position, sensor position, an element, or a convection-airflow issue is more likely than a simple overall calibration offset.
-
PATH 03Next step
What you see
Food is consistently too dark, too light, early, or late throughout the cavity after correct rack, pan, airflow, and preheat setup.
Do this next
Run the KitchenAid model-specific calibration evaluation and use only the owner's manual adjustment method if indicated. Arrange service if calibration does not resolve the offset.
Why this path and its safety boundary
Why it matters: A calibration or temperature-sensing issue becomes more likely than a localized airflow problem, but the controlled bake result must be repeatable.
-
PATH 04Next step
What you see
A visible bake or broil element has a break or blister, the temperature sensor is visibly displaced, or a hidden element is suspected.
Do this next
Keep the oven off and arrange qualified service for diagnosis and any replacement. Do not bend the sensor or remove a panel.
Why this path and its safety boundary
Why it matters: A component or control fault is more likely than a recipe or pan issue. Hidden components cannot be cleared by looking at the cavity.
-
PATH 05Next step
What you see
The door will not close or seal, there is abnormal heat escaping, smoke or arcing occurs, a burning electrical odor is present, or the breaker trips repeatedly.
Do this next
Stop using the oven and arrange qualified appliance service. Use urgent help for smoke, fire, electrical damage, or any immediate hazard.
Why this path and its safety boundary
Why it matters: The problem exceeds normal bake-performance adjustment and may involve a door, heating, wiring, or control safety fault.
Helpful context
Understand the symptom
First define the uneven pattern
Top browning with an underdone bottom, a darker back edge, one hotter rack position, and a dish that is uniformly too hot are different patterns. Write down the recipe, rack, pan, mode, preheat signal, and browning pattern before changing settings. A repeatable pattern is more useful than a single dish made with an unfamiliar pan.
Rack position, pan type, and airflow matter
KitchenAid recommends matching the rack position to the food, allowing clearance around pans, distributing multiple racks for airflow, and avoiding foil across an entire rack or the oven bottom. Dark or dull pans absorb more heat and shiny pans reflect more, so a pan change can alter browning without a failed oven component.
Calibration addresses an overall offset, not every hot spot
If a controlled bake is consistently too light, too dark, early, or late throughout the cavity, model-specific calibration may help. Calibration cannot correct a broken element, a displaced sensor, a blocked airflow path, or a single hot area caused by rack and pan placement. Follow the exact owner's manual and do not apply a generic temperature adjustment.
Element and sensor findings need a service boundary
KitchenAid says an exposed bake or broil element with breaks or blisters may need professional repair, while a hidden element may require service. The temperature sensor's position can affect heat distribution. Inspect only visible, cool parts; do not bend, unplug, remove, or test energized components.
Safety boundary
Stop conditions
- Stop using the oven for smoke, arcing, a burning electrical odor, fire, repeated breaker trips, a visibly damaged or exposed heating component, or a door that will not close or seal normally.
- Do not place foil on the oven floor or cover an entire rack, and do not crowd pans or let them touch the oven walls or each other where airflow is needed.
- Do not bend, unplug, remove, scrape, or electrically test an element or temperature sensor, and do not remove energized or hot panels.
- Do not apply a generic calibration offset, use an unsupported thermometer threshold, or repeatedly recalibrate to compensate for one recipe, one pan, or one localized hot spot.
- Arrange qualified KitchenAid appliance service for a persistent localized or broad uneven-heating fault after controlled setup, a damaged element or displaced sensor, a hidden component concern, or any repair requiring internal access.
Only after diagnosis
Potential parts
- KitchenAid oven bake or broil heating element
Consider this category only when qualified diagnosis or a safe cool inspection identifies a damaged exposed element or a hidden element fault in the exact model.
Confirm the exact KitchenAid model, element position and configuration, and manufacturer's fit information; do not remove or electrically test an element as a user check. - KitchenAid oven temperature sensor
Consider this category only when a repeatable broad temperature offset or qualified inspection identifies a sensor fault or displacement after setup and calibration checks.
Confirm the exact KitchenAid model, sensor location and procedure, and manufacturer's fit information; do not bend or unplug the sensor as a test. - KitchenAid convection fan or airflow component
Consider this category only when uneven results persist in convection operation with correct spacing and qualified diagnosis finds a fan or airflow fault.
Confirm the exact KitchenAid model and fan or airflow configuration; do not access moving or energized components.
When checks do not resolve it
Need a professional?
Arrange qualified KitchenAid appliance service when uneven heating persists after correcting rack, pan, airflow, preheat, and door-use conditions; when a controlled test shows a persistent offset after the model-specific calibration procedure; when an element is damaged, a sensor is displaced, a hidden element or fan is suspected, or the door does not seal. Use urgent help for smoke, fire, arcing, a burning electrical odor, or repeated breaker trips.
Safety scope: This article supports controlled cooking observations, safe rack and bakeware changes, visible cool-component inspection, and the exact model's calibration evaluation. It does not authorize energized testing, panel or element removal, sensor bending, wiring work, door adjustment, or operation with smoke, arcing, electrical odor, or an unsafe door.
Common questions
FAQ
Why does my KitchenAid oven heat unevenly from top to bottom?
Rack position, incomplete preheating, pan material, door opening, crowding, blocked airflow, a temperature sensor, calibration, or an element can create that pattern. Correct the rack, pan spacing, airflow, and preheat setup first, then use a controlled bake-performance test before assuming a part has failed.
Can foil cause uneven heating in a KitchenAid oven?
Yes. KitchenAid warns that covering an entire rack or the oven bottom with foil can block airflow and affect heat distribution. Remove those coverings before a controlled test; use only model- and recipe-appropriate bakeware and foil placement.
Should I use a thermometer to check my KitchenAid oven temperature?
KitchenAid's temperature-help page warns that a thermometer may not accurately reflect a cycling oven at a single moment. Use the KitchenAid bake-performance evaluation and follow the exact owner's manual for calibration instead of applying a generic thermometer threshold.
How do I know whether uneven baking is calibration or a bad element?
A repeatable overall result that is too hot or cool after correct setup can justify a model-specific calibration evaluation. A localized hot or cold area, visible break or blister in an exposed element, displaced sensor, hidden element concern, smoke, or electrical symptom needs qualified service rather than calibration alone.
When should a technician inspect my KitchenAid oven for uneven heating?
Arrange service when the same uneven pattern persists after correcting rack, pan, airflow, preheat, and door-use conditions; when calibration does not resolve a broad offset; when an element or sensor appears damaged; when a hidden element or fan is suspected; or when the door, wiring, smoke, arcing, or breaker behavior is abnormal.
Read the exact guide
Official sources
- Oven Temperature Incorrect (Too Hot or Too Cold)KitchenAid · Official KitchenAid Product Help; the page states that products and calibration methods vary and does not replace the exact owner's manual.
- Oven Not Baking Evenly: Causes and FixesKitchenAid · Official KitchenAid educational guidance for ovens and ranges; exact controls and repair procedures vary by model.
- Convection Bake vs. Bake: What’s the Difference?KitchenAid · Official KitchenAid educational guidance for models equipped with convection; features and recommendations vary by model.
- Uneven browning - Range - Product HelpKitchenAid · Official KitchenAid Product Help for ranges; apply recommendations to the exact oven configuration and recipe.
- How to Evaluate if Temperature Calibration is NeededKitchenAid · Official KitchenAid Product Help for evaluating calibration; calibration is available only on select models and must follow the owner's manual.
- How to Correct Uneven Baking or BrowningKitchenAid · Official KitchenAid Product Help; rack and baking recommendations should be applied with the exact model manual and recipe.
Community feedback
Share a repair observation
Share a plain-text repair observation. Accepted observations are published automatically; this page may take a moment to update.