
On this page
Start here
Quick answer
First decide whether the LG dryer truly shuts off or has reached a sensor-dry decision, cooling stage, or wrinkle-care interval. A very small load may not touch the humidity sensors, residue on the sensors can make the cycle end early, and a low Dry Level can leave clothes damp by design. Clean the sensors and lint filter only as the exact manual directs, use a suitable load or Time Dry for a small load, and check for a blocked exhaust if drying is poor. If the whole unit loses power, check the outlet and breaker from a safe location and use only the documented reset. A door that will not latch, a recurring code, a stalled or overheating drum, burning odor, smoke, sparks, or a dryer that will not power back on is a service boundary.
Before you begin
Safety first
- This article covers safe cycle-state observation, load and Dry Level checks, manual-documented sensor and filter cleaning, visible airflow checks, door observation, and one documented reset. It does not authorize operating switches during a gas odor, touching unsafe electrical equipment, opening panels, bypassing safety devices, testing live parts, or replacing internal components.
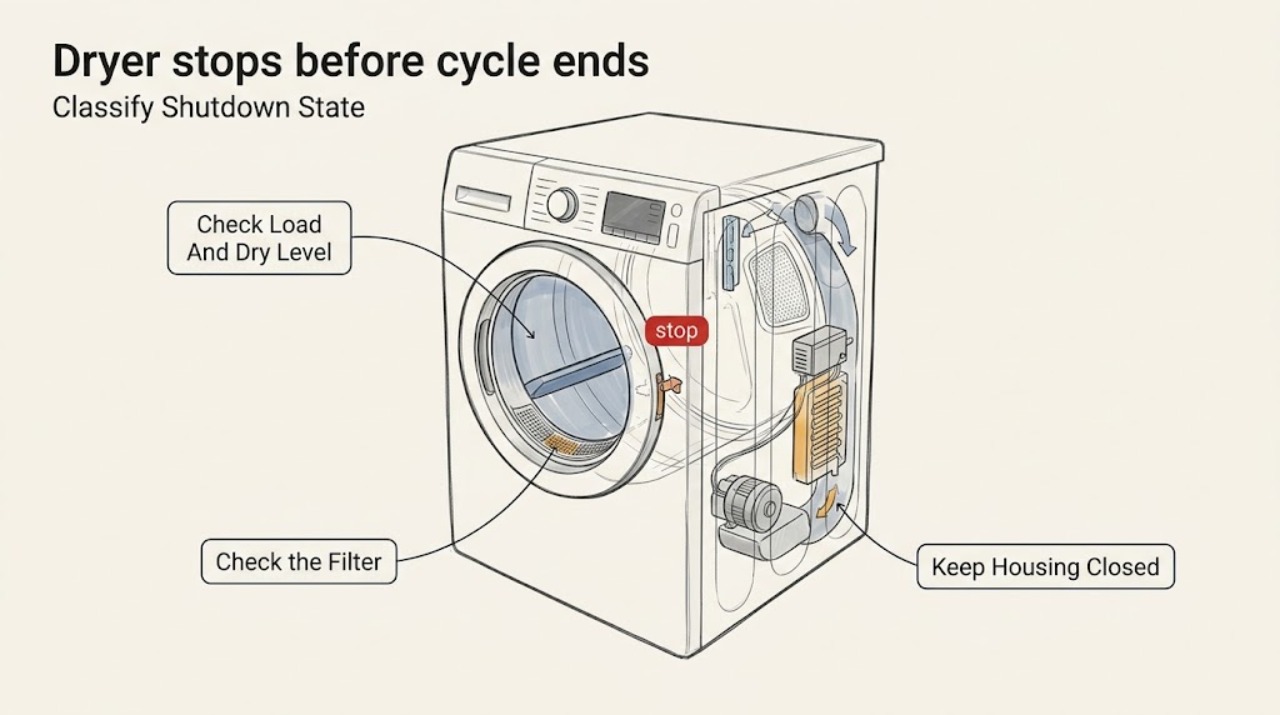
Work through in order
Diagnostic checks
Use only checks that match the exact appliance or system and its official guide.
-
Check 1
When the dryer stops, note whether the display and drum light remain on, whether the drum still tumbles intermittently, whether Cooling or Wrinkle Care is shown, whether the cycle time dropped quickly, and whether the unit can restart. Do not open the door repeatedly while it is operating.
Expected result: The display is active, the dryer is in cooling or wrinkle care, the time falls quickly, the display is blank, the breaker has tripped, or the unit will not restart.
Next step: For active display behavior, continue with load and sensor checks. For loss of power, check the outlet and breaker only from a dry safe location, then use the exact manual's reset; arrange service if power does not return.
Stop if: Stop for smoke, sparks, burning odor, abnormal heat, a damaged cord, repeated breaker trips, or a gas odor.
Why this matters
Why: An active cooling, wrinkle-care, or early sensor endpoint may be normal cycle behavior. A blank display or lost drum light points to interrupted power or a control fault. A unit that cannot restart after shutdown needs a power and service path rather than repeated starts.
-
Check 2
Remove the load and check whether it was only a few items, one thin item, a bulky item, or an overloaded drum. Check the selected Dry Level and cycle against the fabric care label and the exact manual; do not use a forced high-heat setting to compensate for an early endpoint.
Expected result: The load is very small, the drum is about half full, the load is overloaded or tightly balled, Dry Level is Low, or the load and setting match the manual.
Next step: For a small load, use a model-approved Time Dry cycle or a suitable load size. Separate bulky items and remove excess laundry; arrange service if a correctly loaded cycle still stops early with damp clothes and no sensor or airflow cause.
Stop if: Do not operate with an overloaded drum, a load that cannot tumble, a damaged item, or a drum that stalls or overheats.
Why this matters
Why: A very small load may not brush the humidity sensors and can end early. An overloaded or balled load can dry unevenly and may not tumble correctly. Low Dry Level can end with moisture intentionally left for ironing; a matched load and setting make sensor residue, airflow, power, or a component issue more likely.
-
Check 3
With the dryer off and cool, locate the humidity sensors and lint filter only as shown in the exact LG manual. Wipe sensor bars with a clean damp cloth if the manual identifies them, let them dry fully, and clean or correctly reinsert the lint filter; do not remove a gasket or open a panel.
Expected result: The sensors have residue, the filter is blocked or not seated, an F0 or Insert Filter message appears, an HS humidity-sensor code appears, or the accessible surfaces are clean.
Next step: Refit the filter and allow sensors to dry before one model-approved cycle. If a code returns, the cycle still ends early, or the sensor is inaccessible, leave the dryer off and arrange service.
Stop if: Do not scrape sensors, remove the door gasket, bypass a filter message, use solvent, or open the cabinet to reach sensors.
Why this matters
Why: Residue can prevent the sensors from detecting moisture and end a sensor cycle early. A blocked or misplaced filter can affect airflow or trigger a filter message. An HS code points to a humidity-sensor path; a clean accessible area shifts concern toward load, exhaust, power, or internal service.
-
Check 4
With power off, inspect the lint filter, accessible exhaust connection, outside vent hood, and surrounding clearance for lint, crushing, or blockage. Record whether clothes are damp, the cabinet is unusually hot, or the vent airflow is weak; do not dismantle the duct or cabinet.
Expected result: The filter or vent is restricted, clothes are damp after a short cycle, the cabinet or laundry is unusually hot, airflow is strong, or an odor or discoloration is present.
Next step: Clean the accessible filter and have a restricted home vent corrected by qualified help. Keep the dryer off for unusual heat, odor, discoloration, or a recurring early shutdown after airflow is clear.
Stop if: Do not run the dryer with severe vent restriction, smoke, scorching, burning odor, abnormal heat, or an unknown duct blockage.
Why this matters
Why: Restricted airflow can reduce drying performance and increase heat, while damp clothes can be caused by a poor sensor decision or inadequate airflow. Strong accessible airflow does not rule out an internal heater, thermistor, motor, or control fault. Odor or discoloration is a stop condition.
-
Check 5
Check whether the door was opened or the latch is loose, and whether the display returns after the stop. If the dryer lost power, inspect the cord and outlet only without touching exposed terminals, then follow the exact manual's power-reset procedure from a safe location.
Expected result: The door was opened, the latch does not hold, the display returns normally, a PF or other code appears, the drum light stays off, or a breaker trips again.
Next step: Close and latch the door as the manual directs, record any code, and perform only the documented reset once. Arrange service for a loose latch, no power, recurring code, or repeated trip.
Stop if: Do not bypass the door switch, open the terminal block, reset a breaker repeatedly, or test live circuits.
Why this matters
Why: Opening the door pauses the drum by design, and a latch issue can interrupt operation. A returning display after shutdown supports an interrupted-power or sensor path; a persistent code, no light, or repeated breaker trip points to electrical, control, or service work.
-
Check 6
After correcting only an obvious load, sensor, filter, door, or documented reset issue, make one model-approved observation. Record whether the cycle completes, ends early with dry clothes, ends early with damp clothes, loses power, or displays the same code; do not repeat full cycles to force a result.
Expected result: The cycle completes, ends early but clothes are dry, ends early and clothes remain damp, the unit loses power, or the code or symptom returns.
Next step: Keep the dryer off for a recurring symptom or any safety warning. Provide the model, cycle, load, time-to-stop, display state, codes, airflow result, and reset history to qualified service.
Stop if: Stop for smoke, sparks, burning odor, abnormal heat, stalling, gas odor, or a damaged cord; do not open panels or test internal parts.
Why this matters
Why: Completion or a dry load after a corrected sensor or load condition supports that path. An early endpoint with damp clothing after correct loading and clean sensors makes airflow, sensor, heater, thermistor, control, or other service issues more likely. Recurring power loss or codes require diagnosis.
Use your observations
Decision map
Find the observation that best matches what you see, then follow the next safe action.
-
PATH 01Safety boundary
What you see
The dryer remains powered, the cycle time drops quickly, the load is very small or Dry Level is Low, and the clothes are dry or only intentionally damp.
Do this next
Use a suitable load or model-approved Time Dry cycle, clean and dry the documented sensors, and monitor one correctly loaded cycle. Arrange service if damp clothes and early stops continue.
Why this path and its safety boundary
Why it matters: A sensor-dry endpoint, small-load sensing limit, or selected dryness level is more likely than a failed motor or control.
Safety stop: Do not force high heat or keep restarting a cycle if the drum overheats, smells burned, or the symptom persists after the sensor path is corrected.
-
PATH 02Safety boundary
What you see
The load is oversized, tightly balled, or damp; the filter or exhaust is restricted; drying is poor; or the dryer is unusually hot.
Do this next
Reduce or separate the load, clean the accessible filter, and have a restricted home vent corrected. Keep the dryer off for abnormal heat, odor, discoloration, or a repeated stop.
Why this path and its safety boundary
Why it matters: Load arrangement or airflow is more likely than a sensor-only endpoint, and restricted exhaust can make the dryer run hotter and stop abnormally.
Safety stop: Do not operate with severe vent restriction, scorching, smoke, burning odor, or a hot cabinet that is not normal for the model.
-
PATH 03Safety boundary
What you see
The door opens or will not latch, the display or drum light goes dark, power returns only after a reset, a PF or other code appears, or the breaker trips again.
Do this next
Use the exact manual for one reset and record the code. Arrange appliance or electrical service for a loose latch, recurring code, no power, or a repeated breaker trip.
Why this path and its safety boundary
Why it matters: A door-latch, interrupted-power, wiring, thermal, or control issue is more likely than a load or sensor endpoint.
Safety stop: Do not bypass the latch, open the terminal block, test live circuits, or reset a breaker repeatedly.
-
PATH 04Safety boundary
What you see
Correct loading, clean sensors and filter, and a clear accessible airflow path do not prevent early shutdown, or the drum stalls, the unit overheats, or an error returns.
Do this next
Leave the dryer off and arrange qualified appliance service. Provide the exact model, cycle, load, elapsed time, display state, code, heat, sound, and checks completed.
Why this path and its safety boundary
Why it matters: A thermistor, heater, motor, thermal device, sensor, wiring, or control fault is more likely and cannot be separated safely by more cycles.
Safety stop: Do not open panels, touch the heater or motor, bypass thermal protection, or replace an internal part from the symptom alone.
Helpful context
Understand the symptom
An early sensor decision can look like a failure
Sensor Dry does not promise that the displayed estimate will run to zero. LG says a small load may fail to touch the humidity sensors, so the time can drop quickly and the cycle can end while clothes are still damp. A low Dry Level can also be an intentional endpoint. Time Dry or a more suitable load can separate a sensing decision from a power or drive failure.
Check whether the dryer is actually powered off
A dryer in cooling or Wrinkle Care may pause heat or tumble intermittently after the drying portion. That behavior differs from a blank display, lost drum light, tripped breaker, or a unit that will not restart. Note the display, lights, code, and ability to restart before assuming the motor or heater failed.
Poor airflow can make a cycle stop for the wrong reason
A clogged lint filter or home exhaust can change drying performance and heat. Clean accessible filters and follow the model manual for sensors, but do not open the cabinet or treat a restricted vent as a control problem. Persistent early shutdown with heat, odor, or a code needs qualified inspection.
Safety boundary
Stop conditions
- Stop and keep the dryer off for smoke, sparks, gas odor, burning odor, abnormal heat, scorching, a damaged cord, or a repeatedly tripping breaker.
- Do not bypass the door latch, child lock, thermal protection, or any other safety device, and do not test live circuits.
- Do not run the dryer with severe exhaust restriction, a stalled drum, exposed wiring, melted material, or a recurring early shutdown.
- Do not open the cabinet, terminal block, heater, motor, blower, or control area unless the exact manual authorizes the procedure and you have the required qualifications.
- Do not use a reset to mask a recurring code, keep restarting a dryer with damp clothes and early stops, or force a high-heat cycle.
- Do not order a sensor, thermistor, heater, motor, belt, latch, or control until the exact LG model and qualified diagnosis identify the failed part and fit.
Only after diagnosis
Potential parts
- dryer humidity sensor or lint filter
Consider this category only when the exact model documents the component and qualified diagnosis confirms damage or a sensing or filter fault after cleaning and correct seating.
Confirm the exact LG model, sensor location, filter frame, connectors, and manufacturer fit information before ordering. - dryer door latch or thermal device
Consider this category only when a door or thermal symptom repeats and qualified diagnosis rules out load, sensor, filter, exhaust, and power causes.
Confirm the exact LG model, gas or electric design, safety rating, wiring, and technician diagnosis before ordering. - dryer thermistor, heater, motor, or control
Consider this category only when early shutdown persists after safe external checks and qualified diagnosis identifies an internal heat, drive, sensor, or control failure.
Confirm the exact LG model, component revision, connectors, heat source, and technician diagnosis before ordering.
When checks do not resolve it
Need a professional?
Arrange qualified appliance service when the LG dryer stops early after the exact manual's load, Dry Level, sensor, filter, door, airflow, and one reset checks; when it will not restart, a code returns, the door will not latch, the drum stalls, or internal heat or control access is required. Arrange qualified vent help for a restricted exhaust path. Seek prompt help for smoke, sparks, gas odor, burning odor, scorching, abnormal heat, damaged wiring, or repeated breaker trips.
Safety scope: This article covers safe cycle-state observation, load and Dry Level checks, manual-documented sensor and filter cleaning, visible airflow checks, door observation, and one documented reset. It does not authorize operating switches during a gas odor, touching unsafe electrical equipment, opening panels, bypassing safety devices, testing live parts, or replacing internal components.
Common questions
FAQ
Why does my LG dryer stop before the cycle ends with damp clothes?
A very small load may not contact the humidity sensors, and sensor residue can end the cycle early. Low Dry Level, an overloaded or uneven load, restricted airflow, power interruption, or a component fault are also possible.
Can a small load make an LG dryer stop early?
Yes. LG says a small load may not brush the sensors, so Sensor Dry can end early. Use a suitable load or a model-approved Time Dry cycle, and clean the documented sensors before arranging service if the symptom remains.
Is cooling or Wrinkle Care a failure when an LG dryer stops?
Not necessarily. The dryer may have completed its drying portion and be cooling or tumbling intermittently for wrinkle care. Check the display and whether heat has ended before treating that behavior as an early shutdown.
What does it mean if my LG dryer loses power when it stops?
A power interruption, outlet, breaker, cord, or control issue is more likely than a sensor endpoint. Check the power path only from a safe location and use the exact manual's reset once; arrange service for a blank display or recurring trip.
When should I stop using an LG dryer that shuts off early?
Stop for smoke, sparks, burning or gas odor, scorching, abnormal heat, a stalled drum, damaged wiring, a repeated code, or a recurring early shutdown after safe checks. Keep the dryer off and arrange qualified service.
Read the exact guide
Official sources
- LG Dryer - Error Code ListLG Electronics USA · Official LG error reference used to record relevant codes and distinguish normal cooling or wrinkle care from faults; code meanings vary by model.
- [LG Dryer] Remaining Dry Time Decreases Quickly, Laudry Still DampLG Electronics USA · Official LG sensor-dry guidance used to distinguish a valid sensor decision from a fault; model cycles and load requirements vary.
- LG Dryer – Why Does My Dryer Turn Off Abnormally?LG Electronics USA · Official LG dryer shutdown guidance used for the primary early-stop decision tree; exact controls and cycles vary by model.
- LG Dryer – Why is My Dryer Not Heating, Not Drying or Taking a Long Time Drying?LG Electronics USA · Official LG drying-performance guidance used for sensor, load, and airflow interpretation; exact sensor locations and cycles vary.
- Power Issues - Laundry DryerLG Electronics USA · Official LG power troubleshooting used for safe power-state and reset branches; exact panel controls vary by model.
- [LG Dryer] Dryer Drum Not TurningLG Electronics USA · Official LG drum and load guidance used for cycle-state and load branches; it does not replace the exact model manual.
Community feedback
Share a repair observation
Share a plain-text repair observation. Accepted observations are published automatically; this page may take a moment to update.