
On this page
Start here
Quick answer
An oven bake element that heats unevenly may have a visible element defect, a power or control problem, a temperature-sensor or calibration issue, a door-seal or airflow problem, or a cooking setup that makes heat look uneven. After the oven is fully cool, use only ordinary user access to check the selected bake mode, rack and pan placement, door closure, and any visible break, blister, or area of an exposed electric element that never glows during a normal preheat. Do not touch the element, remove panels, test live voltage, or work around gas. If the element is damaged, does not activate, the oven remains uneven after setup checks, or there is smoke, gas odor, arcing, or a tripped breaker, stop using the oven and arrange qualified appliance service. A visible glow is only an observation, not proof that the element, sensor, or controls are healthy.
Before you begin
Safety first
- Owner checks are limited to cool visual observations, ordinary controls, user-accessible rack and pan placement, and visible airflow or seal checks. A qualified technician must handle element removal, wiring, electrical measurements, sensors, controls, burners, igniters, gas, fans, and cabinet access.
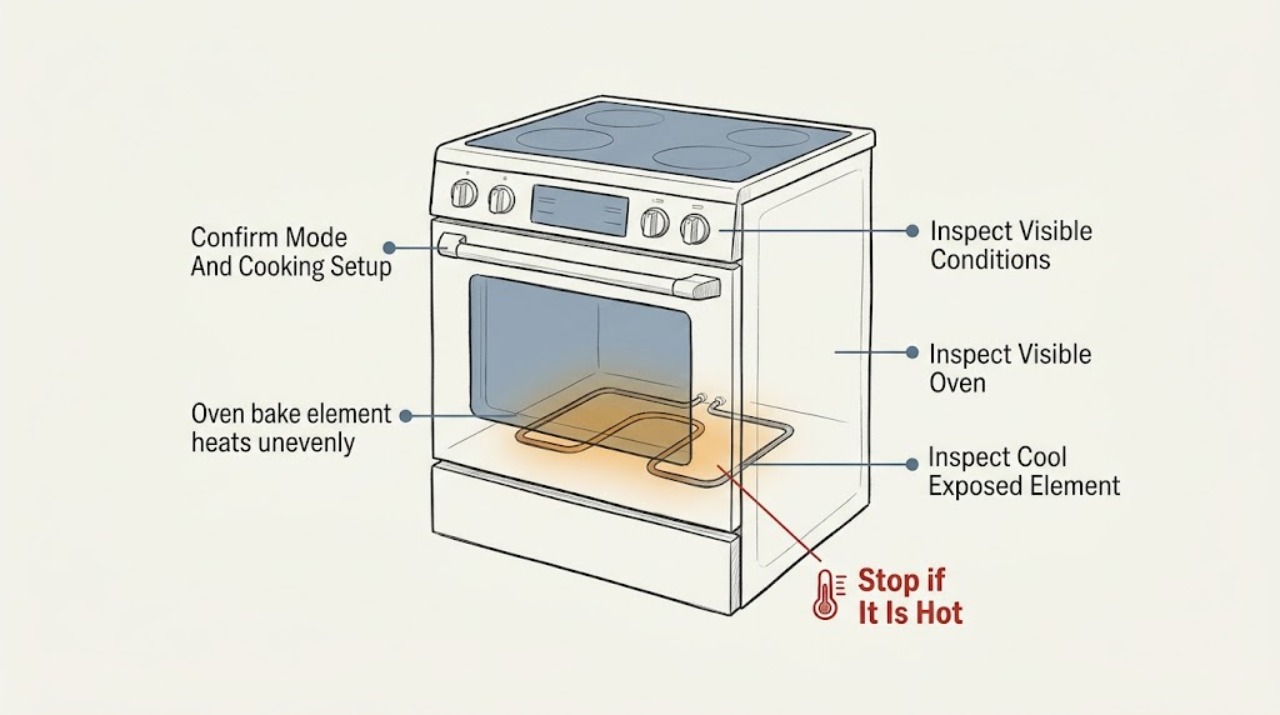
Work through in order
Diagnostic checks
Use only checks that match the exact appliance or system and its official guide.
-
Check 1
With the oven cool and empty, confirm the selected Bake mode, temperature, timer or delayed-start state, rack position, pan placement, and whether the door closes fully. Follow the model manual for settings rather than relying on a generic mode label.
Expected result: Record a correct bake setting and centered pan, a wrong mode or rack position, an overcrowded cavity, a door that does not close, or a visibly damaged or displaced seal.
Next step: Correct only an obvious user setting or pan and rack placement, then repeat one ordinary bake observation. Request service if the door or seal is damaged, cannot close, or uneven heating persists.
Stop if: Stop if the door, seal, control, or cavity is hot in an unexpected way, or if there is smoke, gas odor, arcing, or visible electrical damage.
Why this matters
Why: Wrong settings, poor rack placement, crowding, or a leaking door can create uneven results without a bake-element failure. A correct setup with a persistent hot or cold area keeps the element, sensor, control, and airflow paths open.
-
Check 2
After the oven has fully cooled and power is not being applied, look at an exposed electric bake element only from its normal visible position and without touching it or removing any cover. Do not use this check on a gas burner or hidden element unless the manual specifically provides a safe user inspection.
Expected result: Record an intact element, a visible break, blister, hole, severe discoloration, sagging, or a section that appears damaged; also note if the element is hidden or inaccessible.
Next step: Leave a damaged, inaccessible, or non-obvious element for qualified appliance service. Do not remove or loosen it, and do not attempt a live test.
Stop if: Do not touch the element, remove oven panels, pull wiring, measure voltage or resistance, or restart the oven to reproduce smoke, arcing, or a burning odor.
Why this matters
Why: A visible break or blister makes element damage more likely, but a normal-looking element does not rule out an internal fault, wiring, relay, sensor, or control issue. A momentary dark element during bake may be a normal cycle rather than a failure.
-
Check 3
During one supervised, ordinary bake preheat from a safe position, observe whether the control responds, whether an exposed electric bake element ever activates according to the manual, and whether the oven signals preheat. Do not open the door repeatedly or stand close to a gas flame.
Expected result: Record normal preheat behavior, no activation of an exposed electric element, an element that heats only in one area, a persistent failure to reach the selected temperature, or an error display.
Next step: Stop using the oven and arrange service when the element does not activate, the oven cannot maintain temperature, an error persists, or the heating pattern is abnormal. Follow the manual for any model-specific display guidance.
Stop if: Stop immediately for smoke, sparks, arcing, gas odor, an abnormal flame, a loud electrical sound, or a burning smell.
Why this matters
Why: A normal cycle with uneven food results shifts attention toward rack, airflow, door, calibration, sensor, or pan factors. An element that never activates, heats abnormally, or accompanies an error display makes the element, control, sensor, or power path more likely, but observation alone cannot identify the failed part.
-
Check 4
Check only visible oven vents and the user-accessible convection fan area for obvious blockage or damage after cooling; keep foil and other coverings off the oven floor and racks, and leave space around pans. Do not reach toward a fan or remove the rear cover.
Expected result: Record unobstructed vents and normal fan behavior for a convection mode, foil or coverings, overcrowded pans, a fan that is silent or noisy, or a visibly loose or damaged fan component.
Next step: Remove only an obvious user-added covering or rearrange pans after the oven is cool. If the fan appears damaged, noisy, or absent when the manual says it should run, request appliance service.
Stop if: Do not touch or spin the fan, insert tools through vents, remove a fan cover, or operate with loose parts or exposed wiring.
Why this matters
Why: Blocked airflow and crowded racks can create uneven cooking. A loose, disconnected, noisy, or nonworking convection fan can also impair heat circulation, but fan observation does not diagnose the motor or control.
-
Check 5
Record whether the uneven result is repeatable in the same rack position and whether the oven consistently runs hot or cold, then inspect the visible temperature-sensor position only after complete cooling if the manual permits. Do not reposition a sensor that is fixed, hidden, or requires tools.
Expected result: Record a repeatable hot or cold area, an apparently displaced sensor, a sensor that looks intact and positioned as specified, or readings that vary by rack and pan.
Next step: Use the model manual for any permitted calibration or sensor-position guidance. If the bias persists, the sensor is damaged, or calibration requires access to wiring, arrange qualified service.
Stop if: Do not bend, disconnect, test, or replace the sensor, and do not open the control area to calibrate or measure it.
Why this matters
Why: Consistent temperature bias can involve calibration or the sensor; a displaced sensor can affect control behavior. Variation tied to rack, pan, airflow, or food placement points toward heat distribution or cooking setup instead. A portable thermometer at one spot is not enough to prove the oven control is wrong.
-
Check 6
Prepare an appliance service request with the model if visible from ordinary access, electric or gas configuration, selected mode and temperature, rack and pan position, which area cooks faster or slower, element and fan observations, door-seal condition, error display, and when the problem began.
Expected result: Confirm that the record contains external observations only and that no element, sensor, panel, wiring, burner, igniter, or fan was disturbed.
Next step: Request qualified appliance diagnosis and let the technician test de-energized components, controls, sensors, heating output, airflow, and door sealing using model-specific procedures.
Stop if: Stop all user troubleshooting when the next step requires panel access, electrical testing, gas work, burner or igniter access, element removal, or fan work.
Why this matters
Why: This pattern helps a technician distinguish cooking setup and airflow from bake-element, sensor, control, door-seal, fan, and power or gas issues. A symptom that began after a repair or power event is useful context, not proof of the responsible part.
Use your observations
Decision map
Find the observation that best matches what you see, then follow the next safe action.
-
PATH 01Next step
What you see
The element appears normal, the oven reaches temperature, and uneven results track rack position, crowded pans, foil, frequent door opening, or a blocked vent.
Do this next
Correct only the documented cooking setup after the oven is cool, use the manual's rack guidance, and leave room for airflow. If the pattern remains in an otherwise correct setup, arrange service for calibration, sensor, airflow, and element checks.
-
PATH 02Next step
What you see
A fully cool exposed electric bake element shows a crack, blister, hole, severe discoloration, or a section that never activates during the manual's normal bake behavior.
Do this next
Stop using the oven and request qualified appliance service for element and control diagnosis. Do not remove the element, test live voltage, or assume a generic replacement will fit.
-
PATH 03Next step
What you see
The bake element appears intact and cycles, but the oven repeatedly runs hot or cold or produces the same uneven area after correct rack, pan, door, and airflow checks.
Do this next
Arrange service to check calibration, sensor position and operation, controls, element output, door sealing, and model-specific heat distribution. A single portable thermometer reading is not a complete diagnosis.
-
PATH 04Next step
What you see
A convection fan is noisy, loose, or absent when expected, or the door does not seal and heat visibly escapes.
Do this next
Stop if there is loose material, exposed wiring, or an abnormal sound, and request appliance service for the fan or door assembly. Do not reach into the fan or remove the seal unless the manual explicitly identifies a tool-free user replacement.
-
PATH 05Next step
What you see
The oven is gas-fired, a flame is abnormal, gas odor is present, or there is smoke, burning odor, arcing, sparks, or a repeated breaker trip.
Do this next
Stop using the appliance, keep clear, and use appropriate emergency, gas, electrical, or appliance service from a safe location. Do not manually ignite, reset repeatedly, open panels, or attempt a repair.
Helpful context
Understand the symptom
Uneven cooking is not automatically a failed bake element
An electric bake element normally cycles as the oven maintains temperature, so an element being dark at one moment does not prove it has failed. Uneven results can also come from rack position, blocked airflow, crowded pans, a door that does not seal, calibration, a temperature sensor, or a convection fan. A lasting dark section, visible blister, crack, or failure to activate during a normal bake request is more meaningful than a single snapshot. Gas ovens use a different heating arrangement, so do not assume an exposed electric-element check applies to a gas appliance.
Separate cooking setup from a heat-source fault
Start with the oven empty and fully cool, then confirm the selected mode and temperature, center the rack and pan as the manual describes, leave space for airflow, and keep the door closed during baking. Check that the door closes and its seal is not visibly torn or displaced. These observations can explain one-sided browning or undercooked food without proving a component failure. A consistent hot or cold area after correct setup warrants a service check of the bake element, sensor, control, airflow, and calibration.
Treat the element as a high-temperature electrical or gas-area component
A homeowner can make a cool, visual observation of an exposed electric element if the owner manual permits it, but cannot safely confirm voltage, wiring, resistance, relay operation, or a hidden element. Do not remove an element, back panel, control cover, or insulation to investigate. For gas ovens, do not manually ignite, disturb the burner or igniter, or continue use when a flame is abnormal or gas is smelled. Whirlpool advises professional repair or replacement when an element is damaged or does not activate; Samsung directs users to service when heating remains uneven or element and sensor inspection is needed.
Safety boundary
Stop conditions
- Do not touch a hot element, remove an element or cabinet panel, pull wiring, perform live voltage or resistance tests, or open the control area.
- For a gas oven, do not manually ignite, disturb the burner or igniter, or continue operation when gas odor or an abnormal flame is present.
- Stop using the oven for smoke, sparks, arcing, burning odor, exposed wiring, a repeated breaker trip, a loose fan, or a door that cannot close safely.
Only after diagnosis
Potential parts
- oven bake element
Consider an element only if a qualified technician confirms element damage or failure; uneven browning alone can come from rack, airflow, door, sensor, calibration, control, or pan factors.
Confirm the exact oven model, element shape, terminals, mounting, voltage, wattage, and manufacturer-approved fit before sourcing a replacement. - oven temperature sensor
Consider a sensor only if testing confirms a sensor, position, or calibration fault after setup and element checks; do not select one from a hot or cold spot alone.
A qualified technician should verify the exact model, sensor specification, connector, mounting, and control compatibility before replacement. - oven door seal or convection fan component
Consider this category only when a technician confirms heat loss from a failed seal or a fan fault; a convection component does not apply to every oven or cooking mode.
Confirm the oven model, door configuration, fan design, and manufacturer-approved fit; do not remove a seal, fan, or panel unless the manual and technician authorize the procedure.
When checks do not resolve it
Need a professional?
Call a qualified appliance technician when a bake element is visibly damaged, does not activate, heats abnormally, or the oven remains uneven after correct setup and airflow checks. Seek prompt help for a damaged door seal, abnormal fan, persistent error, or inability to reach or maintain temperature. Stop immediately and keep clear for smoke, sparks, arcing, burning odor, abnormal gas flame, gas odor, exposed wiring, or a repeated breaker trip; use appropriate emergency, gas, electrical, or appliance help.
Safety scope: Owner checks are limited to cool visual observations, ordinary controls, user-accessible rack and pan placement, and visible airflow or seal checks. A qualified technician must handle element removal, wiring, electrical measurements, sensors, controls, burners, igniters, gas, fans, and cabinet access.
Have this ready
- Give the technician the model if safely visible, electric or gas configuration, mode and temperature, rack and pan position, uneven-cooking pattern, element and fan observations, door-seal condition, error display, breaker or gas events, and symptom history.
Common questions
FAQ
Does a bake element being dark mean it has failed?
Not necessarily. Electric bake elements cycle on and off during bake, so a momentary dark element can be normal. A lasting dark section, visible crack or blister, or failure to activate during a normal bake request needs qualified diagnosis.
What can cause uneven baking besides the element?
Rack and pan placement, crowded cookware, blocked airflow, frequent door opening, a door seal, calibration, temperature sensor, convection fan, control, or the appliance's heating design can all affect results.
Can I test or replace the bake element myself?
Do not test live voltage, remove the element, pull wiring, or open panels as a general homeowner step. Inspect only a fully cool, exposed element from its normal visible position if the manual permits; let a qualified technician handle testing and replacement.
Why is one side of the oven browning faster?
Check the documented rack and pan position, spacing, door closure, and airflow first. If the same area remains hot or cold with correct setup, request service to check the element, sensor, calibration, fan, door seal, and controls.
Does this advice apply to a gas oven?
Only the general setup and safety observations apply. Gas ovens use a burner and igniter rather than the same exposed electric bake-element check. Do not manually ignite or disturb gas components; use qualified service for flame, igniter, or gas concerns.
When should I stop using the oven immediately?
Stop for smoke, sparks, arcing, burning odor, gas odor, an abnormal flame, exposed wiring, a repeated breaker trip, a loose fan, or a door that cannot close safely. Keep clear and use appropriate emergency, gas, electrical, or appliance help.
Read the exact guide
Official sources
- 6 Reasons Why Your Oven Is Not Baking ProperlyWhirlpool · Whirlpool consumer guidance used for general uneven-baking checks; exact model manual and service procedures govern any repair.
- Electric Range Operation of the Elements During BakeGE Appliances · GE Appliances support guidance used only to explain normal electric element cycling; it is not a diagnosis or a universal model procedure.
- Troubleshooting guide for Samsung built-in ovenSamsung · Samsung built-in oven troubleshooting used for general heat-retention and fan observations; the user's model guide takes precedence.
- What to Do If Your Gas Oven Is Not HeatingWhirlpool · Whirlpool gas-oven guidance used to keep electric bake-element observations separate from gas appliance service; model instructions govern.
- Samsung Wall Oven FAQs | Samsung USSamsung · Samsung wall-oven FAQ used for general cooking-setup and service boundaries; controls and procedures vary by model.
Community feedback
Share a repair observation
Share a plain-text repair observation. Accepted observations are published automatically; this page may take a moment to update.