
On this page
Start here
Quick answer
When an oven says preheat is complete but food still cooks unevenly, first separate a pan or rack effect from an oven fault. Use the recipe's intended mode and rack, a suitable pan with clear airflow, and one controlled bake test without repeatedly opening the door. Note whether the pattern is front-to-back, edge-to-center, top-to-bottom, or limited to convection. A repeatable pattern across suitable cookware and modes can point to a heating element, temperature sensor or calibration, airflow, or door-seal problem. Do not remove panels, test live wiring, adjust gas components, or replace a part based only on browning; stop using the oven for smoke, an unusual gas odor, sparking, a damaged element, a door that will not seal, or any control that heats when it is not requesting heat.
Before you begin
Safety first
- This article covers ordinary-access observation and controlled bake testing only. Internal electrical, gas, heating-element, sensor, relay, hinge, and control work belongs to a qualified appliance professional.
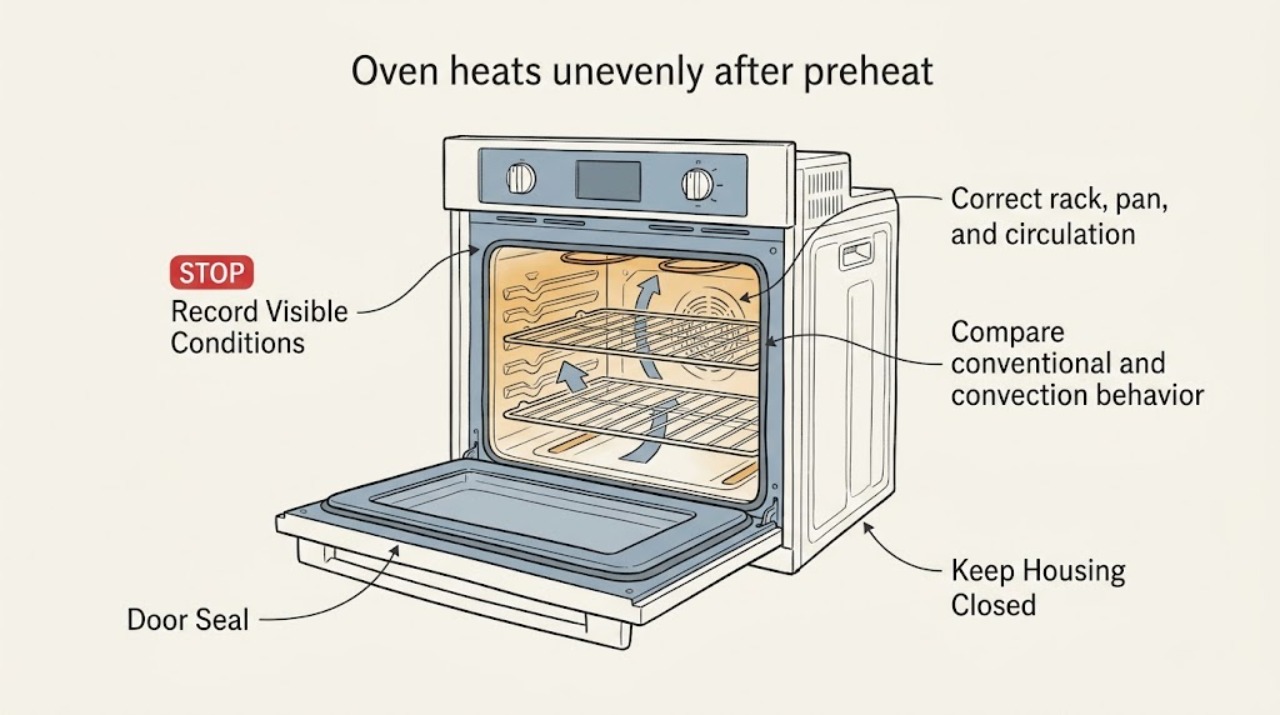
Work through in order
Diagnostic checks
Use only checks that match the exact appliance or system and its official guide.
-
Record where the uneven heating occurs
After the preheat signal, use the normal bake mode and the recipe's specified rack and pan. Keep the door closed during the test, then record the food's browning or doneness pattern from the oven door or after the planned check.
Expected result: The result is mainly edge versus center, front versus back, one side versus the other, top versus bottom, or different only when more than one rack or the convection mode is used.
Next step: Use the pattern to choose the airflow, mode, door-seal, or service check below; keep the recipe, mode, rack, pan, and result together for the technician.
Stop if: Stop the test for smoke, an unusual gas odor, sparking, a flame that will not behave normally, or any sign that the oven is heating with its controls off.
Why this matters
Why: A location-specific result is evidence about airflow, pan placement, rack position, or an element's heat pattern; a repeatable result across locations and suitable setups is more concerning for temperature control or a component fault.
-
Correct rack, pan, and circulation conditions
With the oven cool enough to handle safely, confirm the rack is in the manual's recommended position, the pan is the recipe's intended size and material, no pan touches the oven wall or another pan, and no foil or liner covers the entire rack or oven bottom.
Expected result: The pan is crowded, touching a wall, on an unsuitable rack, made of a strongly heat-absorbing material, or blocking airflow; or the setup already matches the manual and leaves circulation clear.
Next step: Repeat one controlled bake with the corrected rack and pan arrangement. If the result is even, keep that setup; if it is unchanged, compare modes and inspect the door and visible heating behavior without opening the appliance.
Stop if: Do not line the whole rack or oven floor, block vents, force a rack, or remove panels to investigate airflow.
Why this matters
Why: A setup defect can create a local hot spot or slow one area without an oven failure. If the setup is correct and the same location remains uneven, a pan-only explanation becomes less likely.
-
Compare conventional and convection behavior
If the oven offers both modes, repeat the same simple test in the recipe's conventional mode and then in convection only when the manual or recipe supports that comparison; use the recommended rack and cookware for each mode.
Expected result: Unevenness occurs only in convection, only in conventional baking, or in both modes with the same location affected.
Next step: Use the mode that produces the documented result only as a temporary observation, not as a workaround for a suspected fault. Record mode, rack, pan, and pattern and seek service when the issue persists in the supported mode.
Stop if: Do not reach through the oven, touch a fan or element, disable a fan guard, or remove an internal cover.
Why this matters
Why: A convection-only pattern makes fan operation, airflow, mode-specific rack guidance, or conversion settings more likely. A matching pattern in both modes makes a pan-specific explanation less likely and raises the value of an element, sensor, door-seal, or control assessment.
-
Check the closed door and visible gasket
With the oven cool, confirm that the racks are not reversed or protruding, the door closes normally, and the visible gasket has no tear, flattening, or section pulled out of place. Do not remove the gasket or adjust hinges.
Expected result: The door closes evenly with an intact gasket, or the door cannot close fully, the gasket is damaged, or a rack is preventing the seal.
Next step: Correct only a plainly reversed or mis-seated rack if the manual permits it, then repeat the controlled test. Arrange service for a torn gasket, door alignment issue, damaged hinge, or a door that will not close and seal.
Stop if: Do not bend hinges, remove the door, stretch or glue the gasket, or continue using the oven if hot air escapes toward controls or cabinetry.
Why this matters
Why: A poor seal or obstructed door can let heat escape and make baking slow or uneven. A normal door and gasket make heat loss less likely, but do not rule out internal heating or control problems.
-
Observe the heating response without opening the cabinet
For an electric oven with a visible element, observe from the normal user position during a bake cycle whether the expected element heats as described in the model manual; after the oven is cool, look for an obvious crack or break without touching it. For a gas oven, do not remove panels or attempt burner adjustment.
Expected result: The element appears to heat normally, does not heat when the selected mode calls for it, or shows visible damage; on a gas model, the heating behavior cannot be judged safely from ordinary access.
Next step: Leave a suspected failed or damaged heating system out of service and give the technician the mode and observation. Do not attempt an element, burner, sensor, relay, or wiring repair as a user test.
Stop if: Do not touch a hot element, remove power covers, measure live voltage, disassemble the burner, or bypass a safety control.
Why this matters
Why: A failed or visibly damaged element can leave one region underheated even though preheat completes. Normal visible behavior does not prove the element, sensor, relay, or gas system is healthy.
-
Use a repeatable bake test instead of chasing the display
Once rack, pan, airflow, mode, and door conditions are controlled, repeat a simple bake test recommended by the manufacturer, such as a consistent biscuit test, and compare results across the same rack and pan rather than repeatedly changing the set point.
Expected result: The test is even, consistently offset in browning or doneness, or repeatedly uneven in the same location despite the controlled setup.
Next step: Follow the owner's manual for any calibration feature only when the repeatable result supports it; otherwise document the test and arrange qualified service. Do not use calibration to conceal a damaged element, door leak, smoke, gas odor, or a control fault.
Stop if: Stop testing if food burns unexpectedly, smoke appears, the oven smells of gas or burning insulation, or the oven does not respond to its controls.
Why this matters
Why: An even test makes the original recipe, pan, rack, or loading pattern more likely. A consistent overall offset can warrant model-specific calibration guidance, while a fixed local hot or cool area points more toward airflow, an element, sensor, or control issue. Normal element cycling and a single thermometer reading do not by themselves prove a fault.
Use your observations
Decision map
Find the observation that best matches what you see, then follow the next safe action.
-
PATH 01Next step
What you see
The uneven result changes when the rack, pan material, spacing, or number of pans changes, and a correctly placed single-pan test is more even.
Do this next
Keep the manual-approved rack and pan arrangement, leave circulation clear, and avoid covering a rack or oven bottom with foil. Seek service only if the same fault returns with the controlled setup.
Why this path and its safety boundary
Why it matters: The appliance may be operating normally while cookware or airflow creates the hot spot.
-
PATH 02Next step
What you see
Unevenness appears only in convection or only in conventional mode, while the other supported mode gives a consistent result.
Do this next
Use the recipe and owner's manual for that mode, record the mode-specific pattern, and request service if the supported mode remains uneven with proper cookware and clear airflow.
Why this path and its safety boundary
Why it matters: Mode-specific airflow, fan behavior, conversion settings, or rack guidance is more likely than a general oven-temperature fault.
-
PATH 03Next step
What you see
The same side, rack level, or region stays pale or over-browned through a controlled test in more than one supported mode.
Do this next
Stop compensating with repeated set-point changes, preserve the test notes, and arrange qualified appliance diagnosis. Do not open the cabinet or replace a component based only on the browning pattern.
Why this path and its safety boundary
Why it matters: A simple pan-placement explanation is less likely. An element, temperature sensor or calibration, door-seal leak, airflow fault, or control problem needs assessment.
-
PATH 04Next step
What you see
The door does not close evenly, a rack obstructs closure, the gasket is torn or displaced, or heat visibly escapes at the seal.
Do this next
Stop using the oven if the door cannot seal safely; arrange service for the gasket, door, hinge, or alignment and provide the visible condition.
Why this path and its safety boundary
Why it matters: Heat loss can explain slow or uneven baking and is a service or model-specific replacement question rather than a calibration fix.
-
PATH 05Next step
What you see
There is smoke, an unusual gas odor, sparking, visible element damage, a flame or heat source that behaves abnormally, or heating continues when the controls are off.
Do this next
Stop using the oven, keep clear of hot surfaces, leave the area for a gas odor or fire risk when appropriate, and contact the appropriate emergency, gas, or qualified appliance service from a safe location.
Why this path and its safety boundary
Why it matters: This is a stop-use safety condition, not an uneven-baking adjustment. Continued testing could create fire, burn, gas, or electrical risk.
Helpful context
Understand the symptom
What a completed preheat does and does not prove
The preheat signal means the control believes the selected cooking condition has been reached; it does not promise identical heat at every rack position or that every pan will brown identically. Heating elements cycle during baking, and the temperature can rise and fall around the set point. Treat the location and repeatability of the uneven result as the useful evidence: a single dark corner is different from one side staying pale on every controlled test.
Start with the recipe, rack, pan, and airflow
Use the rack position and cookware recommended by the oven manual or recipe. Dark or dull bakeware can brown food more strongly than shiny bakeware, while crowded pans, a pan against a wall, or foil covering a shelf can block circulation and create hot spots. Keep the door closed as much as practical so the oven can maintain its normal control cycle.
A repeatable fault is a service decision
If the same side, rack level, or mode fails after a controlled test with suitable cookware and clear airflow, do not compensate by repeatedly changing the set temperature or by opening the cabinet. The remaining possibilities include a failed or weak element, a sensor or calibration issue, a door-seal leak, or model-specific airflow/control behavior. Record the pattern and arrange qualified appliance service.
Safety boundary
Stop conditions
- Stop using the oven for smoke, an unusual gas odor, sparking, a flame that will not behave normally, burning insulation smell, visible element damage, or heat with every control Off.
- Do not remove panels, test live voltage, adjust gas components, bypass a safety device, or open the cabinet as an ordinary troubleshooting step.
- Do not touch an element, burner, fan, rack, pan, or door hardware while hot, and do not reach into the oven to feel for heat.
- Do not bend hinges, remove the door, stretch or glue a gasket, block vents, or cover a whole rack or oven bottom with foil.
- Stop changing the set point as a workaround when a fixed location remains uneven after a controlled test; arrange qualified appliance service.
Only after diagnosis
Potential parts
- oven temperature sensor
Consider this category only if a repeatable whole-oven temperature or location pattern remains after cookware, rack, airflow, door, and mode checks and service diagnosis supports a sensor fault.
Confirm the exact oven model, sensor design, and manufacturer fit information before ordering; do not infer fit from appearance. - oven bake heating element
Consider this category only when the correct bake mode does not produce the expected heating response or a qualified technician confirms visible or measured element damage.
Confirm the exact model and element design with the manufacturer or technician; do not work on energized or hot components. - oven broil heating element
Consider this category only when the affected mode and service diagnosis implicate the broil element or its heating circuit rather than a pan or rack effect.
Confirm the exact model, fuel type, element layout, and manufacturer fit information before ordering. - oven door gasket
Consider this category only if the cool-oven inspection finds a torn or displaced gasket or a technician confirms that the seal is allowing heat loss.
Confirm the exact model and gasket routing; do not stretch, glue, or alter a seal to make it fit.
When checks do not resolve it
Need a professional?
Arrange qualified appliance service when the same location remains uneven with the manual-approved rack, suitable cookware, clear airflow, closed door, and a repeatable bake test; when a visible element is damaged or fails to heat; when the gasket or door cannot seal; when a mode-specific fault persists; or when calibration or an internal component may be involved. Seek emergency or gas assistance from a safe location for a gas odor, fire, smoke, or uncontrolled flame.
Safety scope: This article covers ordinary-access observation and controlled bake testing only. Internal electrical, gas, heating-element, sensor, relay, hinge, and control work belongs to a qualified appliance professional.
Common questions
FAQ
Why is my oven uneven if preheat says complete?
A completed preheat signal does not make every rack location or pan heat identically. Rack position, pan material and spacing, blocked airflow, door heat loss, normal element cycling, and a repeatable element or sensor fault can all produce uneven results. Control the setup and record the pattern before arranging service.
Should I use an oven thermometer to prove the oven is uneven?
Not as the first test. KitchenAid and GE explain that elements cycle and that a thermometer's position and the door opening can change the reading. A repeatable manufacturer-recommended bake test, such as a consistent biscuit test, is more useful for comparing cooking results; follow the exact model manual.
Can changing the rack or pan fix uneven baking?
It can when the pattern changes with rack position, pan material, spacing, or airflow. Use the rack and cookware guidance in the recipe and owner's manual, keep circulation clear, and do not cover a whole rack or oven bottom with foil. If the same location remains uneven with a controlled setup, request qualified diagnosis.
When should I stop using an oven that heats unevenly?
Stop for smoke, an unusual gas odor, sparking, a visible cracked heating element, an uncontrolled flame, heat with the controls off, a door that cannot seal, or a burning-insulation smell. Leave the area for a gas or fire hazard when appropriate and contact the appropriate emergency, gas, or qualified appliance service from a safe location.
Read the exact guide
Official sources
- Long Pre-Heat - Wall OvenWhirlpool Product Help · Whirlpool wall-oven guidance used for general preheat and loading practice; follow the installed model's manual where it differs.
- Range & Wall Oven - Oven Temperature Fluctuation / Cycling On and OffGE Appliances · General explanation of gas and electric oven cycling; it does not diagnose a particular oven or replace the owner's manual.
- How to Correct Uneven Baking or BrowningKitchenAid Product Help · General troubleshooting guidance for KitchenAid wall ovens and ranges; apply the installed model's manual where instructions differ.
- Oven Temperature Incorrect (Too Hot or Too Cold)KitchenAid Product Help · General KitchenAid range and oven guidance; the owner's manual controls calibration and mode-specific instructions for a particular model.
- Range & Wall Oven - Oven Temperature Is Not CorrectGE Appliances · General GE range and wall-oven support guidance; use the exact owner's manual for the installed model.
Community feedback
Share a repair observation
Share a plain-text repair observation. Accepted observations are published automatically; this page may take a moment to update.