
On this page
Start here
Quick answer
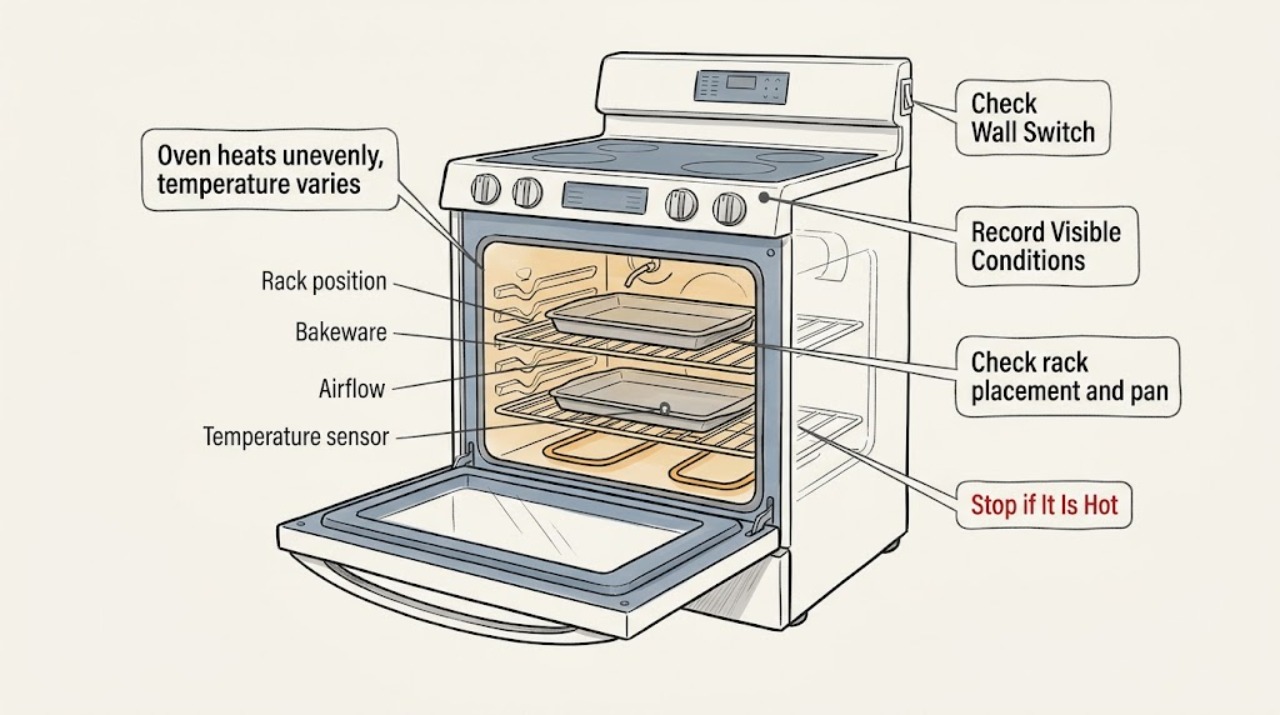
Some temperature difference between the top, center, and bottom of an oven is expected because rack position changes distance from the heating source and airflow pattern. First test the complaint consistently: use the same recipe and pan, one rack in the center, the correct mode, a complete preheat, and a closed door. Whirlpool and GE guidance point to rack position, pan material and spacing, airflow, preheating, door openings, calibration, and the oven's level as common causes of uneven results. Do not line the oven floor or an entire rack with foil, and do not overcrowd the cavity. If the center-rack test is even but the top or bottom rack is not, the result may be a rack-position or recipe adjustment rather than a failed part. If the same area is consistently too hot or too cool after a controlled test, inspect only visible damage with the oven completely cool and arrange appliance service for a failed bake or broil element, temperature sensor, door gasket, convection fan, wiring, or control. Do not touch energized or hot elements, remove panels, test live voltage, or change calibration repeatedly without the model manual.
Before you begin
Safety first
- Homeowner checks should remain limited to recipe and rack setup, pan spacing and material, complete preheat and closed-door observation, an approved controlled bake test, and visual inspection only after the oven is completely cool and safely off. A qualified technician should diagnose energized elements, gas burners, sensors, relays, wiring, fans, door hardware, and controls.
Work through in order
Diagnostic checks
Use only checks that match the exact appliance or system and its official guide.
-
Check 1
Stop using the oven and switch it off if there is a gas odor, smoke beyond normal cooking, sparking, a damaged glass door, exposed or blistered element, melted wiring, or a breaker that trips; keep hands away from hot or energized parts.
Expected result: No hazard is present and the issue is limited to uneven browning or doneness, or a hazard sign or visible damage is present.
Next step: For gas odor, leave the area and follow local emergency guidance. Otherwise keep the oven off and arrange qualified appliance service; do not remove panels or test live circuits.
Why this matters
Why: A rack-to-rack result difference can be a setup issue, but gas, electrical, heat, and damaged-component signs make continued testing unsafe.
-
Check 2
Repeat one simple bake with the same recipe, pan, temperature, mode, and amount of food; use one rack in the center, fully preheat, keep the door closed, and record whether the top, center, or bottom of the food differs.
Expected result: The result is even in the center, varies only when the rack moves, or remains uneven in the same direction during the controlled center-rack test.
Next step: Use the controlled result to guide the next check and do not replace a part based on one batch or one rack position.
Why this matters
Why: A rack-dependent result favors heat-source distance, airflow, pan position, or recipe behavior. A repeatable center-rack error keeps calibration, sensor, element, gasket, or control problems in consideration.
-
Check 3
Check rack placement and pan spacing while the oven is cool: center the pan on the rack, use the rack position recommended for the recipe or model, leave visible space around the pan, and make sure the rack is fully seated and level.
Expected result: The pan is close to an element or wall, multiple pans are crowded, the rack is uneven or in the wrong position, or the cavity has adequate spacing.
Next step: Correct only the rack and pan arrangement, then repeat one controlled bake. If the same area remains wrong with proper spacing, continue to the temperature and component checks.
Why this matters
Why: Distance from an element and restricted circulation can produce consistent top/bottom or rack-to-rack differences without a failed oven component.
-
Check 4
Inspect the bakeware and airflow setup: use the pan type recommended by the recipe, remove any foil covering the oven floor or entire rack, avoid blocking vents, leave space between dishes, and keep the door closed during cooking.
Expected result: Dark, dull, insulated, glass, or shiny cookware is changing browning; foil or overcrowding blocks airflow; the oven is clear; or the result is unchanged.
Next step: Repeat the test with one suitable pan and open airflow. Do not use foil as a heat shield or cover the oven floor; arrange service if a persistent pattern remains.
Why this matters
Why: Bakeware absorbs or reflects heat differently, and blocked circulation can create local hot and cool zones. An unchanged result after a neutral pan and clear airflow keeps an appliance fault possible.
-
Check 5
Confirm the oven reaches its complete preheat indication before loading food, and avoid opening the door until the recipe's minimum time; if using convection, use it only as described in the model manual and observe whether the fan actually circulates.
Expected result: The food was loaded before preheat, the door was opened often, convection improves uniformity, convection is unavailable, or the result is unchanged after a closed-door test.
Next step: Repeat one fully preheated, closed-door test with the correct mode. If the fan does not run when the manual says it should, or the result remains uneven, arrange service rather than removing the fan cover.
Why this matters
Why: Incomplete preheat and heat loss can mimic a rack temperature problem. Convection can distribute heat more uniformly on equipped models, but a missing or abnormal fan can create a separate fault.
-
Check 6
Use a consistent center-rack bake test from the oven manual, such as evenly spaced biscuits, and compare doneness and browning within the package time range; use the oven's approved calibration procedure only if the result is consistently hot or cool.
Expected result: The test is evenly browned and done, consistently too dark or light, or uneven across the same pan despite correct placement.
Next step: Follow the model manual for any calibration adjustment and retest once. Do not calibrate repeatedly or use calibration to compensate for a visibly damaged element, displaced sensor, or leaking door gasket.
Why this matters
Why: An even but globally shifted result can support a calibration check. A localized uneven result is less likely to be fixed by a temperature offset and keeps airflow, element, sensor, or door-seal causes in consideration.
-
Check 7
With the oven completely cool and power or gas safely off as directed by the manual, inspect only visible elements, the temperature sensor position, door gasket, racks, and cavity for breaks, blisters, displacement, tears, or a door that will not close; do not remove panels.
Expected result: An element is cracked or never activates, the sensor is displaced or damaged, the gasket is torn, the door does not seal, or no visible defect is found.
Next step: Stop using the affected mode and arrange qualified appliance service for any defect or persistent pattern. Provide the model, test setup, rack pattern, temperature observations, and photos taken only while cool and safe.
Why this matters
Why: A visible or repeatable component defect can create persistent uneven heating. A clean exterior does not rule out a sensor, relay, wiring, gas burner, fan, or control fault.
Use your observations
Decision map
Find the observation that best matches what you see, then follow the next safe action.
-
PATH 01Next step
What you see
Food is even on the center rack after full preheat, but browns or cooks differently when moved to the top or bottom rack with the same pan.
Do this next
Use the rack position specified by the recipe or model manual, center the pan, and adjust the recipe only after a consistent test. Arrange service if the difference is extreme, new, or accompanied by a failed element or poor preheat.
Why this path and its safety boundary
Why it matters: Rack position and distance from the heating source are more likely than a failed control or sensor; some rack variation is normal for conventional ovens.
-
PATH 02Next step
What you see
The center-rack test improves after full preheat, a closed door, one suitable pan, and clear spacing, while the earlier complaint involved multiple pans, foil, or frequent door opening.
Do this next
Keep the corrected setup and follow the model's rack and pan guidance. Do not line the cavity with foil; escalate if the same pattern returns under controlled conditions.
Why this path and its safety boundary
Why it matters: Heat loss or restricted airflow is more likely than an oven component failure.
-
PATH 03Next step
What you see
A controlled center-rack test is evenly browned but consistently too hot or too cool overall, with no visible element, gasket, or sensor defect.
Do this next
Use the owner manual's calibration instructions, make one small documented adjustment if permitted, and retest. Arrange service if the error persists or becomes localized.
Why this path and its safety boundary
Why it matters: Calibration or temperature-sensing accuracy is more likely than rack-specific airflow, but the model's allowed calibration range and procedure still control the decision.
-
PATH 04Next step
What you see
The same rack or side remains undercooked or over-browned after controlled placement, full preheat, clear airflow, and appropriate bakeware, or a convection fan does not operate as expected.
Do this next
Stop compensating with extreme rack changes or temperature offsets and arrange qualified appliance diagnosis. Do not remove covers or test live voltage.
Why this path and its safety boundary
Why it matters: A heating element, sensor, fan, door gasket, wiring, burner, or control fault is more likely than a recipe or rack choice.
-
PATH 05Next step
What you see
There is gas odor, smoke, sparking, a cracked or blistered element, damaged wiring, a broken door glass or gasket, a breaker trip, or the door cannot close safely.
Do this next
Turn the oven off, leave for gas odor or active fire, and arrange qualified appliance service; use emergency help for fire or immediate danger. Do not continue baking to reproduce the result.
Why this path and its safety boundary
Why it matters: A gas, electrical, heat, or physical hazard outweighs ordinary cooking-result troubleshooting.
Helpful context
Understand the symptom
Temperature varies by rack for a reason
The top, center, and bottom of a conventional oven do not receive heat in exactly the same way. A pan close to a bake or broil element, a blocked vent, or a crowded rack can brown one area faster than another. Compare like with like before deciding the oven is faulty: one recipe, one pan, one rack, complete preheat, and no door opening during the test.
Start with the rack and pan, not a replacement part
Use the rack position specified by the recipe or the oven manual, usually a centered position for general baking. Leave room for air around the pan and between multiple pans. Dark or dull bakeware absorbs more heat than shiny or light-colored bakeware, so changing the pan can change browning without changing the oven. Never cover the floor or an entire rack with foil.
Preheating and door openings change the result
An oven can show that it is approaching temperature while the cavity and racks are still equalizing. Follow the model's preheat signal or instructions before loading food, and use the window or light instead of opening the door repeatedly. Opening the door releases heat and can exaggerate top-versus-bottom differences, especially in a long bake.
Calibration is for a repeatable temperature error
If a controlled center-rack test is consistently too hot or too cool, calibration may be appropriate on models that provide a temperature offset. Calibration changes the reported control target; it cannot repair a weak element, displaced sensor, damaged gasket, or blocked airflow. Use the owner's manual and make one small documented change, then retest rather than continually chasing a single batch.
When a rack pattern points to service
If the same rack area is always undercooked or over-browned with consistent pans and settings, or if one element never activates, the sensor is visibly displaced or damaged, the door does not seal, or convection airflow is absent, a component or control fault becomes more likely. Let the oven cool completely and arrange qualified service; do not remove covers or test energized circuits.
Safety boundary
Stop conditions
- Stop using the oven and arrange qualified appliance service for gas odor, smoke, sparks, damaged wiring, a cracked or blistered heating element, broken door glass, a torn gasket, repeated breaker trips, or a door that will not close safely.
- Do not touch hot or energized elements, remove panels, test live voltage, access gas components, bypass controls, or reposition a sensor while the oven is hot or powered.
- Do not cover the oven floor or an entire rack with foil, overcrowd the cavity, use extreme temperature offsets to mask a defect, or repeatedly open the door to compare rack temperatures.
- Arrange service when the same rack or side remains uneven after a full-preheat, closed-door, one-pan test with correct rack placement and airflow, or when calibration cannot correct a consistent global error.
Only after diagnosis
Potential parts
- oven temperature sensor
Consider only if a qualified diagnosis confirms inaccurate sensing or a damaged or displaced sensor after a controlled bake test; rack variation alone is not proof.
Match the exact oven model, sensor location, connector, and approved calibration procedure; do not substitute a sensor by appearance. - oven bake or broil heating element
Consider only when a qualified inspection confirms an element is cracked, not activating, or underperforming and the uneven pattern is repeatable.
Match the exact oven model, element position, voltage, wattage, terminals, and installation instructions; electrical isolation and replacement require appropriate service precautions. - oven door gasket
Consider only when the gasket is visibly torn, the door does not seal, or a qualified diagnosis confirms heat loss through the door.
Match the exact model and gasket routing; do not use a gasket replacement to conceal a warped door, hinge, or cabinet problem. - convection fan or fan motor
Consider only on a convection-equipped oven when the manual calls for fan operation and a technician confirms the fan or motor is not operating correctly.
Confirm the exact model, fan blade, motor, rotation, wiring, and control requirements; do not reach through the fan guard or test it energized.
When checks do not resolve it
Need a professional?
Safety scope: Homeowner checks should remain limited to recipe and rack setup, pan spacing and material, complete preheat and closed-door observation, an approved controlled bake test, and visual inspection only after the oven is completely cool and safely off. A qualified technician should diagnose energized elements, gas burners, sensors, relays, wiring, fans, door hardware, and controls.
Common questions
FAQ
Is it normal for the top and bottom oven racks to cook differently?
Some difference is normal because rack position changes distance from the heating source and airflow. Use the rack position in the recipe or model manual, center the pan, and compare one fully preheated center-rack test before treating the pattern as a fault.
Why is food browning on one rack but not another?
Rack distance, pan material, crowded cookware, blocked airflow, incomplete preheating, and frequent door openings can all change browning. Correct those variables one at a time. If the same area remains wrong in a controlled test, service may be needed.
Should I calibrate the oven when temperatures vary by rack?
Calibration is more appropriate for a repeatable overall temperature that is consistently hot or cool, not for a single hot or cold rack caused by placement or airflow. Follow the owner manual and retest once; do not use an offset to mask a failed element, sensor, fan, or door gasket.
Can foil cause uneven oven heating?
Yes. Covering the oven floor or an entire rack can block airflow and alter heat distribution. Remove those coverings, leave space around bakeware, and use the cookware and rack arrangement specified by the oven manual.
Read the exact guide
Official sources
- Range & Wall Oven - Oven Temperature Is Not CorrectGE Appliances · GE's support article provides general manufacturer troubleshooting concepts; model-specific controls and service procedures may differ.
- Positioning Racks and BakewareWhirlpool · This Whirlpool control guide describes one model family; its spacing, preheat, and rack principles are used without assuming identical rack numbers for another oven.
- How to Evaluate if Temperature Calibration is NeededWhirlpool Product Help · Whirlpool's test is used as a general example of a controlled bake evaluation; the assigned oven's owner manual controls the actual test and adjustment procedure.
- How to Correct Uneven Baking or BrowningWhirlpool Product Help · Whirlpool's official product-help guidance is general cooking-result advice; exact rack positions and calibration controls remain model-specific.
Community feedback
Share a repair observation
Share a plain-text repair observation. Accepted observations are published automatically; this page may take a moment to update.