
On this page
Start here
Quick answer
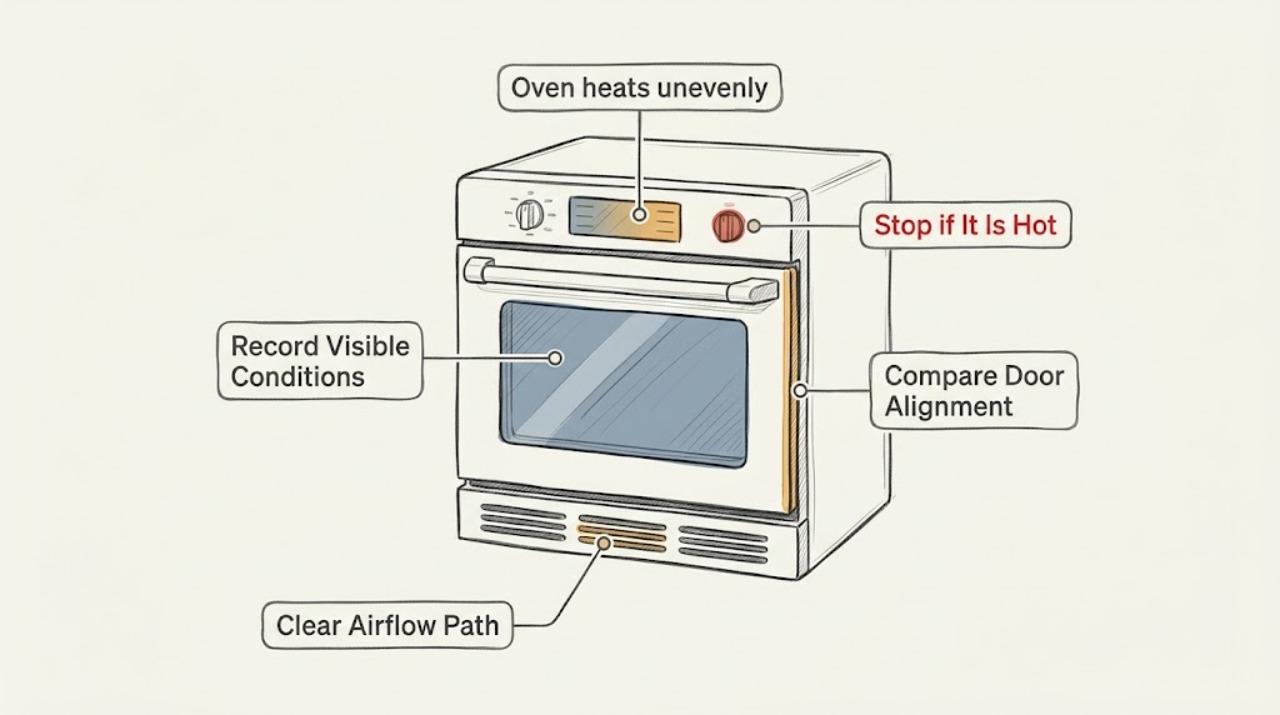
First separate a cooking-setup issue from an oven fault. Use the rack and pan position recommended for the recipe, allow the oven to finish preheating, keep the door closed during the bake, and note whether the same side or level is repeatedly over- or under-browning. When the oven is cool, visually check the door gasket and confirm that racks and the door appear to close normally. Do not remove panels, test live electrical parts, adjust gas components, or replace an element yourself. If the pattern persists after safe setup checks, or there is a gas smell, smoke, arcing, a damaged element, or a door that will not seal, stop using the oven and arrange professional service.
Work through in order
Diagnostic checks
Use only checks that match the exact appliance or system and its official guide.
-
Check 1
Record the repeatable cooking pattern from a normal, supervised bake: which side, rack level, or part of the food browns first, and whether the issue is browning, doneness, or both.
Expected result: Note the recipe, pan type, rack position, preheat completion, door openings, and whether the same pattern appears again; do not continue cooking if there is smoke, a gas odor, or an electrical warning.
Next step: Use the pattern to guide the setup checks and tell the technician exactly where the food differs.
Stop if: Stop the oven and leave it unused for smoke, gas odor, arcing, burning odor, abnormal sparking, or a control that behaves unexpectedly.
Why this matters
Why: A repeatable location-specific pattern is more useful than one uneven batch, while a result that changes with pan or rack setup may be a cooking-method issue rather than a failed oven part.
-
Check 2
With the oven cool, confirm that the appliance appears level, the rack is seated in the intended position, the pan is centered with space around it, and no foil or oversized cookware blocks the oven openings or air path.
Expected result: Compare the result after correcting only the safe placement or preheating setup recommended by the owner manual; do not change multiple variables at once.
Next step: Use the same safe setup once more only if the oven operates normally, then stop experimenting if the uneven pattern remains.
Stop if: Stop if the rack, door, cavity, or appliance is unstable, damaged, excessively hot outside, or difficult to handle safely.
Why this matters
Why: Improvement after a placement or airflow correction points away from an immediate component diagnosis; no improvement keeps a door, sensor, element, convection, or control issue possible.
-
Check 3
After the oven is fully cool, visually inspect the door gasket, door alignment, and visible cavity surfaces without removing the door, gasket, panels, or any fastener.
Expected result: Look for a torn or displaced gasket, a door that does not close evenly, a visible gap, heavy residue, or a damaged rack or cavity surface; do not touch an unknown damaged area.
Next step: Photograph the visible condition and arrange model-specific service for any tear, gap, misalignment, or persistent uneven heating.
Stop if: Stop if glass is cracked, the door is loose, the seal is falling out, the cavity is damaged, or the door cannot close safely.
Why this matters
Why: A compromised seal can allow heat loss and an uneven result, while a normal-looking seal does not rule out an internal heating or control problem.
-
Check 4
During one otherwise normal supervised cycle, observe only through the closed door whether the selected mode starts normally and whether any unusual noise, odor, error message, or visible element damage appears.
Expected result: Note whether the symptom occurs in bake, convection, or more than one mode, and whether a visible element has an obvious crack or break; do not reach inside or continue operation to reproduce a hazard.
Next step: Record the mode and display behavior, then request service for a persistent or mode-specific fault.
Stop if: Stop immediately for gas smell, smoke, arcing, burning odor, repeated fault messages, a cracked element, or unsafe exterior heat.
Why this matters
Why: A mode-specific problem can help a technician narrow the heating system, while a crack, fault code, unusual noise, or odor requires stopping rather than further testing.
-
Check 5
Gather the model number, owner-manual mode and rack guidance, the repeatable browning pattern, photos of any visible damage, and the date the issue began for the service call.
Expected result: Separate confirmed setup observations from guesses about a temperature sensor, fan, bake element, or calibration setting.
Next step: Schedule appliance service if the safe setup and visual checks do not resolve the repeatable issue.
Stop if: Do not open, disassemble, electrically test, gas-adjust, or replace an oven component yourself.
Why this matters
Why: A technician can use the mode, pattern, seal condition, and history to decide whether to test temperature sensing, elements, convection airflow, controls, or the door system.
Use your observations
Decision map
Find the observation that best matches what you see, then follow the next safe action.
-
PATH 01Next step
What you see
Is there gas odor, smoke, arcing, burning odor, a cracked heating element, or a serious control or door fault?
Do this next
Treat any hazard as a service boundary, not as a reason to adjust calibration or replace a part.
-
PATH 02Safety boundary
What you see
Does the uneven result improve after correct preheating, rack position, pan spacing, and a normal closed-door bake?
Do this next
Do not keep changing settings or cooking through a warning sign.
Why this path and its safety boundary
Safety stop: Keep the setup notes and request model-specific service for the persistent pattern.
-
PATH 03Safety boundary
What you see
Is the cool oven door gasket torn, displaced, or unable to make an even visible seal?
Do this next
Do not remove or glue the gasket as a DIY repair.
Why this path and its safety boundary
Safety stop: A normal visible gasket does not clear the heating or control system; continue to the service decision if the pattern persists.
-
PATH 04Next step
What you see
Does the issue occur only in one mode, such as bake or convection, or in every mode?
Do this next
Do not infer a failed sensor, fan, or element from mode behavior alone.
-
PATH 05Safety boundary
What you see
Would the next check require a panel, live wiring, gas component, door removal, or a component replacement?
Do this next
Provide the technician with the model, modes, timing, pattern, and visible observations.
Why this path and its safety boundary
Safety stop: Remain with normal controls, cool visual inspection, and the owner manual's safe use guidance.
Helpful context
Understand the symptom
Uneven browning does not always mean a failed part
Whirlpool notes that preheating, pan material, rack position, appliance level, and door openings can change browning. GE also explains that heating elements cycle on and off to maintain an average temperature, so a single observation of a glowing or dark element is not a complete diagnosis. Look for a repeatable pattern before treating the oven as defective.
Keep the check limited to normal use and cool visual inspection
The oven should be cool before you move a rack or look at the gasket. Do not remove the oven door, expose wiring, open a control or rear panel, use a meter, adjust a gas valve, or attempt to replace a heating component. A technician can test the sensor, elements, convection system, controls, and door seal safely for the specific model.
Only after diagnosis
Potential parts
- oven temperature sensor
Only relevant if a technician's model-specific testing confirms a sensor or sensing-circuit fault rather than a setup, seal, element, or control issue.
Confirm the exact model and manufacturer fit information; do not use a generic sensor or infer compatibility from appearance. - oven convection fan motor
Only relevant when the oven has a convection mode and a technician confirms that the fan motor or its circuit is causing the uneven result.
Verify model-specific fit and the complete fan assembly requirements with a professional before ordering. - oven bake element
Only relevant if a qualified technician confirms a failed bake element or related circuit after safe power isolation and testing.
Confirm exact model, element shape, rating, and installation requirements; do not remove or replace an element as a homeowner check.
When checks do not resolve it
Need a professional?
Have this ready
- Share the model number, cooking mode, rack and pan setup, recipe and timing, repeatable hot or cool location, preheat and door-opening history, visible seal condition, and any warning observed.
Common questions
FAQ
Why does one side of my oven brown food faster?
Start with safe variables: full preheating, rack position, pan material and spacing, appliance level, and keeping the door closed. If the same side remains different after those checks, record the pattern and arrange service.
Can I replace the oven temperature sensor or bake element myself?
Not under this user-observation scope. Do not open panels, isolate live wiring, remove an element, or change a gas or electrical component. A technician should confirm the failed part and model compatibility.
Is an oven thermometer enough to prove uneven heating?
Not by itself. Temperature cycles and thermometer placement can affect a reading, and a single cavity reading does not explain uneven browning. Use repeatable cooking observations and the owner manual, then seek service if the pattern persists.
When should I stop using the oven?
Stop for gas odor, smoke, arcing, burning odor, a cracked element, a damaged or unsafe door, repeated fault messages, or abnormal exterior heat. Keep clear and arrange qualified service.
Read the exact guide
Official sources
- Range & Wall Oven - Oven Temperature Is Not CorrectGE Appliances · General GE range and wall-oven support guidance; exact features and safe procedures depend on model.
- How to Correct Uneven Baking or BrowningWhirlpool Product Help · General manufacturer guidance for Whirlpool-family wall ovens and ranges; model instructions may differ.
- Range & Wall Oven - Oven Cooking Too Slow or Too FastGE Appliances · Supports recording repeatable results and using the owner manual for any model-specific calibration; this article does not direct the reader to calibrate or disassemble the oven.
Community feedback
Share a repair observation
Share a plain-text repair observation. Accepted observations are published automatically; this page may take a moment to update.