
On this page
Start here
Quick answer
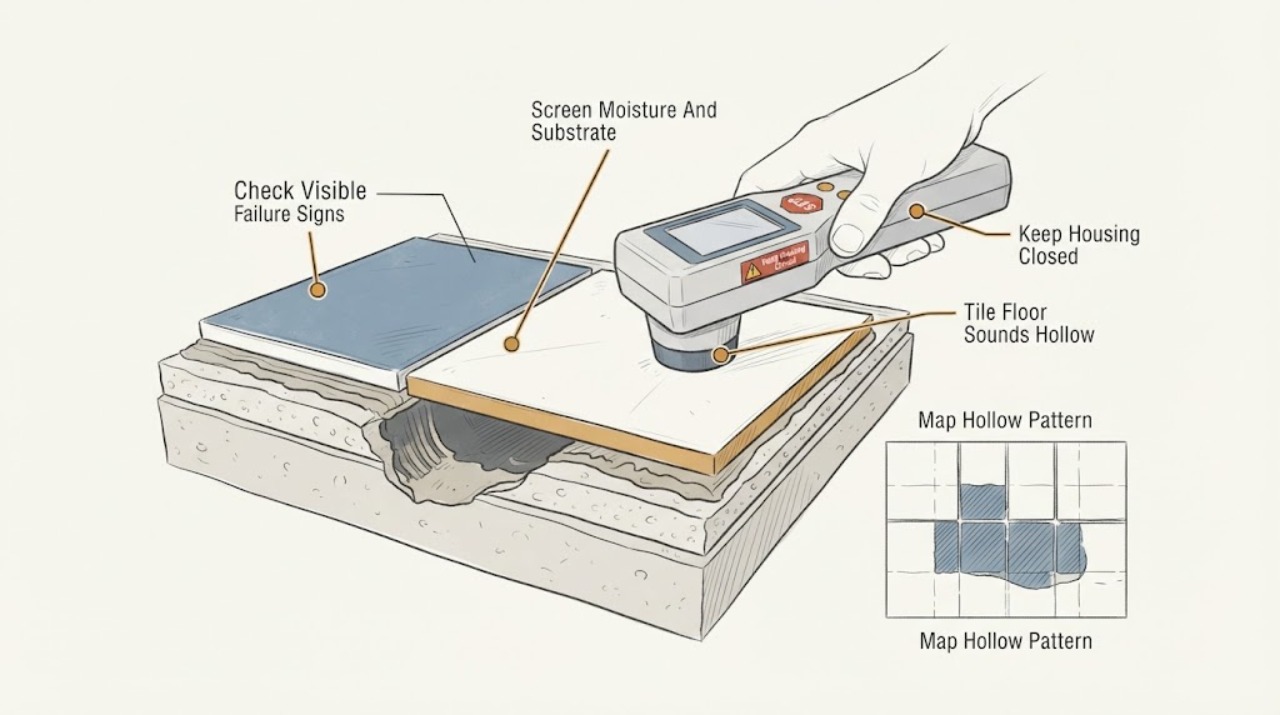
A hollow sound when a tile floor is tapped does not by itself prove that the tile is loose, debonded, or about to fail. An acoustic void can occur in a bonded assembly, while poor thin-set coverage, substrate movement or deflection, contamination, moisture damage, movement-joint problems, or a bond failure can also produce a hollow area. Map the hollow spots, then look for movement, cracked or separated grout, lippage, tenting, cracked tiles, moisture, or a spreading pattern from a safe standing position. Do not pry up tiles, drill or inject resin, grind mortar, or start demolition as a test; have a qualified tile or flooring professional inspect the assembly, especially when tiles move, crack, tent, or sit over a flexible or damaged substrate.
Before you begin
Safety first
- This article covers non-destructive observation only. A qualified professional controls tile removal, dust and silica exposure, moisture or mold work, substrate correction, and any repair or replacement decision.
Work through in order
Diagnostic checks
Use only checks that match the exact appliance or system and its official guide.
-
Check 1
From a normal standing position, gently compare the sound of the suspected tile with nearby tiles using the same light, non-damaging tap; mark the location and do not use a hammer, drill, probe, or pry tool.
Expected result: The sound is isolated to a small interior area, follows an edge or corner, forms a broad band, repeats across many tiles, or cannot be distinguished without striking harder or reaching an unsafe area.
Next step: Mark the tiles on a sketch or with removable low-residue markers, photograph the pattern, and compare it with grout lines, room edges, thresholds, wet areas, and transitions before arranging flooring inspection.
Stop if: Stop if mapping requires moving heavy furniture, stepping onto an unstable or wet area, striking harder to force a result, or disturbing grout, tile edges, or adjacent finishes.
Why this matters
Why: An isolated sound difference is a map for further assessment, not proof of a void or debonding. A broad or repeating pattern can shift the inspection toward installation, substrate, movement, or moisture conditions rather than one failed tile.
-
Check 2
Inspect the marked tile and its grout perimeter visually from the floor without lifting, rocking, removing, or loading the tile to make it move.
Expected result: Record stable grout and tile, cracked or separated grout, a crack through the tile, a raised edge, tenting, lippage, chipped corners, visible movement under ordinary foot traffic, or no visible change.
Next step: Photograph the sign and its relationship to the tile edges and grout, limit traffic over a moving or tented area, and request an on-site flooring assessment.
Stop if: Do not wedge, pry, press a loose edge, remove grout, or stand on a tile that is lifting, shifting, cracked through, or surrounded by unstable material.
Why this matters
Why: Movement, tenting, cracked tile, or opening grout makes the sound more consequential and can indicate loss of support or movement in the assembly. A stable, intact tile may still have an acoustic void, but the sound alone does not establish that it is unsafe.
-
Check 3
From safe accessible areas, record whether the hollow pattern is near a bathroom, kitchen, exterior door, plumbing route, damp crawlspace, prior leak, or wood subfloor, and observe only visible moisture or substrate movement without opening the floor.
Expected result: Note dry and stable surroundings, active or historic water, staining, swollen trim, musty odor, cracked substrate or grout, seasonal change, flex under ordinary use, or no environmental clue.
Next step: Give the professional the moisture history, room location, subfloor information if known, and photos. Arrange prompt assessment when moisture, flex, settlement, or spreading cracks are present.
Stop if: Stop for active water, sewage, mold disturbance, a soft or collapsing floor, exposed wiring, or any need to cut, lift, drill, or enter a concealed cavity.
Why this matters
Why: Moisture deterioration, substrate movement, deflection, or settlement can affect both bond and tile stability; a dry surface today does not prove that an earlier leak or concealed layer is sound. A pattern over a stable concrete assembly may need a different assessment from one over a moving or moisture-affected floor.
-
Check 4
Collect non-destructive installation context: tile size and material, approximate installation date, room and exposure, substrate or underlayment if documented, recent traffic or remodeling, and whether the hollow pattern appeared immediately or developed later.
Expected result: The tiles are large-format or porcelain, the installation is recent, the area is exterior or wet, the substrate is wood or otherwise flexible, the pattern followed a remodel or leak, or the history is unknown.
Next step: Provide the context and any installer or product documentation to the flooring professional, who can compare the installed assembly with the applicable manufacturer instructions and project conditions.
Stop if: Do not assume a tile size, substrate, mortar brand, or installation date proves deficient coverage, and do not remove a tile solely to obtain a coverage sample.
Why this matters
Why: The context changes which causes a professional should investigate. LATICRETE associates hollow or loose tile with substrate deflection or movement, inadequate mortar contact, contamination, residue, and movement-joint conditions; context cannot prove which one occurred after installation.
-
Check 5
Compare the marked area with adjacent rooms, movement joints, thresholds, walls, sunny or wet exposures, and any recent change, without pushing the tile or altering the joints.
Expected result: The hollow sound is isolated and stable, or it is accompanied by expanding grout cracks, tiles pressing against one another or walls, raised edges, tenting, or a pattern that is spreading.
Next step: Keep people and heavy loads away from raised or moving areas, photograph the progression with dates, and request prompt flooring inspection; use urgent service when the walking surface is unstable or a route is blocked.
Stop if: Do not force tiles flat, cut joints, remove baseboards, drill relief holes, or walk over a tented or unstable area to test it.
Why this matters
Why: An isolated stable sound is not the same decision as active tenting or spreading movement. A growing or compressed pattern raises the urgency because movement accommodation, substrate change, moisture, or bond loss may be affecting more than one tile.
-
Check 6
Use the mapped sound, visible condition, moisture and substrate history, installation context, and spreading pattern to decide whether the issue needs monitoring with documentation or a qualified flooring inspection.
Expected result: Choose professional assessment for movement, cracks, tenting, moisture, broad or worsening hollow areas, suspected wood deflection, a disputed new installation, or uncertainty that cannot be resolved safely; monitoring may be reasonable only for a small, stable, intact, dry area with no progression and no route consequence.
Next step: Send the professional the marked plan, photos, sound map, timeline, room and substrate context, and any prior leak or repair information; ask them to identify the cause before recommending removal, re-bonding, replacement, or substrate work.
Stop if: Do not inject epoxy, chisel tiles, grind mortar, demolish the floor, or order replacement material based only on the hollow sound.
Why this matters
Why: The decision is about risk and scope, not a claim that every hollow sound requires replacement. An inspection may find a sound bonded assembly, a localized coverage void, a bond-plane failure, substrate movement, or a moisture or movement-joint cause.
Use your observations
Decision map
Find the observation that best matches what you see, then follow the next safe action.
-
PATH 01Next step
What you see
A small area sounds different but the tile and grout are intact, dry, stable under ordinary use, and not changing.
Do this next
Document the location and monitor for movement, cracks, moisture, or spreading; obtain a professional opinion when the installation is new, disputed, or route-critical.
Why this path and its safety boundary
Why it matters: The sound may be acoustic behavior of the assembly and does not by itself prove a debonded tile or imminent failure.
-
PATH 02Next step
What you see
The hollow pattern is broad or localized with movement, cracked grout, cracked tile, lippage, or evidence suggesting incomplete mortar contact or bond separation.
Do this next
Arrange qualified tile inspection and ask for a cause-and-scope assessment before selecting localized removal, replacement, or any approved repair method.
Why this path and its safety boundary
Why it matters: A coverage or bond problem is possible, but the sound cannot identify whether separation is at the tile, mortar, substrate, or another layer.
-
PATH 03Next step
What you see
The area is associated with moisture, a prior leak, wood-subfloor flex, settlement, substrate cracking, seasonal change, or a spreading pattern.
Do this next
Request flooring and, when indicated, moisture or structural assessment. Keep the area dry and limit traffic over unstable or tented tiles.
Why this path and its safety boundary
Why it matters: The supporting assembly or environment may be driving the symptom; replacing a tile without correcting the underlying condition may not last.
-
PATH 04Next step
What you see
The floor is soft, collapsing, actively wet, contaminated, tented, a walking route is blocked, or useful inspection would require demolition or concealed access.
Do this next
Keep people and pets away, stop the source of water only from a safe known control when appropriate, and request prompt qualified flooring or related professional help.
Why this path and its safety boundary
Why it matters: Further homeowner testing can increase injury, water, dust, or structural risk and cannot establish the repair scope.
Helpful context
Understand the symptom
Hollow is an acoustic clue, not a failure verdict
The Tile Council of North America explains that tile can sound hollow even when it remains well bonded, depending on the tile assembly and supporting layers. The same sound can also occur with incomplete mortar contact or a bond that has separated from the tile or substrate. A sound comparison is useful for mapping an area, but it cannot determine the bond plane or prove that replacement is necessary.
Look for movement and pattern changes
A hollow-sounding tile deserves more attention when it also moves under ordinary use, has cracked or opening grout, a raised edge, tenting, cracked tile, lippage, or a growing pattern across a room. Substrate deflection, settlement, moisture deterioration, contamination, poor coverage, and missing movement accommodation are different possible paths. Only an on-site inspection can determine which layer is involved.
Do not convert a sound check into demolition
Prying, drilling, grinding, chiseling, or injecting material can turn a question about an installed assembly into damage and can create dust or disturb unknown moisture and substrate conditions. TCNA notes that injection may be unsuitable over larger areas and that a repair which leaves the cause unresolved may not last. A flooring professional can select a localized inspection or removal method and control dust and waste when it is actually justified.
Safety boundary
Stop conditions
- Do not pry, lift, drill, chisel, grind, cut, or remove tiles or grout to prove a hollow spot, and do not inject epoxy or resin as an improvised repair.
- Do not assume a hollow sound proves debonding, deficient coverage, or imminent failure; do not order replacement tile or mortar from sound alone.
- Keep away from soft, tented, cracked-through, moving, wet, contaminated, or collapsing flooring and from exposed wiring or concealed cavities.
- Use qualified professionals for demolition, silica-generating work, moisture damage, substrate or structural correction, and any inspection requiring removal or unsafe access.
Only after diagnosis
Potential parts
- replacement floor tile
Consider only after inspection confirms that removal and replacement are necessary and the tile, lot, substrate, and installation system can be matched.
Match exact dimensions, material, thickness, finish, color, lot, substrate, movement conditions, and current manufacturer instructions; a hollow sound alone does not justify ordering tile. - tile-setting mortar system
Consider only after a flooring professional identifies the substrate, moisture, tile type, bond condition, and approved repair method.
Use the selected manufacturer system and substrate requirements; do not infer mortar compatibility or coverage from a generic product label.
When checks do not resolve it
Need a professional?
Arrange a qualified flooring or tile professional when a hollow area is new, broad, spreading, disputed, or accompanied by movement, cracked grout, cracked tile, lippage, tenting, moisture, substrate flex, or settlement. Request prompt service for an unstable walking surface, active water, a blocked route, or a soft or collapsing floor. Provide the sound map, photographs, timeline, installation context, moisture history, and safe observations.
Safety scope: This article covers non-destructive observation only. A qualified professional controls tile removal, dust and silica exposure, moisture or mold work, substrate correction, and any repair or replacement decision.
Common questions
FAQ
Does a hollow sound mean my tile is loose?
No. A tile can sound hollow while remaining bonded, and a hollow sound can also accompany incomplete coverage or bond loss. Look for movement, cracked grout, cracked tile, lippage, tenting, moisture, substrate movement, or a spreading pattern.
Can I tap every tile harder to find the void?
Use only a gentle, repeatable, non-damaging comparison from a safe standing position. Do not strike harder, chip, drill, probe, or pry; map the sound and have a flooring professional assess the assembly when other signs are present.
Should I inject epoxy under a hollow tile?
Do not inject resin as a homeowner test or improvised repair. It may not be practical over larger areas and can leave the cause unresolved. A qualified professional must select any repair method after identifying the bond and substrate condition.
What evidence suggests a hollow tile needs prompt attention?
Movement, cracked or opening grout, cracked tile, raised edges, tenting, a soft floor, active moisture, a growing pattern, or a blocked or unsafe walking route raises the urgency. Keep people away from unstable areas and arrange qualified service.
Can I remove one tile to check thin-set coverage?
Do not remove a tile just to obtain a coverage sample. Removal can damage the assembly and may create dust or expose moisture and substrate issues. If an inspection opening is justified, a qualified flooring professional should plan and control it.
Read the exact guide
Official sources
- Hollow/Loose TileTile Council of North America · Industry standards-body FAQ used to distinguish an acoustic hollow sound from proven debonding and to describe possible substrate, movement, moisture, contamination, coverage, and repair-scope causes. It does not diagnose this floor without an on-site inspection.
- Thin-Set Troubleshooting Guide for Exterior Glue Plywood Substrates (TDS 210)LATICRETE · Manufacturer technical guidance used for substrate deflection and movement, mortar coverage, contamination, tile-back residue, and movement-joint investigation. It is not a universal repair specification for every floor assembly.
Community feedback
Share a repair observation
Share a plain-text repair observation. Accepted observations are published automatically; this page may take a moment to update.