
On this page
Start here
Quick answer
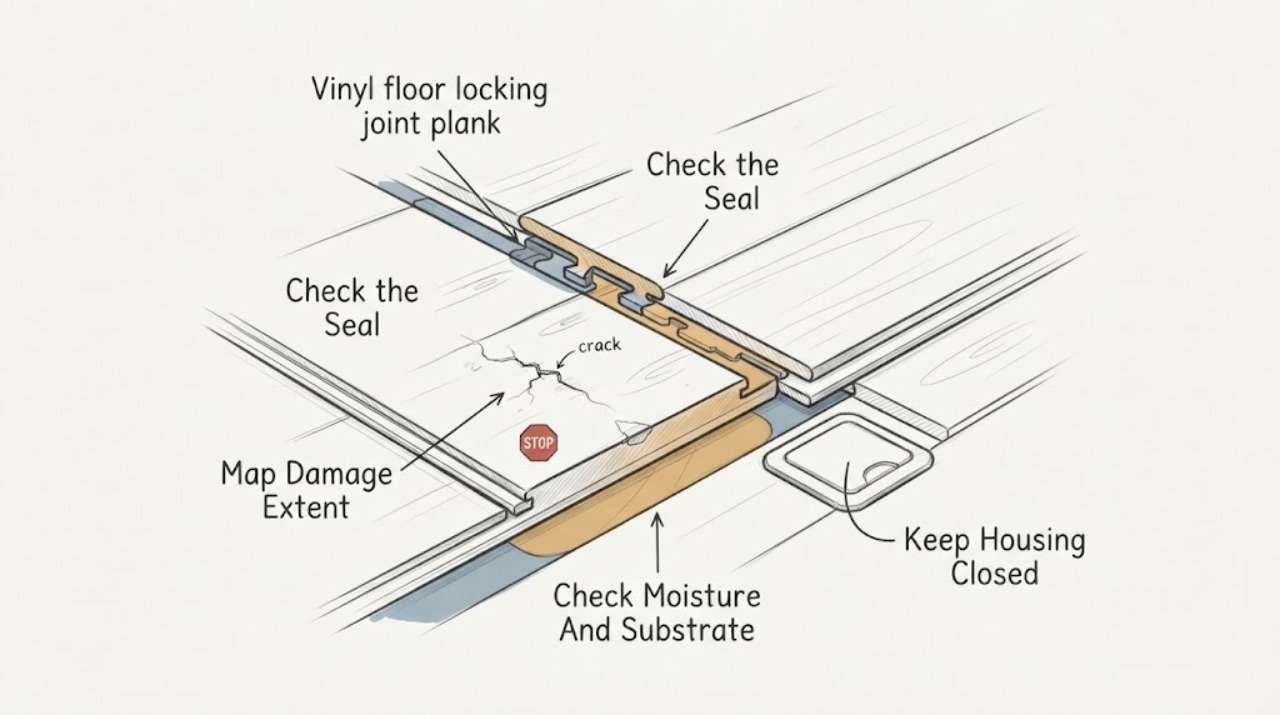
First determine whether the damage is only a surface scratch or chip, or whether the vinyl plank's locking joint has opened, lifted, or lost its interlock. From a standing position, document the gap and raised lip, count whether one plank or a row is affected, and look for nearby moisture, a wavy or uneven floor, tight perimeter edges, or a raised trip edge. Do not pry, tap, cut, heat, glue, or pull apart the floor. A single cosmetic mark may need only manufacturer-approved care, while a damaged locking joint generally needs a compatible plank replacement assessment. Water damage, multiple separating planks, broad lifting, a soft or uneven substrate, or a trip hazard should be handled by a flooring professional.
Work through in order
Diagnostic checks
Use only checks that match the exact appliance or system and its official guide.
-
Check 1
From a stable standing position, inspect the damaged plank's long and end joints without lifting or prying. Look for an open seam, chipped locking lip, lifted edge, crushed corner, height difference, or a surface-only scratch that leaves the joint flat and closed.
Expected result: The seam is closed with only a cosmetic mark, a narrow gap is visible, the edge is raised or chipped, or the planks sit at different heights.
Next step: Photograph the joint with a ruler or familiar object for scale, keep the floor undisturbed, and follow the exact product care or warranty route before considering a replacement plank.
Stop if: Stop if the edge is sharp, the plank moves under normal foot pressure, the joint is spreading, or investigating it would require prying, tapping, cutting, or removing flooring.
Why this matters
Why: A flat closed seam favors a surface-finish concern; an open, chipped, or raised edge indicates possible locking-joint damage or movement. The appearance alone cannot show whether the adjacent plank or substrate is also affected.
-
Check 2
Walk around the room without dragging furniture and note whether the condition is limited to one plank, repeats at several end joints, follows a straight row, or forms a wider field of gaps or raised edges. Photograph the room pattern before moving anything heavy.
Expected result: One plank is affected, several neighboring planks are affected, gaps repeat along a row or wall, or broad lifting and buckling are visible.
Next step: Record the count, direction, and room locations and request a flooring inspection before disturbing the interlocks or moving heavy furnishings.
Stop if: Stop use of the area if a raised edge creates a trip hazard, the floor feels unstable, or multiple planks are lifting. Do not dismantle a row as a test.
Why this matters
Why: A single isolated plank can be a localized impact or joint failure; repeated or row-wide movement raises the possibility of substrate, perimeter, moisture, temperature, or installation-related movement. A broad pattern should not be treated as a one-plank cosmetic repair.
-
Check 3
Look for non-destructive signs around the damaged joint: recent spill or leak, dampness, staining, soft trim, condensation, a wavy appearance, or visible unevenness at a doorway or transition. Do not lift a plank, drill for a moisture sample, or open the subfloor.
Expected result: The area is dry and flat, moisture or staining is present, the surface waves or dips, or the substrate condition cannot be seen without removal.
Next step: Stop water exposure if it can be done safely without opening plumbing or moving an appliance, document the source and timing, and arrange a flooring or water-damage assessment.
Stop if: Stop if water is active, the floor is soft, mold is visible, electrical equipment is wet, or investigation would require demolition or concealed-wall work.
Why this matters
Why: A dry flat area supports a localized joint or surface assessment; moisture or unevenness may be contributing to the damage and can cause a replacement to fail again. Concealed substrate condition remains unknown from a surface view.
-
Check 4
From the room perimeter, observe whether the affected floor appears tight against a wall, cabinet, fixed threshold, or transition, and whether a heavy fixed object or recently installed trim overlaps the floating floor. Do not remove baseboards or trim and do not insert tools into the perimeter.
Expected result: There is visible perimeter clearance, the edge looks pinched or covered, a transition is pressing on the plank, or the cause cannot be seen without moving trim.
Next step: Photograph the perimeter and provide the floor product identity, room history, and any recent trim or cabinet work to a flooring professional.
Stop if: Stop if the perimeter is concealed, trim is loose, the floor is lifting against a fixed object, or checking it would require prying, cutting, or removing installed materials.
Why this matters
Why: A floating floor needs product-specific room to move; a pinched perimeter or fixed obstruction can concentrate movement at locking joints. This is a possible contributor, not a conclusion that the installation is defective.
-
Check 5
Check the raised edge from the side without stepping on it and record when the damage began, any impact or furniture move, seasonal temperature or humidity change, cleaning or spill event, and whether the gap is growing. Keep the area marked off if it catches a foot or rolling item.
Expected result: The edge is not raised, a small lip catches feet, the gap changes with weather, or the condition is progressing regardless of weather or use.
Next step: Use photos and dates to show the progression and ask for a compatible repair or plank-replacement plan. Do not flatten, glue, heat, or clamp the joint.
Stop if: Stop walking over the area for a raised, sharp, loose, or rapidly worsening edge; isolate it and arrange professional service.
Why this matters
Why: A stable surface mark is different from a progressing or hazardous joint separation. Weather-linked change can involve material movement; progression or a trip edge warrants prompt inspection even when no moisture is visible.
Use your observations
Decision map
Find the observation that best matches what you see, then follow the next safe action.
-
PATH 01Safety boundary
What you see
The plank is flat, the locking seam is closed, and the visible issue is limited to a shallow scratch or cosmetic chip.
Do this next
A surface-care decision may be appropriate, but the correct treatment depends on the product's wear layer and manufacturer guidance.
Why this path and its safety boundary
Safety stop: Stop if the mark reaches the joint, the edge lifts, or the plank becomes unstable.
-
PATH 02Safety boundary
What you see
The locking lip is chipped, the seam is open, or the plank is raised or at a different height.
Do this next
The interlock may be damaged and a compatible plank replacement or localized flooring repair may be needed.
Why this path and its safety boundary
Safety stop: Stop use if the edge is sharp, loose, spreading, or a trip hazard.
-
PATH 03Safety boundary
What you see
Several planks separate, the pattern follows a row or wall, the floor waves, or the substrate appears uneven or soft.
Do this next
A broader moisture, movement, perimeter, or substrate issue may be present and a single plank replacement may not last.
Why this path and its safety boundary
Safety stop: Do not dismantle the floor, remove trim, or conceal a damp or soft area with adhesive or a new plank.
-
PATH 04Safety boundary
What you see
There is an active leak, staining, dampness, soft flooring, visible mold, or wet electrical equipment nearby.
Do this next
Water and safety control take priority over joint repair.
Why this path and its safety boundary
Safety stop: Do not open walls, lift flooring, disturb mold, or enter standing water to investigate.
-
PATH 05Safety boundary
What you see
A raised lip catches feet, the joint is sharp or loose, or the gap is visibly progressing.
Do this next
The area is a use hazard and should not be tested by repeated walking or furniture movement.
Why this path and its safety boundary
Safety stop: Do not press the plank flat, heat it, glue it, clamp it, or use a tool to force the lock.
Helpful context
Understand the symptom
Locking vinyl floors float over a substrate and use interlocking edges rather than relying on a visible seam alone. A chip in the wear surface is a different decision from a broken tongue-and-groove or locking edge. Gaps can also reflect moisture, movement, expansion restraint, heavy-object loading, or an uneven substrate, so replacing one plank without checking the surrounding conditions may not address the cause.
Keep the area dry and mark or photograph the condition from above. If a plank edge is sharp or raised, keep people and pets away until it is protected or professionally assessed; do not press it flat or use adhesive as a quick fix.
Only after diagnosis
Potential parts
- vinyl-floor repair kit
Consider this category only for a confirmed surface-only defect that the product maker permits treating without compromising the locking edge.
Match the floor collection, wear layer, color, and manufacturer care instructions; do not use filler to hide an open or damaged locking joint. - flooring transition
Consider this category only when a flooring professional confirms that a transition is required at the actual opening and is not being used to conceal a moving or damaged field.
Confirm floor height, profile, material, doorway geometry, movement requirements, and the product system before selection; it must not pinch a floating floor.
When checks do not resolve it
Need a professional?
Arrange flooring service for an open or chipped locking joint, a raised or uneven plank, multiple separating planks, moisture or soft substrate, a trip edge, broad lifting, or damage that persists after safe observation. Escalate water-damage or electrical safety concerns before attempting floor repair.
Have this ready
- Provide the floor brand and collection if known, photos of the joint and room pattern, the number and locations of affected planks, moisture or spill history, perimeter and transition observations, progression dates, and any trip hazard.
Common questions
FAQ
Does a chipped vinyl plank edge always mean the whole floor must be replaced?
No. A surface-only chip may be a localized care issue, while a damaged locking lip or spreading seam may need one or more compatible plank replacements. The surrounding floor, substrate, moisture, and perimeter conditions should be checked before deciding.
Can I glue a vinyl locking joint that has opened?
Do not glue or force an open interlock as a quick fix. Adhesive can prevent the floating system from moving as designed and conceal moisture or substrate problems. Have the product and damage assessed first.
Why are several vinyl planks separating in one row?
A row pattern can involve joint damage, movement, a tight perimeter or transition, moisture, heavy-object restraint, or an uneven substrate. It is not proof that every plank is defective, so map the pattern and request a flooring inspection.
When is a damaged vinyl joint unsafe to walk over?
Keep traffic away when an edge is raised, sharp, loose, spreading, soft, or catches a foot. Mark or isolate the area without pressing it flat, then arrange flooring service; active water or wet electrical equipment needs immediate safety attention.
Read the exact guide
Official sources
- Vinyl Flooring InstallationShaw Floors · Supports checking visible defects, subfloor condition, perimeter expansion, and product-specific instructions before a repair or replacement; no installation manual is provided.
- Installation Config PageArmstrong Flooring · Supports describing locking planks as a floating system and treating expansion space and product-specific installation method as compatibility conditions; no installation procedure is reproduced here.
- Flooring GlossaryArmstrong Flooring · Supports the article's distinction between interlocking floating planks, the substrate beneath them, and transition pieces; product-specific geometry remains unassigned.
Community feedback
Share a repair observation
Share a plain-text repair observation. Accepted observations are published automatically; this page may take a moment to update.