
On this page
Start here
Quick answer
A damaged strut or garage-door panel on a C.H.I. door can change how the section carries its weight and how the opener pulls it, but a bent panel, hinge, track, roller, spring, or cable can look similar. Stop cycling the door if the strut is bent, detached, loose, or visibly twisted, or if the panel is cracked, sharply dented, sagging, or pulling away from its hinges. From a safe position with the door closed, document the strut, panel, hinges, tracks, cables, springs, and opener attachment without touching tensioned parts. Do not straighten the strut, add a brace, loosen hardware, remove a panel, or adjust springs or cables. C.H.I. specifies strutting according to door size and design and directs significant structural, track, spring, and cable work to trained professionals, so provide the exact model and photos to a qualified C.H.I. dealer or garage-door technician.
Before you begin
Safety first
- This article covers stopping operation, observing and photographing the closed door from outside its travel path, identifying visible damage, recording the model, and checking only obvious sensor obstructions according to the opener manual. Do not lift a damaged door, remove or adjust struts, panels, hinges, tracks, springs, cables, or opener brackets, or increase force.
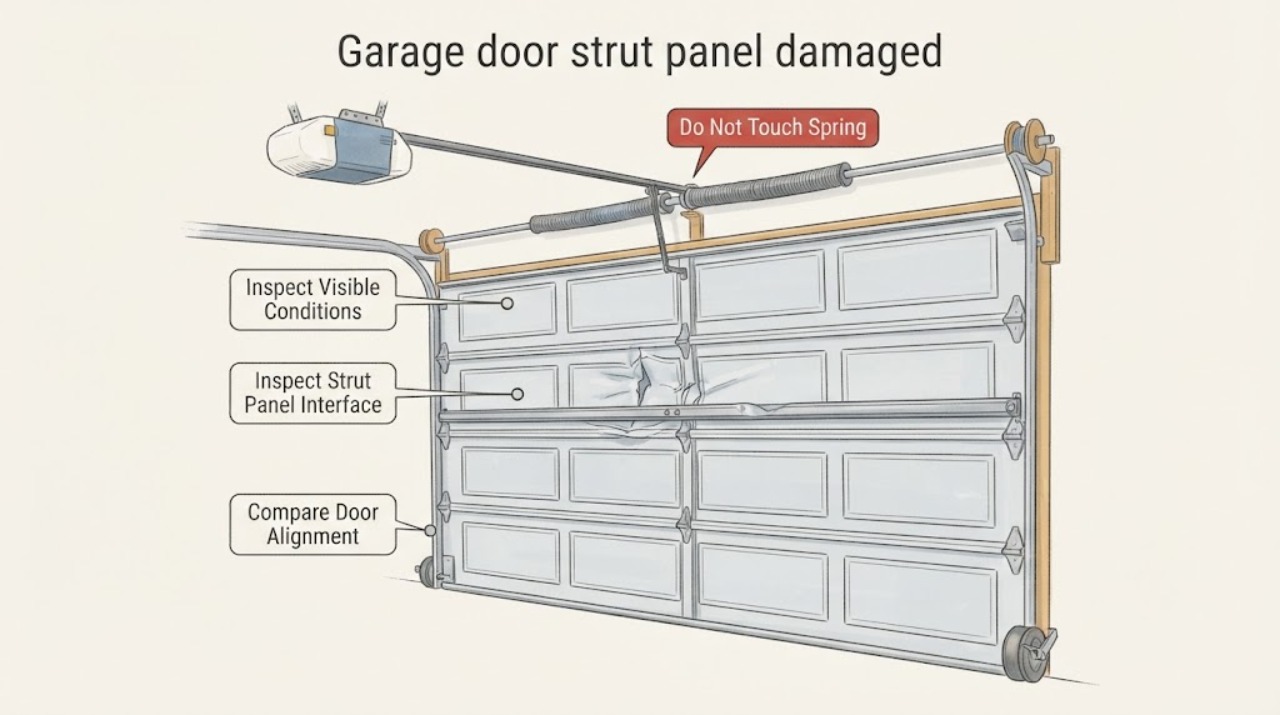
Work through in order
Diagnostic checks
Use only checks that match the exact appliance or system and its official guide.
-
Check 1
Stop the opener and keep people and vehicles outside the door's travel path; from a safe position, observe the C.H.I. door with the door closed and note whether the panel is dented, cracked, bowed, sagging, or separated from the strut or hinges.
Expected result: Record the affected section, side, shape of the damage, sharp edges, panel movement, and whether the door remains level and stable while closed.
Next step: Keep the door out of operation for any structural-looking damage and use the matching branch below; arrange a technician rather than making another test cycle.
Stop if: Do not stand under the door, push the panel, pull the strut, or place fingers between sections or near hinges.
Why this matters
Why: A shallow finish dent with an intact section may be different from a crease, crack, bowed panel, detached strut, or sagging section that changes the door's load path. The latter should be treated as a structural fault.
-
Check 2
With the door closed, visually follow the damaged strut across the section and compare its ends, fasteners, hinges, panel surface, and any opener reinforcement with an undamaged section; do not touch or loosen anything.
Expected result: Look for a strut that is bowed, twisted, detached, split, pulled away from the panel, or missing hardware, and for panel cracks or a changed gap at the section joint.
Next step: Photograph the full strut and both ends, record the section position, and have a trained C.H.I. dealer or garage-door technician assess the reinforcement and panel together.
Stop if: Do not straighten, drill, add a brace, tape, weld, glue, or remove a strut, hinge, panel fastener, or opener bracket.
Why this matters
Why: A strut that no longer lies as designed can leave the panel unsupported or shift the force into hinges and the opener attachment. C.H.I. specifies strutting by door size and design, so a visual mismatch does not identify a safe replacement or repair.
-
Check 3
From outside the path, compare the damaged panel's edges with the jamb, the door's bottom edge, and both visible tracks; look for a roller outside the rail, a warped track, a shifted hinge, or a side gap that begins at the damaged section.
Expected result: Record whether the door is crooked while closed, whether one side sits higher, whether a roller or hinge is out of line, and whether the track or panel rubs.
Next step: Leave the door stationary and arrange complete door-system diagnosis when any track, roller, hinge, or mounting damage is visible; clear only loose objects from the floor without approaching the hardware.
Stop if: Do not push the door back into alignment, pry a roller into the track, loosen track hardware, or operate an off-track door.
Why this matters
Why: An alignment change can be caused by the damaged strut or panel, but a roller, hinge, track, or loose mounting condition can also create the same visible gap. A door that is crooked or off-track is not a strut-only repair.
-
Check 4
Without touching the damaged section or counterbalance hardware, visually check for a broken or stretched spring, frayed or off-drum cable, loose bottom fixture, or a door that has become unusually heavy, low, or unstable.
Expected result: Record any spring gap or break, cable strands or displacement, one-sided sag, sudden weight change, or damage near a bottom corner or drum.
Next step: Keep the area clear, do not operate the door, and request prompt trained service for any spring, cable, bottom-fixture, weight, or stability symptom.
Stop if: Do not wind, stretch, clamp, cut, remove, or adjust springs, cables, drums, bottom fixtures, or other tensioned hardware.
Why this matters
Why: A counterbalance or cable failure can overload a strut or panel and can cause the door to fall; replacing the visible strut without correcting that system fault would be unsafe.
-
Check 5
If the panel and strut look intact and the door remains level, observe from a safe position whether the opener reverses because of a photo-eye obstruction or whether the door physically binds at the damaged section; do not change force or limit settings.
Expected result: Record a clean, aligned door with repeatable opener reversal versus a door that rubs, tilts, stops, or changes shape before the opener reverses.
Next step: Remove only an obvious obstruction from the sensor beam path and follow the opener manual; arrange service if reversal remains or any physical panel, strut, track, or hinge symptom appears.
Stop if: Do not defeat photo eyes, increase opener force, adjust limits blindly, or use the opener to pull a bent panel straight.
Why this matters
Why: A straight door with a sensor-path issue may have an opener safety problem rather than panel damage. A physical bind, tilt, or changed panel gap keeps the door-system and structural diagnosis primary.
-
Check 6
Record the complete C.H.I. model or owner documentation, section position, strut location, panel and hardware photos, and all symptoms; after a technician's repair, watch one supervised operation from outside the travel path and confirm the door remains level and the opener safety features work as instructed.
Expected result: Check for a straight panel, secure-looking strut and hinges, even section gaps, smooth travel, no rubbing or sagging, and a normal opener reversal response under the exact manual procedure.
Next step: Stop using the door for any returning structural or safety symptom and give the technician the before-and-after observations and any part category repaired.
Stop if: Do not continue cycling a door with a loose-looking strut, shifted panel, off-track roller, cable or spring warning, or failed reversal test.
Why this matters
Why: A repaired-looking panel does not prove that reinforcement, track alignment, balance, and opener attachment are correct. A returning bow, gap, rub, or safety-test failure means the system remains unsafe or incomplete.
Use your observations
Decision map
Find the observation that best matches what you see, then follow the next safe action.
-
PATH 01Safety boundary
What you see
The C.H.I. strut is visibly bowed, twisted, detached, missing hardware, or pulled away from a damaged panel or hinge.
Do this next
Keep the door closed and unused, keep the area clear, and arrange trained C.H.I. dealer or garage-door technician service for the exact door design.
Why this path and its safety boundary
Why it matters: The section's reinforcement or load path is compromised, and the panel, hinges, opener attachment, and counterbalance may no longer share force as designed.
Safety stop: Do not straighten, remove, brace, drill, weld, or retighten the strut or its fasteners.
-
PATH 02Safety boundary
What you see
The panel has a crease, crack, sharp edge, bowed section, or sagging gap while the strut appears visually attached.
Do this next
Stop operation, photograph the panel and section joints, and have a technician determine whether the panel, strut, hinge, or larger section needs repair or replacement.
Why this path and its safety boundary
Why it matters: A panel can be structurally compromised even when its strut is still in place; the damage may affect section joints, hinges, rollers, weather seal, and opener load.
Safety stop: Do not push the panel flat, clamp the crease, seal the crack, or operate the door to see whether the damage settles.
-
PATH 03Safety boundary
What you see
Damage is concentrated at the top section, the strut near the opener attachment, or the area where the opener pulls the door.
Do this next
Leave the opener disengaged from use only as the exact manual permits and request trained inspection of the top section, strut arrangement, opener bracket, and door balance.
Why this path and its safety boundary
Why it matters: The opener attachment and top-section reinforcement may be transferring force into damaged metal or a weakened panel; a force-setting change could increase the hazard.
Safety stop: Do not move the opener bracket, add reinforcement, increase force, or attach a pull cord or improvised brace.
-
PATH 04Safety boundary
What you see
A spring is broken, a cable is frayed or off the drum, a bottom fixture is damaged, or the door is suddenly heavy, unstable, or one-sided.
Do this next
Keep everyone and vehicles clear, do not operate the door, and arrange prompt trained garage-door service.
Why this path and its safety boundary
Why it matters: The counterbalance system may be failing and can overload the panel and strut or allow the door to fall; this is an urgent system hazard rather than a panel-only repair.
Safety stop: Do not touch or adjust springs, cables, drums, bottom fixtures, or tensioned hardware.
-
PATH 05Safety boundary
What you see
The panel and strut look intact and aligned, but the opener reverses or the door still binds, rubs, or closes unevenly.
Do this next
Check only an obvious photo-eye obstruction according to the opener manual and arrange complete service if the symptom persists or physical resistance appears.
Why this path and its safety boundary
Why it matters: Photo eyes, opener settings, rollers, hinges, tracks, balance, or another door-system component may be responsible; a strut replacement is not justified by the symptom alone.
Safety stop: Do not defeat sensors, overpower resistance, change force or limits blindly, or add a strut to compensate for another fault.
Helpful context
Understand the symptom
Stop and look before trying another cycle
A strut is part of the door's reinforcement and section hardware, not a decorative trim piece. If a C.H.I. panel or strut is damaged, another cycle can change the load on hinges, rollers, tracks, the opener, or the counterbalance system. Keep the door still and make a visual record from outside its travel path.
The panel, strut, and opener attachment must be assessed together
A panel dent may be cosmetic, but a crease, crack, bowed section, detached strut, or damaged top reinforcement can alter door alignment. C.H.I. provides strutting according to door size and design, so a generic bar or added brace can change the intended loads. The exact model and section position matter.
Keep spring, cable, and structural work professional
Garage doors are heavy moving systems with counterbalance parts under force. C.H.I. warns about springs, cables, warped hardware, pinch points, and doors falling off track. Safe homeowner work is limited to observing, photographing, keeping the path clear, and arranging trained service; it does not include removing the strut or panel.
Safety boundary
Stop conditions
- Do not stand or walk under a moving C.H.I. garage door, put fingers between sections or near hinges and tracks, or operate a door with a damaged, detached, or off-track panel or strut.
- Do not straighten, remove, brace, drill, weld, or retighten a strut, panel, hinge, opener bracket, track, bottom fixture, spring, cable, or other structural or tensioned hardware.
- Do not increase opener force, defeat photo eyes, or use the opener to pull a bent or sagging panel into alignment. A failed safety test, cable off the drum, frayed cable, broken spring, or unstable door requires prompt trained service.
- Keep people and vehicles clear and arrange a trained C.H.I. dealer or garage-door technician when damage is structural, the model or strut design is unknown, the door is heavy or crooked, or the visible repair does not restore smooth and safe travel.
Only after diagnosis
Potential parts
- C.H.I. garage door strut
Consider this class only when a trained technician confirms that the strut is damaged and that the exact C.H.I. door design requires that strut configuration.
Match the complete C.H.I. model, door size, section position, reinforcement pattern, and opener arrangement; do not choose a bar by length or appearance alone. - C.H.I. garage door panel or section
Consider this class only when a technician confirms that a crease, crack, severe dent, or weakened section cannot be safely restored and the exact model supports section replacement.
Confirm the exact C.H.I. collection, model, section height, profile, finish, window configuration, and hardware before ordering. - garage door hinge, roller, or track hardware
Consider this class only when the complete inspection shows that a hinge, roller, track, or mounting component also caused or sustained the panel or strut damage.
Match the exact section position, track and lift configuration, and C.H.I. door model; do not replace a visible part without checking the full alignment. - garage door opener reinforcement or attachment hardware
Consider this class only when a technician confirms damage or inadequate support at the opener attachment and specifies a model-appropriate reinforcement solution.
Require model-specific door and opener fit information; do not add a brace or move the attachment to compensate for a damaged section.
When checks do not resolve it
Need a professional?
Arrange trained garage-door service for any bent, detached, twisted, or damaged strut; a panel crease, crack, sharp edge, sag, or changed section gap; damaged hinges, tracks, rollers, opener reinforcement, springs, cables, or bottom fixtures; a heavy or unstable door; or a failed opener safety test. C.H.I. strutting is selected by door size and design, so do not substitute a generic brace or attempt a structural repair from photographs alone.
Safety scope: This article covers stopping operation, observing and photographing the closed door from outside its travel path, identifying visible damage, recording the model, and checking only obvious sensor obstructions according to the opener manual. Do not lift a damaged door, remove or adjust struts, panels, hinges, tracks, springs, cables, or opener brackets, or increase force.
Common questions
FAQ
Can I straighten a damaged C.H.I. garage-door strut?
No. A strut is selected for the door's size and design, and straightening or adding a generic brace can change the load path through the panel, hinges, and opener. Keep the door out of operation and have a trained technician assess it.
Does a damaged C.H.I. panel always need replacement?
Not every finish dent proves that a section must be replaced, but a crease, crack, sharp edge, bowed panel, detached strut, or changed section gap needs professional structural assessment. The technician must check the panel, strut, hinges, rollers, track, and opener load together.
Can I run the opener to see whether the damaged strut still works?
Do not cycle a door with a bent, detached, or structurally damaged strut or panel. The opener can increase the load or pull a weakened section out of alignment; document the damage from a safe position and arrange trained service.
What other problems can look like a damaged strut?
A damaged hinge, roller, track, opener attachment, balance, spring, cable, or panel can produce similar tilt, rubbing, sagging, or uneven travel. Compare the full visible system, but do not adjust tensioned or structural parts yourself.
Read the exact guide
Official sources
- RESIDENTIAL SPECIFICATION SHEETC.H.I. Overhead Doors · C.H.I. residential 2240 and 4240 raised-panel door specifications; other C.H.I. models require their own model documentation.
- Celebrate Garage Door Safety Month with These 10 Safety TipsC.H.I. Overhead Doors · C.H.I. residential overhead doors and openers; significant adjustments and repairs require trained service.
- Garage Door Safety ChecklistC.H.I. Overhead Doors · C.H.I. residential garage-door systems; exact model and installed opener instructions control any safety test.
- Product warrantyC.H.I. Overhead Doors · C.H.I. residential and commercial door collections listed on the warranty page; exact collection and model determine coverage and parts.
Community feedback
Share a repair observation
Share a plain-text repair observation. Accepted observations are published automatically; this page may take a moment to update.