
On this page
Start here
Quick answer
A few drops from an American Standard shower head immediately after shutoff can be water draining from the head, but a drip that continues or becomes a steady thread is not automatically a washer problem. First identify where the water starts: from the spray nozzles, the shower-head-to-arm joint, the shower arm or wall escutcheon, or another outlet. If the joint is wet only while water is running, a washer or seal may be mis-seated or damaged. If water keeps coming from the nozzles with the control fully off, the shower valve or cartridge may not be closing; replacing the shower-head washer will not correct that. Inspect only from ordinary access, use the exact American Standard model instructions, keep pressure-balancing and flow-control parts intact, and stop for a wall leak, unstable temperature, damaged threads, or any work that requires opening the valve or wall.
Before you begin
Safety first
- This article supports ordinary-access observation, model identification, manufacturer-approved care, and an accessible head-connection check only when the exact instructions permit it. It does not authorize valve or cartridge removal, wall access, concealed plumbing work, pressure-balance bypass, or improvised seal replacement.
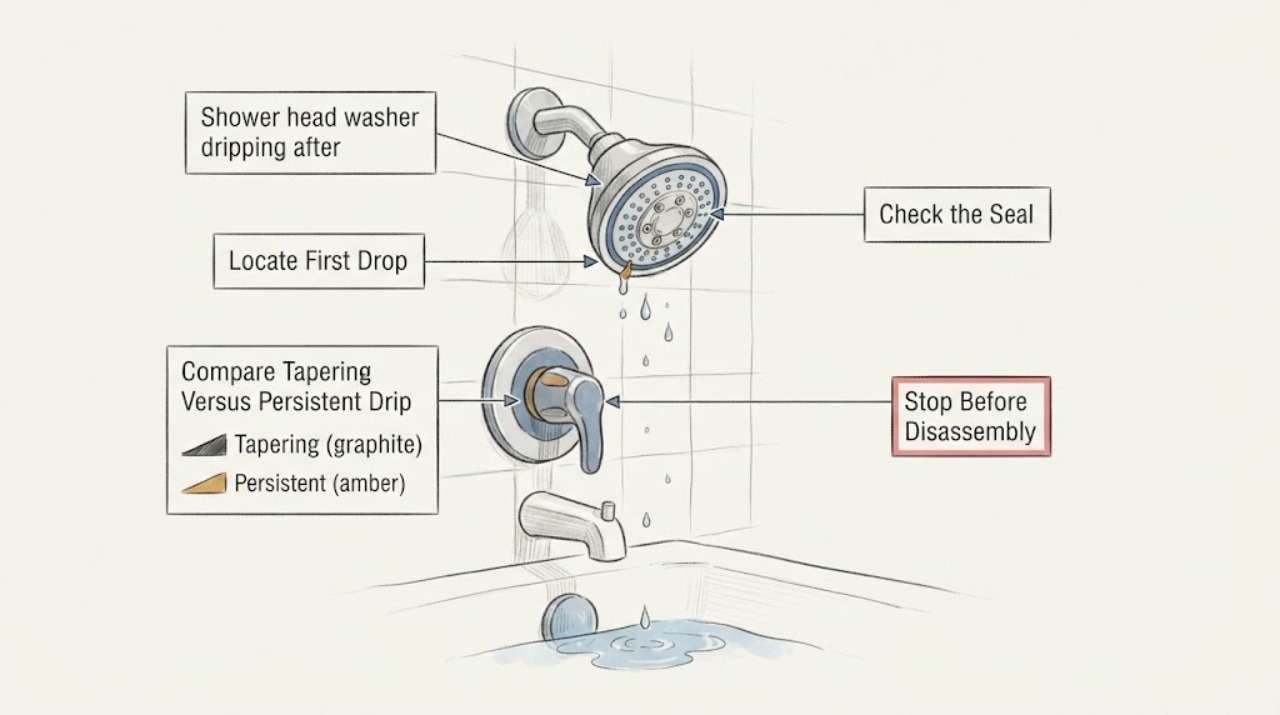
Work through in order
Diagnostic checks
Use only checks that match the exact appliance or system and its official guide.
-
Check 1
Dry the visible shower head, arm, wall escutcheon, and nearby trim with a soft cloth. Turn the shower off normally and watch from a safe standing position for the first new drop; do not remove trim or open the wall.
Expected result: The first drop forms at the spray nozzles, at the threaded head-to-arm joint, at the arm or wall escutcheon, or at another outlet such as a tub spout.
Next step: Photograph the exact origin and continue only with the matching branch. Stop and arrange service for water emerging from the wall, a damaged arm, or any leak that can reach the wall or floor.
Stop if: Do not reach behind the escutcheon, remove the shower arm from the wall, or keep using the fixture when water is entering the wall or ceiling.
Why this matters
Why: Nozzle dripping can be residual water or an upstream valve leak; joint wetness focuses the check on a washer, seal, thread, or head connection; wall or other-outlet wetness changes the likely repair boundary.
-
Check 2
With the handle fully Off and no one operating another fixture, observe whether drops from the spray face taper and stop or continue at a similar rate. If the system has a tub/shower diverter, note its position without forcing it.
Expected result: The drip quickly tapers, continues steadily, becomes a stream, changes when the handle or diverter is moved, or is accompanied by temperature fluctuation.
Next step: If the drip persists, stop repeated cycling and arrange qualified plumbing diagnosis; provide the duration, source, handle position, diverter position, and any temperature change.
Stop if: Do not force the handle or diverter, operate the shower with unstable temperature, or dismantle the valve to test the washer theory.
Why this matters
Why: A tapering drip can be retained water in the head. A continuing or changing drip with the control Off makes a valve, cartridge, diverter, or cross-flow issue more plausible than a shower-head washer alone.
-
Check 3
Only if the leak is clearly at the shower-head connection and the installed model instructions allow head removal, shut the water off at the control, place a soft cloth below the joint, and inspect the accessible washer or seal for presence, dirt, flattening, splits, or displacement. Keep every flow-control insert in its original arrangement.
Expected result: The washer is absent, visibly damaged or displaced, contaminated with debris, intact and seated, or the joint cannot be opened without force or the model identity is unknown.
Next step: Use the exact model parts diagram or manufacturer guidance to identify a compatible seal, then restore the connection only as instructed and check for leaks. If fit, thread condition, or the correct seal is uncertain, stop and request plumbing service.
Stop if: Do not force the head, cross-thread it, overtighten, add unapproved sealant, remove a restrictor, or continue if the shower arm moves in the wall.
Why this matters
Why: A missing, damaged, or displaced seal can explain a connection leak when water is flowing. An intact washer or a joint that is dry while the spray face continues to drip shifts suspicion toward the valve or residual water, not permission to substitute a random washer.
-
Check 4
From ordinary access, inspect the spray face for scale or blocked self-cleaning nozzles and check whether the head was recently cleaned or moved. Follow the specific product care instructions; use only a soft cloth and clean water where that manual calls for it, and do not poke the nozzles.
Expected result: The spray face has visible scale or debris, the nozzles appear intact and clean, the spray pattern changed after cleaning, or the face is cracked or damaged.
Next step: Perform only the permitted care and repeat the source-of-drip observation. If the nozzle drip continues with the face clean, or the head is damaged, arrange qualified service or manufacturer-specific replacement guidance.
Stop if: Do not drill, pin, wire, scrape, soak in an unapproved chemical, use abrasive cleaner, or remove internal flow-control components.
Why this matters
Why: Scale can redirect or retain water at the face, but it does not prove that the valve is leaking. A cracked head or changed spray pattern may need a compatible head assessment; aggressive cleaning can damage finishes or flow-control parts.
-
Check 5
If the installation has a tub spout or diverter, observe which outlet receives water when the diverter is in its normal positions. Keep hands away from hot water and do not force a stiff control; compare the shower head with another nearby outlet only from normal operation.
Expected result: Water appears at the shower head when the diverter should send it to the tub, the tub spout also drips, the shower alone drips with the diverter normal, or water appears around the trim or wall.
Next step: Record the outlet behavior and arrange qualified plumbing assessment of the cartridge, pressure-balance assembly, diverter, and concealed connections as applicable.
Stop if: Stop for scalding, unstable temperature, a leak entering the wall, a stuck control, or any need to remove the handle, escutcheon, or valve trim.
Why this matters
Why: A diverter or valve that does not isolate an outlet can create a persistent shower-head drip unrelated to the shower-head washer. Water at trim or wall connections indicates a broader leak boundary.
-
Check 6
Record the American Standard model or collection if visible without removing trim, the shower-head and valve configuration, whether the head is fixed or handheld, the source of the first drop, and whether the washer or connection was previously changed. Use the manufacturer's support and literature path to locate the exact instructions.
Expected result: The model and parts diagram are known, the model is unknown, a prior repair used an unverified washer or seal, or the shower head and valve are from different product families.
Next step: Give the model, photos, drip origin, control state, and prior work to American Standard support or a qualified plumber; request a compatible repair path rather than guessing from appearance.
Stop if: Do not order or install a seal based only on thread size, remove a cartridge, or open the wall to identify the part as a first test.
Why this matters
Why: A known model makes a seal and parts check more reliable. An unknown or mixed configuration raises the risk of using an incompatible washer or disturbing pressure-balance, hot-limit, or flow-control features.
Use your observations
Decision map
Find the observation that best matches what you see, then follow the next safe action.
-
PATH 01Safety boundary
What you see
The first drop comes from the spray face, the shower control is fully Off, there is no wall or joint wetness, and the drip tapers away rather than continuing.
Do this next
Keep the shower head in its normal position, monitor whether the behavior changes to a persistent drip, and use the exact product care instructions if the spray face is scaled.
Why this path and its safety boundary
Why it matters: Retained water draining from the shower head is more likely than an active washer or valve leak; the observation alone does not prove a failed part.
Safety stop: Arrange service if dripping becomes continuous, the handle no longer stops flow, temperature changes, or water appears at the joint or wall.
-
PATH 02Safety boundary
What you see
The spray face remains wet or drips steadily after the handle is fully Off while the head-to-arm joint is dry and the face is not visibly damaged.
Do this next
Stop repeatedly cycling the control and request qualified plumbing diagnosis; provide the model, drip duration, diverter behavior, and any temperature change.
Why this path and its safety boundary
Why it matters: An upstream valve, cartridge, diverter, or cross-flow issue is more plausible than the shower-head washer. American Standard identifies the valve cartridge as the component intended to provide drip-free shutoff on applicable trim.
Safety stop: Do not remove the valve trim, extract a cartridge, or treat a washer replacement as proof that the upstream leak is fixed.
-
PATH 03Safety boundary
What you see
Water forms at the shower-head-to-arm connection during use or immediately after use, while the spray face does not continue dripping once the head drains.
Do this next
Follow the exact model installation guidance for a cool, accessible connection; restore only the documented seal arrangement and check for leaks without overtightening. Use qualified service when the arm moves or the thread condition is uncertain.
Why this path and its safety boundary
Why it matters: A washer or seal may be missing, displaced, damaged, contaminated, or mismatched, or the threaded connection may be compromised. This is distinct from a valve that leaks through the head.
Safety stop: Do not cross-thread, force, overtighten, add random sealant, or continue if the connection leaks toward the wall.
-
PATH 04Safety boundary
What you see
The shower drips when a tub/shower diverter should isolate it, another outlet also drips, or the drip changes with control movement or temperature behavior.
Do this next
Leave the controls in their normal Off or safe position and arrange qualified plumbing diagnosis of the valve and diverter; do not open the wall or valve as a homeowner test.
Why this path and its safety boundary
Why it matters: A diverter, ceramic mixing cartridge, pressure-balance assembly, or cross-flow condition becomes more likely than a washer at the head connection.
Safety stop: Stop for unstable temperature, scalding risk, a stuck control, or any leak at the escutcheon or wall.
-
PATH 05Safety boundary
What you see
Water appears at the shower arm, escutcheon, wall, ceiling below, or another concealed connection rather than only at the shower-head joint.
Do this next
Stop using the shower, dry and protect nearby surfaces, and arrange prompt qualified plumbing inspection; provide photos of the first visible water and any damage.
Why this path and its safety boundary
Why it matters: The leak boundary is broader than a shower-head washer and may involve the arm threads, valve connections, or concealed plumbing.
Safety stop: Do not remove the escutcheon, arm, valve trim, or wall finish, and do not keep pressurizing a concealed leak.
-
PATH 06Safety boundary
What you see
The model is unknown, the shower head and valve are mixed or previously altered, a washer is missing, or the connection cannot be opened without force.
Do this next
Preserve the existing parts, photograph the assembly, identify the model through manufacturer support or documentation, and request qualified service when fit or access is uncertain.
Why this path and its safety boundary
Why it matters: A visual match cannot establish the correct seal, thread, flow-control, or pressure-balance arrangement. Guessing can create a new leak or temperature and flow problem.
Safety stop: Do not substitute a generic washer, remove a restrictor, bypass pressure balancing, or continue disassembly without the exact procedure.
Helpful context
Understand the symptom
A shower-head drip has more than one possible source
Watch the first place a drop forms after the handle is turned off. Water at the spray face may be residual water draining from the head and should taper rather than remain a continuing stream. Water at the threaded joint between the head and arm points to a connection seal or washer, while water at the wall escutcheon or shower arm can indicate a deeper connection. A drip that continues from the spray face with the control fully off points upstream toward the valve or cartridge, not automatically toward the washer inside the head connection.
Check the washer without changing the valve design
If the leak is confined to the shower-head connection, shut the water off at the control, protect the finish, and use the exact model instructions before loosening anything. A seal washer must be present, flat, clean, and seated in its intended recess; a generic-looking washer is not proof of fit. American Standard's installation guidance uses sealing materials at threaded shower-arm connections and says to turn the water on and check connections for leaks. Do not overtighten, cross-thread, add random sealant, or remove a flow-control or pressure-balancing component as a shortcut.
A persistent nozzle drip is a valve decision
American Standard shower sets separate the shower head from a ceramic disc or pressure-balancing valve cartridge. If the shower head is dry at its joint but continues to drip from the spray face after the handle is fully off, the valve may be allowing water through or the shower may be holding water in its internal passages. Compare the drip over time and with the diverter or tub outlet, if fitted. Persistent dripping, temperature changes, or a wet wall should move the repair to qualified plumbing service rather than a washer swap.
Keep anti-scald and flow-control features intact
American Standard shower-head specifications can include a flow restrictor or pressure-compensating flow-control device, and trim kits can include pressure-balance and hot-limit features. These parts affect flow and temperature safety. Cleaning or replacing a seal should not become an attempt to remove, drill, bypass, or substitute those components. When the model is unknown or the part location is unclear, record the model and ask the manufacturer or a qualified plumber to identify the correct assembly.
Safety boundary
Stop conditions
- Stop using the shower for water at the wall or escutcheon, a moving shower arm, ceiling or floor damage, or a leak that is not confined to the accessible head connection.
- Do not force the handle or diverter, remove valve trim or cartridges, open the wall, or use a shower with unstable temperature or scalding risk.
- Do not cross-thread or overtighten the shower head, add random sealant, or continue when the connection cannot be opened without force.
- Do not drill, scrape, or chemically attack spray nozzles; do not remove, drill through, bypass, or substitute flow-control or pressure-balancing components.
- Do not assume a washer caused a persistent spray-face drip with the control Off; arrange qualified plumbing service for valve, cartridge, diverter, or concealed-connection diagnosis.
Only after diagnosis
Potential parts
- shower head connection washer or seal
Consider this category only if the leak is proven to originate at the accessible head-to-arm connection and inspection confirms the washer or seal is missing, damaged, displaced, or not restorable by the model instructions.
Confirm the exact American Standard model, connection design, seal dimensions, and manufacturer's fit information; do not substitute by appearance or alter flow-control parts. - shower head assembly
Consider this category only if the spray face or head body is cracked, damaged, persistently obstructed, or cannot be restored after approved care and the connection is otherwise sound.
Confirm the exact model, connection, flow-control arrangement, and pressure or flow requirements before selecting a replacement. - shower valve cartridge
Consider this category only when a qualified diagnosis finds that water continues through the valve with the control Off or the cartridge fails model-specific shutoff or temperature checks.
Confirm the exact valve and cartridge configuration with the manufacturer or plumber; a persistent drip alone does not establish fit or failure. - shower diverter or pressure-balance assembly
Consider this category only if outlet isolation, temperature behavior, or qualified testing identifies a diverter or pressure-balance problem rather than a head connection leak.
Confirm the exact trim and rough-in valve configuration and have qualified plumbing service perform any valve-access work.
When checks do not resolve it
Need a professional?
Arrange qualified plumbing service when a spray-face drip continues with the control fully Off, when another outlet or diverter behaves incorrectly, when the head-to-arm washer or seal cannot be identified or seated without force, or when the drip returns after the exact model-approved connection repair. Request prompt inspection for water at the wall or escutcheon, a moving shower arm, unstable temperature, scalding risk, ceiling or floor damage, or a stuck control. Keep pressure-balancing and flow-control components intact until compatibility and repair are confirmed.
Safety scope: This article supports ordinary-access observation, model identification, manufacturer-approved care, and an accessible head-connection check only when the exact instructions permit it. It does not authorize valve or cartridge removal, wall access, concealed plumbing work, pressure-balance bypass, or improvised seal replacement.
Common questions
FAQ
Is a few drops from an American Standard shower head after shutoff normal?
A brief drip from the spray face can be residual water draining from the head, especially when it tapers and stops. A steady or recurring drip with the control fully Off, temperature changes, or water at the joint or wall is not automatically normal and needs the source identified before choosing a washer or valve repair.
Can a shower-head washer cause dripping after shutoff?
It can cause water at the head-to-arm connection if it is missing, displaced, damaged, or mismatched. It usually does not explain a persistent drip from the spray nozzles when the control is fully Off; that pattern points more toward retained water or the shower valve, cartridge, or diverter.
Should I replace the American Standard washer first?
Identify the first drop before replacing anything. If the connection is the only wet point and the exact model instructions support access, inspect the seal and restore only the documented arrangement. If the head itself drips continuously, the joint is dry, or the model is unknown, ask a qualified plumber or American Standard support to identify the valve and compatible part instead of guessing.
Why does the shower head drip when the handle is off?
The head may be draining retained water, but a continuing drip can mean the valve or cartridge is allowing water through. In a tub/shower system, a diverter or cross-flow issue can also send water to the shower when another outlet should be active. A washer at the head connection is relevant only when that joint leaks.
Can I remove the flow restrictor to stop the drip?
No. American Standard identifies flow restrictors and pressure-compensating devices on applicable showerheads, and pressure-balance or hot-limit features can be part of the trim. Do not drill, remove, bypass, or substitute those components; ask the manufacturer or a qualified plumber for a compatible repair.
Read the exact guide
Official sources
- Times Square 2.5 GPM Tub and Shower Trim Kit with FloWise Showerhead and Lever HandleAmerican Standard · Manufacturer product information for the specified Times Square trim kit; do not generalize its exact valve configuration to another model.
- Bedminister Tub and Shower Trim Kit With ValveAmerican Standard · Manufacturer product information for the Bedminster tub and shower trim kit; valve and cartridge details vary by installed collection.
- Installation Instructions M965035 1660 Series FloWise Vandal Proof ShowerheadsAmerican Standard · Manufacturer installation instructions for the specified 1660 Series showerheads; use the installed model's instructions for other assemblies.
- 3-Function 4-3/4-Inch 2.5 gpm/9.5 L/min ShowerheadAmerican Standard · Manufacturer product information for the specified American Standard showerhead; other models may use different internal parts and care instructions.
- Seal WasherAmerican Standard · Manufacturer parts-store listing for a specific seal washer; it does not establish fit for an unspecified shower head or valve.
- Bedminster Pressure Balancing Bath and Shower Sets I 7508.502 Owners ManualAmerican Standard · Manufacturer owner and installation manual for Bedminster 7508.502; use only the portions matching the installed configuration.
- SupportAmerican Standard · Manufacturer support hub used to locate the exact product literature and support path; it is not a substitute for model-specific instructions.
Community feedback
Share a repair observation
Share a plain-text repair observation. Accepted observations are published automatically; this page may take a moment to update.