
On this page
Start here
Quick answer
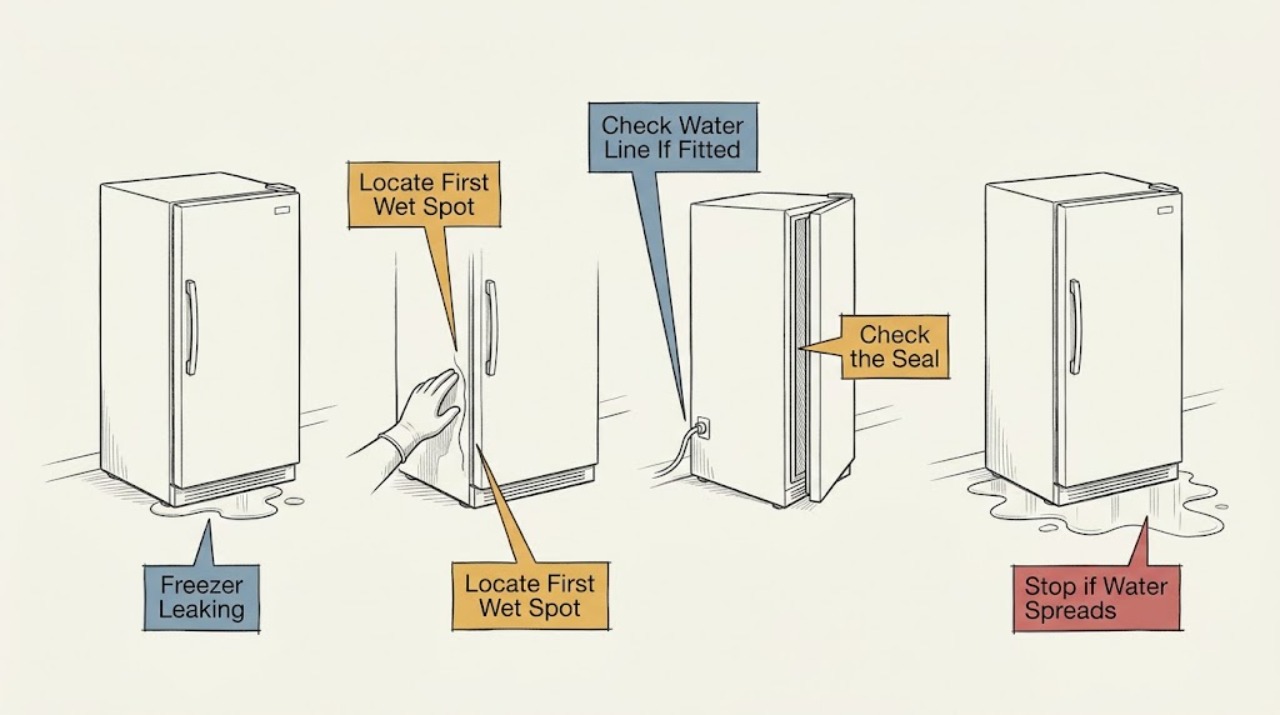
An Amana freezer leak is easiest to narrow down by locating where the water first appears. Water behind the freezer points first to an installed water supply line or a connection, if that model has one. Moisture on the cabinet or around the door can be condensation related to humid room air, frequent openings, or a door gasket that is not sealing. Inside water, heavy frost, or water that returns after wiping needs a model-specific service check rather than sharp tools, forced defrosting, or a panel repair. From a dry, stable position, document the source, check the door seal and visible tubing, and keep food and water away from electrical parts. If water is actively flowing, reaches the outlet or controls, the freezer is losing cooling, or the source cannot be identified safely, stop using it and arrange qualified appliance service.
Before you begin
Safety first
- The homeowner should limit checks to dry external observation and clearing an obvious dry gasket or vent obstruction. Do not move the appliance across water, open panels, chip frost, handle wet electrical parts, or cut or disconnect tubing.
Work through in order
Diagnostic checks
Use only checks that match the exact appliance or system and its official guide.
-
Check 1
From a dry, stable position, blot accessible water and photograph the first place that becomes wet: inside the cabinet, around the door or lid, beneath the front, or behind the freezer. Note whether the moisture appears after opening the door, after an ice or water function is used, or while the freezer is otherwise idle.
Expected result: The wet spot is either interior, exterior condensation, behind the cabinet near tubing, or an unidentified puddle that spreads under the appliance.
Next step: Keep the freezer closed and dry only accessible surfaces while continuing with the matching external check. Do not move the appliance or remove covers to chase the leak.
Stop if: Stop if water reaches the outlet, cord, controls, a hot component, or an unstable wet floor; disconnect power only if it can be done without stepping in water, otherwise keep clear and arrange service.
Why this matters
Why: The location narrows the next check. A rear puddle on a model with a water connection supports checking the visible supply path; cabinet moisture supports checking humidity and the gasket; an interior or recurring puddle needs model-specific service evaluation.
-
Check 2
If the Amana freezer has an ice-maker or water connection, inspect only the visible tubing, shutoff area, and fittings from a dry position without pulling the cabinet out, loosening a fitting, or touching wet electrical parts.
Expected result: Look for a cracked tube, a tube that has pulled out of a fitting, a fitting that is visibly wet, or no water connection at all.
Next step: If a clearly labeled shutoff is accessible without entering water, close it and arrange appliance or plumbing service. If the line looks dry but the leak continues, do not assume the source is fixed; document it for a technician.
Stop if: Do not tighten, disconnect, cut, splice, or replace tubing while wet or while reaching behind the powered appliance; stop if the shutoff cannot be reached safely.
Why this matters
Why: Amana identifies a damaged water line and loose or leaking connections as possible sources of water behind an upright freezer. If there is no water connection, eliminate that branch rather than forcing a cabinet inspection.
-
Check 3
Inspect the freezer door or lid gasket around its full accessible perimeter. Look for food, ice, folds, tears, or a section that does not contact the cabinet; also note high room humidity or unusually frequent openings.
Expected result: The gasket is clean and continuous, or moisture is concentrated near a gap and the door or lid does not seal evenly.
Next step: Remove only an obvious, dry obstruction from the gasket, close the door or lid fully, and monitor whether new exterior moisture stops. If the gasket is torn, distorted, or still fails to seal, arrange service using the exact model information.
Stop if: Do not pry the gasket out, use a sharp tool, heat the seal, or continue if the freezer is unstable or the floor is wet.
Why this matters
Why: Amana says humid air, frequent openings, and an obstructed or improperly sealing gasket can cause moisture to form. A seal clue can explain cabinet moisture, but it does not explain an active rear water-line leak or water reaching electrical parts.
-
Check 4
Inside the freezer, check that food packages are not pressing against the visible air vents, and note whether frost is light and stable or thick and returning quickly. Do not chip ice, remove an interior panel, or use a heat source.
Expected result: Vents are clear and the cabinet remains cold, or vents are blocked and moisture, heavy frost, or warming is also present.
Next step: Rearrange only loose food packages to leave the vents clear and keep the door closed. If frost returns, cooling is poor, or water persists inside, preserve the model information and request qualified appliance service.
Stop if: Stop if food is thawing, water reaches electrical parts, frost must be forcibly removed, or the source requires panel access.
Why this matters
Why: Amana's manual says blocked vents restrict airflow and may cause temperature and moisture problems. Heavy recurring frost or warming may involve a defrost, airflow, seal, or cooling fault that a surface wipe cannot repair.
-
Check 5
After the external checks, place a dry absorbent towel on a stable accessible surface—not against wiring or under an unstable appliance—and record whether new water appears while the freezer remains closed and unused. Do not leave the appliance unattended if water is spreading.
Expected result: Moisture stops after the gasket obstruction is removed, reappears only with a water function, forms steadily while the freezer is closed, or cannot be traced.
Next step: Use the observation, photos, and exact model information in a service request. Keep the water supply closed when appropriate and avoid using an affected ice or water function until the source is repaired.
Stop if: Do not repeat the leak by cycling water, move the freezer, remove panels, or work around wet power connections.
Why this matters
Why: A change linked to the gasket or water function points to that branch; steady or unexplained moisture suggests an internal drain, frost, cabinet, or hidden supply issue that cannot be safely diagnosed from the outside.
Use your observations
Decision map
Find the observation that best matches what you see, then follow the next safe action.
-
PATH 01Safety boundary
What you see
Water is actively flowing, reaches the outlet, cord, controls, or a hot component, or the floor is unsafe.
Do this next
Keep clear. Disconnect power only from a dry position if it is safe to do so; otherwise leave it energized and arrange qualified appliance service. Close an accessible water shutoff only if it can be reached without entering water.
Why this path and its safety boundary
Why it matters: Continuing to operate or inspect the freezer can create an electrical or slip hazard.
Safety stop: Do not step into water, touch wet electrical parts, pull the appliance, or remove covers.
-
PATH 02Next step
What you see
The freezer has a water connection and moisture is localized at the visible tubing, shutoff area, or a fitting behind the cabinet.
Do this next
Close a safe, clearly labeled shutoff if accessible and request appliance or plumbing service. Do not disassemble or splice the line.
Why this path and its safety boundary
Why it matters: A damaged line or connection is a plausible source, but the fitting may be under water pressure and the appliance may be near electricity.
-
PATH 03Next step
What you see
Moisture is on the cabinet or around the door or lid, the room is humid, openings are frequent, or the gasket does not seal evenly.
Do this next
Remove dry obstructions, close the door or lid fully, reduce unnecessary openings, and monitor. Arrange service if the gasket is damaged or moisture continues.
Why this path and its safety boundary
Why it matters: Condensation from humid air or a sealing problem may be contributing to the moisture.
-
PATH 04Next step
What you see
Water is inside, heavy frost returns, vents are blocked with warming, or the freezer does not maintain cooling.
Do this next
Keep food protected and request qualified appliance service using the exact model information. Do not chip ice, use a heat source, or open panels.
Why this path and its safety boundary
Why it matters: The issue may involve airflow, defrost, sealing, or another internal system that surface checks cannot confirm.
-
PATH 05Next step
What you see
The leak continues or the wet spot cannot be identified safely after external checks.
Do this next
Stop using the affected water or ice function, keep the freezer closed, document the symptoms, and arrange qualified service.
Why this path and its safety boundary
Why it matters: The source may be hidden, internal, or model-specific; guessing can cause water or electrical damage.
Helpful context
Understand the symptom
The first wet spot matters
A puddle behind the cabinet, moisture on the outside, water on an interior shelf, and water on the floor are different starting points. An upright freezer with an ice maker or dispenser connection can leak at the supply tubing or a fitting. A freezer without a water connection cannot have that particular source, so the inspection should focus on condensation, the door or lid seal, frost, and the appliance's cooling condition. Wipe only accessible dry surfaces and watch where new moisture appears; do not pull the freezer out across a wet floor or reach behind it while water is near the electrical connection.
Condensation is not the same as a water-line leak
Amana says humid room air, frequent door openings, and a gasket that is not sealing can create moisture on or around the freezer cabinet. That pattern can look like a leak even when no pressurized water line is involved. If moisture is localized behind a freezer that has a water connection, inspect the visible line and fittings without disassembling them. If the moisture is inside, recurring, or accompanied by frost or poor cooling, use the model manual and a qualified technician rather than trying to open the sealed or cooling system.
Protect the freezer while you diagnose
Keep the door or lid closed as much as practical, move food away from visible water, and do not block the freezer's air vents. Amana's manual explains that blocked vents can restrict airflow and create temperature and moisture problems. If the freezer is warming, if frost is rapidly building, or if water reaches electrical parts, preserving the appliance and food is secondary to stopping the leak and arranging service.
Safety boundary
Stop conditions
- Do not inspect or handle wet electrical connections, cords, outlets, controls, or wiring.
- Do not pull the freezer out across a wet floor, remove panels, or reach into the rear cabinet while it is powered.
- Do not chip frost, use a knife or sharp tool, apply a heat source, or attempt sealed-system work.
- Do not disconnect, cut, splice, or replace a water line unless the work is performed by a qualified professional under the model and installation requirements.
- Stop use and arrange prompt service if water is active, cooling is failing, food is thawing, the source is hidden, or moisture returns after a simple external correction.
When checks do not resolve it
Need a professional?
Safety scope: The homeowner should limit checks to dry external observation and clearing an obvious dry gasket or vent obstruction. Do not move the appliance across water, open panels, chip frost, handle wet electrical parts, or cut or disconnect tubing.
Common questions
FAQ
Why is my Amana freezer leaking from behind?
If the model has an ice-maker or water connection, Amana's guidance says to inspect the visible water line, tubing connections, and shutoff area for damage or leaks. Do this only from a dry, stable position and arrange service if the line or fitting is wet.
Can humidity make an Amana freezer look like it is leaking?
Yes. Amana says humid room air, frequent door openings, and an obstructed or poorly sealing gasket can create moisture on the freezer cabinet. Clear only an obvious dry obstruction and arrange service if the gasket is damaged or moisture continues.
What if the water is inside the freezer?
Check that food is not blocking visible vents and note whether heavy frost or warming is present, but do not chip ice, use heat, or remove panels. Recurring interior water, rapid frost, or poor cooling needs qualified service using the exact model information.
Should I pull the freezer out to find the leak?
Not across a wet floor or while water is near the power connection. Limit the check to what is visible from a dry position; if the rear source cannot be seen safely, close an accessible water shutoff when appropriate and arrange qualified service.
Read the exact guide
Official sources
- Moisture on the Outside of the Cabinent - Top Freezer RefrigeratorAmana Product Help · Amana explains that humid air, frequent door openings, and an obstructed or improperly sealing freezer gasket can create exterior moisture.
- Leaking from Behind - Upright FreezerAmana Product Help · Amana identifies damaged water lines and loose or leaking tubing connections as possible sources of water behind a freezer.
- Owner's ManualAmana · The opened Amana manual notes that some models have water connections, instructs users to check for leaks after connection work, and warns that blocked vents can cause temperature and moisture problems.
Community feedback
Share a repair observation
Share a plain-text repair observation. Accepted observations are published automatically; this page may take a moment to update.