
On this page
Start here
Quick answer
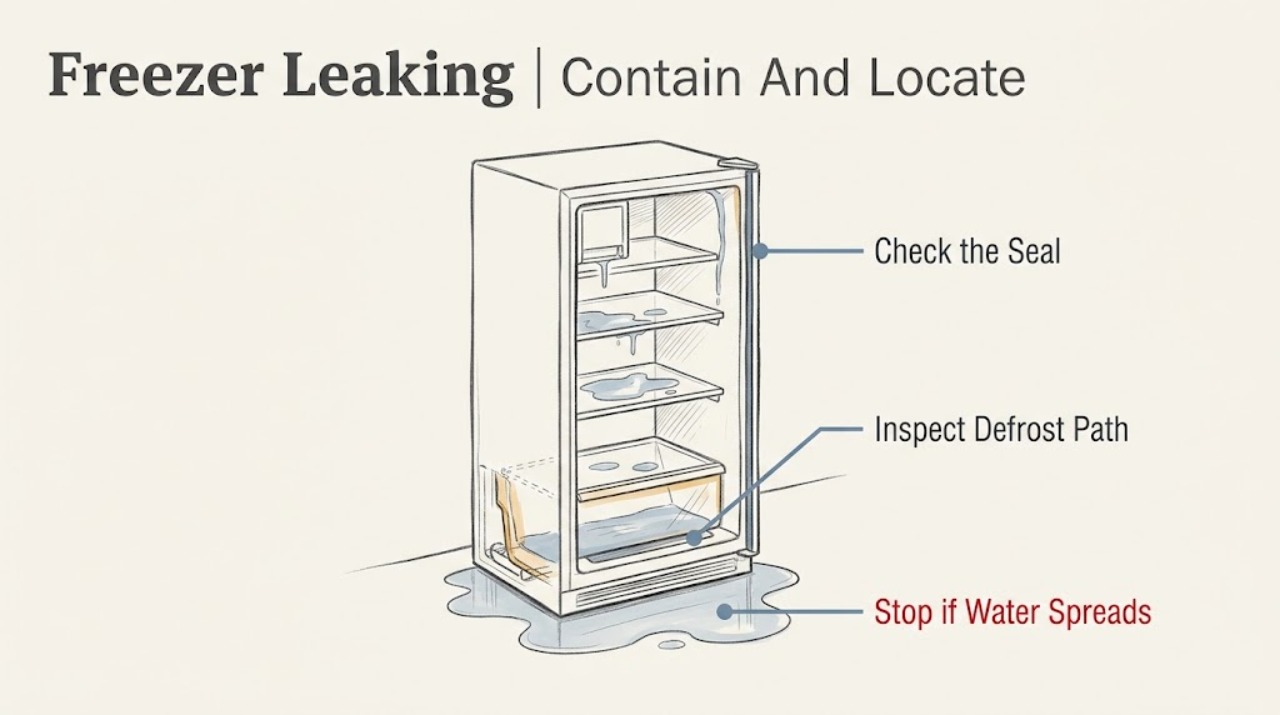
When a Danby freezer is leaking, first protect the floor and food, then locate whether the water starts at the door, inside the cabinet, under the appliance, behind it, or at an optional ice-maker connection. Danby identifies a clogged defrost drain, damaged door seal, and an unlevel unit as common leak checks, while model manuals explain that defrost water may collect in a drip pan and that frost can keep the door from closing. Inspect only user-accessible parts, defrost safely if the exact manual permits it, and never use sharp objects near the refrigerant lines. Stop for water near electrical parts, a damaged cord, a cracked tray, a hidden leak, warming food, or a leak that returns after the documented checks, and arrange qualified service.
Work through in order
Diagnostic checks
Use only checks that match the exact appliance or system and its official guide.
-
Check 1
Move food away from standing water, place towels or a shallow container where they cannot block ventilation, and trace the leak from the freshest wet point to its apparent source: door, interior floor, underside, rear, or ice-maker area.
Expected result: The water is confined to the interior or front edge, appears beneath or behind the cabinet, or is concentrated around a visible water connection; the source may also remain unclear.
Next step: Keep the freezer closed and follow the matching branch. If water reaches electrical components, the leak is rapid, or the source is hidden, stop using the appliance and call qualified service.
Why this matters
Why: Location separates a door, frost, or defrost path from a rear pan or optional water system. A rapid or unclear leak is less suitable for repeated user testing.
-
Check 2
Inspect the full door gasket and cabinet contact surface for food packages, ice, dirt, tears, or a section that will not seal; also check from outside whether the freezer is stable and not rocking.
Expected result: An item or frost held the door open, the gasket is dirty or damaged, the appliance is unstable, or the door and level appear normal.
Next step: Remove only an obvious obstruction and clean or dry the accessible gasket as the exact manual directs. Do not glue, stretch, or force a damaged gasket or move a full freezer; arrange service if the door cannot seal or sit correctly.
Why this matters
Why: Danby links leaks with damaged door seals and recommends checking level. Manuals also identify a package, excessive frost, or a door that does not close as a cause of frost and poor operation.
-
Check 3
With power disconnected if the exact manual calls for it, inspect only the user-accessible defrost drain opening, channel, or drip pan for ice, residue, overflow, displacement, or a crack; do not remove sealed panels.
Expected result: The accessible drain or channel is blocked or iced, the drip pan is full or damaged, or the visible path is clear and contained.
Next step: Clean only the accessible part with the manual-approved method and dry the surrounding area. Do not force a hidden blockage or substitute a container for a damaged pan; call service if water returns.
Why this matters
Why: Danby identifies a clogged defrost drain as a leak check. Model manuals explain that meltwater may flow into a drip pan during defrosting, where it should remain contained; a clear visible path with recurring water suggests a hidden restriction or component fault.
-
Check 4
If the freezer is a manual-defrost model and the exact owner manual permits user defrosting, turn the control Off, disconnect power, remove food, leave the door open, and monitor the drip tray while frost melts; keep the floor protected.
Expected result: Water collects in the tray as expected and stops after the frost is gone, or water escapes the tray, the leak continues, or the freezer cannot be safely defrosted.
Next step: Wipe the interior fully dry before resuming operation only if the manual permits it. Never chip ice with a sharp object or use a forced heat source; stop and arrange service for recurring frost, overflow, or hidden ice.
Why this matters
Why: Danby states that meltwater can collect in the drip tray and should be watched so it does not damage flooring. Escaping water, excessive recurring frost, or a leak after a complete safe defrost indicates more than a one-time frost load.
-
Check 5
If the freezer has an ice maker or water line, inspect only the visible tube, fitting, shutoff area, and ice-maker housing for fresh droplets, kinks, cracks, or ice buildup; do not loosen fittings or pull tubing.
Expected result: The leak follows a visible water connection or ice-maker component, or no water-connected accessory is installed and the area is dry.
Next step: Stop using the ice maker. If the shutoff is clearly accessible and safe, close it, then arrange qualified appliance or plumbing service; do not patch or retighten an uncertain fitting.
Why this matters
Why: An ice-maker water path can leak independently of the defrost drain. Danby advises checking visible connections and damage for ice-maker leaks, then seeking further support if the problem persists.
-
Check 6
After containing the water, note whether the freezer remains cold, whether food has begun to thaw, whether the motor runs unusually long, and whether frost or an alarm returns after the door is closed.
Expected result: Cooling remains normal and the leak stops, or the freezer is warming, food is thawing, frost rapidly returns, or the leak continues.
Next step: Keep the door closed and follow food-safety directions on the packaging. If cooling is abnormal, food is thawing, or water returns, stop using the freezer and request qualified service; do not open the sealed system.
Why this matters
Why: A one-time melt or spill with normal cooling is different from a leak accompanied by a cooling or defrost fault. Danby manuals direct users to service when the appliance continues to perform poorly after the basic checks.
-
Check 7
Check from outside that the freezer is on a firm, stable surface with its required clearance, that the cord is not trapped or damaged, and that no nearby drain, pipe, or spill is being mistaken for an appliance leak.
Expected result: The unit rocks, the cord is damaged, ventilation is obstructed, or the surrounding area is dry and installation appears stable.
Next step: Do not move a full freezer or repair a damaged cord. If the cord or installation is unsafe, stop and call qualified service; if the surroundings are dry and the leak persists, continue with the service boundary.
Why this matters
Why: Leveling and stable placement affect door closure and the path of water, while a damaged cord or restricted ventilation is a safety or performance concern rather than a drain-cleaning task.
Use your observations
Decision map
Find the observation that best matches what you see, then follow the next safe action.
-
PATH 01Next step
What you see
Water is pooling on the freezer floor or at the front edge.
Do this next
Check for an obstruction, damaged seal, excessive frost, and an accessible drain or channel. Defrost only as the exact manual permits; call service if water returns.
Why this path and its safety boundary
Why it matters: A door-seal, frost, or defrost-drain issue is more likely than an external water line.
-
PATH 02Next step
What you see
Water appears behind or beneath the freezer.
Do this next
Inspect only the model-authorized visible pan with power disconnected. Do not remove rear panels; arrange service for a damaged pan or recurring leak.
Why this path and its safety boundary
Why it matters: Defrost water may be reaching a rear or lower pan, but an overflow, displacement, crack, or hidden path fault is possible.
-
PATH 03Next step
What you see
The wet point is around an ice maker, tube, or water fitting.
Do this next
Stop the ice maker and close a clearly accessible shutoff only if safe. Obtain qualified appliance or plumbing service without loosening fittings.
Why this path and its safety boundary
Why it matters: The optional water system is a separate leak path from the defrost system.
-
PATH 04Next step
What you see
Frost is heavy or the door does not close fully.
Do this next
Remove only an obvious obstruction and use the model's safe defrost procedure. Do not use sharp objects; call service for a damaged seal or recurring frost.
Why this path and its safety boundary
Why it matters: A package, gasket problem, frequent opening, or manual-defrost need can admit moisture and create meltwater.
-
PATH 05Next step
What you see
The leak is accompanied by warming food, unusually long running, or recurring frost.
Do this next
Keep the door closed, protect food, and call qualified appliance service promptly. Do not access refrigerant lines or internal controls.
Why this path and its safety boundary
Why it matters: A cooling, defrost, door-seal, or airflow fault may be causing both symptoms.
-
PATH 06Next step
What you see
Water reaches the plug, cord, outlet, controls, or other electrical parts.
Do this next
Stop using the freezer and isolate power only if safe without standing in water; obtain qualified electrical or appliance help.
Why this path and its safety boundary
Why it matters: The appliance presents an electrical-shock or short-circuit risk.
Helpful context
Understand the symptom
Find the first wet point
A puddle at the front, water on the freezer floor, a rear drip-pan overflow, and a leak beside an ice maker are different paths. Wipe up visible water, keep the door closed as much as practical, and trace the freshest or highest wet point without pulling covers or moving a full appliance.
Keep water and sharp tools away from hazards
If water reaches the plug, cord, outlet, controls, or other electrical parts, stop using the freezer and isolate power only if safe without standing in water. Do not use knives, screwdrivers, heaters, or sharp scrapers to remove ice, and do not puncture the cabinet or refrigerant lines. Water-line, sealed-system, compressor, and internal wiring work belongs to qualified service.
The leak location changes the next check
Front or interior water often follows a door-seal, frost, or defrost-drain problem. Water behind the unit may be normal defrost water only when it stays contained in the model's pan, or it may indicate a cracked, displaced, or overflowing pan. A leak at an ice maker or tube needs a separate water-connection check. A leak paired with warming food is a cooling fault until proven otherwise.
Only after diagnosis
Potential parts
- door gasket
Consider only if the exact model's gasket is torn, permanently deformed, or cannot seal after an obstruction is removed.
Door seals are cabinet- and model-specific; confirm the rating-plate model and the manual or manufacturer parts documentation. - defrost drip pan
Consider only if service confirms the model's pan is cracked, displaced beyond adjustment, or unable to contain normal defrost water.
Pan shape and mounting vary by model; do not substitute an improvised container inside the appliance. - defrost drain or drain grommet
Consider only after service confirms a restricted or damaged drain component rather than a door-seal, frost, or spill cause.
Drain parts may be inside insulated sections and require exact model confirmation and professional access. - ice-maker inlet valve or water tube
Consider only when the freezer is equipped with an ice maker or water line and a technician confirms the leak is in that path.
Water-system parts depend on exact model and connection design; shutoff and installation should be handled by qualified service.
When checks do not resolve it
Need a professional?
Call qualified service when the leak returns after the accessible door, drain, pan, and model-authorized defrost checks, when the source is hidden, or when the freezer is warming or repeatedly frosting., Stop using the freezer for water near electrical parts, a damaged cord, a cracked or overflowing pan, a damaged gasket that prevents closure, or any suspected refrigerant-line damage., For an ice-maker or water-line leak, stop using the accessory and arrange qualified appliance or plumbing service; do not loosen fittings or repair tubing yourself.
Common questions
FAQ
Why is my Danby freezer leaking from the front?
Check whether the door gasket is damaged or blocked, whether frost is preventing closure, and whether the freezer is stable and level. Danby also identifies a clogged defrost drain as a leak check; persistent water needs service.
Is water in the freezer drip pan always a fault?
Not necessarily. Danby manuals explain that defrost water can collect in a drip pan, but it should remain contained. An overflowing, cracked, displaced, or repeatedly wet pan is not normal for the appliance and needs diagnosis.
Can I chip the ice away to stop a freezer leak?
No. Danby warns that sharp objects can damage refrigerant lines. Use only the exact manual's safe defrost procedure, or call service for heavy or hidden ice.
What if the leak is near the ice maker?
Treat it as a separate water-system problem. Stop using the ice maker, inspect only visible tubing and fittings for droplets or damage, and arrange qualified appliance or plumbing service without loosening connections.
When should I call for a Danby freezer leak?
Call when the leak returns, the source is hidden, the freezer warms or repeatedly frosts, a pan or gasket is damaged, or water reaches electrical parts. Do not open the sealed system or repair refrigerant and internal electrical components yourself.
Read the exact guide
Official sources
- OWNER’S MANUALDanby · Official Danby owner manual used for safe manual defrost, drip-tray monitoring, door-seal cleaning, and sharp-object/refrigerant-line warnings; exact model manual controls
- untitledDanby · Official Danby freezer manual used for model-dependent door, frost, defrost-pan, cooling, and ice-maker guidance; exact model manual controls
- The ice maker is leaking water. How can I stop the leak?Danby Canada · Official Danby FAQ used for visible ice-maker connection and component leak checks
- The fridge is leaking water. How can I stop the leak?Danby Canada · Official Danby FAQ used for the shared refrigerator/freezer leak checks of defrost drain, door seal, and level
- The freezer is not cooling properly. What should I do?Danby Canada · Official Danby FAQ used for the cooling-failure and service boundary when a leak is accompanied by warming
Community feedback
Share a repair observation
Share a plain-text repair observation. Accepted observations are published automatically; this page may take a moment to update.