
On this page
Start here
Quick answer
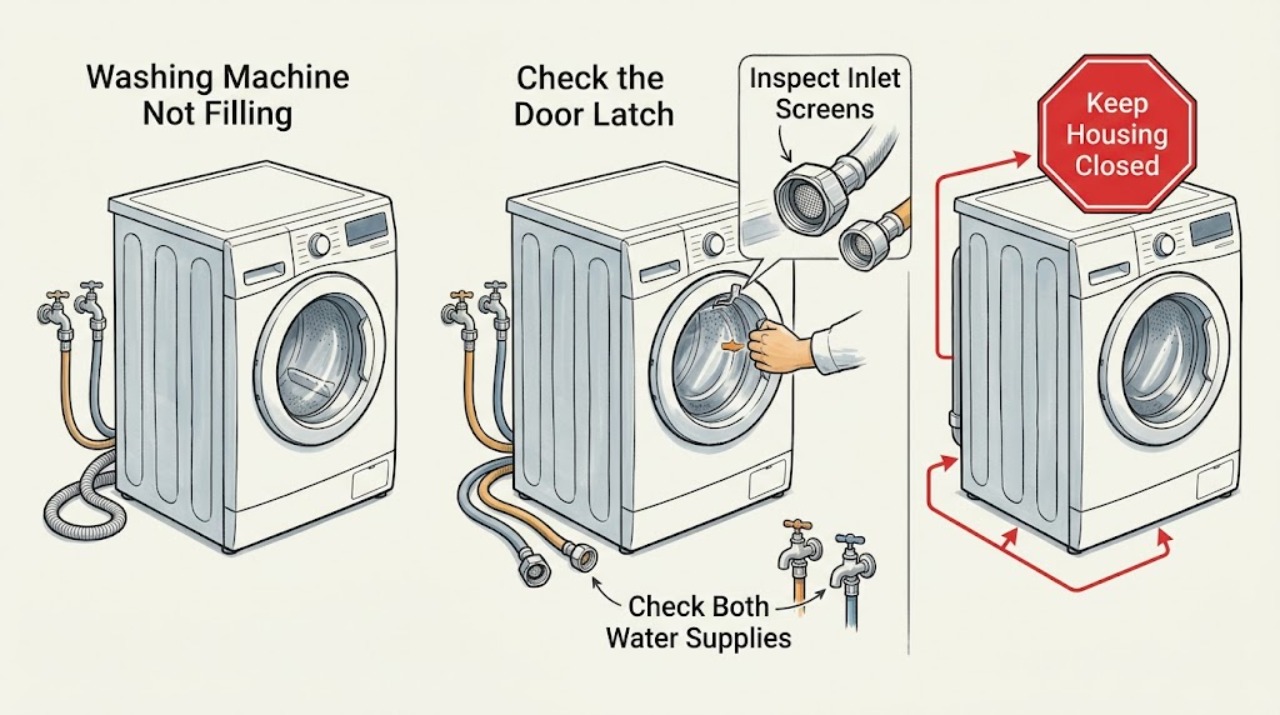
An Amana washer that is not filling should first be checked for both water supplies being on, connected hoses without kinks, an unobstructed closed lid or door, and a drain hose that is not siphoning water away. If the fill is only slow, consider the selected cycle because some top-load cycles can pause or take longer to fill. With the water turned off, inspect the inlet screens from ordinary safe access and clean them only as Amana describes. If both supplies and the visible installation checks are correct but the washer still does not fill, or if there is a leak, electrical concern, flooding, or a latch that will not secure, stop and arrange qualified appliance service rather than testing internal parts live.
Before you begin
Safety first
- This article covers ordinary-access observation and water-off inlet-screen inspection only. Do not open the console, test live wiring, bypass a latch, force fittings, or alter a wall drain.
Work through in order
Diagnostic checks
Use only checks that match the exact appliance or system and its official guide.
-
Check 1
From a dry, stable position, confirm that the washer has power, the intended cycle was selected and started, and the top-load lid or front-load door is fully closed with the latch area free of clothing or debris; do not defeat or bypass the latch.
Expected result: The control responds and the latch secures; the washer remains paused or unresponsive; or the lid or door will not close or latch.
Next step: Remove only an obvious, loose obstruction, close the lid or door normally, and retry once. If it will not latch or the control remains unresponsive, arrange appliance service.
Stop if: Stop for a broken hinge or latch, exposed wiring, a door or lid that must be forced, or any attempt to bypass a safety interlock.
Why this matters
Why: A washer may not begin filling until the cycle starts and the lid or door is recognized as closed. A latch that will not secure can prevent filling and points to a closure, obstruction, or internal latch issue rather than a water-supply diagnosis.
-
Check 2
At the wall connections, verify that both the hot and cold household valves are fully open and that both supply hoses are connected to the washer and the corresponding valves; do not loosen a pressurized connection.
Expected result: Both valves are open and both hoses are connected; one valve is closed; a hose is missing, cross-connected, or visibly kinked; or the connection drips.
Next step: With the machine idle, open a closed valve normally and correct only an obvious hose-routing kink without moving the appliance. If a connection leaks, cannot be identified, or needs disassembly, stop and request service.
Stop if: Stop for active leaking, a damaged hose, a stuck valve, water near electrical equipment, or any need to move the washer while connected.
Why this matters
Why: Amana states that both incoming sources need to be connected and on for proper operation. A closed valve or incorrect connection can cause no fill, while a kink restricts flow. A drip is a leak condition, not a reason to tighten a pressurized fitting aggressively.
-
Check 3
After turning off the household water supply and keeping a bucket ready, remove an inlet hose only if it can be done without force and inspect the washer-end screen; use pliers as Amana describes, and do not remove the screen from its seat.
Expected result: The screen is visibly blocked by mineral scale or debris; the screen is clear; the hose itself has restricted flow when disconnected; or the fitting will not release safely.
Next step: Clean a reachable screen with a brush and mild soap and water as Amana instructs, reinstall the hose without cross-threading, and restore water slowly while checking for leaks. Replace a restricted hose only after the exact model and connection are confirmed; otherwise arrange service.
Stop if: Do not work on a pressurized hose, pry out the screen, use a sharp tool, or continue if the fitting, hose, or screen is damaged.
Why this matters
Why: A blocked screen or hose can restrict the fill stream. A clear screen makes a hidden inlet valve, control, or supply problem more plausible, while restricted flow through a disconnected hose points to a hose or household-supply issue. Inability to remove the hose safely is a stop condition.
-
Check 4
If water enters and then disappears, inspect the visible drain hose routing from a stable position: it should retain the model's U-shaped form, have an air gap at the drain, and not be taped or sealed into the standpipe.
Expected result: The hose is inserted too far, the drain opening is sealed, the standpipe is unusually low, the hose is kinked or clogged, or water remains in the tub after filling.
Next step: Restore the drain hose only to the exact model's installation arrangement; Amana's guidance gives a maximum insertion of 4.5 inches (113 mm) and a minimum standpipe height of 39 inches (99 cm). If the installation cannot be changed safely or the drain is blocked, request appliance or plumbing service.
Stop if: Do not tape or seal the drain, reach into standing water, move a connected appliance, or alter a wall drain without qualified help.
Why this matters
Why: Amana identifies excessive insertion, sealing the drain opening, and a low standpipe as conditions that can allow siphoning or gravity flow. A kink or clog can instead prevent draining. Water that remains points away from immediate siphoning but does not prove the inlet system is healthy.
-
Check 5
Run one normal, model-appropriate cycle observation without opening the cabinet or repeatedly cancelling it; note the selected cycle, whether the machine is sensing, and how long it takes before a steady fill begins.
Expected result: A steady fill begins after a short sensing period; the fill is weak but continuous; a bulky or water-saving cycle pauses; or there is still no water after the visible checks.
Next step: Allow the cycle's normal sensing and fill behavior to complete once, then compare the result with the model's use-and-care instructions. If no fill persists, document the cycle and symptoms for appliance service rather than opening the console.
Stop if: Stop for burning odor, unusual sparking, repeated tripping, flooding, a grinding latch, or a drum or tub that moves abnormally.
Why this matters
Why: Some cycle behavior is intentional: Amana notes that water use varies by cycle, bulky cycles may pause, and some top-load fills can take about 10–12 minutes. A weak stream or persistent no-fill after that context keeps a restricted supply, inlet component, control, or latch issue in consideration.
-
Check 6
After the safe checks, record whether the washer is completely dry, receives a weak stream, fills and drains, shows a latch or control symptom, or leaks; keep the washer disconnected from water or power if the condition is unsafe.
Expected result: All visible checks pass but no fill occurs; a leak or electrical symptom is present; the latch will not secure; or the symptom changes intermittently.
Next step: Arrange qualified appliance service and provide the model information, cycle, water-supply status, photos of visible connections, fill timing, and any error or latch behavior. Use the washer only after the professional confirms it is safe.
Stop if: Do not apply live-voltage tests, open the console, jumper a latch, or replace an internal component based only on the symptom.
Why this matters
Why: A persistent no-fill after supply, hose, screen, drain, and latch observations may involve an internal inlet valve, pressure-sensing, control, or wiring fault that cannot be confirmed safely from outside. A leak or electrical symptom raises the urgency and changes the task from troubleshooting to hazard control.
Use your observations
Decision map
Find the observation that best matches what you see, then follow the next safe action.
-
PATH 01Safety boundary
What you see
One or both water valves are closed, a supply hose is kinked, or the hot and cold connections are not both present.
Do this next
Open the valve normally or correct an obvious routing kink while the washer is idle; then observe one cycle without forcing a connection.
Why this path and its safety boundary
Why it matters: The washer may have insufficient or no incoming water, so the supply path is the leading safe check.
Safety stop: Stop for a leaking, burst, stuck, or unidentified hose or valve and arrange service.
-
PATH 02Safety boundary
What you see
A washer inlet screen has scale or debris, or a disconnected inlet hose has restricted flow.
Do this next
With water off, clean a reachable screen using Amana's brush and mild-soap-and-water method; replace a restricted hose only after exact compatibility is confirmed.
Why this path and its safety boundary
Why it matters: The fill path is restricted, but the screen and hose must not be damaged or modified during cleaning.
Safety stop: Do not pry out the screen, use sharp tools, or continue when a fitting will not release safely.
-
PATH 03Safety boundary
What you see
The top-load lid or front-load door will not close and latch, or the latch area is obstructed.
Do this next
Clear only a loose visible obstruction and close the lid or door normally. Arrange service if the latch, hinge, strike, or control remains faulty.
Why this path and its safety boundary
Why it matters: The washer may be withholding fill or wash operation because the safety closure is not recognized.
Safety stop: Do not force, tape, bypass, or jumper the latch.
-
PATH 04Safety boundary
What you see
Water enters but immediately drains, the drain hose is sealed or inserted too far, or the standpipe is too low.
Do this next
Restore the visible drain-hose installation to the model guidance, preserving an air gap; use qualified help when the standpipe or wall drain needs alteration.
Why this path and its safety boundary
Why it matters: The washer can appear not to fill when incoming water is being lost through drain-hose siphoning or gravity flow.
Safety stop: Do not seal the drain opening, reach into standing water, or move the appliance while connected.
-
PATH 05Safety boundary
What you see
The washer is sensing or on a bulky cycle, a weak stream is not worsening, and filling resumes within the cycle's expected behavior.
Do this next
Compare the result with the exact model's use-and-care instructions and monitor one complete cycle; arrange service if the delay repeats outside that context or the tub remains dry.
Why this path and its safety boundary
Why it matters: The delay may be cycle-specific rather than a failed fill system; Amana notes that bulky cycles may pause and can take about 10–12 minutes to fill.
Safety stop: Stop for flooding, abnormal noise, burning odor, electrical symptoms, or a latch that will not secure.
-
PATH 06Safety boundary
What you see
Both supplies, visible hoses, screen access, drain routing, cycle selection, and the latch appear correct, but the washer still does not fill.
Do this next
Stop user troubleshooting and arrange qualified appliance diagnosis with the model, cycle, timing, and observed symptoms.
Why this path and its safety boundary
Why it matters: An internal valve, sensor, control, or wiring issue is possible, but the specific failed part cannot be identified safely from this observation alone.
Safety stop: Do not open the console, perform live electrical tests, bypass the latch, or install an unverified internal part.
Helpful context
Understand the symptom
Separate no fill from a slow or intentionally paused fill
First note whether the drum or tub receives no water at all, receives a weak stream, fills and then loses water, or pauses before continuing. A no-fill symptom keeps the supply, inlet path, and lid or door latch high on the list. A slow fill can also reflect a restricted hose or screen, low supply flow, or a cycle that takes longer. On some top-load cycles, Amana says the fill can pause and a bulky cycle can take about 10–12 minutes, so the selected cycle and elapsed time matter.
Check model-specific loading and controls
Top-load and front-load Amana washers use different lid or door arrangements, but neither should be forced. Newer top-load models will not fill or wash with the lid open, while a front-load model needs its door to latch. Confirm that the cycle has actually started, the latch area is clear, and the control is not paused before moving to hose and screen checks.
The drain hose can make a washer look as if it will not fill
If water enters and immediately disappears, inspect the drain hose installation rather than assuming the inlet is bad. Amana identifies siphoning when the hose is inserted too far, the drain opening is sealed, or the standpipe is too low. Restore only the installation described for the exact model and keep an air gap; do not tape or seal the drain opening.
Safety boundary
Stop conditions
- Stop immediately for active leaking, flooding, water near electrical equipment, burning odor, sparking, repeated breaker trips, or a damaged supply hose or valve.
- Do not bypass, tape, jumper, or defeat a lid or door latch or operate the washer when it cannot close and secure normally.
- Do not open the console, apply live-voltage tests, or replace an inlet valve, sensor, control, or wiring based only on a no-fill symptom.
- Do not work on a pressurized connection, force a hose fitting, pry out an inlet screen, or move the washer while connected to water or power.
- Stop and request qualified appliance or plumbing service when the drain, standpipe, hidden leak, or wall connection needs alteration.
Only after diagnosis
Potential parts
- washer inlet hose
Consider this category only if inspection confirms a kinked, leaking, blocked, or damaged hose and the exact model and connection are verified.
Match the exact Amana model and hose connection; do not substitute a hose based only on appearance or use a damaged hose while troubleshooting. - washer inlet screen
Consider this category only when the exact model uses a separately serviceable screen and the screen is damaged beyond Amana's cleaning procedure.
Confirm the exact model and manufacturer procedure; do not pry out or omit the screen. - water inlet valve
Consider this only after safe supply, hose, screen, drain, cycle, and latch checks and a qualified diagnosis supports an internal fill-valve fault.
Exact model compatibility and electrical safety must be confirmed by the manufacturer documentation or a qualified technician; do not live-test or install by symptom alone. - lid or door latch assembly
Consider this only if the exact model's lid or door will not latch after loose obstructions are cleared and a qualified diagnosis identifies the latch path.
Match the exact top-load or front-load model and preserve the safety interlock; do not bypass it.
When checks do not resolve it
Need a professional?
Arrange qualified appliance service when both water supplies and visible installation checks are correct but the Amana washer still will not fill, when the lid or door will not latch, or when an inlet, sensor, control, or wiring fault is suspected. Seek prompt service for active leaks, flooding, electrical symptoms, burning odor, repeated breaker trips, or a damaged hose or valve. Plumbing service may be needed when the standpipe, drain, or wall connection is the source of siphoning or leakage.
Safety scope: This article covers ordinary-access observation and water-off inlet-screen inspection only. Do not open the console, test live wiring, bypass a latch, force fittings, or alter a wall drain.
Common questions
FAQ
Why is my Amana washer not filling with water?
Check that both hot and cold valves are open, both hoses are connected and not kinked, the lid or door latches, and the drain hose is not siphoning water away. If these checks pass and no water enters, arrange qualified appliance service rather than opening the control area.
Can one water hose be connected on an Amana washer?
Amana's fill guidance says both incoming hot and cold sources should be connected and turned on for proper operation. Do not improvise a one-hose setup; use the exact model's installation instructions or ask a technician.
Why does my Amana washer fill slowly or pause?
A kinked hose, restricted screen, low incoming flow, or drain issue can slow filling. Some top-load cycles, especially bulky cycles, can also pause and take longer; Amana notes that a bulky cycle may take about 10–12 minutes to fill. Compare the behavior with the exact model instructions before treating a normal sensing period as a failure.
What if water enters my Amana washer and immediately drains?
Inspect the visible drain-hose installation for excessive insertion, a sealed drain opening, a low standpipe, or a kink. Amana identifies these as possible siphoning or drainage conditions. Restore the model-specific arrangement without taping or sealing the opening; use plumbing help if the standpipe or wall drain needs work.
Should I replace the water inlet valve if my Amana washer will not fill?
Not from the symptom alone. First document the two supplies, hoses, screens, drain routing, cycle behavior, and latch. A technician should diagnose an inlet valve, sensor, control, or wiring fault and confirm the exact model before any internal replacement.
Read the exact guide
Official sources
- Not Filling or Long Fill - Washer - Product Help | AmanaAmana Product Help · Supports top-load checks of both valves, hose kinks, drain-hose insertion and height, and cycle-specific longer or paused filling.
- Lid Not Latching - Washer - Product Help | AmanaAmana Product Help · Supports the lid-closure branch for newer top-load washers that will not fill or wash with the lid open.
- Not Filling or Filling Slowly - Front Load Washer - Product Help | AmanaAmana Product Help · Supports front-load checks of hot and cold valves, hose connections and kinks, inlet screens, restricted hoses, anti-flood devices, and drain routing.
- Checking the Fill Hoses if the Washer is not Filling - Product Help | AmanaAmana Product Help · Supports checks of household faucets, both hot and cold connections, hose kinks, drain-hose installation, and safe inlet-screen inspection.
- Continuously Fills / Fills and Drains - Front Load Washer - Product Help | AmanaAmana Product Help · Supports the branch where incoming water immediately drains because the hose is inserted too far, sealed, or connected to a low drainpipe.
Community feedback
Share a repair observation
Share a plain-text repair observation. Accepted observations are published automatically; this page may take a moment to update.