
On this page
Start here
Quick answer
First decide whether the washer truly receives no water or is simply sensing and using a lower high-efficiency water level. Keep the lid closed, cancel any pause or lockout shown on the display, and press Start/Pause once. Then check that both household water valves are open, the hoses are not kinked or frozen, and the external hose connections and inlet screens are not obstructed, using the model manual for any screen-cleaning procedure. If water enters and immediately drains, inspect the external drain-hose position for siphoning. Stop for a leak, damaged cord, burning smell, repeated breaker trip, or water near electrical parts; if H2O SUPPLY or a lid, sensor, or control fault returns after these safe checks, arrange authorized or qualified service.
Before you begin
Safety first
- Do not bypass the lid lock, open electrical covers, energize an exposed valve, move a loaded washer, or continue operating with a leak, wet plug, damaged cord, burning smell, or repeated breaker trip.
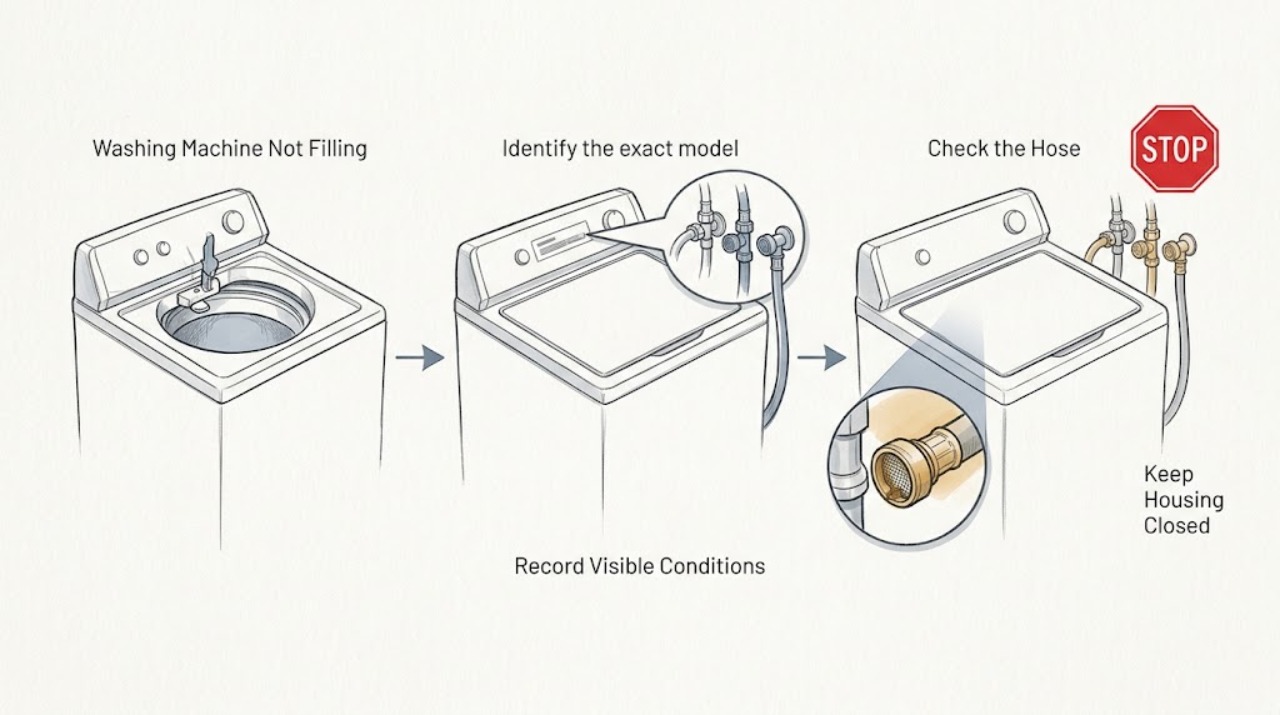
Work through in order
Diagnostic checks
Use only checks that match the exact appliance or system and its official guide.
-
Check 1
Identify the exact Crosley model from the label under or around the lid, then start a short normal cycle with the basket safely empty or lightly loaded. Close the lid fully, select a documented cycle, press Start/Pause once, and watch the first minute without opening the lid.
Expected result: A SEnSing or FILL indication, a brief motor sound, or a short burst of water can be normal startup. A Lid or lid-open indication, a blinking Start light, or no response means the washer is not yet permitted to fill. A completely silent, powered panel points to a control or start-state issue rather than proving that the inlet valve is bad.
Next step: Close the lid without forcing it and press Start/Pause once to resume. If the display stays on Lid, the latch will not engage, or the washer stops before any water test, continue to the lid and service branch rather than bypassing the interlock.
Why this matters
Why: The lid must be closed for compatible automatic-fill top-load cycles to start, and sensing includes part of the water fill. Opening the lid during startup can pause the sequence, so testing with the lid open can create a false no-fill symptom.
-
Check 2
Read the display or status lights before resetting anything. Look specifically for H2O SUPPLY, FILL, PAUSE, Lid, CAnCELEd, or a model-specific water-level or lid code; write down the exact spelling and when it appeared.
Expected result: On the Crosley top-load manual, H2O SUPPLY means the washer cannot sense water entering, while Lid means the cycle stopped because the lid is open. CAnCELEd or a comparable lockout can keep controls from responding temporarily. A front-load model may instead report that water is not supplied or show a model-specific information code.
Next step: For a documented four-minute top-load lockout, wait the full interval once and retry after checking the supply. If the warning returns, record it with the model number and arrange service; do not keep cycling power.
Why this matters
Why: The displayed state determines whether to check the lid, wait for a documented lockout, or inspect the water path. Repeatedly unplugging during the top-load H2O SUPPLY or CAnCELEd lockout restarts its timer rather than repairing the cause.
-
Check 3
With the washer stopped and safe to approach, verify that both hot and cold household supply valves are fully open. Trace each hose from the faucet to the washer, checking for a sharp kink, crushing, freezing, loose connection, or visible leak; do not move a loaded washer to reach the rear.
Expected result: If one or both valves are closed, a supply was interrupted, or a hose is kinked or frozen, the washer may not fill or may fill only on one temperature selection. If both valves are open and hoses are intact but neither temperature supplies water, continue to the inlet-path branch.
Next step: Open a closed valve slowly and correct only an accessible kink or loose external connection. If a hose bulges, splits, leaks at the faucet, or cannot be safely accessed, shut the valve and arrange replacement or service instead of running the washer.
Why this matters
Why: Crosley documentation identifies the faucets, water-inlet hoses, and rear inlet valves as part of the fill path, and its troubleshooting guidance calls out open taps, connected hot and cold taps, sufficient pressure, and hoses that are not clogged.
-
Check 4
After turning off both water valves and isolating the washer, inspect the hose ends and the washer's external inlet screens only as the exact manual permits. Use a container and towel for residual water; do not poke, enlarge, or remove a screen that requires cabinet disassembly.
Expected result: Sediment, a clogged mesh filter, or a blocked hose can restrict or stop fill even when faucet pressure is good. A clean, undamaged external path with no water from either side points toward an inlet valve, wiring, pressure, or control diagnosis rather than more detergent or a longer cycle.
Next step: Restore connections without cross-threading, open the valves slowly, and run one supervised test. If water still does not enter, or a connection leaks, stop and provide the technician the model, selected temperature, code, and which supply was tested.
Why this matters
Why: Crosley troubleshooting lists clogged hoses and a clogged mesh filter as possible causes of water not being supplied. The same guidance says a persistent information code should go to a service center; it does not authorize bypassing the valve or sensor.
-
Check 5
Watch the drain hose during one supervised fill attempt without placing hands behind the washer. Confirm that the external hose is seated and supported according to the installation instructions and is not pushed so far into the standpipe that incoming water is immediately siphoned away.
Expected result: If water can be heard entering but the basket never retains it, or the washer repeatedly fills and drains, a drain-hose position or drain-path problem is more likely than a closed water valve. If no water enters at all, return to the supply and inlet branches.
Next step: Stop the cycle if the standpipe overflows or a hose connection leaks. Correct only an obvious, accessible external hose-position issue documented for the model; otherwise arrange service or an installation check.
Why this matters
Why: A washer can look as though it is not filling when water leaves as fast as it arrives. Drain-hose installation details vary by model, so a visual external check is appropriate but moving plumbing or the appliance is not a substitute for the manual.
-
Check 6
If the washer fills only a little, allow the sensing portion to finish and compare the behavior with the selected water-level option and load. Keep clothes loosely distributed and do not add water manually or select a level that the model does not provide.
Expected result: An Auto or high-efficiency cycle may use a lower visible level and may briefly sense before adding more water. If the cycle progresses normally, the lower level is not a no-fill failure. If it never progresses, the H2O SUPPLY warning returns, or the water level does not respond to a documented setting, treat it as a fault.
Next step: Run one compatible cycle with the lid closed and the documented level selected. If sensing or water-level codes return, stop changing settings and arrange diagnosis for the water-level sensor, inlet system, lid lock, or control.
Why this matters
Why: Crosley explains that automatic load sensing selects water for load size and that high-efficiency washers use less water than older machines. Manual load-size selections are model-dependent and should not be used to override a sensor or a lid interlock.
Use your observations
Decision map
Find the observation that best matches what you see, then follow the next safe action.
-
PATH 01Next step
What you see
The lid-open message remains, the lid will not lock, or the cycle never starts.
Do this next
Remove only an accessible garment or shipping obstruction, close the lid normally, and press Start/Pause once. If the latch or lock code remains, stop and arrange service; never bypass the lid interlock.
-
PATH 02Next step
What you see
H2O SUPPLY or a water-not-supplied message appears and neither hot nor cold water enters.
Do this next
Check both supply valves, hose condition, sufficient household pressure, and the model-approved external screens. Wait through any documented lockout once; if the warning returns, request service for the inlet valve, wiring, sensor, or control.
-
PATH 03Next step
What you see
Only hot or only cold water is absent.
Do this next
Check that the affected faucet is open, the hose is connected to the matching washer inlet, and the hose is not kinked or frozen. Do not run repeated temperature tests if the connection leaks or the hose is damaged.
-
PATH 04Next step
What you see
Water enters but immediately drains or the basket never retains water.
Do this next
Stop the cycle and inspect the external drain-hose position against the exact installation instructions. If the drain overflows or the hose is inaccessible, arrange an installation or appliance service visit.
-
PATH 05Next step
What you see
The washer adds a small amount of water during Auto or sensing, then advances normally.
Do this next
Treat this as normal high-efficiency operation unless the manual or display reports a fault. Do not add water by hand; use the documented cycle and water-level options.
-
PATH 06Next step
What you see
Water leaks, the cord or plug is wet or damaged, a burning smell appears, or the breaker trips repeatedly.
Do this next
Stop immediately, shut the supply valves, and disconnect power only if safe. Keep away from standing water and arrange qualified service or electrical help.
Helpful context
Understand the symptom
Separate a real no-fill from normal sensing
Crosley sells more than one washer design, so the exact control panel and manual govern the details. On compatible top-load models, SEnSing can include a brief spin and part of the fill, and an automatic level can leave less water visible than an older washer. A lid-open indication, pause, delayed start, water-supply warning, or water that enters and immediately leaves is a different branch from a closed lid with no sound or water at all. Record the model number, display text or flashing light, selected cycle, and whether either hose or the floor is wet before changing settings.
Make the water and electrical checks safe
Do not reach into a moving basket, bypass the lid lock, or remove panels to test a valve or control. If a hose is leaking, the cabinet is wet near the plug, the cord or plug is damaged, there is a burning smell, the breaker trips repeatedly, or water cannot be controlled, stop the cycle and disconnect power only if it is safe to do so; shut the water valves and arrange service. Before inspecting a hose connection or inlet screen, turn off the water supply and unplug or isolate the washer. Pressing Power alone does not disconnect electrical power on the Crosley top-load manual.
Safety boundary
Stop conditions
- Stop immediately for a burst or uncontrolled hose leak, standing water near the plug or controls, a damaged cord or plug, smoke, a burning smell, repeated breaker trips, or a cabinet that is electrically unsafe.
- Do not reach into a moving basket, bypass the lid lock, remove electrical covers, bridge an inlet-valve circuit, or replace a sensor or control without model-specific repair instructions and the required skill.
- Stop repeating tests when a documented water-supply or lid code returns after the safe external checks, when the washer cannot hold water, or when the supply pressure and plumbing need building-level work.
Only after diagnosis
Potential parts
- washing-machine water inlet valve
Consider this class only after both faucets, hoses, pressure, and permitted external screens pass inspection and a qualified diagnosis shows that the valve does not open or has a failed coil.
Confirm the complete model number and the exact connector, temperature ports, and manufacturer fit information; do not infer compatibility from the Crosley name alone. - washing-machine lid latch or lid switch
Consider this class only when the lid closes normally but the washer continues to report Lid or will not begin its documented fill sequence.
Use model-specific service information and keep the interlock intact; never bypass it to test a cycle. - water-level sensor or control board
Consider this class only when a model-specific water-level or control indication persists after the supply and lid checks and a technician confirms the failed circuit.
Verify the exact model, software or control revision, harness, and electrical safety requirements before replacement.
When checks do not resolve it
Need a professional?
Arrange Crosley-authorized or qualified appliance service when both supply valves and accessible hoses are correct but the washer still does not fill, a water-supply, lid, water-level, or control code returns, the washer fills and immediately drains, an inlet screen or valve requires disassembly, or any leak or electrical hazard is present. Crosley directs owners to the dealer or the Use and Care Guide for the correct product-specific service contact.
Safety scope: Do not bypass the lid lock, open electrical covers, energize an exposed valve, move a loaded washer, or continue operating with a leak, wet plug, damaged cord, burning smell, or repeated breaker trip.
Common questions
FAQ
Why does my Crosley washer sound like it is filling but show little water?
An Auto or high-efficiency cycle may briefly sense and use less visible water than an older washer. If the cycle advances normally, that can be expected. If H2O SUPPLY, a water-level code, or a stalled cycle appears, check the supply and lid branches instead.
Why will my Crosley washer not fill with the lid closed?
Check the exact lid indication, Start/Pause state, both water valves, hose condition, and any documented lockout. If the lid does not lock or a supply warning returns after the safe checks, the inlet path, lid interlock, sensor, or control needs service diagnosis.
Can I add water by hand to a Crosley washing machine?
No. Use the documented cycle and water-level controls. Adding water manually can hide a supply or sensing fault and can create an overflow or electrical hazard.
Read the exact guide
Official sources
- 16138000018362说明书Crosley · Crosley washer documentation hosted on the official Crosley domain; confirm the exact model before applying control details
- Washer Owners Manual & Installation InstructionsCrosley · Crosley-branded top-load washer models covered by the linked manual, including the listed 5TW and XTW/YTW model families
- Crosley Washers - CROSLEY HOME PRODUCTSCrosley Home Products · Crosley laundry product catalog page; model-specific troubleshooting remains controlled by the exact manual
- CUSTOMER SERVICE - CROSLEY HOME PRODUCTSCrosley Home Products · Crosley appliances, with service contact varying by product
Community feedback
Share a repair observation
Share a plain-text repair observation. Accepted observations are published automatically; this page may take a moment to update.