
On this page
Start here
Quick answer
Stop the cycle and contain the water. Close the dishwasher's water tap; disconnect power only if the plug, floor, and surrounding area are dry and safe to approach. Note whether the leak starts during filling, washing, draining, or while the machine is idle, and whether it is at the door, an accessible hose, the sink connection, or underneath the appliance. Check only visible door-seal and load conditions, the accessible inlet and drain-hose route, and the removable filters as allowed by the exact model manual. Ariston manuals describe anti-flood protection on some models and warn never to cut an inlet hose because it can contain live electrical parts. A cracked or triggered water-stop hose, water in the base, a persistent leak, or any leak near electrical parts is a service boundary.
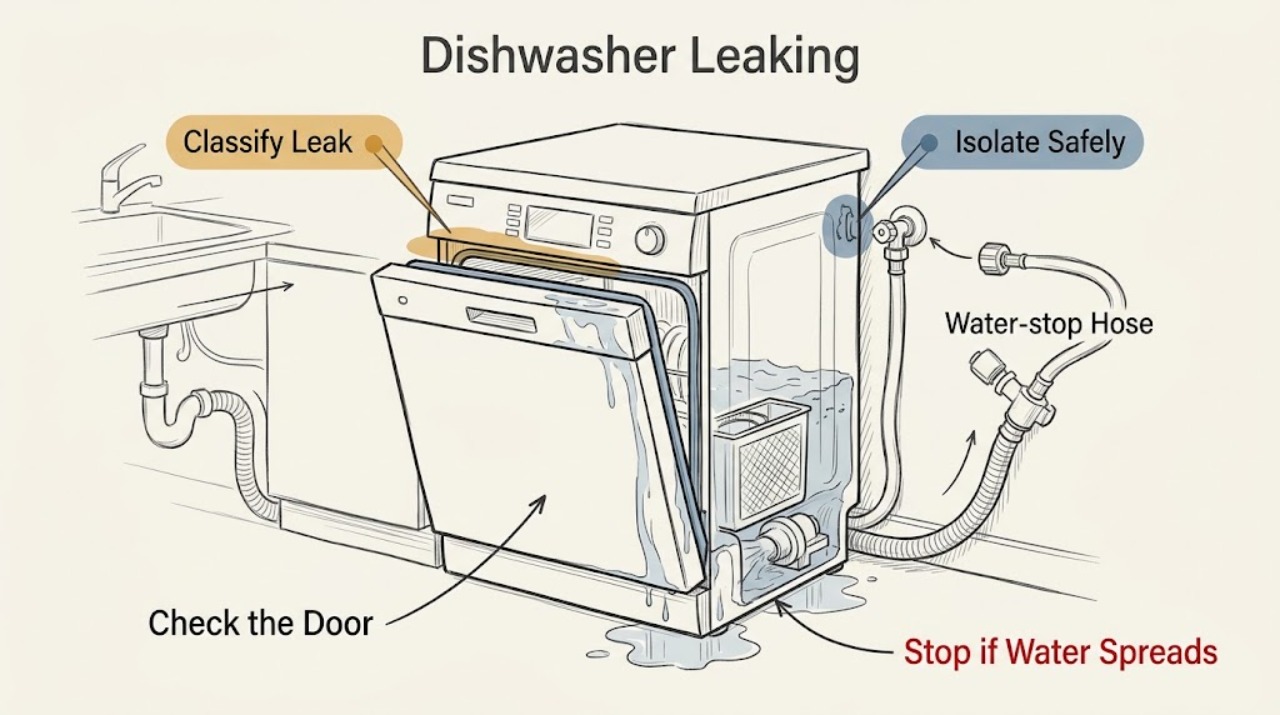
Work through in order
Diagnostic checks
Use only checks that match the exact appliance or system and its official guide.
-
Check 1
Without starting another cycle, dry the accessible floor and note where the water first appears. If the dishwasher is still running and it is safe to do so, cancel it according to the exact manual; otherwise leave it alone. Record whether the leak starts during filling, washing, draining, after the cycle, or while idle, and whether it is at the door, an inlet hose, the sink side, or underneath.
Expected result: Water appears during fill, only during drain, at the front while washing, after a cycle, or with no cycle running; the visible source is the door, hose, sink connection, or hidden underneath area.
Next step: Close the water tap and proceed only to the matching visible check below. If water is under the appliance, near wiring, or continuing after the tap is closed, keep the dishwasher off and arrange service rather than pulling it out.
Why this matters
Why: Timing narrows the decision: fill timing makes the inlet side more likely, drain timing makes the drain path more likely, and front-of-door water during washing makes the seal, closure, loading, foam, or leveling worth checking. A leak that starts while idle can indicate a pressurized inlet-side issue. A hidden source cannot be identified safely from the floor alone.
-
Check 2
Close the dishwasher's water tap. Disconnect the plug only when the plug, floor, and approach are dry and safe; if water is near the electrical connection, leave the area and use a safe breaker or qualified help instead of reaching through water. Do not touch a running appliance or open a panel.
Expected result: The tap closes and the leak stops; the leak continues; power cannot be isolated without approaching water; or the appliance has a burning smell, damaged wiring, or a tripped breaker.
Next step: Keep the water tap closed and the dishwasher out of use. For water near electrical parts or any electrical warning, do not restore power; arrange qualified appliance or electrical service.
Why this matters
Why: Stopping when the tap closes supports an inlet-side or pressure-related leak, but it does not identify which hose or connection is defective. Continued flow after isolation, inaccessible isolation, or an electrical warning crosses the safe homeowner boundary.
-
Check 3
With the appliance off and cool, inspect the visible door gasket and the door's closing path. Look for food residue, a displaced or damaged seal, a dish or rack protruding into the door, or a door that does not close evenly. Clean only the accessible seal as the exact model manual allows; do not remove the gasket or adjust hinges as a leak experiment.
Expected result: The seal has visible residue or damage, the door is obstructed or misaligned, the leak is concentrated at a corner, or the door area looks normal and water comes from elsewhere.
Next step: Remove only an obvious loading obstruction and clean the visible seal according to the exact manual, then make one supervised test only if the appliance is otherwise dry and safe. If the gasket is damaged, the door will not close evenly, or the leak returns, stop and provide the model number to service.
Why this matters
Why: A contaminated, damaged, or poorly closed door can allow wash water to escape at the front. A clean-looking gasket does not rule out a door alignment, tub, spray, foam, or internal leak, and it does not justify ordering a generic seal.
-
Check 4
At the accessible water-supply side, inspect the inlet hose and visible fittings without disconnecting them. Look for a kink, crush point, brittleness, crack, or water-stop indicator; on a model with a transparent water-stop coating, note any color intensification, and on a model with an inspection window note whether it is red. Never cut the inlet hose.
Expected result: The hose is cracked, brittle, crushed, wet at a fitting, visibly damaged, or its water-stop indicator shows a trigger; alternatively, it is dry and intact.
Next step: Keep the tap closed and arrange qualified Ariston after-sales or appliance service for any damage, wet fitting, or triggered indicator. Do not cut, splice, or substitute a hose based on appearance or a generic search result.
Why this matters
Why: A damaged or triggered water-stop hose can explain a fill or idle leak and requires replacement through service. An intact visible hose does not rule out a concealed fitting or appliance-side inlet-valve leak, and a water-stop feature is not present or identical on every Ariston model.
-
Check 5
Inspect only the visible drain hose route under the sink or at an accessible opening. Check for a sharp bend, squash point, loose visible connection, or water at the sink outlet. If the dishwasher was recently installed or the disposer was changed, have the installer verify that any sink-outlet plastic plug was removed and that the hose route and height match the exact installation manual; do not pull out an integrated dishwasher.
Expected result: The leak begins during drain, the drain hose is kinked or crushed, the sink connection is wet or backs up, a recent installation or disposer change occurred, or the visible route is clear and dry.
Next step: Leave the dishwasher off and have an installer, plumber, or appliance technician correct or verify the connection when the route, plug, or sink side is suspect. Do not detach hidden hoses, open the sink trap, or repeatedly run drain cycles.
Why this matters
Why: A drain-timed leak or wet sink connection makes the downstream drain path more likely. A retained sink-outlet plug, incorrect routing, or a household drain restriction can prevent discharge or send water back. A clear visible hose does not exclude an internal drain fault.
-
Check 6
After power is safely disconnected and standing water is contained, remove only the removable filter assembly described by the exact Ariston manual. Check for food or hard debris, clean the filters using the manual's method, and reinstall them fully and securely. Do not run the dishwasher without the filters, with a loose filter, or with the wash-cycle pump protection removed.
Expected result: The filters are clogged, damaged, or loose; debris is visible around the accessible filter area; or the filters are clean and correctly seated.
Next step: Correct only cleaning and seating conditions allowed by the model manual. If water remains, the leak is underneath, the filter will not lock, or the leak returns after the filter is secure, stop and arrange service; do not probe the pump.
Why this matters
Why: A restriction or incorrectly seated filter can affect water flow and contribute to drain-side symptoms, but filter condition alone does not prove the cause of an external leak. Damage or a missing filter can also allow debris toward protected pump areas.
-
Check 7
Only after the area is dry, the water connection is intact, the door closes normally, the filters are secure, and no stop condition is present, run one short empty or documented test cycle while staying nearby. Stop immediately if water reappears; do not repeat cycles to reproduce a leak.
Expected result: No water appears, the leak returns at the same stage, water collects underneath, the anti-flood behavior prevents filling, or an error/indicator appears.
Next step: Close the water tap, leave the dishwasher off, and arrange service for any recurrence, base water, anti-flood response, or error. Give the technician the leak timing, location, model number, and checks already completed.
Why this matters
Why: A dry test after a corrected visible condition makes that condition a plausible contributor, but it does not prove a durable repair. A repeatable stage-specific leak, water in the base, or a triggered protective response needs diagnosis beyond the external checks.
Use your observations
Decision map
Find the observation that best matches what you see, then follow the next safe action.
-
PATH 01Next step
What you see
Do this next
Keep the water tap closed and arrange qualified Ariston after-sales or appliance service. Do not cut, splice, or disconnect the inlet hose yourself.
-
PATH 02Next step
What you see
Do this next
Correct only an obvious loading or accessible-cleanliness condition allowed by the manual and make at most one supervised retest. If the seal is damaged, the door remains uneven, or water returns, stop and call service.
-
PATH 03Next step
What you see
Do this next
Leave the dishwasher off and have a qualified installer, plumber, or appliance technician verify the hose route, sink outlet, and household drain. Do not pull out an integrated unit or detach hidden hoses.
-
PATH 04Next step
What you see
Do this next
Close the water tap and keep the appliance off. Do not tilt, pull out, open panels, or restore power through a wet area; arrange qualified appliance service and report the model, timing, location, and any indicator.
Helpful context
Understand the symptom
The timing and location are more useful than the amount of water
A leak that begins as the dishwasher fills points toward the inlet side; water appearing only during drain points toward the drain hose, sink connection, filter, or an appliance-side drain fault. Water at the front during washing makes the door seal, door closure, loading, foam, or leveling worth checking, while water under the machine can be hidden hose, base, or internal leakage. Dry the surrounding floor and record the first moment the water appears before running another cycle.
Ariston models do not all use the same hose or flood-protection arrangement
The opened Ariston documents cover different model families. One describes an anti-flood system and a water-stop hose, while another gives installation dimensions and drain-connection details. Treat those as model-scoped guidance: use the complete model number and its manual before moving an integrated dishwasher, changing hose routing, or assuming that a visible water-stop indicator exists.
Keep the inspection boundary outside the sealed and electrical parts
The safe user checks are visible seal and loading conditions, accessible hose routing, the sink connection, and removable filters. Do not cut an inlet hose, remove pump protection, open a base or electrical cover, tilt or pull out an integrated unit to chase a leak, or restart a machine that has water near electrical parts. A continuing leak, a triggered water-stop, or water collecting in the base needs qualified service.
When checks do not resolve it
Need a professional?
Keep the water tap closed and arrange qualified service for a cracked or triggered inlet/water-stop hose, a leak that continues or returns after the visible checks, water collecting underneath or near electrical parts, a door that will not close evenly, a filter that will not seat, an anti-flood response, or any leak requiring the integrated dishwasher to be pulled out or a panel to be removed. Stop immediately for smoke, burning odor, damaged wiring, or a breaker trip. Do not cut the inlet hose, remove pump protection, tilt the machine, or order a seal, valve, pump, or hose without the complete model number and a supported diagnosis.
Common questions
FAQ
Why is my Ariston dishwasher leaking from the front door?
First note whether the water appears only during washing. With the dishwasher off, inspect the visible gasket and closing path for residue, damage, a protruding dish, or uneven closure. Correct only an obvious accessible condition allowed by the exact manual and retest once if the area is dry and safe. A clean seal does not rule out a tub, spray, foam, leveling, or internal problem; stop if the leak returns.
What should I do if the Ariston dishwasher inlet hose is leaking?
Close the dishwasher's water tap and leave the appliance off. Inspect only the visible hose for cracks, brittleness, crushing, or a water-stop trigger. Ariston warns never to cut the inlet hose because it may contain live electrical parts; arrange after-sales or qualified appliance service for a damaged or triggered hose.
Can a kinked drain hose make an Ariston dishwasher leak?
It can contribute to a drain-side problem or water backing up at the sink connection. Check only the accessible route for a kink, crush point, wet connection, or recent installation change, and have the connection checked against the exact installation manual. Do not pull out an integrated dishwasher or disconnect hidden hoses.
Should I clean the filters when my Ariston dishwasher is leaking?
If the leak is drain-timed and power has been safely disconnected, you can clean and correctly reseat the removable filters using the exact model manual. Ariston says not to operate the dishwasher without the filters or with a loose filter, and says not to remove the wash-cycle pump protection. A clean filter does not justify probing the pump or running repeated cycles.
What does an anti-flood or water-stop response mean on an Ariston dishwasher?
Some Ariston models use anti-flood or water-stop protection that can block the water supply after an anomaly or hose leak. The exact indicator and reset behavior depend on the model. Close the tap, do not cut or disconnect the hose, and arrange qualified service if the protection has triggered or the appliance will not fill normally.
Read the exact guide
Official sources
- Ariston Dishwasher Installation and User ManualAriston Australia · Official model-family installation guidance used for hose routing, drain connection, leveling, and anti-flood cautions; the user's exact Ariston manual controls when the model differs.
- Ariston FAQAriston Australia · Official Ariston Australia troubleshooting guidance for dishwasher inlet taps, inlet and waste-hose routing, the sink spigot connection, and filter condition; exact controls and installation details vary by model and market.
- Ariston Dishwasher Care and Troubleshooting ManualAriston Australia · Official model-family care and troubleshooting instructions used for water isolation, seal care, inlet-filter and dishwasher-filter maintenance; the exact model manual takes precedence.
- Ariston LFP 5P31 WLTO X Dishwasher User ManualAriston · Exact-model Ariston manual used for inlet-hose and water-stop indicators, filter care, anti-flood installation cautions, and service escalation; do not generalize its indicator to models without that hose.
- Ariston LIC 3C26 C Dishwasher User ManualAriston · Exact-model Ariston troubleshooting manual used only for its drain-hose height, kink, sink blockage, filter, inlet sieve, and service-identification guidance; other models may differ.
Community feedback
Share a repair observation
Share a plain-text repair observation. Accepted observations are published automatically; this page may take a moment to update.