
On this page
Start here
Quick answer
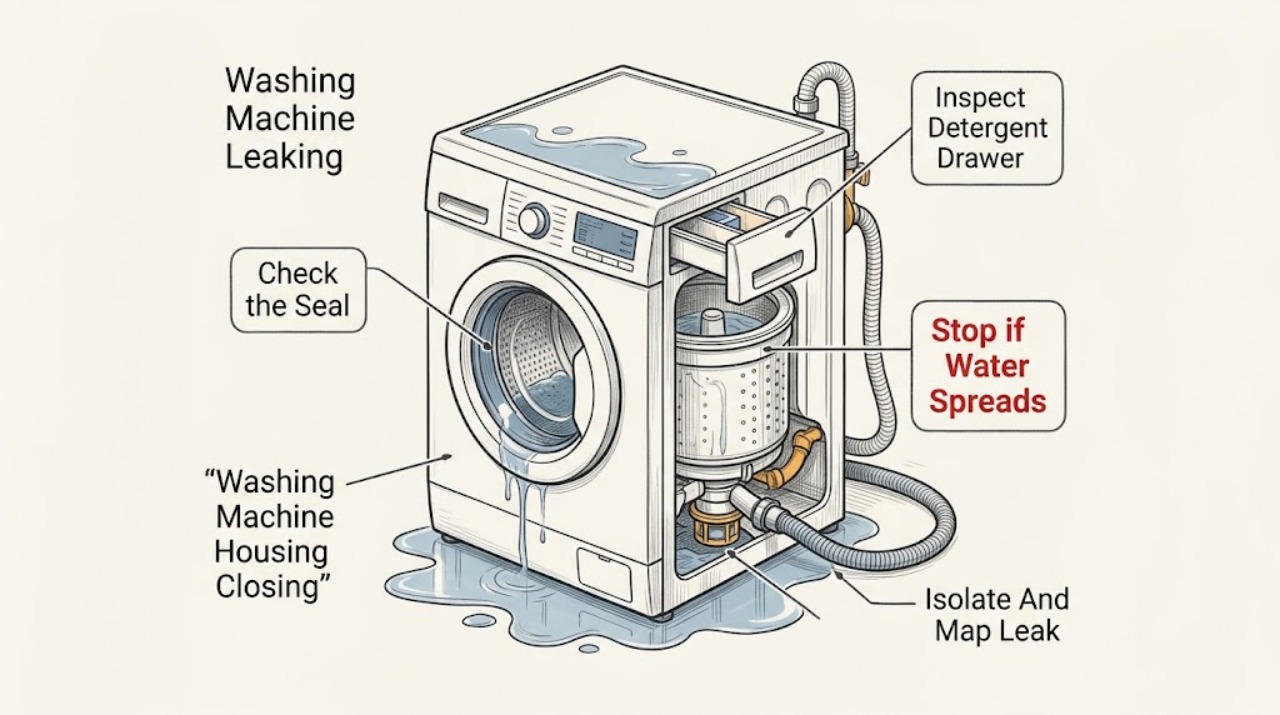
Treat an Asko washing-machine leak as a water-and-electricity safety issue first. Stop the program, keep hands and feet away from pooled water, turn off the water supply if it is safe, and disconnect power only without reaching through water or touching damaged wiring. Note where the water first appears and whether it happens while filling, washing, draining, or spinning. Then check only ordinary-access points: the door or Steel Seal area for trapped laundry or damage, the detergent drawer for overflow or excess foam, the visible inlet and drain hose connections for looseness or kinks, and the pump filter only with the exact model procedure after the water has cooled and the machine is disconnected. ASKO's cleaning guidance warns that water escapes during pump-filter cleaning and requires controlled draining, an absorbent cloth or shallow container, cooled water, and a power-off appliance. A leak from underneath, a damaged hose or seal, repeated leakage after cleaning, or any need to move the cabinet or open a panel is a qualified-service boundary.
Before you begin
Safety first
- This article covers only dry-position observation and model-approved ordinary checks of the door area, detergent drawer, visible hoses, and cooled, power-free pump-filter procedure. It does not authorize wet electrical work, cabinet removal, tilting, live testing, internal hose or pump access, seal replacement by guesswork, or operation with an active leak.
Work through in order
Diagnostic checks
Use only checks that match the exact appliance or system and its official guide.
-
Check 1
Stop the wash program, keep clear of pooled water, and from a dry position turn off the water supply and disconnect power only if this can be done without touching water, damaged wiring, or an unsafe outlet; do not move the washer yet.
Expected result: Record whether water is still entering, whether the leak stops when filling stops, and whether the first visible point is the front door, detergent drawer, rear hose, lower filter area, or underneath the cabinet.
Next step: Photograph the dry and wet areas, note the cycle stage and approximate load, and follow the corresponding ordinary-access check; arrange urgent help when water is near electricity or the source is underneath.
Stop if: Do not reach through water for a plug or valve, touch an exposed conductor, tilt the washer, or continue a cycle to reproduce an active leak.
Why this matters
Why: Stopping incoming water and the cycle limits damage. The first visible point and cycle stage separate a door or detergent leak from an inlet, drain, pump-filter, or internal-cabinet leak, but water can travel along the cabinet before appearing.
-
Check 2
With the door open and the machine isolated, inspect the visible door glass, Steel Seal or door-seal area, and the opening for trapped laundry, residue, a crack, displacement, or an item preventing full closure; wipe only accessible residue with a soft cloth as the exact manual allows.
Expected result: Classify the door path as clear and intact, obstructed, dirty, visibly damaged, wet only after filling, or impossible to assess without removing a seal or front panel.
Next step: Remove only an obvious trapped item, clean the accessible seal as the model guide permits, and keep the washer unused until a cautious, empty check is safe; replace or service a damaged seal through qualified support.
Stop if: Do not pull the seal from its channel, cut or glue it, force the door, or run the machine with a cracked glass, damaged seal, or unresolved front leak.
Why this matters
Why: A trapped item, residue, or damaged or poorly seated seal can let water escape from the front. A clear intact seal with water from the base or rear makes a door cause less likely; a damaged or inaccessible seal is not a stretch-or-glue repair.
-
Check 3
Inspect the detergent drawer, its inserts, the drawer opening, and the top front of the washer for excess foam, residue, overflow marks, an overfilled compartment, or a blocked dispenser path; do not exceed the detergent maker's or Asko model's fill guidance.
Expected result: Record whether water or foam escapes from the drawer, the compartment is above its marked limit, residue blocks an insert, or the drawer area is dry while the leak begins elsewhere.
Next step: Clean and refit removable drawer parts only as the exact manual permits, correct the detergent amount and compartment, and arrange service if overflow returns with a correct dose or the drawer cannot seat.
Stop if: Do not pour cleaning chemicals into an active leak, force inserts, drill the dispenser, or keep operating the washer while foam or water reaches controls.
Why this matters
Why: A drawer overflow or heavy foam pattern supports a detergent or dispenser-path cause, while a dry drawer with leakage during drain or spin points toward another path. The observation does not prove a failed valve or dispenser inlet.
-
Check 4
From the rear or side only if there is safe ordinary access, inspect the visible water-inlet and drain-hose connections for a loose fitting, split hose, kink, displaced clamp, or water trail; do not pull the washer out against taut hoses.
Expected result: Record whether the inlet connection leaks while filling, the drain connection leaks while pumping out, a hose is kinked or damaged, the hose is not the supplied or model-approved type, or the area is dry.
Next step: Turn off the water supply, do not operate the washer, and have the connection or hose restored according to the exact installation instructions; do not substitute a hose or clamp by appearance alone.
Stop if: Do not loosen a pressurized fitting, stretch or splice a hose, move the appliance with hoses under tension, or use the washer with a split hose or active connection leak.
Why this matters
Why: A leak that follows filling supports an inlet-side connection or hose issue; a leak during drain supports the drain hose or pump path. ASKO's installation guidance says the hose connection must seal firmly and be checked for leaks, but a damaged hose or inaccessible connection needs a proper repair.
-
Check 5
If the exact Asko manual identifies a user-serviceable pump-filter access, wait for the water to cool, make the machine power-free, place an absorbent cloth and shallow container, drain through the provided hose if present, and remove and clean the filter only as instructed.
Expected result: Record whether the filter or housing contains coins, buttons, lint, or other debris; whether the impeller moves as the manual allows; whether the filter seal is clean and intact; and whether water continues to escape after firm refitting.
Next step: Clean, inspect, and reinstall the filter and cap firmly only if the model procedure permits it; dry the area and arrange service if the filter will not seat, the seal is damaged, the housing leaks, or the source is deeper in the cabinet.
Stop if: Do not open the filter with hot water inside, work while powered, force the cap, use sharp tools near the pump, or operate the washer with a missing or loose filter.
Why this matters
Why: ASKO says debris in the drain filter can cause drainage problems and warns that water escapes during cleaning. Debris or a dirty seal can explain a lower-front leak, but a cracked housing, damaged seal, pump leak, or continuing leak is not established by cleaning alone.
-
Check 6
Only after the visible cause has been corrected, all water is removed, every accessed part is dry and securely refitted, and the exact manual permits testing, run a short empty rinse or drain while watching from a dry position; stop at the first drop.
Expected result: Record whether the machine remains dry, leaks during fill, leaks during wash movement, leaks during drain, leaks during spin, or shows a warning or unusual noise.
Next step: If dry, monitor one compatible load without leaving the appliance unattended; if any leak returns, stop using the washer and provide the stage, location, photos, and prior checks to qualified service.
Stop if: Do not test with a full load, leave the washer unattended, run it near pooled water, or continue after a leak, electrical symptom, burning smell, or abnormal movement.
Why this matters
Why: The cycle stage narrows the path, but a dry short test does not prove the washer is safe under a full load. A repeat leak after a correct external check indicates an internal seal, hose, pump, tub, valve, or cabinet issue requiring diagnosis.
Use your observations
Decision map
Find the observation that best matches what you see, then follow the next safe action.
-
PATH 01Safety boundary
What you see
Water reaches an outlet, plug, power cord, control area, exposed wiring, or the source cannot be reached from a dry safe position.
Do this next
Leave the area if necessary, isolate the supply only from a safe dry position, keep the appliance unused, and arrange qualified appliance or electrical help.
Why this path and its safety boundary
Why it matters: The immediate risk is electrical injury or further water damage, not identifying a washer part.
Safety stop: Do not touch wet plugs, pull a cord through water, open panels, or restore power to test the leak.
-
PATH 02Safety boundary
What you see
Water first appears at the door or Steel Seal area during filling, washing, or spinning, and trapped laundry, residue, or visible seal damage is present.
Do this next
Remove only the visible obstruction and clean the accessible seal as the exact manual permits; keep the washer unused and arrange service for damage, poor seating, or any returning leak.
Why this path and its safety boundary
Why it matters: A door-path obstruction, residue, or seal problem is plausible, but water may have traveled from above or behind the opening.
Safety stop: Do not pull out, cut, glue, or force the seal, door, or glass.
-
PATH 03Safety boundary
What you see
Foam or water emerges from the detergent drawer or top front, especially after excess detergent or a blocked insert is observed.
Do this next
Clean and refit removable drawer components according to the model guide, correct the dose, and stop using the washer if overflow repeats or reaches controls.
Why this path and its safety boundary
Why it matters: The dispenser path or detergent dose is a plausible source rather than a lower pump leak.
Safety stop: Do not force the drawer, add unapproved chemicals, or run another cycle while the dispenser leaks.
-
PATH 04Safety boundary
What you see
Water appears at the rear inlet connection or hose while the washer fills, or the inlet hose is split, loose, or kinked.
Do this next
Turn off the water supply, keep the washer unused, and have the connection or exact approved hose restored according to the installation instructions.
Why this path and its safety boundary
Why it matters: The inlet path is implicated, but a pressurized connection should not be improvised or repeatedly tightened.
Safety stop: Do not loosen a pressurized fitting, splice a hose, use an unapproved hose, or move the appliance with the hose under tension.
-
PATH 05Safety boundary
What you see
Water appears at the lower filter area or drain hose during draining, and debris, a loose cap, a dirty seal, or a kink is observed.
Do this next
Use the exact model's cooled-water, power-off pump-filter procedure, collect residual water, clean and firmly reseat the filter, or arrange service if the leak remains.
Why this path and its safety boundary
Why it matters: The drain path may be obstructed or not sealing, but the pump housing or internal drain assembly may also be involved.
Safety stop: Do not open a hot or powered filter, force the cap, use sharp tools, or run with the filter or drain hose unsecured.
-
PATH 06Safety boundary
What you see
Water comes from underneath, the source is not visible, a correct external check does not stop it, or the leak returns during a controlled test.
Do this next
Keep the water supply and power isolated, do not move or open the washer, protect the floor, and arrange qualified Asko appliance service.
Why this path and its safety boundary
Why it matters: An internal hose, pump, tub, seal, valve, cabinet, or other component may be involved; location alone cannot identify a safe part.
Safety stop: Do not tilt the machine, remove panels, probe the base, test live parts, or continue washing to locate the source.
Helpful context
Understand the symptom
The first clue is where and when the water appears
Water at the front during filling or washing suggests the door or detergent path; water at the rear suggests an inlet or drain connection; water at the lower front during draining suggests the pump-filter or drain path; water appearing underneath without a visible external source points inside the cabinet. The cycle stage is not proof of a failed part, but it tells you which ordinary-access check is relevant and helps a technician avoid guesswork.
Do not turn a small leak into an electrical hazard
Stop the cycle and isolate water and power only from a dry, safe position. Do not reach through a puddle for a plug, touch damaged wiring, tilt the washer, or pull it out while hoses are under tension. If water is near an outlet or electrical parts, leave the area and use qualified help. Keep the door closed if the drum contains hot water until the exact manual's safe-drain procedure is available.
Filter maintenance is possible only with controlled drainage
ASKO's cleaning guide says the drain filter collects items such as threads, coins, pins, and buttons, and that water leaks during filter cleaning. It instructs the owner to drain the water into a shallow container, ensure the water is cooled, make the machine power-free, remove debris, check the filter seal, and refit the filter firmly. Access and filter location vary, so the exact model instructions take precedence.
Safety boundary
Stop conditions
- Stop for water near an outlet, plug, control, or exposed wiring; isolate power only from a dry safe position and arrange qualified help.
- Do not tilt, drag, or open the washer while hoses are connected or water remains inside; do not remove cabinet panels or probe the base.
- Do not open a pump filter with hot water inside or power connected; collect residual water, use the exact model procedure, and keep the filter and seal securely refitted.
- Do not cut, glue, splice, stretch, or substitute door seals, inlet hoses, drain hoses, clamps, valves, or pump parts based only on appearance.
- Stop using the washer for a leak from underneath, a damaged seal or hose, repeated leakage after ordinary checks, electrical symptoms, burning smell, or any repair requiring internal access.
When checks do not resolve it
Need a professional?
Arrange qualified Asko appliance service when the leak is from underneath or inside the cabinet, the source is not visible, a door seal, hose, filter housing, pump, valve, tub, or wiring area is damaged, the leak returns after the exact model's ordinary-access cleaning or connection check, water reaches electrical parts, or the washer must be moved, tilted, opened, or electrically tested. Keep the water supply and power isolated until the appliance is assessed.
Safety scope: This article covers only dry-position observation and model-approved ordinary checks of the door area, detergent drawer, visible hoses, and cooled, power-free pump-filter procedure. It does not authorize wet electrical work, cabinet removal, tilting, live testing, internal hose or pump access, seal replacement by guesswork, or operation with an active leak.
Common questions
FAQ
Where should I look first when my Asko washing machine is leaking?
Stop the cycle and note where water first appears and whether it happens during fill, wash, drain, or spin. Check the visible door or Steel Seal area, detergent drawer, rear hose connections, and lower pump-filter area only from a dry safe position. Water from underneath or an unclear source needs service.
Can a door seal cause an Asko washer to leak?
Yes. Trapped laundry, residue, poor seating, or visible seal damage can let water escape at the front. Remove only an obvious obstruction and clean accessible residue as the exact model guide permits. Do not pull, cut, glue, or force the seal; a damaged or recurring front leak needs service.
What if my Asko washing machine leaks from the detergent drawer?
Inspect for excess foam, an overfilled compartment, residue, or a blocked insert. Clean and refit removable drawer parts only as the manual allows and correct the detergent amount. If overflow returns with a correct dose or water reaches the controls, stop using the washer and arrange service.
Is it safe to clean an Asko washer pump filter when it is leaking?
Only with the exact model procedure and controlled drainage. ASKO warns that water escapes during filter cleaning; cool the water, make the washer power-free, use an absorbent cloth and shallow container, drain in a controlled way, inspect the seal, and refit the filter firmly. Use service for a damaged housing, seal, or continuing leak.
What should I check if the leak is at the back of my Asko washer?
From safe ordinary access, inspect the visible inlet and drain hose connections for a leak trail, loose fitting, split hose, or kink, and note whether it occurs during filling or draining. Turn off the water supply and do not move the appliance against taut hoses. Use the model installation instructions or qualified service for a connection or hose repair.
When should I stop using a leaking Asko washing machine?
Stop for water near electrical parts, a leak from underneath, a damaged door or hose, repeated leakage after a correct ordinary check, an unclear source, a burning smell, or any repair requiring tilting, moving, panel removal, or live testing. Isolate water and power from a dry safe position and arrange qualified service.
Read the exact guide
Official sources
- Classic Washer Installation InstructionsASKO · Official ASKO Classic washer installation instructions; connection details and approved hoses vary by model.
- De wasmachine lekt water, wat moet ik doen?ASKO Service · Official ASKO service article for washing-machine water leaks; the page is in Dutch and exact steps remain model-dependent.
- ASKO Cleaning GuideASKO · Official ASKO cleaning guide with washer instructions; access and parts differ by model.
- Wasmachine trekt geen water aanASKO Service · Official ASKO service article in Dutch; it is supplemental water-path guidance and does not replace the exact model manual.
Community feedback
Share a repair observation
Share a plain-text repair observation. Accepted observations are published automatically; this page may take a moment to update.