
On this page
Start here
Quick answer
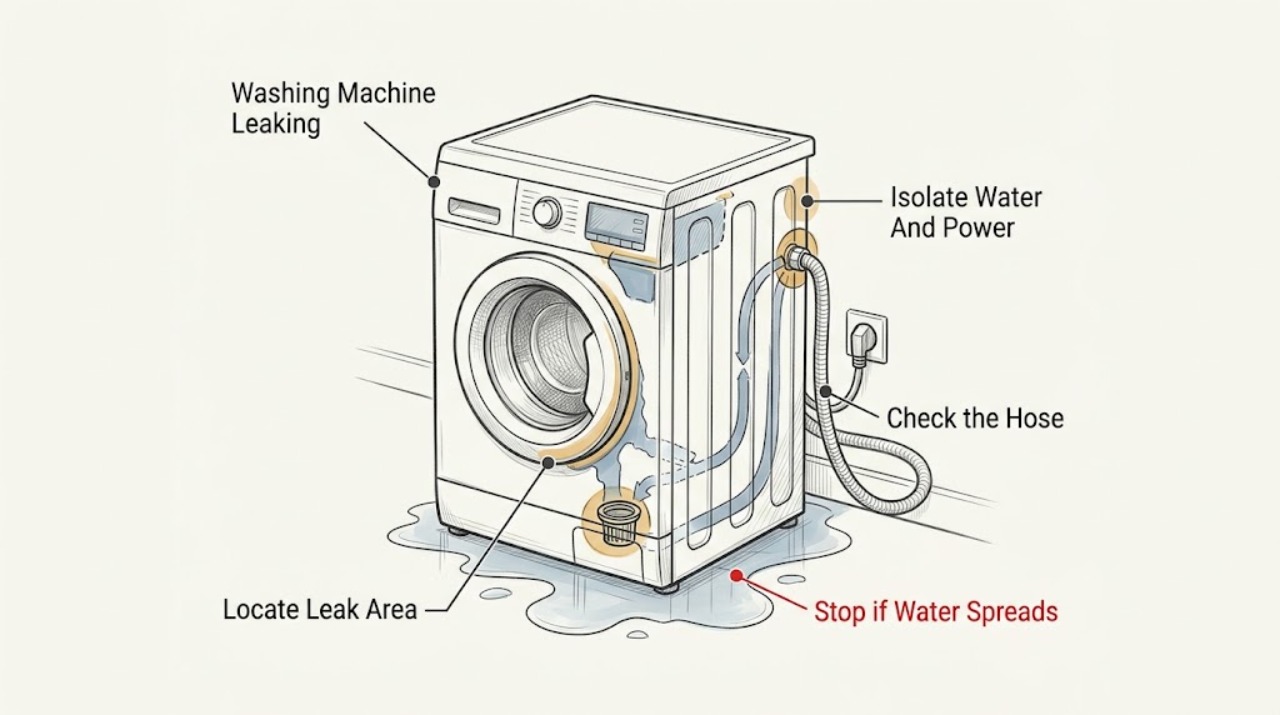
If an AEG washing machine is leaking, stop the cycle, keep people away from spilled water, turn off the machine's water supply, and disconnect power only when you can do so without touching water or damaged electrical parts. Once safe, identify whether water comes from the rear inlet hose, front door seal, detergent drawer, or lower filter area. Tighten hose connections by hand only, remove laundry caught in the door seal, clean the drawer or model-approved filter as directed, and do not use the machine if a hose or seal is damaged. A leak that continues, appears from underneath, or involves an internal pump, valve, or hose needs authorised appliance service.
Work through in order
Diagnostic checks
Use only checks that match the exact appliance or system and its official guide.
-
Check 1
Pause or stop the wash programme. If the area is dry and the plug and controls are safe to reach, disconnect the machine from mains power; otherwise isolate power from a safe location. Turn off the water tap feeding the machine, place towels away from electrical connections, and do not touch a wet plug, outlet, or damaged cord.
Expected result: The leak stops when the water tap is closed, the drum still contains water, or water is near the plug, outlet, controls, or other electrical parts.
Next step: If the area is safe, identify the leak location without restarting the machine. If water has reached electrics or the source cannot be isolated safely, leave the appliance off and call qualified service or an electrician as appropriate.
Stop if: Stop immediately for a wet plug or outlet, sparking, smoke, a damaged cord, a burst hose, uncontrolled water, or any need to reach through water to disconnect power.
Why this matters
Why: Stopping the supply limits further flooding; a wet electrical area changes this from a routine inspection to a safety isolation and service issue. Standing water also means the filter should not be opened until the water has been safely drained and cooled according to the manual.
-
Check 2
With the machine isolated, use a dry cloth to trace the highest wet point you can see without moving the appliance. Check the rear inlet connections and tap, the front door and seal, the detergent drawer, and the lower filter or pump-cover area. Note whether water appeared while filling, washing, draining, or after the cycle ended.
Expected result: The highest wet point is at the rear hose, front door, dispenser, lower filter, or underneath/inside the cabinet, and the timing is known or unknown.
Next step: Follow only the branch matching the visible source. If no source is visible, keep the tap and machine off and arrange service rather than running another cycle.
Stop if: Stop if locating the source requires pulling out a built-in machine, tipping it, removing panels, or reaching behind a wet electrical connection.
Why this matters
Why: A location-and-timing match directs the next safe check. Water that starts inside the cabinet or appears from underneath without an accessible source should not be diagnosed by removing panels.
-
Check 3
For a rear or tap-side leak, inspect the inlet hose, its O-ring or seal, and both threaded connections. If the hose is intact and the area is dry enough to handle, tighten the connection by hand only; do not use pliers. If the hose is kinked, split, cracked, or missing its seal, leave the water tap closed.
Expected result: A sound connection was loose, the tap itself is leaking, or the hose/fitting is damaged.
Next step: If the connection was sound and hand-tightening stopped the visible leak, keep the area monitored during a short model-approved fill only when no electrical hazard remains. For a damaged hose, leaking tap, or recurring leak, keep the water off and arrange repair.
Stop if: Stop if water continues under pressure, the hose is damaged, the tap body leaks, threads are cross-threaded, or reaching the connection requires moving a heavy appliance.
Why this matters
Why: A loose connection can leak during filling and may stop after hand-tightening. A damaged hose or seal is a replacement or service issue; tool-tightening can damage the fitting and create another leak.
-
Check 4
For water at the front, inspect the door glass and the full accessible door seal for a garment caught between the seal and glass, a fold, crack, hole, or foreign object. Check whether the machine was overloaded, but do not open a locked door by force or run another cycle with a damaged seal.
Expected result: Laundry or an object is trapped in the seal, the load was excessive, or the seal is cracked, holed, deformed, or wet from one area.
Next step: Remove only a loose, accessible item after the machine is isolated and the door opens normally. If the seal is damaged or the leak returns, keep the water off and do not use the machine until repaired.
Stop if: Stop if the door is locked, glass is cracked, the seal is torn, water remains hot, or removal would require tools or forcing the door.
Why this matters
Why: A trapped item or overload can prevent the door seal from closing correctly. A damaged seal cannot be made safe with detergent or tightening and must be replaced by a service engineer according to AEG guidance.
-
Check 5
For a dispenser leak, remove and clean the detergent drawer only as the model manual permits, clear residue from the drawer recess, and use the recommended detergent dose. For a lower leak, first drain the machine as the manual directs, disconnect power, wait for hot water to cool, and inspect or refit the accessible pump filter with a bowl and cloth; never loosen a filter with the machine full of water or powered.
Expected result: The drawer or spray plate is heavily coated, excess foam was present, the filter is loose or dirty, or both areas are clean and correctly refitted.
Next step: Rinse the drawer or clean the filter only as instructed, refit it securely, and check for a dry seal before any permitted test. If the leak persists or comes from inside the cabinet, keep the appliance off and request service.
Stop if: Stop if water is hot, the filter will not move or seal, the pump cover is damaged, the drawer cannot refit, or cleaning exposes wiring or internal parts.
Why this matters
Why: A blocked dispenser or excessive foam can push water from the drawer; a loose or blocked filter can leak or prevent proper draining. A clean, correctly fitted area shifts suspicion to an internal hose, valve, pump, or pressure fault.
Use your observations
Decision map
Find the observation that best matches what you see, then follow the next safe action.
-
PATH 01Next step
What you see
Water appears at the tap or rear inlet-hose connection while filling.
Do this next
Close the water tap, hand-tighten only a sound connection, and replace or service a cracked hose, damaged seal, or leaking tap. Do not use pliers.
-
PATH 02Next step
What you see
Water runs from the door area and laundry is caught in the seal, the load was excessive, or the seal is damaged.
Do this next
Remove only a loose accessible item after safe isolation; keep the machine off and call service for a cracked, holed, or deformed seal.
-
PATH 03Next step
What you see
Water or foam comes from the detergent drawer or its recess.
Do this next
Clean the drawer and recess according to the exact manual, correct the detergent dose, and avoid pods in a drawer not designed for them.
-
PATH 04Next step
What you see
Water is visible around the lower fluff or pump-filter area.
Do this next
Drain and disconnect the machine as directed, inspect the accessible filter, and refit it by hand so its seal is correct. Escalate if it cannot seal or the leak returns.
-
PATH 05Next step
What you see
The source is underneath or inside the cabinet, no accessible source is visible, or the leak continues after a permitted check.
Do this next
Keep the water supply and appliance off and request an authorised service visit for the internal hose, valve, pump, sensor, or other fault.
-
PATH 06Next step
What you see
Water reaches the plug, outlet, controls, wiring, or another electrical part, or the cord is damaged.
Do this next
Do not touch the wet electrical area or operate switches. Isolate power only from a safe location, keep the machine off, and obtain qualified electrical or appliance service.
Helpful context
Understand the symptom
The location and timing of the water are more useful than the size of the puddle. A leak at the rear while the machine fills points toward the inlet hose or tap; water at the front can involve the door seal or detergent drawer; water at the bottom after draining can involve the filter or drain path. Water appearing only with excess foam can also begin at the dispenser. Do not keep running cycles to find the source if the floor or electrical area is wet.
These checks are limited to safe isolation, visual inspection, hand-tightening a sound hose connection, cleaning the dispenser, and model-approved drain-filter care. Do not tip a heavy machine, remove cabinet panels, replace an internal valve or pump, or work near live electricity. The exact manual for the appliance controls which user-accessible parts may be cleaned.
Only after diagnosis
Potential parts
- washing machine inlet hose
Consider this only if the accessible inlet hose is visibly cracked, split, or otherwise damaged and the water supply is already isolated.
Confirm the exact appliance model, hose connection, seal arrangement, and manufacturer fit information before selecting a replacement; a generic hose is not proven to fit every AEG machine.
When checks do not resolve it
Need a professional?
Request authorised appliance service for a persistent AEG washing-machine leak or any damaged seal, hose, filter housing, internal pump, valve, or electrical area. Provide the exact model, leak location, when it appears in the cycle, whether the water tap was closed, the condition of the door seal and filter, and any displayed code; do not order an internal part from the puddle location alone.
Common questions
FAQ
Where do I look first when an AEG washing machine leaks?
Safely isolate water and power, then trace the highest visible wet point. Check the rear inlet hose and tap, front door seal, detergent drawer, and lower filter area. If no accessible source is visible or the leak continues, do not run another cycle; arrange service.
Can I tighten a leaking AEG inlet hose with pliers?
No. AEG says to tighten a sound pipe connection by hand only because tools can damage the hose fittings. If the hose is cracked, kinked, or otherwise damaged, close the water supply and arrange replacement or authorised service.
Can a detergent drawer or pump filter cause a washing-machine leak?
Yes. A dirty drawer or excess foam can push water out of the dispenser, while an incorrectly fitted or blocked filter can leak or interfere with draining. Clean or refit only the user-accessible part allowed by the manual, with the machine isolated; persistent leaks require service.
Read the exact guide
Official sources
- Washing machine is leaking waterAEG Ireland · AEG washing-machine and washer-dryer leak locations, inlet hose, load, filter, detergent, door seal, and service guidance
- The inlet hose on my washing machine is leakingAEG Ireland · AEG washing-machine inlet-hose connection, hand-tightening, tap, damaged-hose, and service guidance
- How to drain a washing machine/washer dryerAEG Ireland · AEG washing-machine draining, power disconnection, cooling, hose, pump-filter, water containment, and refitting guidance
- Washing machine does not take detergents / water remains in the softener compartmentAEG Ireland · AEG detergent-drawer cleaning, dosing, foam, pod placement, and model-manual guidance related to dispenser leaks
Community feedback
Share a repair observation
Share a plain-text repair observation. Accepted observations are published automatically; this page may take a moment to update.