
On this page
Start here
Quick answer
Start by drying the visible water and identifying where it first returns: the inner rear wall, a door edge, beneath the cabinet, or an external water connection. Blomberg says rear-wall droplets can be normal condensation or defrost water, but excessive or constant water can indicate a blocked defrost drain, poor airflow, or a damaged door seal. On water-connected models, inspect only the visible hose and connections and close the water valve if a connection is leaking. Disconnect power before cleaning, keep water away from electrical parts, and do not remove covers or work on sealed refrigeration components; a recurring leak or a concealed source needs qualified or authorized service.
Before you begin
Safety first
- This article supports drying and observing ordinary visible areas, checking door closure and gasket condition, checking a visible water-line route with the valve closed, and following the exact model's user drain or cleaning procedure. It does not authorize rear-cover removal, electrical work, compressor or refrigerant work, drain-tube modification, or concealed leak repair.
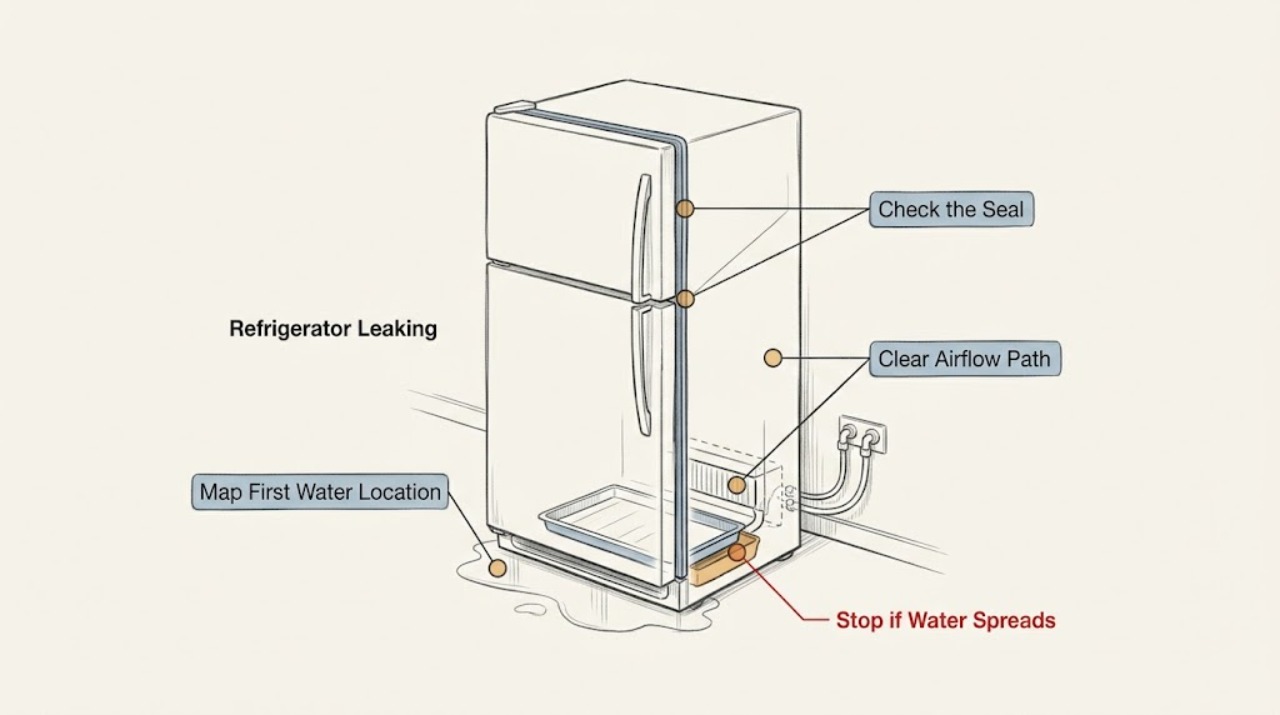
Work through in order
Diagnostic checks
Use only checks that match the exact appliance or system and its official guide.
-
Check 1
Protect the floor, remove any spilled container or food package, and wipe the visible water. From safe access, inspect the inner rear wall, beneath drawers, the door gasket and threshold, the front underside, and any visible water-line connection without tilting or dismantling the refrigerator.
Expected result: Water returns inside below the rear wall, along the door edge, beneath the cabinet, at a visible hose or valve connection, or does not return after an external spill is removed.
Next step: Use the matching check below and record whether the leak follows door opening, a defrost event, dispenser or ice use, or a recent installation. If water is near electrical parts, stop handling the wet area and arrange safe assistance.
Stop if: Do not reach behind a wet appliance, touch a wet plug or outlet, tilt the refrigerator to find a leak, or remove panels.
Why this matters
Why: The first return location narrows the path: rear-wall water suggests condensation or defrost drainage; a door-edge trail suggests seal or closure; water below the cabinet suggests a pan or concealed drain; a wet external connection suggests the water system. A dry check does not rule out an intermittent leak.
-
Check 2
With power disconnected if cleaning is needed, inspect the door gasket and the mating cabinet surface for food residue, folds, gaps, tears, or a section pulled out of position. Check that shelves, drawers, or food packages are not holding the door open and that the refrigerator stands evenly.
Expected result: The gasket makes continuous contact and the door closes evenly, or a gap, damaged section, obstruction, or uneven closure is visible; note condensation or frost concentrated along the same edge.
Next step: Clean the visible gasket and mating surface with the exact manual's approved method, remove the obstruction, and verify even closure. Arrange service if the gasket is torn, distorted, or the door remains misaligned.
Stop if: Do not glue, cut, stretch, force, or remove hinges or door hardware to stop the leak.
Why this matters
Why: Blomberg says a damaged or loose seal can let warm, humid air enter and cause condensation or ice that later runs out. A clean, continuous seal makes a rear-wall drain or another source more likely when water is centered inside.
-
Check 3
If the exact model has a user-accessible defrost drain, switch the refrigerator off at the mains before cleaning and inspect the visible drain area at the bottom or rear of the refrigerator compartment. Clear only ordinary surface obstruction with the soft brush or pipe-cleaner method allowed by the Blomberg guidance; keep food from blocking vents and avoid overpacking the compartment.
Expected result: Water or ice collects at the documented drain, the drain opening is visibly obstructed, air vents are blocked by food, or the drain and airflow path appear clear while water keeps returning.
Next step: Follow only the exact model's user defrost or cleaning procedure and monitor the first-water location. If the drain cannot be accessed safely, the ice returns, or the leak persists, leave the refrigerator off as needed and arrange service.
Stop if: Do not probe with a knife, wire, drill, metal tool, or heated device; do not remove the inner rear panel or use a generic drain procedure on an unknown model.
Why this matters
Why: Blomberg identifies a blocked defrost drain as a cause of water accumulating or freezing on the rear wall and identifies blocked airflow or overpacking as contributors to condensation. A clear visible path with recurring water makes a concealed drain, defrost, or other component fault more likely.
-
Check 4
Only for a model connected to a water supply, close the water valve before inspecting the visible hose, tap adaptor, clips, and rear connection. Look for a kink, loose fitting, cracked hose, or water that appears immediately after dispenser or ice-maker use; do not pull the refrigerator through standing water or open a rear cover.
Expected result: The visible hose or connection is wet, the hose is kinked or displaced, water appears after water-system use, or the external connection remains dry while the refrigerator leaks elsewhere.
Next step: Keep the valve closed for a leaking connection and arrange qualified appliance or plumbing service; only correct an obvious external hose route when the exact manual permits it and the area can remain dry. Do not restart a leaking water system to repeat the symptom.
Stop if: Do not loosen pressurized fittings, replace internal tubing, or reach near electrical parts while water is present.
Why this matters
Why: A wet external connection or use-related recurrence makes the water line or fitting more likely than a defrost drain. A dry external line shifts attention back to the door, defrost path, pan, or a concealed source. A refrigerator without a water connection cannot use this branch.
-
Check 5
Read the model and serial label and obtain the exact Blomberg manual. Record whether the refrigerator is water-connected, where water first appeared, whether the leak follows defrosting or water use, whether the door seals, and whether cooling remains normal.
Expected result: The model manual confirms a user-accessible drain or hose arrangement and the approved check resolves the leak, or the source remains concealed, the manual does not match, the leak returns, or cooling and electrical symptoms are abnormal.
Next step: Use Blomberg's model lookup and support route to arrange qualified or authorized service. Give the technician the model, photos, first-water location, timing, water-connection status, and the safe checks already performed.
Stop if: Do not substitute another model's instructions, remove rear covers, bend tubing, work near the compressor, or attempt sealed-system or electrical repair.
Why this matters
Why: The same floor puddle can come from a model-specific defrost route, door seal, drain pan, water connection, or concealed cooling-area fault. A recurring or unresolved leak is not evidence that more disassembly is safe.
Use your observations
Decision map
Find the observation that best matches what you see, then follow the next safe action.
-
PATH 01Safety boundary
What you see
Water or ice repeatedly forms on the inner rear wall or below a drawer, especially after a defrost period, while the door seal is continuous.
Do this next
Switch off before any permitted visible drain cleaning, use only the exact model procedure, and arrange service if water returns or the drain is concealed.
Why this path and its safety boundary
Why it matters: Condensation or a restricted defrost drain is more likely than a door-edge leak. The exact model must confirm whether the drain is user-accessible.
Safety stop: Do not probe, drill, heat, or remove the rear interior panel.
-
PATH 02Safety boundary
What you see
Moisture or frost is concentrated along the door edge and the gasket has residue, a gap, distortion, damage, or an obstruction prevents full closure.
Do this next
Clean the gasket and remove the obstruction, then verify even closure. Request the exact model gasket or service if the seal remains damaged or the door needs adjustment.
Why this path and its safety boundary
Why it matters: Warm humid air entering at the door is more likely to be producing condensation or frost that runs out than a failed drain pan.
Safety stop: Do not glue, stretch, cut, or force the gasket or hinges.
-
PATH 03Safety boundary
What you see
Water appears beneath the cabinet or at a visible hose connection, especially after dispenser or ice-maker use, while the inner rear wall is dry.
Do this next
Close the water valve for a water-connected model, keep the floor and electrical area dry, and arrange appliance or plumbing service. Do not move the refrigerator through standing water.
Why this path and its safety boundary
Why it matters: A water-line fitting, hose, drain pan, or concealed lower path is more likely than ordinary rear-wall condensation.
Safety stop: Stop immediately for water near an outlet, plug, cord, control, or exposed electrical component.
-
PATH 04Safety boundary
What you see
The leak continues after an approved visible cleaning or closure correction, the source cannot be seen without a cover, or the refrigerator also has abnormal cooling, noise, odor, or electrical symptoms.
Do this next
Leave power and any water valve off as appropriate and arrange qualified or Blomberg-authorized service with the model, serial, timing, photos, and observations.
Why this path and its safety boundary
Why it matters: A concealed drain, pan, defrost, water, or cooling-system fault is possible and cannot be separated safely by further user testing.
Safety stop: Do not remove covers, touch wiring, pull tubing, or attempt sealed refrigeration work.
Helpful context
Understand the symptom
A puddle does not identify the source
Water can travel from the rear-wall drain area to a shelf, follow a door gasket, emerge from a drain pan, or come from a water-dispenser or ice-maker connection on an equipped model. Dry the first puddle, note the first place that becomes wet again, and photograph the area before moving the refrigerator. A one-time spill that does not return is different from water that recurs after condensation or defrosting.
Use the exact Blomberg model information
Blomberg manuals and service routes are model-specific. The model and serial number are needed to find the correct manual, arrange repair, or identify a part. Do not assume that a compact refrigerator, a frost-free refrigerator, and a water-connected refrigerator have the same drain, pan, or hose arrangement.
Keep water and electrical work separate
If water is near a plug, outlet, cord, control, or exposed electrical area, do not reach behind the appliance. Disconnect only from a safe, dry location or use qualified help. User checks stop at visible cleaning, door closure, visible hose routing, and manual-permitted drain access; rear covers, compressors, refrigerant tubing, wiring, and concealed leaks belong to trained service personnel.
Safety boundary
Stop conditions
- Do not touch a wet plug, outlet, cord, control, or electrical component; use a safe disconnect point or qualified help.
- Do not operate a refrigerator with a damaged cord, door seal that cannot close, water near electrical parts, smoke, burning odor, or a repeated leak that reaches the floor.
- Do not probe a drain with a knife, wire, drill, metal tool, or heated device, and do not remove interior or rear panels.
- For water-connected models, close the water valve for a leaking hose or fitting and do not loosen pressurized connections in a wet area.
- Stop and arrange authorized service for a concealed, recurring, or model-uncertain leak, or any fault involving the compressor, refrigerant tubing, wiring, defrost system, or drain pan.
Only after diagnosis
Potential parts
- refrigerator door gasket
Consider this category only if the exact model inspection confirms a torn, distorted, or permanently nonsealing gasket after cleaning and removing door obstructions.
Confirm the complete Blomberg model and the manufacturer's fit information before ordering; a gasket that does not seal can recreate the leak. - defrost drain or drain-pan component
Consider this category only if qualified diagnosis confirms a blocked, damaged, or displaced model-specific drain or pan after the approved visible checks.
Confirm the exact model and service documentation; do not substitute a generic pan or modify drain tubing by guesswork. - refrigerator water inlet hose or fitting
Consider this category only for a water-connected model when a qualified inspection confirms that a visible hose or fitting is the leak source after the water valve is closed.
Match the exact model and approved connection specifications; do not order or install a line based only on connector appearance.
When checks do not resolve it
Need a professional?
Arrange qualified or Blomberg-authorized service when the leak returns after the exact model's approved visible cleaning or door correction, water comes from beneath the cabinet, a drain pan or hose connection is damaged, the source is concealed, the door cannot seal, or water is near electrical parts. Close the water valve on a leaking water-connected model and provide the exact model and serial number.
Safety scope: This article supports drying and observing ordinary visible areas, checking door closure and gasket condition, checking a visible water-line route with the valve closed, and following the exact model's user drain or cleaning procedure. It does not authorize rear-cover removal, electrical work, compressor or refrigerant work, drain-tube modification, or concealed leak repair.
Common questions
FAQ
Why is my Blomberg refrigerator leaking from the inside rear wall?
Blomberg says rear-wall droplets can be normal condensation or defrost water, but excessive or constant water can indicate a blocked defrost drain, restricted airflow, or a faulty door seal. Check the first return location, use only the exact model's visible drain procedure with power off, and call service if the water returns.
Can a Blomberg refrigerator door seal cause a leak?
Yes. A damaged or loose gasket, residue, or a package holding the door open can let humid air in, causing condensation or frost that later runs out. Clean the visible seal and remove obstructions; arrange service if it still cannot close and seal evenly.
What should I check if my water-connected Blomberg refrigerator is leaking?
Close the water valve and inspect only the visible hose, clips, tap adaptor, and rear connection for moisture, a kink, or a displaced fitting. Do not loosen pressurized connections or reach behind a wet appliance. Keep the valve closed and arrange qualified appliance or plumbing service for a confirmed connection leak.
Can I clear a Blomberg refrigerator drain with a knife or wire?
No. Blomberg's public guidance limits drain clearing to a soft brush or pipe-cleaner approach where the exact model permits it. Do not probe, drill, heat, or remove panels; use the model manual or qualified service if the drain is blocked or inaccessible.
When should I call for Blomberg refrigerator leak service?
Call when the leak returns after the exact model's approved visible checks, water comes from beneath the cabinet, a hose or drain pan is damaged, the source is concealed, the door cannot seal, or water is near electrical parts. Have the model and serial number ready because Blomberg uses them for manuals, repairs, accessories, and parts.
Read the exact guide
Official sources
- Find Your Model & Serial NumberBlomberg · Official Blomberg model-finder page; the model number determines the applicable refrigerator manual and service path.
- Contact UsBlomberg · Official Blomberg UK support page; service route and contact details depend on the user's market.
- Refrigerator User Manual KFD4952XDBlomberg · Official KFD4952XD model manual; water connection and component details are not universal to every Blomberg refrigerator.
- Why are there droplets of water or ice on the fridge rear wall?Blomberg · Official Blomberg fridge FAQ; exact drain access and controls vary by model.
- Product ManualsBlomberg · Official Blomberg manual index; the model number determines the applicable refrigerator manual.
- What’s the best temperature for my fridge?Blomberg · Official Blomberg fridge FAQ; the manual controls the exact setting and adjustment procedure for each model.
Community feedback
Share a repair observation
Share a plain-text repair observation. Accepted observations are published automatically; this page may take a moment to update.