
On this page
Start here
Quick answer
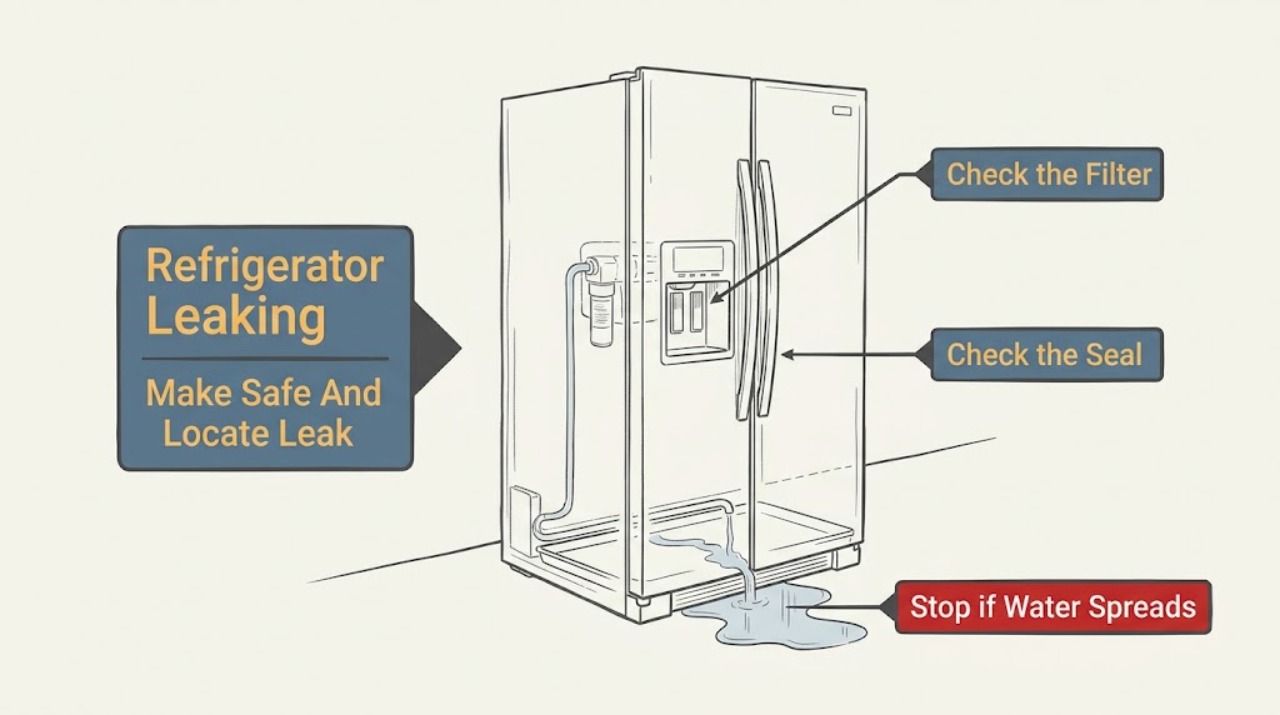
If a Crosley refrigerator is leaking, first protect people and nearby equipment: if water is reaching an outlet, cord, control, light, or other electrical part, stop using the refrigerator and isolate power only by a safe, dry method. Identify the exact model and whether the water is coming from the connected ice-maker or dispenser line, inside the fresh-food or freezer compartment, underneath the cabinet, or from normal condensation. With the unit safe to approach, close the household water shutoff if a supply connection, filter housing, or ice maker is the source; inspect only accessible connections and reseat a model-approved filter or removable ice bin as its manual allows. Check that food, drawers, bins, and the door gasket are not preventing the door from closing, and clean the gasket with the model's approved mild method. A little water entering a drain pan during automatic defrost can be normal on some Crosley models, but water on the floor, a cracked pan, recurring overflow, a damaged gasket, a leaking valve or tube, or water behind panels needs service. Do not remove cabinet panels, thaw with a sharp tool or heater, repair refrigerant tubing, test live parts, or keep operating when water is near electricity.
Before you begin
Safety first
- This article covers making the area safe, identifying the leak location, closing an accessible water shutoff, observing visible connections, clearing removable food or bin obstructions, and following an exact model's user-level filter or ice-bin procedure. A qualified technician must handle internal plumbing, inlet valves, ice-maker assemblies, drain paths, pans, wiring, compressors, refrigerant tubing, sealed systems, and electrical testing.
Work through in order
Diagnostic checks
Use only checks that match the exact appliance or system and its official guide.
-
Check 1
Keep people away from standing water, wipe only water that can be reached without touching electrical parts, and identify the Crosley model. Observe whether water is near an outlet, cord, control, light, or other electrical component, and trace the first visible wet point without moving panels.
Expected result: Water is near electricity; the wet point is at a rear water connection or filter; water is around the ice maker or dispenser; water is inside a compartment; or water is under the cabinet.
Next step: If water is near electricity, stop using the refrigerator and isolate power only by a safe dry method. If a water connection is clearly the source, close the accessible household water shutoff; otherwise continue only with dry, visible checks.
Stop if: Do not pull a wet plug, reach through standing water, move the refrigerator across wet flooring, or remove a panel to find the source.
Why this matters
Why: Water near electricity is an immediate safety boundary. A rear or dispenser-side wet point favors the water system; compartment or underside water favors condensation, door sealing, defrost drainage, drain-pan, or hidden leakage.
-
Check 2
Only if the model has a connected ice maker or dispenser, with water shut off and the refrigerator safe to approach, inspect visible supply tubing, the shutoff connection, filter housing, and the area below the ice maker or dispenser. Reseat only a removable filter or ice bin that the exact manual identifies, and do not loosen a fitting or reach into moving ice-maker parts.
Expected result: A visible connection is wet; the filter is not fully seated; water appears after dispensing or ice making; the line is kinked; the ice bin is out of position; or the visible water system is dry.
Next step: Keep the water valve closed and follow only the exact model's filter or removable-bin procedure. Arrange service for a cracked housing, valve, tube, fill assembly, recurring leak, or any work behind the cabinet.
Stop if: Do not perform plumbing disassembly while energized or wet, apply sealant or glue to a water component, test a valve live, or reach into an operating ice maker.
Why this matters
Why: A wet connection, filter seal, kinked line, or ice-maker/dispenser event makes the water system more likely. A dry visible system with water elsewhere points toward door, condensation, defrost, drain-pan, or hidden internal causes.
-
Check 3
Check whether food packages, shelves, drawers, bins, or an ice container prevent the door from closing. Inspect the visible gasket for a twist, gap, trapped residue, tear, or section pulled out of its groove, and confirm the cabinet is not visibly rocking or pressed against a wall or cabinet.
Expected result: Removing a food or bin obstruction restores closure; the gasket seals evenly; the door remains slightly open; frost or condensation surrounds the gasket; or the gasket, door, hinge, cabinet, or frame is damaged.
Next step: Reseat only removable items and clean the gasket with the exact manual's mild method. Stop and arrange service for a damaged gasket, hinge, door, frame, or a cabinet that cannot be safely leveled under the model instructions.
Stop if: Do not bend the door, adjust hinges, glue the gasket, wedge the door shut, or use harsh cleaners on plastic or gasket surfaces.
Why this matters
Why: A changed result after clearing a removable obstruction supports a closure or moisture path issue. A persistent gap, damaged gasket or door, hinge problem, or unlevel/obstructed installation can admit humid air and cause water or frost, but it is not corrected by forcing the door.
-
Check 4
With the refrigerator operating safely and doors kept closed as practical, note whether water appears only during humid conditions or after a defrost cycle, collects in a drawer or on a shelf, or returns to the floor. Inspect only accessible drain or pan areas that the exact manual says are user-accessible; do not remove an identified non-removable pan.
Expected result: Moisture disappears as humidity falls; water is limited to normal produce or drawer condensation; water drips into the pan but stays contained; water pools inside a compartment; the pan overflows or is cracked; or a hidden drain appears blocked.
Next step: Dry normal condensation and correct only a visible food or door condition. Stop if water escapes the pan or the drain requires panel removal, forced thawing, or internal access; arrange service.
Stop if: Do not pour large amounts of water into a drain, use boiling water or a heater, insert a knife or wire, or dismantle freezer panels.
Why this matters
Why: Humidity and normal defrost collection can be expected on some models. Pooling, overflow, a cracked pan, or recurring water on the floor indicates a drainage, sealing, pan, or internal problem that a surface wipe cannot resolve.
-
Check 5
After the water source is isolated where possible, inspect the floor and visible underside or rear area without removing covers. Note whether water is near the compressor, wiring, control enclosure, drain pan, refrigerant tubing, or a damaged cord, and record whether the leak recurs after the refrigerator is idle.
Expected result: The leak stops after the water valve is closed; the visible rear area is dry; water is beneath a sealed or inaccessible area; the drain pan appears damaged or overflowing; or water is near electrical or refrigerant components.
Next step: Keep the water supply closed and the refrigerator off when water is near electrical parts. Arrange authorized or qualified service for any hidden, recurring, or component-level leak.
Stop if: Do not remove the rear cover, touch the compressor or wiring, pierce tubing, test with a meter, or continue operation to observe a dangerous leak.
Why this matters
Why: A leak that stops with the water supply isolated supports the water system. Water from an inaccessible pan, drain, tube, cabinet, or sealed system, especially near electricity, requires professional diagnosis rather than a user part swap.
Use your observations
Decision map
Find the observation that best matches what you see, then follow the next safe action.
-
PATH 01Safety boundary
What you see
Water is reaching an outlet, plug, cord, control, light, wiring, compressor area, or another electrical component.
Do this next
Stop using the refrigerator and isolate power only by a safe dry method, then close the accessible water shutoff if it can be reached without entering water. Arrange service.
Why this path and its safety boundary
Why it matters: The immediate risk is electrical shock, fire, or further appliance damage; the leak source cannot be safely diagnosed while energized or wet.
Safety stop: Do not pull a wet plug, touch wet controls, move the appliance through standing water, or restore power to test it.
-
PATH 02Safety boundary
What you see
Water is first visible at the rear supply line, filter housing, inlet area, dispenser, ice maker, or below the ice bin, especially after dispensing, ice making, filter work, or moving the unit.
Do this next
Close the household water valve, wipe only accessible dry surfaces, and follow the exact model's removable-filter or ice-bin procedure. Call service for a cracked housing, valve, tube, fill assembly, or recurring leak.
Why this path and its safety boundary
Why it matters: A water-line, filter seating, valve, fill-tube, ice-bin, or ice-maker condition is more likely than a defrost drain or condensation issue.
Safety stop: Do not loosen wet fittings, use sealant or glue, reach into moving ice-maker parts, or test a water valve live.
-
PATH 03Safety boundary
What you see
Water or frost is inside or around the fresh-food compartment, door edge, or drawer, and the door is slightly open, obstructed, unlevel, or has a visible gasket gap.
Do this next
Clear only removable food or bin obstructions, reseat drawers, and clean the gasket with the approved mild method. Arrange service for a damaged gasket, door, hinge, frame, or persistent gap.
Why this path and its safety boundary
Why it matters: Warm humid air entering through a closure or gasket problem can produce condensation or frost that migrates as water; the cabinet and gasket may need model-specific service.
Safety stop: Do not force the door, adjust hinges, glue the gasket, or use harsh cleaners or heat.
-
PATH 04Safety boundary
What you see
Water pools inside a compartment or escapes underneath after defrosting, while visible supply connections are dry; a drain or pan is suspected.
Do this next
Stop at visible observation and arrange service if water pools, overflows, reaches the floor, or requires panel removal. Do not attempt forced thawing or drain probing.
Why this path and its safety boundary
Why it matters: A blocked or frozen drain path, overflowing or cracked pan, or inaccessible internal drainage issue is more likely. Some Crosley guides describe a drain pan as non-removable and normal defrost dripping as contained.
Safety stop: Do not use a knife, wire, heater, hair dryer, flame, or large-volume flush, and do not remove panels.
-
PATH 05Safety boundary
What you see
A small amount of moisture is limited to a drawer or humid exterior, or defrost water is heard or seen entering a pan without escaping; the doors and supply system are normal.
Do this next
Dry the accessible surface, keep food covered, minimize unnecessary door opening, and monitor. Escalate if water reaches the floor, recurs outside the documented normal behavior, or the door no longer seals.
Why this path and its safety boundary
Why it matters: Humidity, produce moisture, or contained automatic-defrost water may be normal for the applicable model, not a failing water system.
Safety stop: Do not assume every model has the same pan or drain design, and do not remove a pan described as non-removable.
Helpful context
Understand the symptom
Locate the water before changing anything
Crosley refrigerators are sold in different formats, including bottom-mount, top-freezer, and models with optional or built-in ice and water systems. Record the model number first. Then dry the visible water and observe where it returns: at a rear water connection or filter, around the ice maker or dispenser, inside the fresh-food or freezer compartment, from the front underside, or as moisture on the outside. Water near a receptacle, cord, controls, or lighting makes this an immediate stop-use situation. Do not pull a wet plug or reach through standing water.
Separate an ice-maker or dispenser leak from defrost water
If the leak follows ice production, dispensing, a filter change, or movement of the refrigerator, the water line, filter housing, inlet valve, fill tube, ice bin, or an ice-maker component is more likely. If water appears in the freezer or fresh-food compartment or after a defrost cycle, a blocked or frozen drain path, overflowing trough, or normal defrost water may be involved. A Crosley guide notes that water can drip into a non-removable drain pan during automatic defrost; that normal sound does not explain water repeatedly reaching the floor. Only shut off an accessible household water valve and inspect visible connections; plumbing or internal drain work belongs to service.
Check the door, gasket, food clearance, and condensation
A door that is slightly open can allow warm humid air to enter, create frost or condensation, and send water toward shelves or the floor. Crosley troubleshooting guidance lists food or drawers interfering with closure, an unlevel cabinet, a wall or cabinet contact, and a damaged or poorly seated gasket as relevant conditions. Remove only food or a removable bin that is clearly obstructing closure, ensure drawers and shelves are properly seated, and wipe the gasket with the exact manual's mild cleaning method. Do not bend the door, remove hinge hardware, or glue or replace a gasket without model-specific instructions.
Treat condensation and the drain pan as model-specific
Humidity, an open door, and moisture from uncovered food can produce water or frost without a supply-line failure. A drain pan may collect defrost water for evaporation, and some Crosley guides identify that pan as not removable. Do not assume the pan can be pulled out or flushed. If the leak continues with the doors closed and the visible supply connections dry, or if the pan is cracked, overflowing, inaccessible, or surrounded by water behind the base, stop at visible observation and arrange service.
Escalate any electrical, sealed-system, or hidden leak
Water behind a panel, under insulation, near the compressor or wiring, or from a damaged tube is not a user repair. Disconnect the water supply when it is safely accessible and stop the refrigerator if water is approaching electrical parts. Do not use a hair dryer, heat gun, flame, knife, or sharp object to remove ice; do not open the refrigerant circuit or test a live valve, heater, or compressor. Provide the technician with the leak location, timing, model, water-source status, and whether the door or ice system was recently serviced.
Safety boundary
Stop conditions
- If water is near an outlet, plug, cord, controls, lights, wiring, compressor, or another electrical part, stop using the refrigerator and isolate power only by a safe dry method.
- Close the accessible household water shutoff for a supply-line, filter, dispenser, or ice-maker leak; do not loosen wet plumbing or restore water to a cracked or recurring connection.
- Do not remove cabinet or freezer panels, probe a drain, test a valve or heater live, open the refrigerant circuit, or repair sealed-system tubing.
- Do not use a knife, wire, boiling water, hair dryer, heater, flame, or other unapproved method to remove frost or clear a drain.
- Do not bend or force the door, adjust hinges, glue a gasket, or continue operation with a visible gap, damaged door, damaged gasket, overflowing pan, or water under the cabinet.
- Do not assume a drain pan, ice maker, filter, control, or water-line procedure from another Crosley model; use the exact model manual.
- Arrange service for any hidden, recurring, or unexplained leak, any cracked pan or water component, or any leak that cannot be isolated without internal access.
When checks do not resolve it
Need a professional?
Safety scope: This article covers making the area safe, identifying the leak location, closing an accessible water shutoff, observing visible connections, clearing removable food or bin obstructions, and following an exact model's user-level filter or ice-bin procedure. A qualified technician must handle internal plumbing, inlet valves, ice-maker assemblies, drain paths, pans, wiring, compressors, refrigerant tubing, sealed systems, and electrical testing.
Common questions
FAQ
What should I do first if my Crosley refrigerator is leaking?
Keep water away from outlets, cords, controls, and lights. If water is near electricity, stop using the refrigerator and isolate power only by a safe dry method. Locate the first visible wet point and close the accessible household water valve if the leak is from the ice-maker or dispenser system.
Could the Crosley ice maker or water filter be causing the leak?
Yes, if water appears near the rear supply, filter housing, dispenser, ice maker, or below the ice bin. With water shut off, inspect only visible connections and reseat a model-approved removable filter or ice bin. A cracked housing, valve, tube, or recurring leak needs service.
Is water in the Crosley refrigerator drain pan normal?
Some Crosley-hosted guides describe water dripping into a drain pan during automatic defrost, and some identify the pan as non-removable. Contained defrost water can be normal for that model; water escaping onto the floor, a cracked pan, or recurring overflow is not a user-level reset.
Can a Crosley door gasket cause water to leak?
A door that is slightly open or has a gasket gap can admit warm humid air, producing frost or condensation that turns into water. Clear only food or removable-bin obstructions and clean the gasket with the exact manual's mild method. A damaged gasket, door, hinge, frame, or persistent gap needs service.
Can I unclog a Crosley refrigerator defrost drain myself?
Do not assume the drain or pan is user-accessible. Stop if clearing it would require a panel, sharp object, wire, heater, boiling water, or forced thawing. If water pools inside or reaches the floor while visible water connections are dry, arrange service for the model-specific drain and pan system.
When should I call service for a leaking Crosley refrigerator?
Arrange service for water near electricity, a damaged cord or plug, a cracked or recurring water-system leak, a damaged door or gasket, an overflowing or inaccessible pan, water behind panels or near the compressor, or any repair requiring plumbing disassembly, internal drainage, live testing, or refrigerant access.
Read the exact guide
Official sources
- Crosley Top-Freezer Refrigerator Use & Care ManualCrosley · Official Crosley-hosted top-freezer manual; used for clearly labeled top-freezer examples and safety limits, not as a universal procedure for every Crosley model.
- Crosley CFEH272 Refrigerator Use & Care GuideCrosley · Official Crosley-hosted guide for an ice-and-water refrigerator family; used for model-labeled examples and visible user checks, not for unrelated Crosley formats.
- Crosley Refrigerator and Freezer Use & Care ManualCrosley · Official Crosley-hosted older-model care guide; used to establish that drain-pan access and cleaning are model-specific, not as a current-model repair procedure.
- CFD28SDQS Bottom-Mount RefrigeratorCrosley Home Products · Official Crosley product page for one bottom-mount model; used only to establish that configuration and features differ by model.
- Crosley Fridge Freezer Use & Care GuideCrosley · Official Crosley-hosted use-and-care PDF; used for visible water-system, door, condensation, normal defrost-pan, and model-specific troubleshooting examples, not as a universal procedure for every Crosley refrigerator.
Community feedback
Share a repair observation
Share a plain-text repair observation. Accepted observations are published automatically; this page may take a moment to update.