
On this page
Start here
Quick answer
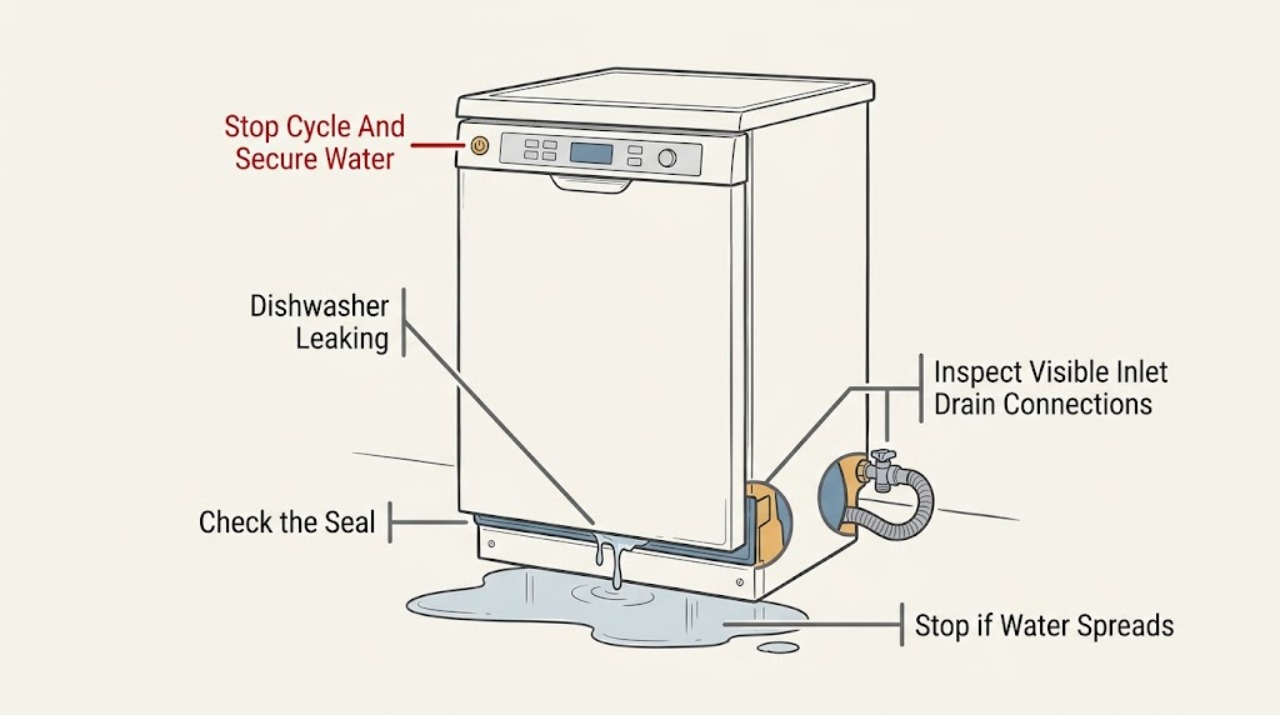
Stop the cycle, keep hands and feet away from hot water, and turn off the water supply. If water is on the floor, at the base, or near the plug, outlet, controls, or other electrical parts, do not restart the dishwasher; isolate power only from a safe, dry location and arrange service. If the leak is limited to the front edge, inspect the accessible door gasket, latch area, loading, level, and excess foam from the correct detergent or spilled rinse aid. If it is at the faucet adapter, inlet connection, or drain connection, inspect only the visible hose and fitting from outside; Danby portable models use a pressurized quick-connect assembly, so do not disconnect it without shutting off water and following the model manual's pressure-relief procedure. A small amount of clean water in the sump can be normal on some Danby models, but water rising in the tub, returning after drain, leaking from underneath, or reaching internal parts can involve the drain pump, inlet valve, hose, seal, or wiring. Persistent, hidden, or internal leaks require Danby or qualified appliance service.
Before you begin
Safety first
- The user may stop the cycle, shut off the water, inspect the accessible gasket and loading, check level and visible connections, and clean a documented accessible filter with power safely isolated. Qualified service personnel must handle pressurized disconnection, cabinet movement, pump, valve, hidden hose, tub seal, overflow sensor, wiring, controls, and live testing.
Work through in order
Diagnostic checks
Use only checks that match the exact appliance or system and its official guide.
-
Check 1
Stop the wash cycle and keep the door closed if hot water or steam may be present. Turn off the water supply at the faucet or shutoff. From a dry position, identify whether water is only inside the tub, on the floor, under the base, or near the plug, outlet, controls, or wiring. If water is near electrical parts or the cord is damaged, isolate power at a safe dry location and do not restart.
Expected result: There is no water outside the tub, water is at the front edge, water is under or behind the unit, water is near electrical parts, or the leak continues while the dishwasher is idle.
Next step: Keep the dishwasher out of service until the source is identified safely. For water near electrics, smoke, burning odor, a hot cord, or repeated breaker trips, arrange urgent appliance or electrical service; otherwise continue only with external checks after the area is dry and safe.
Stop if: Do not reach into standing water while power may be present, restart a leaking appliance repeatedly, or pull a built-in dishwasher out by its door.
Why this matters
Why: A controlled front-edge seep is a different path from a pressurized supply leak, a drain leak, or water entering the electrical base. A leak that continues while idle points toward the inlet path or supply rather than wash splash.
-
Check 2
With the unit stopped and safe to approach, inspect the visible door gasket and frame for food debris, a fold, gap, crack, or displaced section. Check that a plate, pan, rack, detergent cup, or other item is not holding the door open and that the dishwasher is level as the exact manual requires. Look for unusual foam, spilled rinse aid, or detergent residue; do not add more detergent.
Expected result: The gasket is dirty or damaged, the door or rack is obstructed, the unit is visibly out of level, or suds are present while the gasket and loading appear normal.
Next step: Clean only the accessible gasket with a damp cloth, remove the loading obstruction, correct only an obvious safe leveling issue, and use the exact model's detergent amount and type. If the gasket needs replacement, the frame is bent, or the leak returns, call service.
Stop if: Do not remove the door panel, force the latch, use hand soap, add chemicals to suppress suds, or continue a cycle with a torn gasket or water entering the base.
Why this matters
Why: Door contact, loading, level, and oversudsing can all send wash water over the front edge without a failed pump or valve. Foam makes the apparent leak location less reliable.
-
Check 3
From outside the dishwasher, inspect the visible faucet adapter, quick-connect collar, inlet hose, drain hose, and accessible connection points for a drip, crack, kink, loose-looking joint, or water trail. For a portable Danby, confirm only that the inlet and drain hoses are attached to the correct visible ports and that the faucet is off when the unit is not in use. For a built-in model, inspect only what is visible under the sink; do not disconnect or move the machine.
Expected result: Water appears at an inlet or faucet adapter, at a drain hose or sink connection, along a visible hose, or no external connection is wet.
Next step: For a visible faucet or supply leak, turn off the water and leave the unit unused. For a portable quick-connect, do not disconnect until water is shut off, power is disconnected safely, and pressure is relieved exactly as the manual shows. Call a plumber for household plumbing and an appliance technician for the dishwasher connection or hidden hose.
Stop if: Do not loosen a pressurized quick-connect, disconnect a built-in hose, over-tighten a fitting, pull the appliance out, or place hands under a wet electrical base.
Why this matters
Why: A supply-side drip can continue while the dishwasher is idle; a drain-side drip usually appears during pumping or when the sink connection receives discharge. A dry visible path does not rule out a hidden connection, internal valve, or hose leak.
-
Check 4
Once the area is dry and power is isolated when required, compare the water level and condition with the exact Danby manual. A small amount of clean water around the tub outlet may be normal on some models; water that rises above the normal sump area, is dirty or foamy, returns after draining, or collects under the appliance is not a reason to keep testing. Check only a documented removable filter or drain area; do not open the pump or base.
Expected result: Only a small clean sump amount is present, the tub is overfull, water returns after drain, water is under the unit, a filter or drain area is visibly blocked, or the accessible drain path is clear.
Next step: Clean only the model-documented accessible filter or drain area and stop if water remains, returns, or is under the machine. Persistent overflow, a pump that does not drain, or any hidden path requires appliance service rather than a pump or hose replacement guessed from the symptom.
Stop if: Do not scoop water toward electrical parts, remove a pump cover, probe the sump with sharp tools, run the drain pump repeatedly, or use chemical drain cleaner.
Why this matters
Why: Normal sump water does not explain a floor leak. Overfill or water returning after drain can involve a blocked filter, drain hose, pump, check valve, or control; water under the base can also come from an inlet or tub seal.
-
Check 5
Record the exact Danby model, portable or built-in type, when the leak starts, its highest wet point, whether the dishwasher is idle or washing or draining, gasket and loading condition, suds, level, inlet and drain connection findings, tub water level, and any electrical warning. Provide the record and photos of dry external areas to Danby or a qualified appliance technician; do not perform another cycle solely to reproduce a hazardous leak.
Expected result: The leak stops after a safe external correction, returns at the front, continues while idle, appears only during filling or draining, comes from underneath, or has reached electrical parts.
Next step: Leave the dishwasher unused and arrange Danby or qualified appliance service for any persistent, hidden, under-base, or internal leak. Use a plumber when the household faucet, sink, disposer, or drain connection is the leaking path.
Stop if: Do not open the base, test live wiring, bypass an overflow or door sensor, disconnect hoses, or keep running cycles to locate a leak.
Why this matters
Why: Recovery after a gasket, loading, suds, level, or visible connection correction supports that condition as the immediate cause. A leak that persists or changes with fill/drain timing makes an internal hose, valve, pump, tub seal, sensor, or wiring fault more likely.
Use your observations
Decision map
Find the observation that best matches what you see, then follow the next safe action.
-
PATH 01Safety boundary
What you see
Water appears at the front edge during washing, and the gasket, latch area, rack loading, or level is abnormal.
Do this next
Clean the accessible gasket, remove the obstruction, and correct an obvious safe loading or leveling issue as the exact manual permits. Call service for a damaged gasket, latch, frame, or recurring leak.
Why this path and its safety boundary
Why it matters: A door-contact, loading, level, or gasket issue is more likely than a hidden pump or inlet-valve failure.
Safety stop: Do not remove the door panel, force the latch, or run with water entering the base.
-
PATH 02Safety boundary
What you see
Foam is visible, the wrong detergent or too much detergent may have been used, or rinse aid has spilled near the dispenser.
Do this next
Stop the cycle, do not add more detergent or chemicals, wipe accessible rinse-aid spills, and follow the exact model's safe cleanup instructions. Arrange service if foam or overflow returns.
Why this path and its safety boundary
Why it matters: Oversudsing can push water past the door and make the front appear to be leaking even when the gasket is intact.
Safety stop: Do not use hand soap, pour drain chemicals into the tub, or restart while suds are overflowing toward electrical parts.
-
PATH 03Safety boundary
What you see
Water appears at the faucet adapter, quick-connect collar, inlet hose, inlet valve area, or continues while the dishwasher is idle.
Do this next
Turn off the water supply and leave the dishwasher unused. Inspect only the visible adapter and hose. For a portable unit, follow the manual's water shutoff, power isolation, and pressure-relief sequence or call service; for a built-in connection, use qualified appliance or plumbing service.
Why this path and its safety boundary
Why it matters: A pressurized supply path is more likely than wash splash; a portable quick-connect can also spray hot water if disconnected without pressure relief.
Safety stop: Do not loosen a pressurized connection, touch wet electrical parts, or continue testing while the leak is active.
-
PATH 04Safety boundary
What you see
Water appears during draining, returns after the cycle, rises above the normal sump area, collects under the appliance, or the visible drain path is wet.
Do this next
Check only the documented accessible filter and visible hose route with power isolated. If water remains or the source is underneath or hidden, stop and arrange appliance service; use plumbing service for a blocked household drain.
Why this path and its safety boundary
Why it matters: A blocked or damaged drain hose, filter, pump, check valve, tub seal, or hidden connection is more likely; a small clean sump amount alone may be normal on some models.
Safety stop: Do not open the pump or base, disconnect a hose, probe the drain path, or repeatedly run drain cycles.
-
PATH 05Safety boundary
What you see
Water reaches the plug, outlet, controls, wiring, or base electrical area, or the leak persists after the accessible door, loading, suds, level, and connection checks.
Do this next
Isolate power only from a safe dry location, leave the dishwasher out of service, and arrange urgent qualified appliance service. Provide the timing and wet-location record instead of reproducing the leak.
Why this path and its safety boundary
Why it matters: Electrical shock, shorting, fire, or an internal valve, pump, hose, seal, sensor, or control fault is possible; user diagnosis has reached its safety boundary.
Safety stop: Do not restore power, perform live tests, remove panels, bypass safety devices, or attempt an internal part replacement.
Helpful context
Understand the symptom
Treat a floor leak differently from a little sump water
Some Danby manuals describe a small amount of clean water around the tub outlet as normal, but water spreading onto the floor, rising in the tub, returning after drain, or appearing under the cabinet is a different symptom. Note the highest wet point without reaching under the machine. Stop immediately if water is near electrical parts, the plug, outlet, controls, or a damaged cord.
Front-edge leaks often change with loading or foam
A door gasket that is dirty, damaged, folded, or not contacting the frame can leak at the front. A rack or tall dish can prevent the door from closing, while too much detergent, the wrong detergent, or spilled rinse aid can create foam that escapes as an apparent door leak. Check the gasket and loading from the outside and use only the exact model's detergent guidance.
Connections are pressurized and installation-specific
Danby portable dishwashers may use a faucet adapter and quick-connect assembly with separate inlet and drain hoses; built-in models use a different under-counter arrangement. A visible drip at an adapter or hose is not permission to loosen it. Shut off the water, unplug only from a safe dry position, and follow the model manual's pressure-relief procedure or call a technician.
Safety boundary
Stop conditions
- Stop the dishwasher and water supply for any active leak; isolate power only from a safe, dry location when water is near the plug, outlet, controls, or wiring.
- Do not reach into standing water while the appliance may be energized, restart a leaking unit repeatedly, or reproduce a hazardous leak for diagnosis.
- Do not disconnect a portable quick-connect or built-in hose while pressurized; shut off water, disconnect power safely, and follow the exact manual's pressure-relief procedure or call service.
- Do not remove the door panel, base, pump, inlet valve, wiring, or overflow sensor, and do not perform live electrical tests.
- Do not use hand soap or chemical drain cleaner, add chemicals to suppress suds, force the door latch, or pull a built-in dishwasher by its door.
When checks do not resolve it
Need a professional?
Safety scope: The user may stop the cycle, shut off the water, inspect the accessible gasket and loading, check level and visible connections, and clean a documented accessible filter with power safely isolated. Qualified service personnel must handle pressurized disconnection, cabinet movement, pump, valve, hidden hose, tub seal, overflow sensor, wiring, controls, and live testing.
Common questions
FAQ
What should I do first if my Danby dishwasher is leaking?
Stop the cycle and turn off the water supply. If water is near the plug, outlet, controls, or wiring, do not restart; isolate power only from a safe dry location and arrange service. If the area is safe, note whether the leak is at the door, a visible inlet or drain connection, or underneath before checking only accessible items.
Can a Danby dishwasher door gasket cause a leak?
Yes. Danby directs owners to inspect the door gasket, and loading or an unlevel unit can also let water escape at the front. Check the accessible gasket for debris or damage and make sure racks or tall dishes are not holding the door open. A torn gasket, bent frame, or recurring leak needs service.
Can too much detergent make a Danby dishwasher leak?
Yes. Danby manuals identify too much or incorrect detergent and spilled rinse aid as causes of suds; foam can overflow at the door and mimic a gasket leak. Stop the cycle, do not add more detergent or chemicals, wipe accessible rinse-aid spills, and follow the exact model's cleanup instructions. Call service if the overflow returns.
How do I check a Danby dishwasher hose leak?
Inspect only the visible faucet adapter, quick-connect collar, inlet hose, drain hose, and sink connection from outside. Danby portable quick-connect hoses are pressurized when the faucet is open, so shut off water and follow the model manual's power-isolation and pressure-relief steps before any permitted disconnection. Do not disconnect built-in hoses yourself.
Is water in the bottom of a Danby dishwasher always a leak?
Not always. Some Danby manuals describe a small amount of clean water around the tub outlet as normal, but water that rises above the sump, returns after draining, is dirty or foamy, collects under the appliance, or reaches electrical parts is not a normal-sump explanation. Stop and arrange service when the accessible filter and visible drain path do not explain it.
Read the exact guide
Official sources
- The dishwasher is leaking. How can I stop the leak?Danby · Official Danby FAQ used for the general door-gasket, inlet-valve, hose-connection, drain-hose, and leveling checks; exact model instructions control access and parts.
- Danby Designer 8 Place Setting DishwasherDanby · Official Danby product page used to distinguish a built-in under-counter dishwasher from portable quick-connect models and to direct users to model documents; product status does not change the leak safety boundary.
- DDW621WDB Owner's ManualDanby · Official Danby model-family manual used for model-specific examples of a quick-connect water path, normal sump water, gasket/filter care, suds, hose and pump symptoms, and electrical safety; do not transfer its layout to another model.
- Faqs Category: DishwashersDanby · Official Danby category guidance used for gasket care, detergent and rinse-aid context, drain-path checks, and the distinction between appliance service and household plumbing; model-specific procedures still apply.
- DDW1801MWP Installation InstructionsDanby · Official Danby portable-dishwasher installation manual used to explain the pressurized quick-connect boundary; its procedure is not a built-in-dishwasher procedure.
Community feedback
Share a repair observation
Share a plain-text repair observation. Accepted observations are published automatically; this page may take a moment to update.