
On this page
Start here
Quick answer
If a Danby dishwasher leaves water after a completed cycle, first make the appliance safe: stop the cycle, let hot water cool, and do not put hands into standing water while the dishwasher is energized. With power isolated according to the exact manual, clean the user-accessible filter and drain area, then inspect the accessible drain hose for a kink, twist, clog, loose connection, or missing high loop. If the hose enters a garbage disposal, confirm the sink/disposal connection is open and that the disposal's dishwasher inlet knockout was removed during installation; do not reach into the disposer or pull out a built-in dishwasher just to inspect the rear. Danby's troubleshooting guidance lists a kinked hose, clogged filter, and drain-pump malfunction as distinct causes, while its installation guidance calls for a high drain loop or suitable air gap and warns that a remaining disposal membrane can block the hose. A small amount of clean water around the filter area can be normal on some models, but deep or dirty water after the cycle, a leak, sewage backflow, or persistent no-drain condition needs service. Do not dismantle the pump, open wiring, or perform a live electrical test.
Before you begin
Safety first
- The user may stop use, let water cool, isolate power as directed, clean a documented user-accessible filter, and inspect accessible hose and sink-side routing. Drain-pump, base, wiring, control, float, internal blockage, and live electrical diagnosis are for qualified service personnel.
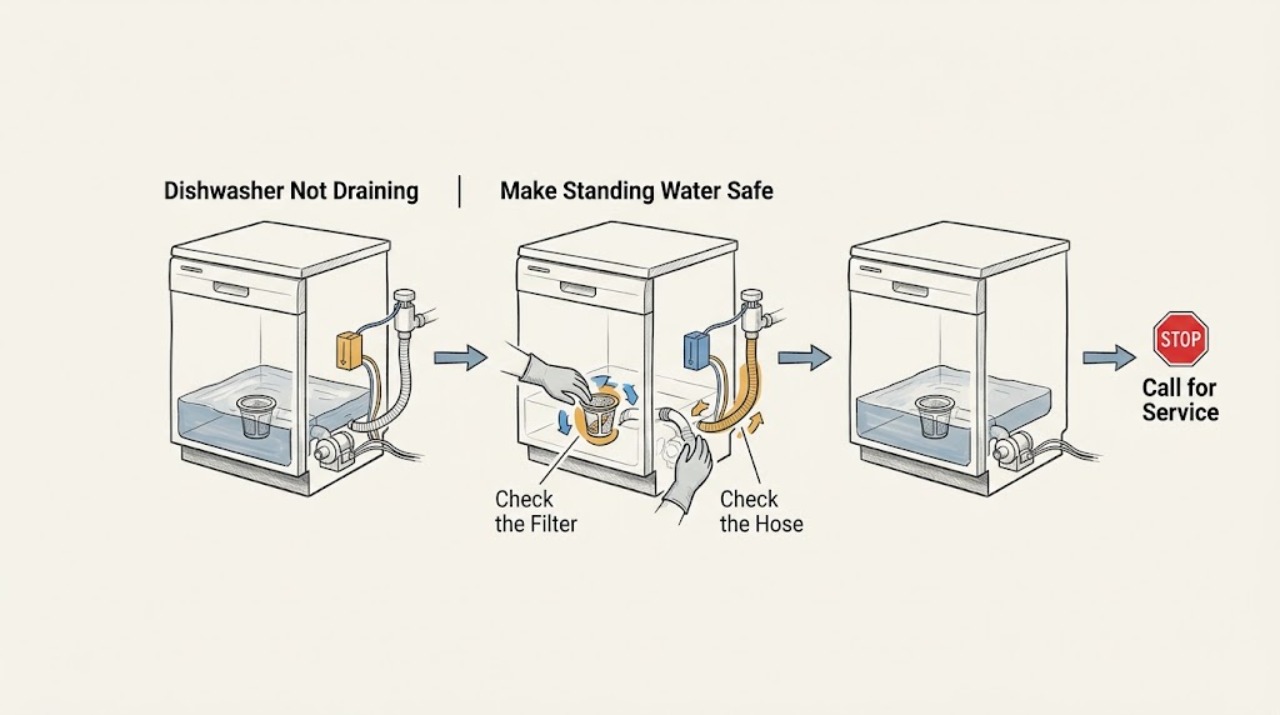
Work through in order
Diagnostic checks
Use only checks that match the exact appliance or system and its official guide.
-
Check 1
Stop the dishwasher and let any hot water cool. From a dry position, note whether water covers the filter area, whether it is clean or dirty, and whether water is leaking onto the floor, cabinet, cord, plug, or nearby outlet. Do not put hands into the water while the dishwasher is powered.
Expected result: The tub is deeply full, water is dirty or foul-smelling, water is leaking outside, water is near electrical parts, or only a shallow amount remains around the drain-filter area.
Next step: For a leak or water near electrics, keep clear and isolate power only from a dry, safe position; do not move the dishwasher. For safe shallow residual water, continue only after power is isolated and the exact manual permits filter access. Otherwise arrange service.
Stop if: Do not reach into hot or energized water, pull out a built-in dishwasher, or cross a wet floor to reach a plug or breaker.
Why this matters
Why: Deep, contaminated, leaking, or electrically unsafe water requires stopping use. A shallow amount around the filter area can be normal on some Danby models, but water covering the filter after a completed cycle indicates a drainage problem.
-
Check 2
With the dishwasher switched off and power isolated as directed by the exact owner manual, remove and rinse only the user-accessible filter or screen. Clear loose food residue from the visible drain area with a gloved hand or soft cloth; do not remove pump covers, force an impeller, or insert a knife, wire, or screwdriver.
Expected result: The filter or visible drain area is clogged, the filter is damaged or missing, a solid object is visible, or the area is clear but the tub still will not drain.
Next step: Reinstall the filter exactly as the manual shows and leave the dishwasher unused until the hose and sink-side checks are complete. If an object is below the accessible area or the pump remains obstructed, stop and arrange service.
Stop if: Do not disassemble the pump, reach below the filter housing, or restore power while hands or tools are inside the drain area.
Why this matters
Why: Food debris or a damaged filter can restrict the drain path and is a plausible user-correctable cause. A clear filter with continued standing water shifts attention to the hose, sink/disposal connection, pump, or control rather than just the filter.
-
Check 3
From an accessible cabinet or sink position, inspect the visible drain hose without pulling the dishwasher. Look for a kink, twist, crushed section, loose clamp, damage, or a hose that drops low instead of following the exact manual's high-loop or air-gap arrangement.
Expected result: The hose is kinked, twisted, crushed, loose, leaking, damaged, or missing the documented high loop/air gap; or it is intact and routed as specified.
Next step: Correct only a clearly accessible routing issue using the exact model installation instructions, without disconnecting a wet or pressurized connection. If the hose is damaged, inaccessible, or requires moving a built-in unit, arrange qualified service or installation help.
Stop if: Do not cut, puncture, force, or disconnect the hose under the cabinet, and do not pull the dishwasher out by the door or hose.
Why this matters
Why: Danby installation guidance links bends, kinks, damage, and an improperly routed hose to drainage problems and backflow. An intact correctly routed hose makes a filter, sink connection, pump, or control issue more likely.
-
Check 4
Check the sink-side drain destination from above or inside the cabinet without opening the dishwasher. Confirm the sink drains normally, inspect an accessible air-gap cap for visible debris if the model has one, and identify whether the hose enters a garbage disposal or sink spigot. If a disposal connection is new, have the installer confirm that the dishwasher inlet knockout was removed; do not reach into the disposal or use sharp tools in the hose.
Expected result: The sink or disposal is blocked or slow, the air gap is visibly obstructed, the hose is on a sealed disposal inlet, the connection leaks, or the sink-side path is clear.
Next step: Clear only an accessible sink or air-gap obstruction using its own safe instructions. Have a plumber or appliance installer correct a disposal knockout, connection, leak, or hidden blockage; do not run the dishwasher to force water through it.
Stop if: Do not put a hand into a disposal, disconnect a hose over standing water, or run a disposer with the dishwasher drain connection open.
Why this matters
Why: A blocked sink, air gap, sealed disposal inlet, loose connection, or backflow path can prevent the dishwasher from emptying even when its filter is clean. A clear sink-side path shifts the diagnosis toward the hose, pump, or control.
-
Check 5
Compare the water level and timing with the exact manual: note whether a small amount remains below the filter after a completed program, whether water returns from the sink after the dishwasher stops, and whether the dishwasher stopped mid-cycle or displayed an error. Do not start another wash solely to see if it drains.
Expected result: Only a small clean amount remains in the documented filter area, water returns from the sink/disposal, the program stopped early, or the tub remains deeply full after completion.
Next step: Use the model manual to interpret the residual level and any error indication. Address sink-side backflow if present; for deep water or a repeated incomplete drain after the filter and hose path are clear, arrange service.
Stop if: Do not repeatedly start, cancel, or reset cycles while water remains in the tub.
Why this matters
Why: Documented shallow residual water can protect a seal and is not the same as a full tub. Backflow points to the sink-side routing or blockage; a mid-cycle stop can leave water without proving a drain-pump failure. Deep water after a completed cycle remains abnormal.
-
Check 6
If the filter, visible drain area, hose routing, and sink-side destination are clear, record the exact Danby model, water level, error or indicator pattern, whether a drain sound was heard, and whether the problem began after installation or a blockage. Keep the appliance power isolated and do not open the base, pump, control area, or wiring.
Expected result: The drain pump is silent or only hums, the pump runs but water remains, an error returns, the dishwasher leaks, or no accessible cause explains the standing water.
Next step: Arrange qualified Danby appliance service and provide the model, water level, timing, error, and observations. A plumber may be needed for the sink/disposal path; do not perform a live electrical or pump test.
Stop if: Do not remove the pump, disconnect line harnesses, probe voltage, bypass a float or door switch, or work under the dishwasher while energized.
Why this matters
Why: A pump blockage or malfunction, drain-path restriction, wiring or control fault, or installation problem is possible. The external symptom cannot safely distinguish these assemblies, and a pump that runs does not prove that its impeller or hose is sound.
Use your observations
Decision map
Find the observation that best matches what you see, then follow the next safe action.
-
PATH 01Safety boundary
What you see
Only a small amount of clean water remains around or below the filter area where the exact Danby installation guidance says residual water can remain, and there is no leak or backflow.
Do this next
Confirm the level and location against the exact owner's manual. Monitor the next normal use only if the dishwasher is safe and no other symptom is present; deep or dirty standing water needs troubleshooting.
Why this path and its safety boundary
Why it matters: The observation may be normal for that model rather than a failed drain system.
Safety stop: Do not remove pump parts to eliminate a documented small residual amount.
-
PATH 02Safety boundary
What you see
The filter or accessible drain area contains food debris or a loose object, and the hose and sink-side connection have not yet been evaluated.
Do this next
With power isolated, clean and reinstall only the user-accessible filter as the manual directs, then continue with the hose and sink/disposal checks. Arrange service if the obstruction is below the accessible area or drainage remains poor.
Why this path and its safety boundary
Why it matters: A restricted filter or drain entrance is a plausible first cause and is different from a failed pump diagnosis.
Safety stop: Do not reach into the pump housing or use sharp tools to dislodge debris.
-
PATH 03Safety boundary
What you see
The hose is kinked, twisted, low without the documented high loop/air gap, connected to a blocked sink or air gap, or attached to a disposal inlet whose knockout may still be present.
Do this next
Correct an obvious accessible routing issue only with the exact installation instructions. Have a qualified installer or plumber correct a sealed disposal inlet, hidden blockage, damaged hose, or leaking connection.
Why this path and its safety boundary
Why it matters: The external drain route or backflow protection is more likely than an internal pump fault.
Safety stop: Do not pull out the dishwasher, disconnect a hose over standing water, or reach into the disposal.
-
PATH 04Safety boundary
What you see
The filter, visible drain area, hose, high loop/air gap, and sink/disposal path are clear, but deep water remains or the drain pump is silent, abnormal, or unable to empty the tub.
Do this next
Keep the appliance off and arrange qualified Danby appliance service. Provide the model, error pattern, water level, and whether a pump sound was heard without trying a live test.
Why this path and its safety boundary
Why it matters: A drain-pump, wiring, control, internal blockage, or installation fault is more likely; the observation does not identify a replacement part.
Safety stop: Do not remove the pump or base, disconnect harnesses, or probe energized wiring.
-
PATH 05Safety boundary
What you see
Water is leaking onto the floor or electrical area, the appliance is energized with standing water, a cord or outlet is damaged, or a person cannot safely isolate the appliance from a dry position.
Do this next
Keep clear, stop using the dishwasher, and isolate power and water only from a dry, safely reachable control point. Arrange qualified appliance service and plumbing or electrical help as needed.
Why this path and its safety boundary
Why it matters: Shock, slip, sanitation, or property damage risk overrides routine drain troubleshooting.
Safety stop: Do not touch wet electrical parts, cross water to reach a plug or breaker, or move the dishwasher to find the leak.
Helpful context
Understand the symptom
First decide whether the water level is abnormal
Danby installation material distinguishes the water level below the filter screen and a small amount around the drain-filter area from a tub that remains full after the wash program. Record whether the water is clean or dirty, shallow or covering the filter, and whether the sink or disposal is also slow. Do not assume every drop means a failed pump, but do not run another cycle when water is deep, contaminated, leaking, or near electrical parts.
The drain path depends on the installation
Danby dishwashers may drain through an air gap, a sink connection, or a garbage-disposal inlet. A hose can look connected while being kinked, twisted, low without the required high loop, or blocked by a disposal inlet membrane that was never removed. Portable and built-in Danby models also have different access and connection arrangements, so use the exact model's manual and do not pull a built-in unit solely to reach the hose.
Keep standing water and pump work within a safe boundary
Turn the dishwasher off and isolate its power as the exact manual requires before removing a filter or clearing visible debris. Wear gloves for food residue, avoid sharp tools, and do not remove the pump cover, disconnect wiring, reach under the tub, or probe energized parts. Danby identifies pump malfunction as a service-level possibility; a clear filter and hose do not authorize an owner to dismantle the pump.
Safety boundary
Stop conditions
- Stop if water is leaking onto the floor, cord, plug, or outlet, or if standing water is still hot; isolate power and water only from a dry, safe position.
- Do not repeatedly start, cancel, or reset cycles to force a drain or confirm a pump fault.
- Do not put hands into standing water while the dishwasher is energized, reach into a garbage disposal, or disconnect a hose over water.
- Do not remove the pump or base, disconnect wiring, bypass a float or door switch, probe live parts, or perform an electrical or pump test.
- Do not pull a built-in dishwasher by its door, cut or puncture a drain hose, or use sharp tools to clear the drain path.
Only after diagnosis
Potential parts
- filter or drain-screen assembly
Consider this category only if the exact manual identifies the filter as user-accessible and it is damaged, missing, or remains restricted after correct cleaning.
Filter shapes and access differ by Danby model; confirm the exact SKU and manual before ordering. - drain hose, clamp, air-gap, or disposal connector
Consider this category only when a qualified installer or plumber finds a kinked, damaged, leaking, incorrectly routed, or incompatible drain connection.
Portable and built-in Danby installations use different routing and connection hardware; verify local plumbing requirements and model fitment. - drain pump or pump seal
Consider this category only after the filter, hose, high loop or air gap, disposal/sink path, and visible blockage are cleared and qualified diagnosis identifies a pump fault.
A silent or running pump symptom does not establish the failed component; confirm the exact model and approved service part information. - control or drain-circuit wiring
Consider this category only when qualified service traces the no-drain condition to the control or wiring after the mechanical drain path is clear.
Do not order or access electrical assemblies from a standing-water symptom alone; fitment and service procedure are model-specific.
When checks do not resolve it
Need a professional?
Arrange qualified Danby appliance service when deep water remains after the exact model's accessible filter, drain-area, hose-routing, and sink/disposal checks; when the drain pump is silent or abnormal; when an error returns; or when the dishwasher leaks. Use a qualified plumber or installer for a blocked sink, air gap, disposal knockout, hidden drain connection, or damaged hose, and use electrical service for a wet or damaged outlet, cord, or wiring.
Safety scope: The user may stop use, let water cool, isolate power as directed, clean a documented user-accessible filter, and inspect accessible hose and sink-side routing. Drain-pump, base, wiring, control, float, internal blockage, and live electrical diagnosis are for qualified service personnel.
Common questions
FAQ
Why is my Danby dishwasher not draining?
Start with the accessible drain path: a clogged filter or drain area, a kinked or blocked hose, a blocked air gap or sink/disposal connection, or an unremoved disposal inlet knockout. Danby also lists drain-pump malfunction as a separate possibility. If deep water remains after the safe external checks, arrange service rather than dismantling the pump.
Can a clogged filter cause a Danby dishwasher to leave water?
Yes. Danby's FAQ and troubleshooting manual both identify a clogged filter as a possible no-drain cause. Isolate power as the exact manual directs, clean only the user-accessible filter and visible drain area, and stop if the obstruction is below the filter or water remains afterward.
How does a drain-hose high loop affect a Danby dishwasher?
Danby's installation instructions use a high drain loop or air gap to help prevent improper draining and backflow. The required height and routing are model- and installation-specific, so inspect for kinks or a low route and follow the exact manual. Do not pull out a built-in dishwasher just to reach the hose.
Why does my Danby dishwasher drain into the garbage disposal but still leave water?
The sink or disposal may be blocked, the hose may be kinked or low, the air gap may be obstructed, or the dishwasher inlet knockout may still seal a new disposal connection. Danby says to check the disposal connection and its installation instructions. Do not reach into the disposal or disconnect a hose over standing water.
Is a small amount of water in a Danby dishwasher normal?
On some Danby built-in installation guidance, water below the filter screen or a small amount around the drain-filter area can remain after a program to keep the water seal lubricated. Water covering the filter, dirty or foul water, water returning from the sink, or a tub that stays full after completion is a different symptom and needs the drain-path checks.
Read the exact guide
Official sources
- OWNER'S MANUALDanby Products · Specific DDW1805EWP model; its troubleshooting list illustrates Danby causes but is not a universal procedure for every Danby dishwasher.
- Danby 8 Place Setting Dishwasher - DDW1809W-1Danby USA · Specific discontinued Danby portable dishwasher; its FAQ illustrates filter/drain-area and extension-cord guidance but is not universal to built-in models.
- INSTALLATION MANUALDanby Products · Specific built-in installation family; high-loop, air-gap, disposal, hose, and residual-water details must be matched to the exact dishwasher.
- The dishwasher is not draining. How can I fix this?Danby USA · General Danby dishwasher guidance; the exact model manual controls filter access, hose routing, and service procedures.
- Product ManualsDanby Appliances - USA · Model lookup and documentation scope; it does not itself diagnose a no-drain fault.
Community feedback
Share a repair observation
Share a plain-text repair observation. Accepted observations are published automatically; this page may take a moment to update.