
On this page
Start here
Quick answer
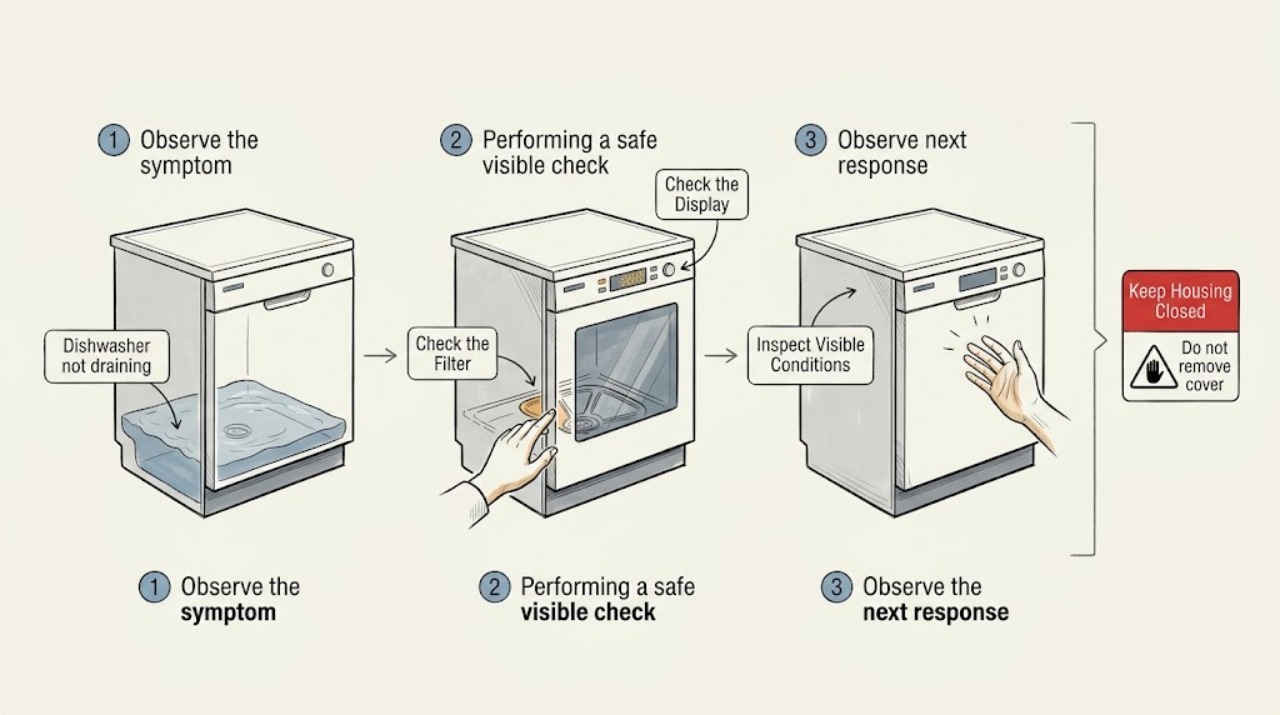
First distinguish a small amount of water in the filter or sump area from water covering the tub floor or reaching the door. Note whether the problem appears at the end of a cycle, after a cancellation, or after sink or disposal use, and record any displayed code or drain-pump sound. Keep the inspection dry and visual: do not touch standing water near electrical parts, use drain chemicals, disconnect a hose, reach into a disposal, or run repeated cycles that could overflow. If the filter, visible hose routing, and sink-side connection look normal but water remains, or if there is a leak, burning smell, repeated breaker trip, or no drain-pump response, stop using the dishwasher and arrange model-specific service.
Work through in order
Diagnostic checks
Use only checks that match the exact appliance or system and its official guide.
-
Check 1
With the dishwasher idle and the floor around it dry, look through the open door without reaching into water and note where the water sits: only in the filter or sump recess, across the tub floor, near the door opening, or outside the appliance.
Expected result: A small amount confined to a filter or sump area can be model-normal, while water across the tub floor or near the door indicates incomplete draining or a severe restriction. Water outside the appliance adds a leak concern.
Next step: Record the visible level and take a photo without touching the water. If water is near the door, outside the unit, or spreading across the floor, stop using the dishwasher and arrange service.
Stop if: Stop immediately if water is leaking toward an outlet, cord, junction, or other electrical equipment, or if the floor is becoming wet.
Why this matters
Why: The water location sets urgency and helps distinguish a localized filter-area observation from a blocked path, pump problem, backflow, or leak.
-
Check 2
Read the display and note when the water remains: after a completed cycle, after a cancelled cycle, after a power interruption, or after the dishwasher stops before the drain portion. Do not start repeated drain or wash cycles to make the comparison.
Expected result: A code, a cycle that stops before draining, a steady pump hum with no water movement, or no pump sound at the expected drain stage points to different diagnostic paths. Water that returns after the sink or disposal is used suggests a downstream restriction or backflow path.
Next step: Write down the code exactly, the cycle selected, and what the dishwasher sounded like. Use the model manual or give those details to service; do not repeatedly test a full tub.
Stop if: Stop using the appliance for burning smell, damaged wiring, a repeated breaker trip, unusual grinding, or water rising toward the door.
Why this matters
Why: Timing and control behavior can separate a flow restriction from a pump, door-switch, wiring, or control issue, but a code must be matched to the exact model manual.
-
Check 3
If the filter area is dry enough to view safely and the appliance is not running, look at the visible filter screen and sump opening without reaching into standing water or removing parts. Note food residue, paper, labels, or other visible material; do not use a sharp or forced tool.
Expected result: A visibly covered filter or sump opening can restrict flow. A clean-looking visible area does not rule out a deeper pump or hose obstruction, and glass or sharp debris is a stop condition rather than a hands-on task.
Next step: Follow the model manual only when safe isolation and a dry work area are confirmed; otherwise leave the filter and sump closed and schedule service. Record what is visible for the technician.
Stop if: Do not reach into the sump, handle glass or sharp debris, remove a filter against resistance, or continue if water or power conditions are uncertain.
Why this matters
Why: The observation can support a filter-related branch but cannot confirm pump condition or justify reaching into the sump while water or power is present.
-
Check 4
From a dry, accessible position under the sink, look at the exposed dishwasher drain hose, air gap if present, and sink or disposal connection without loosening clamps, detaching the hose, reaching into the disposal, or touching wet plumbing.
Expected result: A visibly kinked, crushed, sagging, or disconnected hose, a blocked-looking air-gap outlet, or water backing up at the sink connection can explain poor draining or return flow. A normal-looking route does not prove that the hose or pump is clear.
Next step: Photograph the hose route and connection, note whether the sink or disposal also drains slowly, and give the information to service. Do not detach the hose or operate the disposal with a hand inside it.
Stop if: Stop if the area is wet, a hose is under tension, the connection is leaking, or the disposal or sink has a blockage that requires hands-on work.
Why this matters
Why: Sink-side observations separate an external routing or downstream connection concern from an internal dishwasher diagnosis. A recently installed or replaced disposal can also leave an installation-specific drain issue.
-
Check 5
Note any recent change before the first failure: dishwasher installation, disposal replacement, under-sink work, a new detergent, a moved hose, or a power event. Compare only with your existing observations; do not alter the installation or run another cycle to test it.
Expected result: A new installation or disposal change makes hose routing, an air gap, or an unremoved disposal inlet plug more relevant. A failure after normal operation makes a clog, pump, control, or component fault more plausible, but does not identify which part failed.
Next step: Provide the installation or maintenance history, model number, exact error text, water location, and sink-side observations when arranging service.
Stop if: Do not continue troubleshooting if water is leaking, the appliance is electrically unsafe, or the drain path requires panel removal or hose disconnection.
Why this matters
Why: History tells the technician which branch to inspect first and prevents ordering a pump or hose before the cause is confirmed.
Use your observations
Decision map
Find the observation that best matches what you see, then follow the next safe action.
-
PATH 01Next step
What you see
Only a small amount of water is visible in the filter or sump area, with no leak, code, or abnormal behavior.
Do this next
Check the model manual for what water level is normal for that design. Do not assume every visible sump amount is a failure, and do not run repeated cycles just to verify it.
-
PATH 02Next step
What you see
Water covers the tub floor, reaches the door, returns after sink or disposal use, or appears outside the appliance.
Do this next
Stop using the dishwasher and arrange service. Describe the water level, return timing, sink-side condition, and any visible leak; keep water away from electrical equipment.
-
PATH 03Next step
What you see
The visible filter or hose path is obstructed, kinked, crushed, or disconnected, and the area is not safe for a dry homeowner check.
Do this next
Do not force a filter, disconnect a hose, or reach into the sump. Follow the model manual only under safe isolation, or have a technician clear and verify the restriction.
-
PATH 04Next step
What you see
The filter and visible connections look normal but the pump hums without movement, makes grinding noise, or never engages, or an error code remains.
Do this next
Stop using the appliance and arrange model-specific diagnosis for the drain pump, wiring, door switch, control, or deeper restriction. Do not assume the pump is the only possible part.
-
PATH 05Next step
What you see
There is burning smell, damaged wiring, a repeated breaker trip, a hard-wired installation with uncertain isolation, or a water leak.
Do this next
Stop immediately and seek qualified appliance service. Do not touch wet electrical parts or remove panels.
Helpful context
Understand the symptom
What not draining usually points to
Standing water can result from a restricted filter or sump, a blocked or poorly routed drain hose, a sink or disposal connection, wastewater returning through an air gap or low loop, or a pump, control, or wiring fault. The visible water level and the timing of the symptom help separate those paths, but they do not identify a replacement part by themselves.
Keep water and power separate
Do not reach into standing water, touch wet electrical parts, remove panels, disconnect hoses, or use tools in the sump or disposal. Do not add drain-opening chemicals. If any access beyond a dry, visible check is needed, power and water isolation should be handled according to the model documentation by a qualified person, especially for a hard-wired dishwasher.
Only after diagnosis
Potential parts
- dishwasher drain pump
Consider this only after model-specific diagnosis confirms that the drain pump is not operating or cannot move water after the drain path is clear.
Confirm the exact dishwasher model, pump revision, electrical connector, and manufacturer fitment before ordering. - dishwasher filter
Consider this only if the model manual or technician confirms that the filter is damaged, missing, or no longer seats correctly after the obstruction issue is understood.
Filter shape and locking method vary by model; do not substitute a screen based only on dimensions or appearance. - dishwasher drain hose
Consider this only if the hose is confirmed to be kinked, crushed, leaking, blocked, or incompatible with the installation routing and cannot be safely corrected under model guidance.
Match hose length, ends, routing requirements, clamps, and model instructions; a hose replacement will not fix a failed pump or control.
When checks do not resolve it
Need a professional?
Arrange appliance service when water remains after safe visible checks, the pump is silent or only hums, an error code persists, water returns from the sink side, or a filter, sump, hose, or disposal connection requires hands-on access. Seek prompt help for leaks, burning smell, damaged wiring, or repeated breaker trips.
Have this ready
- Provide the dishwasher model number, exact water level and location, cycle stage, code or display behavior, pump sound, filter and sink-side observations, recent installation or disposal work, and photos taken from a dry safe position.
Common questions
FAQ
Is some water in the dishwasher filter area normal?
It can be model-dependent. Water confined to the sump or filter area is not the same as water covering the tub floor or reaching the door. Check the model manual and focus on whether the amount and behavior are abnormal for that design.
Why does the dishwasher drain problem appear after a disposal replacement?
A new disposal connection can introduce an installation-specific drain issue, such as the inlet setup or hose routing. Note the timing and have the connection checked without disconnecting the hose or reaching into the disposal.
Can I pour drain cleaner into a dishwasher that will not drain?
No. Drain-opening chemicals can damage dishwasher components and create a safety hazard. Stop using the appliance and use model guidance or qualified service for the obstruction.
Should I keep running cycles to make the dishwasher drain?
No. Repeated cycles can raise the water level and increase spill or leak risk. Record the cycle stage, code, water location, and pump sound, then arrange service if the safe visible checks do not resolve the issue.
Read the exact guide
Official sources
- Dishwasher Not DrainingWhirlpool Product Help · Supports distinguishing water level and timing clues, filter and sump visibility, hose and sink-side routing, pump symptoms, and when electrical or leak concerns require service; model-specific steps remain applicable only to the matching appliance.
- Newly Installed Dishwasher Not DrainingWhirlpool Product Help · Supports treating recent installation or disposal work as a distinct branch involving hose routing, high loop or air gap, and disposal inlet setup; it is not a universal instruction for every dishwasher.
- Dishwasher - Not DrainingGE Appliances · Supports checking model-dependent normal sump water, visible filters and sump obstructions, hose and sink/disposal connections, air-gap or high-loop context, and the warning against drain cleaner and disposal hand access.
Community feedback
Share a repair observation
Share a plain-text repair observation. Accepted observations are published automatically; this page may take a moment to update.