
On this page
Start here
Quick answer
First identify whether the Danby is frost-free or a manual/partial-defrost model. Danby's current frost-free guidance points to frequent door opening, damaged door seals, and an incorrect temperature setting as common contributors, while non-frost-free units require the exact manual's manual-defrost procedure. Check that the door closes fully, the gasket is clean and intact, warm or humid air is not entering repeatedly, and food is not blocking visible air outlets. If your model permits manual defrosting, switch it off and unplug it, let the ice melt naturally, and protect the floor with towels or a pan. Never chip ice with a knife or other sharp tool and do not use a heat gun or hair dryer; Danby manuals warn that refrigerated gas lines can be pierced. Frost that returns quickly on a frost-free model, frost behind an inaccessible panel, or a fan/heater/defrost symptom needs qualified service.
Before you begin
Safety first
- The user may identify the model, inspect and clean the accessible gasket, correct visible loading, check ordinary settings, and perform only the exact manual's natural-defrost procedure. Qualified personnel must handle interior panels, defrost heaters/timers/sensors, fans, drains, wiring, refrigerant lines, and live tests.
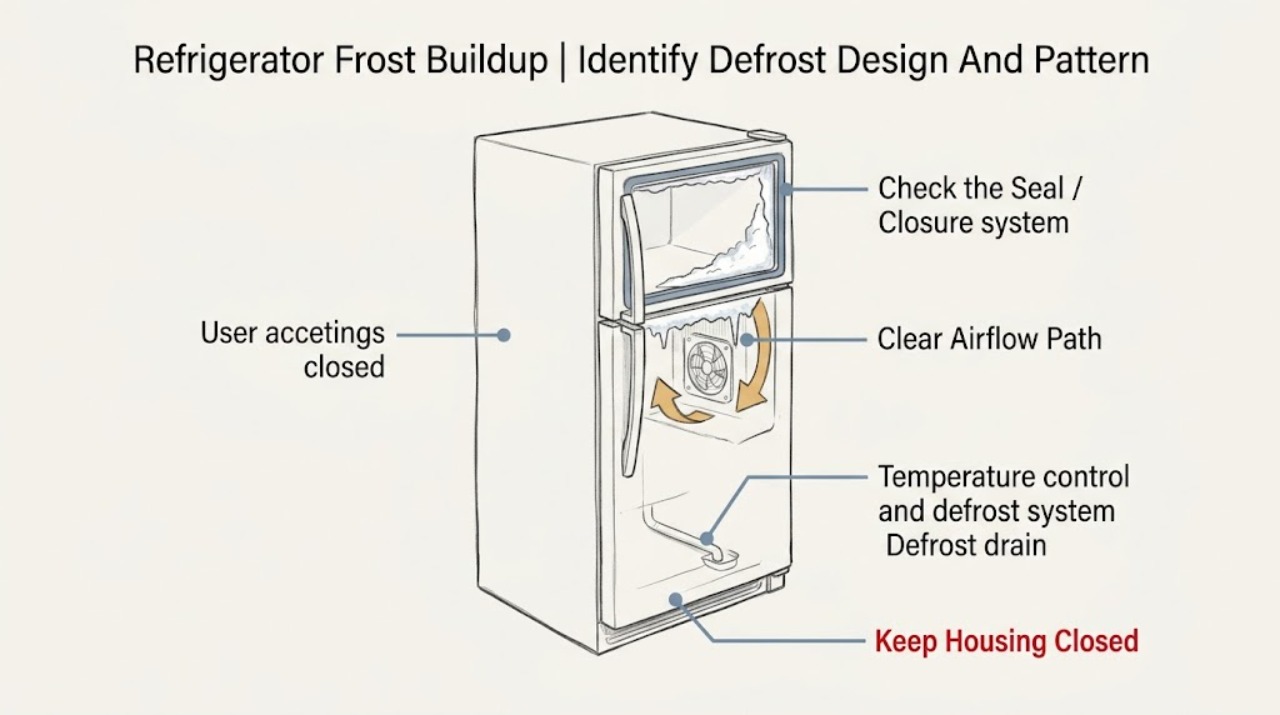
Work through in order
Diagnostic checks
Use only checks that match the exact appliance or system and its official guide.
-
Check 1
Record the full Danby model number and check its product page or owner manual for frost-free, automatic-defrost, partial-defrost, or manual-defrost wording. Note where the frost is concentrated: around the door edge, on accessible freezer walls, on food/packages, or behind an interior cover or rear panel.
Expected result: The model is frost-free/automatic-defrost, the model requires manual or partial defrosting, or the design and frost location are unknown or inaccessible.
Next step: Follow the matching branch. Use only the exact manual's defrost instructions for a manual/partial-defrost model; arrange service for recurring hidden frost on a frost-free model or whenever the architecture is unknown.
Stop if: Do not remove an interior panel to identify the defrost system, assume all Danby refrigerators are frost-free, or copy a defrost procedure from another model.
Why this matters
Why: Routine frost has a different meaning on a manual-defrost freezer than on a frost-free one. A door-edge pattern keeps warm-air entry in view; hidden frost on a frost-free model may involve the defrost, fan, airflow, or drain system and cannot be diagnosed by opening the liner.
-
Check 2
With the appliance operating normally and the door area dry, inspect the accessible magnetic gasket all the way around for food residue, a fold, tear, gap, or section that does not meet the cabinet. Check that no package or shelf prevents the door from closing and note whether frost is localized along the same edge.
Expected result: The gasket is dirty but intact, the door is held open by a package, the gasket has a gap or damage, the frost follows one door edge, or the door closes and seals normally.
Next step: Clean the gasket and cabinet contact area with a soft damp cloth, remove a loose obstruction, and close the door normally. If the gasket is torn, the door will not align, or frost returns after the seal check, arrange service rather than heating or reshaping the gasket.
Stop if: Do not use a heat source, adhesive, sharp object, or forced hinge adjustment on the gasket or door.
Why this matters
Why: A local edge pattern plus a gap or obstruction makes humid room air entering through the door more likely. A damaged gasket or door alignment issue cannot be confirmed as the only cause if frost is widespread; normal closure shifts attention to loading, airflow, temperature, or defrost behavior.
-
Check 3
Check accessible user settings and loading: the temperature control is not set warmer or colder than the exact manual recommends, the door has not been opened unusually often, recently added warm food is not against a wall or outlet, and visible air outlets are not covered. Keep food containers closed and leave the model's required clearance around the appliance.
Expected result: The setting or loading is abnormal, the room is very humid or warm, food blocks a visible outlet, frost is concentrated where airflow is obstructed, or these conditions are normal.
Next step: Correct one obvious setting or loading issue, clear only visible obstructions, minimize door openings, and monitor the frost pattern. If frost is behind a cover, airflow is absent, or the condition returns despite normal settings and loading, call service.
Stop if: Do not block or remove ducts, touch a concealed fan, move a heavy refrigerator to access the rear, or change an internal control or thermostat.
Why this matters
Why: Danby troubleshooting material links door use, ambient humidity/temperature, temperature settings, warm food, and restricted airflow with temperature and condensation behavior. These factors can increase frost without proving a failed defrost heater or fan.
-
Check 4
If the exact manual identifies the freezer as manual or partial defrost, remove food, switch the appliance off, unplug it, leave the door open, and place towels or a pan to catch melt water. Let the frost melt naturally and monitor the floor. Do not use a knife, scraper, pointed tool, heat gun, hair dryer, or other heat source; if the manual identifies the model as frost-free, skip this user defrost procedure.
Expected result: The ice melts without damage, water threatens the floor, the freezer compartment or liner is pierced/damaged, the frost-free model refreezes, or the ice cannot be reached without a panel.
Next step: After a complete manual-approved thaw, dry the interior and restart only as the exact manual directs. If the unit is damaged, refreezes, or cannot be safely thawed, keep it off and arrange qualified service.
Stop if: Stop immediately if a tool punctures the liner or a gas line, if the casing is damaged, or if water reaches electrical parts. Do not restart a pierced or electrically wet appliance.
Why this matters
Why: Natural thawing is an appropriate user path only for a model whose manual permits it. Water must be controlled to prevent property damage. A pierced compartment, refreezing frost-free appliance, or inaccessible ice indicates a professional boundary rather than a tool-assisted cleanup.
-
Check 5
For a frost-free or automatic-defrost model, after correcting the door, setting, loading, and visible airflow conditions, record whether frost returns quickly and whether it covers an accessible wall, blocks cooling airflow, or appears behind a cover. Note whether the fan is silent or abnormal only from a safe listening position; do not remove a panel to test a heater, timer, sensor, drain, or fan.
Expected result: Frost does not return, frost returns at one door edge, frost returns broadly on a frost-free model, airflow is absent/abnormal, or frost is hidden behind an interior panel.
Next step: Protect food if cooling is compromised and arrange Danby or qualified appliance service for recurring frost-free ice, hidden frost, absent airflow, or abnormal fan behavior. Provide the exact model and frost pattern.
Stop if: Do not remove evaporator or fan covers, test a heater or thermostat live, bypass a sensor, clear ice with tools, or handle refrigerant lines.
Why this matters
Why: A stable result after a corrected warm-air or loading condition supports that external contributor. Rapid or broad frost on a frost-free model, hidden ice, and abnormal airflow keep the automatic-defrost, fan, drain, sensor, heater, or control system in view; the observation cannot select the failed part.
-
Check 6
After one safe external correction or one exact manual-approved natural thaw, reassess the frost pattern without opening panels. Record whether the refrigerator reaches its normal temperature, whether frost returns and where, whether the door seals, and whether any water from thawing was contained. Move perishable food to a known-safe cold appliance if cooling is not reliable.
Expected result: Frost remains absent, frost returns only at a door edge, frost returns broadly on a frost-free model, temperatures remain unsafe, or the refrigerator has electrical/physical damage.
Next step: Keep the refrigerator off when unsafe and arrange qualified Danby appliance service. Give the technician the model, defrost architecture, frost location, return timing, settings, door result, and any damage or water event.
Stop if: Do not continue repeated thaw/restart cycles, run a damaged appliance, or order a heater, fan, thermostat, drain, control, or gasket solely from the frost symptom.
Why this matters
Why: A one-time correction may resolve warm-air entry or routine manual-defrost accumulation. Persistent frost, poor cooling, hidden ice, or damage means the external checks did not identify the cause and may involve internal defrost, airflow, fan, heater, control, drain, or sealed-system work.
Use your observations
Decision map
Find the observation that best matches what you see, then follow the next safe action.
-
PATH 01Safety boundary
What you see
The exact model is manual or partial defrost, and frost is accessible without removing panels, with no electrical or physical hazard.
Do this next
Follow only the exact manual's natural-defrost procedure: unplug, leave the door open, catch melt water, and let the ice melt. Monitor the floor and dry the compartment before restarting as directed.
Why this path and its safety boundary
Why it matters: Accumulation can be a normal maintenance condition for that architecture rather than evidence of an automatic-defrost failure.
Safety stop: Do not use sharp tools or heat, and stop if the liner is pierced, water reaches electrics, or the appliance is damaged.
-
PATH 02Safety boundary
What you see
Frost follows one door edge and the gasket has residue, a gap, a fold, damage, or a loading obstruction prevents full closure.
Do this next
Clean the accessible gasket and cabinet contact area, remove only a loose obstruction, and close the door normally. Arrange service for a torn gasket, misaligned door, or frost that returns after the seal is corrected.
Why this path and its safety boundary
Why it matters: Warm, humid air entering through the door is more likely than a proven internal defrost failure.
Safety stop: Do not heat, glue, stretch, or forcibly realign the gasket or hinges.
-
PATH 03Safety boundary
What you see
The frost follows blocked visible airflow or follows frequent door opening, high humidity, warm-food loading, or an incorrect user temperature setting, and the door seals normally.
Do this next
Correct one visible setting or loading issue, keep food covered, minimize door openings, clear only visible outlets, and monitor once. Call service if frost or poor cooling persists.
Why this path and its safety boundary
Why it matters: Moisture entry, heat load, or restricted circulation may be contributing without proving a failed heater or fan.
Safety stop: Do not remove air ducts, access a concealed fan, or alter internal thermostat settings.
-
PATH 04Safety boundary
What you see
The exact model is frost-free or automatic-defrost, but frost returns broadly or rapidly, blocks cooling airflow, appears behind a cover, or is accompanied by abnormal/absent fan airflow after external checks.
Do this next
Protect food and arrange Danby or qualified appliance service. Provide the model, frost location, return timing, temperature behavior, and whether the door and visible loading checks passed.
Why this path and its safety boundary
Why it matters: An automatic-defrost, fan, sensor, heater, timer/control, drain, or sealed-system fault is more likely; user checks cannot identify a safe part.
Safety stop: Do not open the evaporator or fan cover, chip ice, test a heater or sensor live, bypass protection, or handle refrigerant.
-
PATH 05Safety boundary
What you see
A sharp or heated tool has been used, a liner or refrigerated line may be pierced, melt water reaches electrical parts, the cord is damaged, or the appliance trips protection.
Do this next
Stop using it, isolate power only from a dry, safe position, keep people away, and arrange prompt qualified appliance service. Do not attempt to verify a suspected line puncture.
Why this path and its safety boundary
Why it matters: The refrigerator may be physically, electrically, or refrigerant-system unsafe; continued operation can worsen the hazard.
Safety stop: Do not restart a pierced or electrically wet refrigerator, touch exposed wiring, use flame/heat, or perform live tests.
Helpful context
Understand the symptom
Frost buildup is not the same on every Danby refrigerator
A frost-free Danby is designed to prevent routine ice buildup through automatic defrosting, while a manual or partial-defrost model may require the user to defrost the freezer. Check the model number and manual before deciding that ice is abnormal or starting a defrost procedure. A frost pattern limited to a door edge suggests a seal or warm-air path; a broad pattern behind an interior cover points to a system the user should not open.
Start with warm-air entry and visible airflow
Repeated door openings, a gasket that does not seal, an overfilled cabinet, or food placed against an outlet can bring moisture in or interfere with circulation. Clean the accessible gasket and remove only a loose loading obstruction. Do not reshape the seal with heat or take apart the door to investigate it.
Manual defrosting must be gentle and model-appropriate
On a model whose manual allows user defrosting, switch it off and unplug it, remove the contents, leave the door open, and catch melt water with towels or a pan. Let the ice melt naturally. Danby warns that sharp tools can pierce refrigerated gas lines; a frost-free model with recurring ice may instead have an internal defrost, fan, airflow, or control problem that requires service.
Safety boundary
Stop conditions
- Stop immediately for a punctured liner or suspected refrigerated line, refrigerant odor or hissing, exposed wiring, smoke, burning odor, damaged cord, water near electrical parts, or a repeated breaker trip.
- Do not chip or scrape ice with a knife, screwdriver, pointed tool, or other sharp object; do not use a heat gun, hair dryer, flame, or other heat source to force defrosting.
- Do not remove rear, evaporator, fan, drain, or control panels; test a defrost heater, thermostat, sensor, or wiring live; bypass protection; or handle refrigerant.
- If the model is frost-free and frost returns after normal door, loading, and setting checks, stop repeated thaw/restart cycles and arrange qualified service.
- If a manual-defrost procedure is allowed but water cannot be contained safely, stop the thaw and arrange help rather than allowing water to reach floors or electrics.
When checks do not resolve it
Need a professional?
Safety scope: The user may identify the model, inspect and clean the accessible gasket, correct visible loading, check ordinary settings, and perform only the exact manual's natural-defrost procedure. Qualified personnel must handle interior panels, defrost heaters/timers/sensors, fans, drains, wiring, refrigerant lines, and live tests.
Common questions
FAQ
Why is my Danby freezer building up frost?
First check whether the exact Danby model is frost-free or manual/partial defrost. Danby's official FAQ points to frequent door openings, an incomplete door seal, and an unsuitable temperature setting; on a non-frost-free model, routine manual defrosting may also be required. Frost concentrated along one door edge makes a seal or warm-air path more likely, while broad or hidden frost on a frost-free model needs service if it returns.
Can I use a hair dryer or knife to remove Danby freezer ice?
No. For a model whose manual permits user defrosting, unplug it and let the ice melt naturally with towels or a pan to catch water. Danby warns that sharp or pointed tools can pierce refrigerated gas lines. Do not force defrosting with a hair dryer, heat gun, flame, or other heat source.
Why does frost keep returning on my Danby frost-free refrigerator?
After checking the gasket, door closure, temperature setting, loading, and visible airflow, recurring broad or hidden frost on a frost-free model can involve its automatic-defrost, fan, sensor, heater, timer/control, drain, or airflow system. The frost pattern cannot identify which part failed, so do not remove the interior panel; arrange qualified service.
Can a bad Danby door seal cause frost?
Yes, a gap or incomplete closure can let humid room air enter and create localized frost, and Danby's manual warns that an incompletely closed door can cause excessive condensation. Clean the accessible gasket and remove a loose loading obstruction, but do not heat, glue, or reshape a damaged seal; persistent gaps need service.
Should I manually defrost every Danby refrigerator?
No. Danby says to regularly defrost a freezer only if it does not have a frost-free feature. A frost-free/automatic-defrost model with recurring frost should be diagnosed from the exact manual and serviced if external door, setting, loading, and airflow checks do not resolve it.
Read the exact guide
Official sources
- Danby 11.6 cu. ft. Apartment Size Fridge Top Mount in White - DFF116B1WDBRDanby · Official product page for the DFF116B1WDBR family; its frost-free and airflow details are model-specific.
- Work using electrically powered equipmentHealth and Safety Executive · Government electrical-safety guidance used for the unplugging and professional-repair boundary; it is not Danby-specific frost diagnosis.
- Product ManualsDanby Appliances · General Danby support page used to establish that the exact model manual controls the applicable defrost and troubleshooting procedure.
- DCR047A1BBSL Owner's ManualDanby Products Limited / Danby Products Inc. · Official Danby-hosted manual for a specific compact refrigerator/freezer family; its manual-defrost and safety instructions must not be generalized to frost-free models.
- DFF258BLSSB Owner's Use and Care GuideDanby Products Limited / Danby Products Inc. · Official Danby-hosted manual for a specific frost-free family; its defrost heater, timer, and drain-pan arrangement is not universal across Danby models.
- The freezer is frosting up. How can I prevent this?Danby Appliances · General Danby guidance; it distinguishes frost-free from non-frost-free equipment and does not replace the exact model manual.
Community feedback
Share a repair observation
Share a plain-text repair observation. Accepted observations are published automatically; this page may take a moment to update.