
On this page
Start here
Quick answer
First locate where the water starts and whether the refrigerator has a plumbed dispenser or ice maker. Danby identifies a clogged defrost drain, damaged door seal, and an out-of-level refrigerator as initial leak checks; its manuals also distinguish defrost water overflowing a trough from water caused by frost and moisture entering through a door left open. From a dry, visible position, inspect the door seal and closure, the cabinet level, accessible drain or trough opening, visible supply/filter connections, and any ice-maker or dispenser area. Do not pull panels, probe a hidden drain, disconnect a pressurized line, or work on a valve or drain pan. If water is near a plug, outlet, light, control, or other electrical part, or there is a damaged cord, smoke, burning odor, or repeated trip, stop using the refrigerator and disconnect power or close the water supply only if safe. Persistent leaks, hidden drainage, internal tubing, valves, drain pans, or wiring require qualified Danby service.
Before you begin
Safety first
- This article covers tracing water from a dry visible position, door/gasket and level observations, visible loading, and exact-manual-directed accessible maintenance only. A qualified technician must handle hidden drains, drain pans, defrost components, valves, tubing, refrigeration controls, and electrical parts.
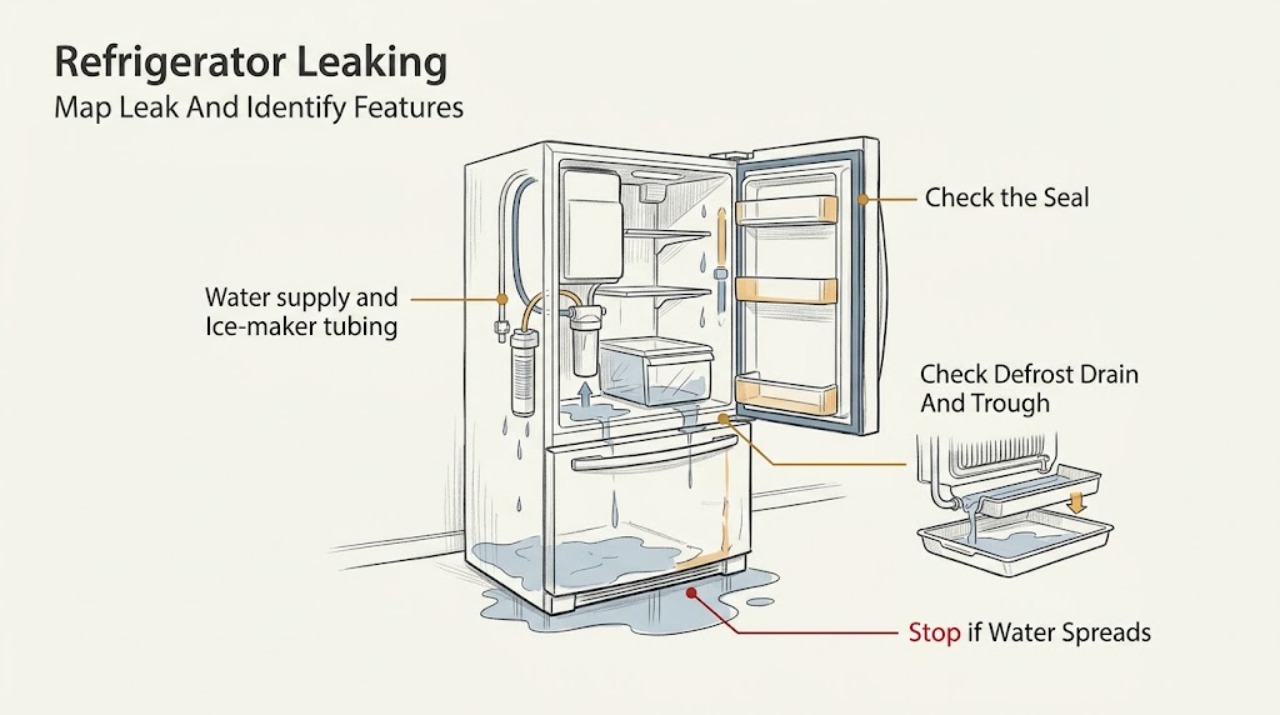
Work through in order
Diagnostic checks
Use only checks that match the exact appliance or system and its official guide.
-
Check 1
From a dry position, unplug only if safe and use towels or a shallow container to protect the floor without moving the appliance. Trace the highest wet point you can see and record whether water is inside the fresh-food area, under drawers, from the freezer, at the front, at the rear, or near an ice maker, dispenser, filter, or supply connection. Record the exact model and serial information and whether the refrigerator is plumbed.
Expected result: Water starts at an interior bottom or rear wall, around the door edge, beneath the unit, at a visible water connection, or only after dispensing/ice production; the source cannot be seen without removing a cover.
Next step: Photograph the source and continue only with the matching visible checks below. If water is near electrical parts or the source is behind a panel, stop using the unit and arrange service.
Stop if: Do not tilt or pull the refrigerator, remove covers, or touch wet electrical parts to trace the leak.
Why this matters
Why: The location separates a defrost drain/trough or condensation path from a door-seal issue, drain pan, or plumbed ice/dispenser path. An unseen source is not a reason to dismantle the refrigerator; it is a service boundary.
-
Check 2
Inspect the accessible gasket and door or drawer closure all around. Remove only packages or shelves visibly preventing closure, and check whether the refrigerator stands level as the model manual permits. Note frequent or prolonged opening, high room humidity, condensation around the opening, or a frost trail that melts near the door.
Expected result: The gasket is torn or gapped, a load prevents closure, the cabinet rocks or is visibly out of level, condensation is concentrated at the door, or the door and seal look normal.
Next step: Correct only a visible loading or closure obstruction and follow the exact manual for safe leveling checks. If the gasket is damaged, the door is misaligned, or water continues, arrange service rather than removing the seal or hinges.
Stop if: Do not force the door, heat or glue the gasket, remove hinges, or continue operation if water reaches electrical parts.
Why this matters
Why: Danby identifies damaged door seals and an unlevel unit as leak checks; a closure gap or humid-air entry can increase frost and meltwater. A normal visible seal does not clear a hidden drain, pan, supply, or internal fault.
-
Check 3
Look at the user-accessible drain opening or trough only if the exact manual identifies it as accessible. Note a bottom ice sheet, standing water, a blocked visible opening, or water overflowing into the cabinet. Remove only loose surface debris with power disconnected and dry hands if the manual allows; never insert wire, a knife, or a chemical cleaner and never remove an evaporator cover.
Expected result: Water or ice repeatedly collects at the cabinet bottom, the visible trough overflows, a drain opening is visibly obstructed, or the accessible drain area is clear.
Next step: Follow only the exact model's low-risk drain or defrost instruction. If pooling returns, the opening is hidden, frost blocks the path, or the unit requires a panel or tubing access, stop and arrange service.
Stop if: Do not probe or force a drain, pour water into a hidden path, scrape ice, remove panels, or use heat to accelerate melting.
Why this matters
Why: Danby identifies a clogged defrost drain tube or overflow as a leak cause. A hidden or frozen drain, drain pan, or defrost-system fault cannot be safely distinguished from a visible pool, and a temporary melt may not correct the recurrence.
-
Check 4
If the model has a water dispenser, ice maker, or filter, inspect only the visible hose, filter housing exterior, shutoff connection, and dispenser/ice area. Note whether the leak appears after dispensing or an ice cycle, whether a cartridge is unseated, and whether a visible connection is wet, kinked, or damaged. Close the household water shutoff only from a dry accessible location and only if safe.
Expected result: The refrigerator is not plumbed, water appears after dispensing/ice making, a visible line or filter connection is wet, the filter is unseated, or water use does not change the leak.
Next step: Stop water use and follow the exact model manual for a user-removable filter or visible connection. Arrange service for a damaged line, internal valve, pressurized tubing, recurring leak, or any water near electrical parts.
Stop if: Do not disconnect pressurized tubing, force a filter, tighten an inaccessible fitting, open an internal valve, or run the dispenser while a leak is active.
Why this matters
Why: A leak linked to dispensing or ice production makes the external or internal water path more likely than a defrost-only path. A line or filter that looks dry does not clear an internal inlet valve, tubing, reservoir, or drain-pan fault.
-
Check 5
Inspect user-accessible shelves, drawers, and vents for a large warm load, uncovered moist food, packages touching the rear wall, or a blocked air path. Keep the door closed as much as practical and note whether frost formed on the inner rear wall before it melted into water. Do not remove hidden covers or manually chip frost.
Expected result: A large warm load or moist food was added, the door is opened often, a package blocks a vent or closure, frost is concentrated on the rear wall, or the load and airflow are ordinary.
Next step: Correct only visible loading, moisture, or closure conditions and monitor the model's normal cooling cycle. If frost or water returns, arrange service rather than repeatedly melting the symptom.
Stop if: Do not use sharp tools or heat on frost, block vents, change sealed cooling controls, or operate with unsafe food temperatures.
Why this matters
Why: Danby documentation associates increased ice/moisture with frequent or open doors, control conditions, and a large food load; meltwater can then appear as a leak. Persistent rear-wall frost or water with ordinary loading suggests a defrost, drain, airflow, or temperature-control issue.
-
Check 6
Record the model, leak location and timing, whether it follows defrost, dispensing, or ice making, door and gasket condition, level, frost pattern, visible drain status, water/filter observations, temperature trend, and any electrical symptoms. Do not remove rear panels or the drain pan to continue the diagnosis.
Expected result: The leak stops after a visible closure, level, loading, or model-permitted surface correction, returns intermittently, continues from an unseen area, or is accompanied by frost, poor cooling, a damaged line, or water near electrics.
Next step: Arrange Danby support or a qualified appliance servicer with the observation record and photos. Protect the floor and food, and stop operation for any electrical or substantial water hazard.
Stop if: Do not keep cycling the refrigerator, open panels, probe the drain, disconnect tubing, or perform live electrical tests.
Why this matters
Why: Improvement after a visible correction supports that external condition. A recurring or hidden leak may involve a drain tube, trough, pan, inlet valve, reservoir, ice-maker/dispenser line, defrost system, or wiring and cannot be safely assigned to a part from the puddle alone.
Use your observations
Decision map
Find the observation that best matches what you see, then follow the next safe action.
-
PATH 01Safety boundary
What you see
Moisture or frost is concentrated at the door edge, a gasket gap or obstruction is visible, or the door is opened frequently.
Do this next
Correct only visible loading and closure issues and monitor. Arrange service for a damaged gasket, misaligned door, or leak that returns.
Why this path and its safety boundary
Why it matters: Humid-air entry, poor closure, or condensation is more likely than an internal water valve.
Safety stop: Do not force, heat, glue, or remove the gasket or door hardware.
-
PATH 02Safety boundary
What you see
Water or a recurring ice sheet collects under drawers or on the interior floor, with no visible supply-line leak.
Do this next
Use only the exact manual's accessible drain or defrost instruction. For recurrence, hidden access, or overflow, arrange service.
Why this path and its safety boundary
Why it matters: A clogged or frozen defrost drain, overflowing trough, or hidden drain-pan path is more likely.
Safety stop: Do not probe, flush, scrape, heat, or remove the evaporator cover.
-
PATH 03Safety boundary
What you see
The puddle begins beneath or behind the refrigerator, or water appears from an unseen drain pan, hose, or connection.
Do this next
Do not pull the appliance or reach behind wet equipment. Close the household water shutoff and disconnect power only if safely accessible, then arrange service.
Why this path and its safety boundary
Why it matters: A drain pan, drain tube, water line, inlet valve, or installation/level issue is more likely than door condensation, but the component cannot be selected from outside.
Safety stop: Do not remove rear covers, disconnect tubing, tilt the unit, or touch wet electrical components.
-
PATH 04Safety boundary
What you see
Water appears after using the dispenser or after an ice-maker cycle, or a visible filter/line connection is wet.
Do this next
Stop dispensing and ice making, close the water supply only if safe, and follow the exact model's filter instruction. Arrange service for a line, valve, reservoir, or internal connection.
Why this path and its safety boundary
Why it matters: The external or internal water path is more likely than a pure defrost leak.
Safety stop: Do not disconnect a pressurized line, force the filter, or operate the water system while leaking.
-
PATH 05Safety boundary
What you see
A large frost layer or rear-wall ice forms first, then melts into a puddle; a large load, frequent opening, blocked closure, or abnormal cooling is also present.
Do this next
Correct only visible loading and door conditions and use exact-manual maintenance. Arrange service if the frost or leak returns or cooling changes.
Why this path and its safety boundary
Why it matters: Moisture entry or a temperature/defrost problem may be producing meltwater; recurring frost makes an internal issue more likely.
Safety stop: Do not chip ice or repeatedly defrost to conceal recurrence.
-
PATH 06Safety boundary
What you see
Water reaches the plug, outlet, lamp, control, compressor wiring, or another electrical part, or there is smoke, burning odor, sparking, abnormal heat, or repeated tripping.
Do this next
Stop using the refrigerator. Disconnect power and close the water supply only from a dry safe position, keep clear of the hazard, and arrange qualified service.
Why this path and its safety boundary
Why it matters: The immediate issue is an electrical, shock, fire, or water hazard, not a drain adjustment.
Safety stop: Do not touch wet electrics, continue operation, reset protection repeatedly, or attempt diagnosis behind a panel.
Helpful context
Understand the symptom
Trace the water before choosing a fix
A puddle under the front edge can come from an interior defrost drain or trough, while water at the rear can come from a drain pan, supply connection, filter, or ice-maker/dispenser line. Condensation around a door points to closure, seal, humidity, or loading; a leak that follows a water or ice cycle points to the plumbed path. Danby models vary widely, so identify the model, whether it has a freezer, ice maker, dispenser, or filter, and whether the unit is compact, apartment-size, or full-size before applying a procedure.
Water near electricity is an immediate stop condition
Keep water away from the plug, outlet, light, thermostat, display, compressor wiring, and other electrical parts. Do not operate a refrigerator with a wet electrical area, damaged cord, smoke, burning odor, sparking, abnormal heat, or repeated breaker trips. Do not remove rear or evaporator covers, probe a drain, disconnect a water line, open a valve, or make live electrical tests. Disconnect power and close a household water shutoff only from a dry, safe position and only when doing so does not require touching the hazard.
Safety boundary
Stop conditions
- Stop immediately when water is near a plug, outlet, light, control, compressor wiring, or other electrical part, or when smoke, burning odor, sparking, abnormal heat, damaged cord, or repeated electrical trips occur.
- Do not probe or flush a hidden drain, remove rear or evaporator panels, disconnect pressurized tubing, open an internal valve, dismantle a drain pan, or perform live electrical tests.
- Do not force or heat a gasket, scrape ice with a sharp tool, tilt or pull a leaking refrigerator, or continue dispensing water while a leak is active.
- Recurring or hidden leaks, water from internal valves, tubing, drain pans, defrost systems, or wiring require Danby or qualified appliance service.
When checks do not resolve it
Need a professional?
Safety scope: This article covers tracing water from a dry visible position, door/gasket and level observations, visible loading, and exact-manual-directed accessible maintenance only. A qualified technician must handle hidden drains, drain pans, defrost components, valves, tubing, refrigeration controls, and electrical parts.
Common questions
FAQ
Why is my Danby refrigerator leaking water?
Trace the highest wet point and check the accessible door seal, closure, level, and model-permitted defrost drain. If the leak follows ice or water dispensing, inspect only visible filter and supply connections. Persistent, hidden, or electrical-area leaks require service.
Can a clogged defrost drain cause a Danby refrigerator to leak?
Yes. Danby identifies a clogged defrost drain or a defrost trough overflow as a leak cause. Use only the exact model's accessible maintenance instructions; do not probe a hidden drain or remove panels, and arrange service if pooling returns.
Can a damaged door seal make a Danby refrigerator leak?
Yes. A door that does not close or seal can admit humid air, increase frost, and create meltwater. Remove only visible closure obstructions and arrange model-specific service for a torn gasket, misalignment, or recurring moisture.
What if my Danby refrigerator leaks from the water dispenser or ice maker?
Stop using the water or ice feature and inspect only the visible filter housing and supply connection. Close the household water shutoff if safe. Internal valves, reservoirs, tubing, and ice-maker connections require qualified service.
When should I stop using a leaking Danby refrigerator?
Stop immediately when water reaches an outlet, plug, light, control, or wiring, or when there is smoke, burning odor, sparking, abnormal heat, a damaged cord, repeated trips, substantial water, or unsafe food temperatures. Disconnect power or close the water supply only from a dry safe position, then arrange service.
Read the exact guide
Official sources
- COMPACT REFRIGERATOR Use & Care GuideDanby · Official EL4WSNXWS guide only; its drain, frost, controls, and maintenance details are not universal to all Danby refrigerators.
- Customer Support | Danby Appliances - USADanby USA · Official Danby USA support page; service and parts availability varies by region and model.
- The fridge is leaking water. How can I stop the leak?Danby Canada · Official Danby FAQ; the visible checks are general, while drain access and procedures vary by model.
- Support CenterDanby Appliances Canada · Official Danby support hub; regional service and parts availability varies by model and location.
- Refrigeration FAQsDanby USA · Official Danby refrigeration FAQ category; product type and model determine which guidance applies.
Community feedback
Share a repair observation
Share a plain-text repair observation. Accepted observations are published automatically; this page may take a moment to update.