
On this page
Start here
Quick answer
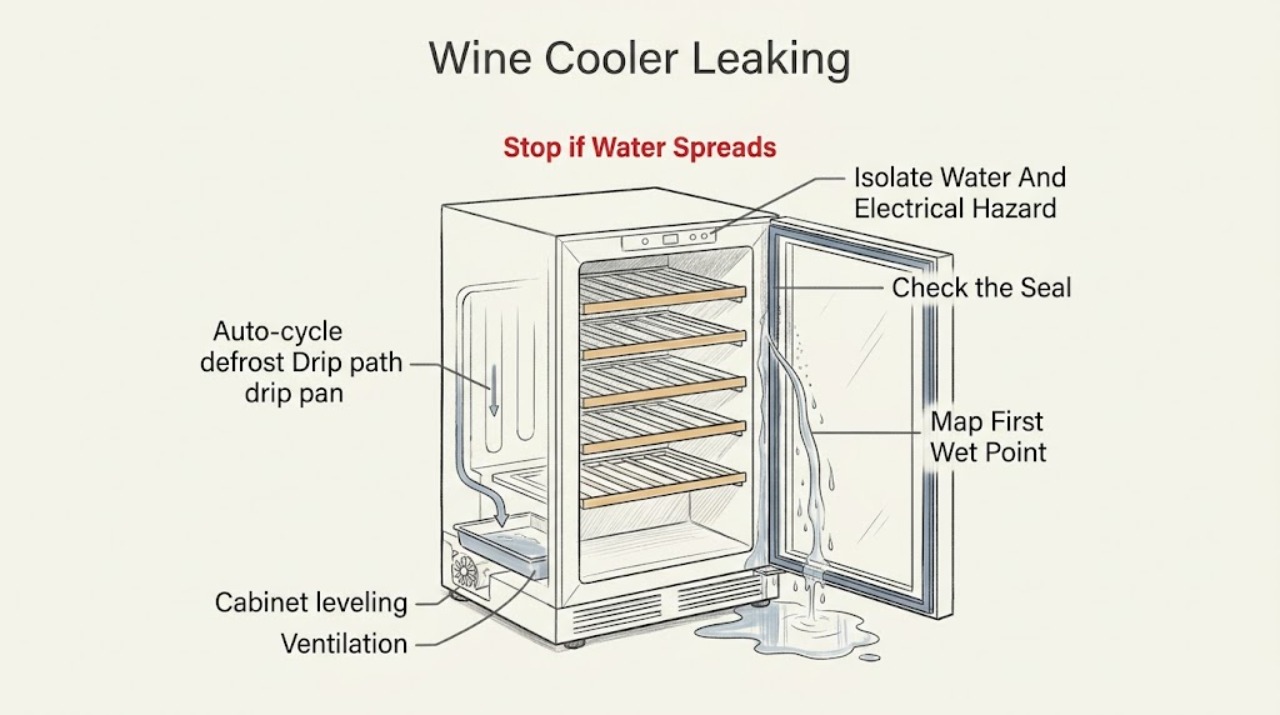
First distinguish a spilled bottle or condensation from an active internal leak. If water is near the plug, socket, control, or wiring, do not touch the wet appliance; isolate power from a dry, safe location and leave it out of service. Danby wine-cooler manuals describe sealed bottles, magnetic door gaskets, auto-cycle defrost on some models, and defrost water routed to a drip tray, not a refrigerator-style user water inlet or ice-maker circuit. Check for a wet bottle or shelf, a door that is not closing or sealing, high room humidity, excessive door opening, blocked ventilation, and whether the cooler is level. Dry the accessible area and observe when water returns. Water that repeatedly appears beneath the cabinet, around an inaccessible drain or drip pan, or after the visible checks have passed needs qualified service; do not move the cooler, open the compressor area, or disassemble the drain or refrigeration system.
Before you begin
Safety first
- The user may dry accessible surfaces, remove an obvious spill, clean the accessible gasket contact area, observe ordinary door closure, and note level/ventilation conditions. Qualified personnel must handle concealed drains and pans, compressor-area components, wiring, live tests, sealed refrigeration, and any required moving or disassembly.
Work through in order
Diagnostic checks
Use only checks that match the exact appliance or system and its official guide.
-
Check 1
From a dry, stable position, inspect the visible puddle, plug, socket, cord, controls, and lower cabinet without touching wet electrical parts. If water is near the plug, socket, controls, or wiring, isolate the circuit from a dry, safe location; unplug only when the plug and socket are dry and safely reachable. Do not operate the wine cooler to reproduce the leak.
Expected result: Water is near electrics, the flow is fast or spreading, the cord or plug is damaged, there is smoke/burning odor/sparking, a breaker trips, or the leak is slow and isolated from electrical parts.
Next step: For any electrical-area water, fast flow, damage, odor, sparks, or repeated trip, keep the cooler out of service and arrange prompt qualified help. Otherwise contain water with towels or a tray only if this can be done without touching wet electrical parts, then continue to locate the source.
Stop if: Do not stand in water to operate a switch, touch a wet plug or socket, restart a wet cooler, or use it while water can reach electrical parts.
Why this matters
Why: Water near electrical equipment or a protection trip is an electrical hazard, not an ordinary wine-cooler maintenance issue. Only a slow, contained leak away from electrics permits the external classification checks below.
-
Check 2
After the safety check, dry accessible shelves, the door sill, and the floor around the cabinet. Without moving the cooler, place dry paper towels at separate safe locations near the front corners, door edge, and visible lower edges. Note whether water returns while idle, after opening the door, after adding or moving bottles, during humid weather, or only after the cooler has run for a while.
Expected result: The first wet point is beneath a bottle or shelf, along the door/gasket or cabinet exterior, or beneath/behind the cabinet; water does not return after drying, or it returns repeatedly after operation.
Next step: Follow the matching branch and record the model, wet point, trigger, room humidity/temperature conditions, and recurrence. If the first wet point cannot be seen without moving the cooler or opening a cover, stop and arrange service.
Stop if: Do not pull, tilt, or drag the wine cooler, reach behind it through pooled water, or remove a bottom or rear cover to find the first wet point.
Why this matters
Why: A local bottle/shelf wet spot makes a spill more likely. Door-edge or cabinet-surface moisture keeps condensation and warm humid air in view. Recurrent water beneath or behind the cabinet after operation keeps the auto-cycle drip route, pan, or an internal fault in view.
-
Check 3
Inspect only accessible bottles, shelves, the door sill, magnetic gasket, and door-closing path. Look for a wet or cracked bottle, a shelf carrying liquid forward, residue on the gasket/cabinet contact area, a bottle or rack preventing closure, or a visible gap around the door. Store wine in sealed bottles and wipe the spill with a soft cloth once the area is safe.
Expected result: A bottle or shelf is the source, the gasket is dirty but intact, the door is held open or does not seal, moisture is spread over the door/cabinet surface, or the accessible area is dry and seals normally.
Next step: Remove only the obvious spill or loose loading obstruction, clean and dry the gasket contact area with a soft cloth, and close the door normally. If the gasket is damaged, the door cannot close, or water returns after the correction, arrange service.
Stop if: Do not heat, glue, stretch, or reshape a gasket; do not remove hinges, racks under load, or door panels to correct a leak.
Why this matters
Why: A localized spill can imitate an appliance leak. A gasket gap, incomplete closure, or moisture on the cabinet supports a condensation/warm-air path; a dry, normally sealing door makes an internal drip path or another source more likely if water returns.
-
Check 4
Without moving the cooler, check that it is visibly stable and level, that its front/rear ventilation openings are not covered, and that it is not exposed to a sink, direct sunlight, a stove, a heater, or an uncontrolled outdoor/garage environment. Check the exact manual for the required clearance and installation type; do not fully enclose a free-standing model.
Expected result: The cooler is unstable or tilted, a vent is covered, the surrounding area is hot or humid, the installation clearance is inadequate, or the installation and environment appear normal.
Next step: Correct only a loose external obstruction or environmental condition that can be changed without moving the appliance or altering wiring. If the cooler is built in contrary to its manual, remains wet, or the leak recurs, arrange service or an installation assessment.
Stop if: Do not shim, tilt, or move a loaded cooler, alter leveling hardware under the cabinet, block/unblock hidden vents, or access the compressor compartment.
Why this matters
Why: Poor levelness or ventilation can change how condensate is collected or evaporated, while high humidity and heat can increase surface condensation and cooling load. These conditions can contribute to wetness but do not prove a blocked drain or failed compressor.
-
Check 5
If the exact manual describes an auto-cycle or automatic defrost system, note whether water appears beneath the cabinet only after the cooler has run or the refrigerated surfaces have cycled, and whether the visible interior remains dry. Do not access the compressor, drip tray, drain tube, or rear panel; the DWC310BL1 manual describes a drip tray near the compressor, but its location and access must not be generalized to another model.
Expected result: Water returns beneath the cabinet after operation, the interior remains dry, water appears inside or at an accessible opening, or the model's defrost/drip design is unknown.
Next step: Keep the cooler dry and stable, protect the floor and wine, and arrange qualified service for recurring underside water or an inaccessible drip path. Do not try to flush or clear it from the outside.
Stop if: Do not remove the rear panel, probe or flush a drain, touch compressor-area parts, or perform refrigeration-system or electrical tests.
Why this matters
Why: A recurring underside pattern after an auto-cycle can be consistent with condensate reaching a drip tray or an internal drainage problem, but the puddle cannot distinguish a blocked path, pan issue, cabinet leak, or another fault. An unknown design requires the exact manual rather than a generic drain procedure.
-
Check 6
After one safe external correction, such as removing an obvious spill, cleaning the gasket contact area, or clearing a loose visible obstruction, dry the area and observe once whether new water returns. Record the exact model, first wet location, trigger, room conditions, door-seal result, level/ventilation result, and whether the water appeared under the cooler.
Expected result: The water does not return, it returns only with high humidity or an open door, it returns beneath the cabinet after operation, or it persists despite normal accessible conditions.
Next step: Keep the wine cooler out of service when unsafe, protect the floor and wine, and contact Danby-authorized or qualified appliance service for any recurring, concealed, or internal leak. Provide the observation record instead of ordering a generic drain or refrigeration part.
Stop if: Do not keep cycling the cooler to reproduce the leak, open the compressor area, or continue operation after water reaches electrical parts.
Why this matters
Why: A stopped leak after an obvious spill or condensation correction supports that immediate cause. Recurrence beneath the cabinet or persistence after normal door and environmental checks makes the internal drip path, pan, drainage, or refrigeration/electrical system more likely; the user checks cannot identify the part.
Use your observations
Decision map
Find the observation that best matches what you see, then follow the next safe action.
-
PATH 01Safety boundary
What you see
Water is near the plug, socket, cord, controls, or wiring, the leak is fast or spreading, smoke/odor/sparking is present, or a breaker trips.
Do this next
Keep people away, isolate power from a dry safe location, contain water only if safe, and arrange prompt qualified appliance/electrical help.
Why this path and its safety boundary
Why it matters: The immediate issue is electrical and property safety, not ordinary wine-cooler troubleshooting.
Safety stop: Do not touch the wet cooler, plug, or socket; do not restore power to test it.
-
PATH 02Safety boundary
What you see
The first wet point is under a bottle/shelf or on the door/cabinet surface, and an obvious spill, dirty gasket, incomplete closure, frequent opening, or high humidity is present.
Do this next
Remove only the spill or loose obstruction, clean/dry the gasket contact area, close the door normally, and monitor once. Arrange service for a torn gasket, door that will not close, or recurring water.
Why this path and its safety boundary
Why it matters: A spill or condensation from warm humid air is more likely than an internal drain failure.
Safety stop: Do not use heat, glue, forced hinge adjustment, or door disassembly to repair the seal.
-
PATH 03Safety boundary
What you see
The cooler is tilted or unstable, a visible ventilation opening is covered, clearance is inadequate, or the unit is in a hot, humid, sunny, outdoor, or otherwise uncontrolled location.
Do this next
Correct only a safe external obstruction or environmental condition, using the exact manual's installation requirements. If the cooler must be moved, unloaded, leveled, or rebuilt into an enclosure, use qualified help.
Why this path and its safety boundary
Why it matters: Installation and environmental conditions may be increasing condensation or interfering with normal heat rejection; they do not identify a failed refrigeration part.
Safety stop: Do not move a loaded unit, alter the cabinet, block vents, or access the compressor to improve ventilation.
-
PATH 04Safety boundary
What you see
The exact model documents auto-cycle/automatic defrost, the interior is dry, and water repeatedly appears beneath the cabinet after the cooler has run.
Do this next
Keep the cooler stable and the floor protected, stop operating it if the water is near electrics, and arrange qualified service to inspect the internal drip path or pan.
Why this path and its safety boundary
Why it matters: Condensate reaching an internal drip path or pan is possible, but a blocked drain, pan problem, cabinet leak, or another fault cannot be distinguished from the puddle.
Safety stop: Do not pull the unit forward, open the compressor area, probe/flush a drain, or perform sealed-system work.
-
PATH 05Safety boundary
What you see
Water returns after the visible spill, gasket, level, ventilation, and environment checks, or the first wet point is behind/under the cabinet and cannot be accessed safely.
Do this next
Keep the cooler out of service as appropriate and contact Danby-authorized or qualified wine-cooler service with the exact model, timing, wet point, and environmental observations.
Why this path and its safety boundary
Why it matters: A concealed drip pan, drain path, cabinet, electrical, or refrigeration fault is more likely; no safe user check can select a replacement part.
Safety stop: Do not continue running it to find the source, remove panels, disconnect internal tubing, or order a drain, pan, thermostat, fan, or sealed-system part from the symptom alone.
Helpful context
Understand the symptom
A wine cooler leak is usually classified by location and timing
Begin with the first wet point, not the size of the puddle. A damp shelf beneath a bottle is a spill; moisture on the door or floor during humid weather can be condensation; water repeatedly appearing underneath after the cooler has run can involve its auto-cycle drip route or pan. Danby wine coolers are not all the same, so use the exact model manual before assuming a drain or pan is accessible.
Do not treat a wine cooler like a plumbed refrigerator
The reviewed Danby wine-cooler materials focus on sealed wine bottles, door gaskets, condensation, ventilation, and auto-cycle defrost water. They do not document a user water inlet, ice maker, or filter circuit for these wine-cooler examples. Do not add a refrigerator water-supply diagnosis unless the exact product manual explicitly shows one.
The internal drip path and refrigeration system are service boundaries
An auto-cycle wine cooler may route melt water to a drip tray near the compressor, but a user cannot safely confirm a blocked internal channel, overflowing pan, refrigerant problem, or electrical fault from the floor puddle alone. Keep the unit stable and dry, do not pull it forward or remove covers, and arrange qualified service when the leak recurs after the accessible checks.
Safety boundary
Stop conditions
- Stop immediately if water is near the plug, socket, controls, cord, or wiring; isolate power only from a dry, safe location and do not touch the wet appliance.
- Stop for fast or spreading water, smoke, burning odor, sparks, a damaged cord or plug, a suspected refrigerant-line puncture, or a breaker that trips again.
- Do not pull, tilt, or drag a loaded wine cooler, remove rear/bottom/compressor covers, probe or flush a drain, or access the drip pan behind a panel.
- Do not use heat, flame, sharp objects, or chemicals to clear ice, condensate, or a drain, and do not alter the door gasket or hinges as a leak repair.
- If one safe external correction does not stop the leak, or the source is concealed, keep the cooler out of service as appropriate and arrange qualified service.
When checks do not resolve it
Need a professional?
Safety scope: The user may dry accessible surfaces, remove an obvious spill, clean the accessible gasket contact area, observe ordinary door closure, and note level/ventilation conditions. Qualified personnel must handle concealed drains and pans, compressor-area components, wiring, live tests, sealed refrigeration, and any required moving or disassembly.
Common questions
FAQ
Why is my Danby wine cooler leaking water onto the floor?
First rule out a spilled bottle or shelf, then check whether water appears on the door/cabinet during high humidity or when the door does not seal. Danby also documents auto-cycle defrost on some wine coolers, with water routed to a drip tray near the compressor. Repeated water beneath the cabinet after operation, or water near electrical parts, needs service rather than a generic drain repair.
Does a Danby wine cooler have a water line or ice maker that can leak?
The reviewed Danby wine-cooler examples document sealed wine bottles, door gaskets, condensation, ventilation, and auto-cycle defrost water, not a refrigerator-style user water inlet, filter, or ice-maker circuit. Do not assume a supply-line diagnosis unless the exact model manual explicitly documents that feature.
Can a bad door gasket make a Danby wine cooler leak?
Yes. An incomplete seal or frequent door opening can allow humid air to produce condensation on the cabinet, door, or floor. Clean the accessible gasket contact area and remove only a loose obstruction. Do not heat, glue, stretch, or disassemble a damaged gasket; recurring moisture needs service.
Can leveling or poor ventilation cause water around a Danby wine cooler?
They can contribute to abnormal condensation or collection, but they do not prove a failed drain. Danby wine-cooler manuals call for a level installation and unobstructed ventilation according to the model, and Danby says persistent cooling or ventilation problems should be escalated. Do not move a loaded cooler or access its compressor area to correct the issue.
Should I unplug a leaking Danby wine cooler?
Only if the plug and socket are dry and safely reachable. If water is near the electrical connection, do not touch the wet cooler or reach through water; isolate power from a dry, safe location and keep the appliance out of service. Danby warns against immersing the cord, plug, or appliance, and HSE advises stopping unsafe equipment and using competent repair personnel.
Read the exact guide
Official sources
- DWC656BLS Free-Standing Wine Cooler Owner's ManualDanby Products Limited / Danby Products Inc. · Official Danby-hosted manual for a specific wine-cooler family; its free-standing and safety instructions are model-specific context.
- Danby 36 Bottle Free-Standing Wine Cooler in Stainless Steel - DWC93BLSDBR1Danby · Official Danby product page for one free-standing wine-cooler model; configuration and features are not universal.
- DWC310BL1 Wine Cooler Owner's ManualDanby Products Limited / Danby Products Inc. · Official Danby-hosted manual for the DWC310BL1 family; its auto-cycle and drip-tray details are model-specific.
- Work using electrically powered equipmentHealth and Safety Executive · Government electrical-safety guidance used for the dry inspection, stop-use, and professional-repair boundary; it is not Danby-specific leak diagnosis.
- DWC040D2BSSDB Wine Cooler Owner's ManualDanby Products Limited / Danby Products Inc. · Official Danby-hosted manual for a specific wine-cooler family; its condensation table and controls must not be generalized to every model.
- The wine cooler is not cooling properly. What should I do?Danby Appliances · General Danby wine-cooler support guidance used for the ventilation and service boundary, not a leak-specific part diagnosis.
Community feedback
Share a repair observation
Share a plain-text repair observation. Accepted observations are published automatically; this page may take a moment to update.