
On this page
Start here
Quick answer
First identify what is leaking and where it starts. Clear water or droplets on the door, vent area, or cabinet during cooking can be condensation or steam, especially with wet food; DeLonghi installation guidance says condensation can occur during use and that the cavity and surrounding cabinetry need protection from frequent or excessive condensation. Grease or food liquid on the oven floor or tray is usually a spill, but let the oven cool before cleaning. Water or oil appearing from beneath, behind, or inside the control area is not a safe cleaning problem: switch the oven off and arrange service. If you smell gas, hear hissing, see an abnormal flame, or suspect a gas leak, do not test the oven, operate switches, or use a flame; leave for a safe location and contact the local gas emergency service from outside. Do not open the oven housing or gas system.
Before you begin
Safety first
- This article covers classification and ordinary-access, cool-surface observations only. Leave built-in oven removal, electrical work, gas work, door and glass repair requiring disassembly, and internal leak diagnosis to authorised or otherwise appropriately qualified service.
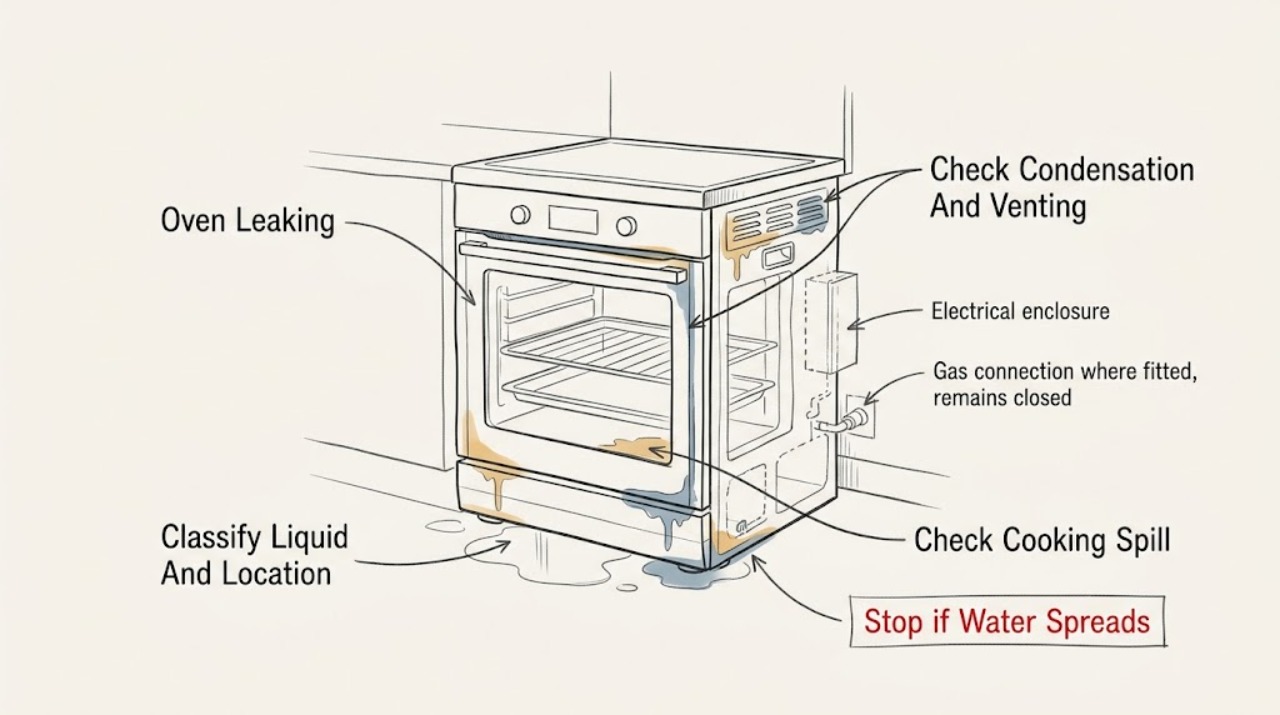
Work through in order
Diagnostic checks
Use only checks that match the exact appliance or system and its official guide.
-
Check 1
Switch the oven off and observe from a safe position without opening panels. Once it is cool enough to approach, place an absorbent cloth outside the appliance to see where any new liquid first reaches the floor; do not put hands inside a hot cavity or near the control area.
Expected result: Record whether the substance is clear water, greasy or food-coloured liquid, condensation droplets, or an unknown liquid; note whether it starts on the door, vent, cavity floor, tray, underside, rear, or gas connection area, and whether there is a gas smell.
Next step: Use the condensation, spill, external liquid, or suspected gas branch below. Keep the oven off until the liquid and area are identified.
Stop if: If the liquid is near electrical controls, the source is underneath or behind the oven, the appliance is hot or smoking, or gas is suspected, stop observation and arrange emergency or qualified service.
Why this matters
Why: Condensation and cooking spills have a different path from a liquid emerging under or behind the oven. A gas smell is an emergency branch regardless of whether visible liquid is also present.
-
Check 2
If the moisture is clear and appears on the door glass, around an oven vent, or on nearby cabinetry during or just after cooking wet food, observe whether it is steam-related without blocking vents or opening the door abruptly.
Expected result: Record whether moisture is a light film or droplets associated with cooking, whether it dries after the oven cools, and whether the amount is unusually persistent, damaging cabinetry, or escaping from an unexpected seam.
Next step: Allow the appliance to cool, wipe accessible surfaces with a soft dry cloth, keep ventilation paths clear, and consult the exact model manual for door and vent guidance. Arrange service if moisture persists when the oven is cold or damages surrounding materials.
Stop if: Do not cover vents, use a steam cleaner, pour water into an opening, or touch the appliance while hot or wet around electrical controls.
Why this matters
Why: DeLonghi notes that cooking habits and environmental factors can cause condensation in and around an oven. Frequent or excessive condensation can still require an installation or service assessment; it is not proof that a seal or water system has failed.
-
Check 3
If the liquid is greasy, coloured, or pooled on the cavity floor, tray, or rack, wait until the oven and accessories are fully cool. Inspect only the accessible tray and cavity surfaces for an overfilled dish, a tipped container, or food residue.
Expected result: Record whether the liquid matches the food or cooking fat, is confined to the tray or cavity floor, and stops appearing after the spill is removed; note any crack, distortion, or liquid path toward the door or base.
Next step: Clean the cool cavity with the mild method in the exact DeLonghi manual and dry it thoroughly. Use a correctly sized tray and do not line the cavity floor with foil unless the model specifically permits it.
Stop if: Do not clean a hot oven, touch heating elements, use flammable fluids, use harsh abrasives or sharp scrapers, or continue if liquid has reached controls, wiring, or the underside.
Why this matters
Why: A cooking spill is different from liquid entering from the appliance's plumbing, gas, or electrical areas. A repeated or unexplained liquid path after cleaning indicates a fault or installation issue rather than another spill.
-
Check 4
With the oven cold and isolated only as the manual requires, inspect the visible door perimeter, glass, hinge side, and any accessible gasket or condensation channel. Look for food residue, a displaced seal, a cracked pane, a door that no longer closes evenly, or a damaged lower trim.
Expected result: Record whether moisture begins at the door edge, whether the gasket is torn or displaced, whether glass is cracked, and whether the door or trim is obstructed or misaligned.
Next step: Remove only loose residue with a soft cloth using the model manual's method. Stop use and arrange model-specific service for a damaged gasket, glass, hinge, trim, or a leak that continues with a clean, correctly closing door.
Stop if: Do not force the door, remove hinges or glass unless the exact manual allows and you can do so safely, use sharp tools on seals, or operate an oven with cracked glass or unstable door hardware.
Why this matters
Why: A door contact or seal problem can redirect steam or cooking liquid toward the front. A damaged glass pane, hinge, or door structure is a safety issue and cannot be corrected with cleaning or pressure.
-
Check 5
Inspect only the visible cabinet edges, surrounding cabinetry, supports, and accessible isolation switch for signs of moisture, heat damage, or a wet trail from beneath. Do not pull out a built-in oven or reach behind it.
Expected result: Record whether the liquid appears beneath or behind the appliance, whether cabinetry is repeatedly damp, whether the oven is unsupported or installed with restricted ventilation, and whether the isolation point or cord area is wet.
Next step: Keep the oven off and arrange qualified appliance service or an authorised installer. Provide the model, liquid type, first wet location, cooking mode, and photographs taken only from a safe dry position.
Stop if: Do not pull, tilt, unfasten, drill, seal, or dismantle a built-in oven; do not touch a wet isolation switch, cord, plug, or electrical enclosure.
Why this matters
Why: DeLonghi installation manuals warn that rear and underside areas may have sharp edges, require qualified installation, and need adequate ventilation. A leak from the base or rear is outside ordinary cleaning and may involve an internal component, installation, or electrical hazard.
-
Check 6
If the oven is gas-connected and there is a gas smell, hissing, abnormal flame, soot, or any doubt that the leak is gas, stop immediately. Otherwise, if a liquid leak persists after the safe checks, keep the oven isolated and arrange authorised DeLonghi or appliance service.
Expected result: For a suspected gas event, the relevant observation is the safety symptom itself, not a test result. For a non-gas leak, record whether it returns while the oven is cold, during heating, at the door, from the cavity, or from underneath.
Next step: For gas suspicion, leave to a safe location, avoid ignition sources and electrical switches, and contact the local gas emergency service from outside. For other leaks, leave the oven off and provide the technician with the model and evidence.
Stop if: Do not relight, reset, test for gas with a flame, operate switches, use a phone in the suspected area, open the gas line, or restart an oven that leaks from underneath or behind.
Why this matters
Why: A gas leak can ignite or create an unsafe atmosphere; it must not be investigated with flames or electrical controls. A persistent non-gas leak may still involve internal wiring, heating, door, tray, seal, or installation and cannot be identified from outside.
Use your observations
Decision map
Find the observation that best matches what you see, then follow the next safe action.
-
PATH 01Safety boundary
What you see
Clear moisture appears on the door, vent area, or nearby cabinet during cooking wet food and is not emerging from the base or control area.
Do this next
Let the oven cool, wipe accessible moisture, keep vents clear, and follow the exact model manual; arrange service if moisture persists cold or causes damage.
Why this path and its safety boundary
Why it matters: Condensation can result from cooking habits and environmental conditions, but frequent or excessive moisture can still damage cabinetry or indicate an installation concern.
Safety stop: Do not block vents, pour water into an opening, use a steam cleaner, or wipe wet electrical controls.
-
PATH 02Safety boundary
What you see
Greasy, coloured, or food-smelling liquid is confined to the tray or cavity floor and corresponds to an overfilled or tipped dish.
Do this next
Wait for complete cooling, clean with the exact manual's mild method, dry the cavity, and use a suitable tray and dish size.
Why this path and its safety boundary
Why it matters: The liquid is more consistent with a cooking spill than an internal appliance leak.
Safety stop: Stop for a crack, unexplained return of liquid, liquid near controls, or any need to remove panels.
-
PATH 03Safety boundary
What you see
Moisture or cooking liquid begins at the door edge, lower trim, hinge side, or a visibly damaged gasket or glass area.
Do this next
Clean only accessible residue when cold; keep the oven off and arrange model-specific service for damage, misalignment, or continued leakage.
Why this path and its safety boundary
Why it matters: Door alignment, seal, glass, hinge, or trim may be redirecting steam or liquid and cannot be confirmed by wiping alone.
Safety stop: Do not operate with cracked glass, a door that will not close evenly, a displaced seal, or unstable hinges.
-
PATH 04Safety boundary
What you see
Liquid appears under, behind, or inside the control area, or dampness repeatedly reaches the cabinetry or electrical isolation point.
Do this next
Keep the oven off, isolate power only from a dry and safely reachable position if appropriate, do not move the appliance, and arrange qualified service.
Why this path and its safety boundary
Why it matters: An internal, plumbing, installation, or electrical issue is possible; an external wipe cannot identify the source safely.
Safety stop: Do not pull out a built-in oven, touch wet electrical parts, open the housing, or seal over a leak.
-
PATH 05Safety boundary
What you see
There is a gas smell, hissing, abnormal flame, soot, carbon-monoxide concern, or uncertainty that the leak is gas on a gas-connected oven.
Do this next
If safe without approaching the suspected source, leave the area and ventilate by opening doors or windows; do not operate electrical switches or use flames. From outside, contact the local gas emergency service and wait for instructions.
Why this path and its safety boundary
Why it matters: This is an immediate gas-safety event, not a home troubleshooting branch.
Safety stop: Do not relight the oven, test with a match, use a phone in the area, operate switches, re-enter, or restore gas until qualified responders declare it safe.
Helpful context
Understand the symptom
Do not treat every wet mark as the same fault
A wet door or vent during cooking may be steam condensation; a greasy puddle in a tray may be a cooking spill; liquid beneath the cabinet may indicate an internal or installation problem. Start with the liquid's appearance, temperature, smell, and first wet location. Never taste or touch an unknown liquid, and do not wipe around live controls or wiring.
Use the model manual for safe access
DeLonghi manuals differ by oven family and by whether the appliance is electric, gas, built-in, or equipped with a steam-related function. The manual controls any removable tray, door component, cleaning method, and isolation point. A built-in oven must not be pulled out simply to look for a leak; the rear and underside may have sharp edges and electrical or gas connections.
Gas suspicion ends the troubleshooting path
If the oven is gas-connected and the smell could be gas, stop using it immediately. Do not light the burners to check, use a match, operate electrical switches, or use a phone inside the suspected area. Leave, ventilate only if this can be done without risk, and contact the local gas emergency service from outside. Do not return or relight the appliance until it has been declared safe.
Safety boundary
Stop conditions
- If gas is suspected, leave immediately for a safe location; do not use flames, operate electrical or light switches, use a phone in the area, or relight the oven.
- Stop for smoke, burning smell, abnormal flame, soot, carbon-monoxide concern, sparking, shock, or a repeated electrical trip.
- Do not touch wet controls, plugs, cords, isolation switches, wiring, or the underside and rear of a built-in oven.
- Do not open the oven housing, gas line, regulator, burner system, or electrical enclosure; DeLonghi specifies authorised personnel for servicing.
- Do not clean while hot, use flammable fluids, use sharp metal scrapers, block vents, or use a steam cleaner unless the exact manual explicitly permits the method.
- Arrange qualified service for liquid from under or behind the oven, persistent unexplained moisture, damaged glass or seal, cabinetry damage, or any leak that returns after a cool, manual-approved cleaning.
Only after diagnosis
Potential parts
- oven door gasket or seal
Consider this only when a cold inspection confirms a damaged, displaced, or persistently leaking seal after the door contact area is clean.
Confirm the exact DeLonghi model and seal profile before ordering; do not operate with a damaged or poorly closing door. - oven door glass or hinge component
Consider this only when qualified diagnosis confirms cracked glass, a damaged hinge, or door misalignment as the leak or steam path.
Match the exact model and installation procedure; DeLonghi warns that glass and hinges can cause injury if handled incorrectly. - oven tray or condensation-management component
Consider this only when the exact model documentation identifies a damaged tray, channel, or condensation component and a technician confirms it is the source.
Do not infer compatibility from appearance; confirm the exact model and approved accessory or replacement.
When checks do not resolve it
Need a professional?
Arrange qualified DeLonghi or appliance service for liquid from beneath, behind, or the control area; persistent or excessive condensation; a damaged door, glass, gasket, tray, or trim; an unexplained liquid path; or any situation requiring the built-in oven to be moved or a panel to be opened. For any suspected gas leak, leave the area and contact the local gas emergency service from outside before arranging appliance repair.
Safety scope: This article covers classification and ordinary-access, cool-surface observations only. Leave built-in oven removal, electrical work, gas work, door and glass repair requiring disassembly, and internal leak diagnosis to authorised or otherwise appropriately qualified service.
Common questions
FAQ
Is water on a DeLonghi oven door always a leak?
No. Steam and condensation from wet food can leave moisture on or around an oven. Let it cool, wipe accessible surfaces, and arrange service if moisture is excessive, persists when cold, damages cabinetry, or starts under the appliance.
Why is liquid collecting on the floor of my DeLonghi oven?
It may be a cooking spill from an overfilled or tipped dish. Wait until the oven is completely cool, clean it with the exact manual's method, and stop if the liquid returns, reaches controls, or appears from beneath or behind the oven.
What should I do if my DeLonghi oven may be leaking gas?
Stop immediately. Do not light a flame, operate switches, or test the oven. Leave for a safe location, ventilate only if this is safe, and contact the local gas emergency service from outside. Do not re-enter or relight until responders declare it safe.
Can a damaged DeLonghi oven door seal cause moisture?
A damaged or displaced door seal can redirect steam or cooking liquid. Inspect only when cold; do not force the door or run the oven with damaged glass, hinges, trim, or a seal. Arrange model-specific service for replacement or alignment.
When should a DeLonghi oven leak be serviced?
Arrange service for liquid under or behind the oven, persistent unexplained moisture, damaged glass or seals, wet controls, cabinetry damage, smoke, burning smell, electrical symptoms, or any need to remove a built-in oven or open a gas or electrical panel.
Read the exact guide
Official sources
- De'Longhi Cooking Installation and Service InstructionsDe'Longhi Group · Official DeLonghi oven manual for a specific product family; use the exact model manual for the user's oven.
- De'Longhi Cooking Installation and Service InstructionsDe'Longhi Group · Official DeLonghi installation and service manual for the DE602EPS family; installation and model-specific safety details vary.
- Methane: general informationUK Health Security Agency / GOV.UK · UK government methane and gas-smell guidance; local emergency arrangements differ by country.
Community feedback
Share a repair observation
Share a plain-text repair observation. Accepted observations are published automatically; this page may take a moment to update.