
On this page
Start here
Quick answer
If a DeLonghi oven is not heating, first stop for smoke, a burning or gas odor, sparking, a damaged cord, or a tripped breaker that will not reset. With the oven cool and switched off, confirm the supply or isolation switch, select a normal bake or heat function, set a temperature clearly above room temperature, and check that any timer is in manual or timed-cooking mode; DeLonghi notes that a manual timer must be set to a time period or manual position. Remove foil or a tray from the oven base because DeLonghi warns that it can reflect heat into the base and damage the enamel. If the display and controls work but the oven stays cold, warms only on one function, shows an alert, repeatedly trips protection, or does not reach temperature, stop opening the appliance and arrange model-specific service for the elements, thermostat or sensor, wiring, timer, or control system.
Before you begin
Safety first
- A professional may need to test the heating elements, thermostat or sensor, thermal protection, wiring, timer, and electronic control using the model-specific procedure. This article does not authorize live electrical measurements, cabinet disassembly, gas-system work, or bypassing a safety device.
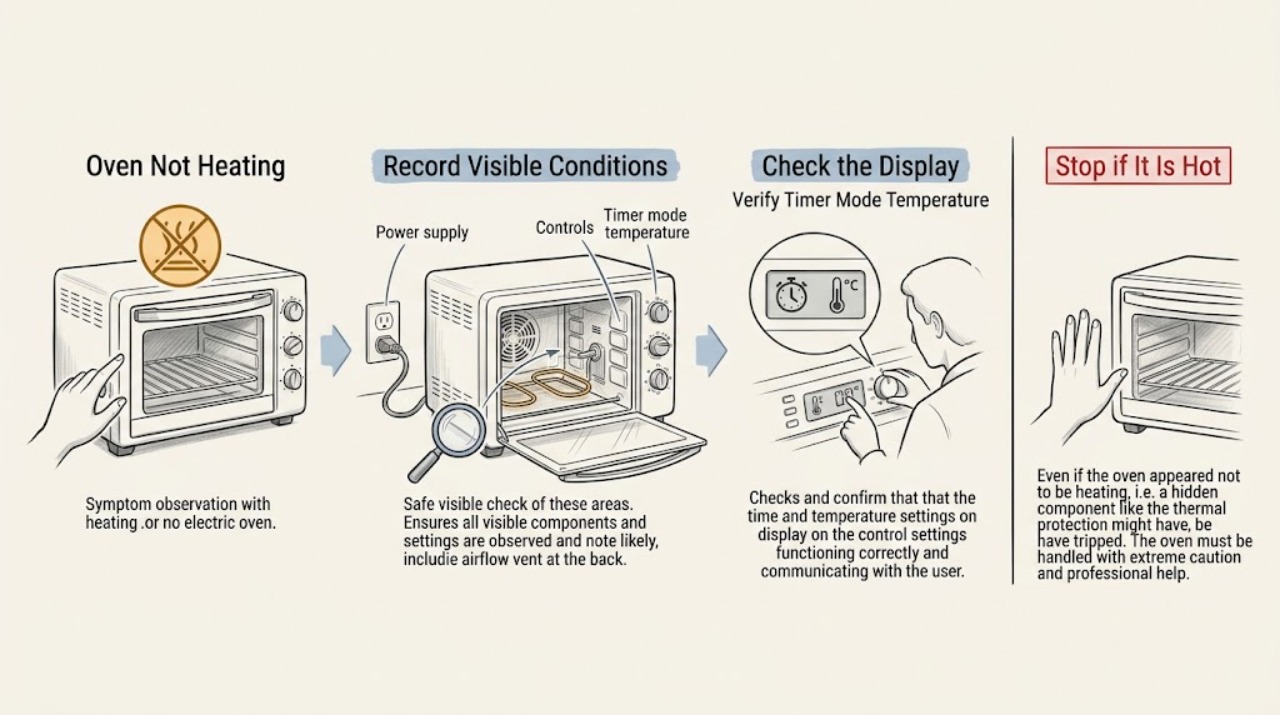
Work through in order
Diagnostic checks
Use only checks that match the exact appliance or system and its official guide.
-
Check 1
Turn the oven controls off and observe from a dry, stable position for smoke, a burning or gas odor, sparking, a damaged cord or plug, a cracked glass panel, water near electrical parts, or a breaker that trips again; do not open the door to investigate smoke or touch a wet connection.
Expected result: There is smoke, a gas odor, sparking, visible electrical damage, repeated breaker operation, or no immediate hazard.
Next step: For smoke or a gas odor, leave the area, avoid switches or flames, and use the local emergency or gas-safety procedure. For electrical damage or repeated tripping, isolate the appliance if safe and arrange qualified service. Otherwise continue with the power and control check.
Stop if: Stop immediately for smoke, gas odor, flame outside the cavity, sparking, a hot or damaged cord, water near electrics, or a breaker that will not remain on.
Why this matters
Why: A fire, gas, or electrical symptom is a stop condition and cannot be diagnosed by repeated heating tests. With no hazard, the remaining checks can begin at the control and supply state while the oven is cool.
-
Check 2
With the oven cool, confirm the wall supply or isolation switch is on, the plug is fully seated if the model uses one, and the display or control indicators respond without using an extension arrangement that the manual does not allow.
Expected result: The display is dark or the control does not respond; the supply was off; the display works but the oven does not begin a selected cycle; or power and controls appear normal.
Next step: Correct only an obvious supply-switch condition and perform one supervised start. If the outlet, cord, or isolation circuit is suspect, stop and use a qualified electrician or appliance professional; do not remove covers.
Stop if: Do not bypass an isolation switch, replace a fuse with a larger rating, or test exposed conductors.
Why this matters
Why: DeLonghi's basic check for an oven that will not turn on is the mains power or isolation switch. A working display does not prove that the heating circuit is healthy, but it moves the next check from supply to timer, mode, and temperature selection.
-
Check 3
Select the normal bake or heat function described by the exact model manual, set a temperature clearly above room temperature, and verify that the clock or timer is in the required manual or timed-cooking state; keep hands away from hot surfaces.
Expected result: The timer is at zero, delayed start, or an unintended mode; the temperature was too low; the function was not selected; or the settings are correct but the cavity remains cold.
Next step: Correct one setting at a time, allow one supervised warm-up attempt, and record whether an indicator changes or heat begins. If the settings are already correct and the cavity stays cold, stop repeated cycling and inspect only the cool, user-accessible cavity conditions.
Stop if: Do not force a timer knob, defeat a child lock or safety interlock, or leave a malfunctioning oven unattended.
Why this matters
Why: DeLonghi's timer FAQ says a manual timer must be set to a time period or manual position. A wrong timer or function can make a healthy oven appear not to heat; correct settings with no temperature rise point toward a fault or protection state.
-
Check 4
After switching off, unplugging where the model permits, and allowing the oven to cool completely, remove only loose cookware or foil that the manual allows you to move; check that the base is not covered and that the visible vent or air path is not blocked.
Expected result: Foil or a tray is on the base, food or cookware blocks a visible airflow path, the cavity is clear, or an obstruction cannot be removed without disassembly.
Next step: Remove only the permitted loose obstruction, restore the rack arrangement from the manual, and perform one supervised cycle. If the oven remains cold or slow, record the exact mode and escalate.
Stop if: Do not scrape an element, remove panels, touch hot surfaces, or operate a unit with blocked ventilation or heat damage.
Why this matters
Why: DeLonghi warns that foil or a tray on the base can reflect heat into the base, damage enamel, and prolong cooking. A clear cavity makes a setting, sensor, element, or control fault more likely, while an inaccessible obstruction is not a reason to open the cabinet.
-
Check 5
During one supervised cycle using the exact manual's normal heating function, observe whether the indicator responds, whether the fan runs if that function calls for it, whether the cavity begins warming, and whether the oven heats consistently rather than repeatedly cutting out.
Expected result: No indicator or heat appears, only one function heats, the oven warms slowly, the temperature cycles abnormally, or the oven reaches temperature normally.
Next step: Stop the test after the first clear abnormal result, record the function and behavior, and arrange service when heat is absent or inconsistent. Do not repeat tests to force a trip or bypass a thermal device.
Stop if: Stop for smoke, odor, sparks, a hot cord, abnormal noise with heat loss, repeated breaker trips, or uncontrolled temperature rise.
Why this matters
Why: A difference between functions can narrow the service diagnosis toward a selected element, mode control, sensor, or relay, but it does not identify a part for replacement. Normal heating after a corrected setting or obstruction supports ending troubleshooting.
-
Check 6
Before requesting service, write down the complete model identifier, selected function, temperature setting, timer state, display or alert text, whether the fan or indicator ran, approximate warm-up behavior, and any breaker or odor event; do not test live voltage or remove the rear cover.
Expected result: The oven remains cold after correct settings and clear user-accessible conditions, heats only on one function, shows an alert, trips protection, or returns to normal.
Next step: Arrange qualified appliance service for persistent or recurring symptoms and provide the observation record. If the oven works normally, monitor it and keep the model manual available.
Stop if: Do not continue operating an oven with a safety alert, repeated overheat, gas odor, smoke, electrical damage, or unreliable temperature control.
Why this matters
Why: Persistent no-heat or function-specific heat loss is evidence for model-specific diagnosis of the elements, thermostat or sensor, thermal protection, wiring, timer, or control board. A normal result after a simple correction does not prove that an intermittent fault will never recur.
Use your observations
Decision map
Find the observation that best matches what you see, then follow the next safe action.
-
PATH 01Safety boundary
What you see
Is there smoke, gas odor, sparking, a damaged cord, water near electrical parts, or repeated breaker operation?
Do this next
Stop using the oven, keep clear of the hazard, isolate power or gas only if safe, and use qualified emergency or appliance service as appropriate.
Why this path and its safety boundary
Safety stop: No repeated heating tests or cabinet access after a hazardous symptom.
-
PATH 02Safety boundary
What you see
Is the oven unpowered, unresponsive, or affected by an off isolation switch?
Do this next
Correct only an obvious switch or control-state issue and perform one supervised start; use qualified electrical help for a supply fault.
Why this path and its safety boundary
Safety stop: Never bypass a switch, fuse rating, grounding, or safety interlock.
-
PATH 03Safety boundary
What you see
Is the timer in delayed or zero state, or is the heating function or temperature setting wrong?
Do this next
Set the manual or timed-cooking state and a normal heat function according to the exact manual, then make one supervised retest.
Why this path and its safety boundary
Safety stop: Do not force knobs or defeat a lock or interlock.
-
PATH 04Safety boundary
What you see
Is foil, a tray, food, or another visible obstruction covering the base or blocking a permitted airflow path?
Do this next
After complete cooling, remove only the loose item the manual permits and retest once under supervision.
Why this path and its safety boundary
Safety stop: Do not scrape elements, remove panels, or operate with damaged or blocked ventilation.
-
PATH 05Safety boundary
What you see
After correct settings and clear user-accessible conditions, does the oven still fail to heat or heat only on one function?
Do this next
Stop household diagnosis and provide the mode, indicator, temperature, alert, and breaker observations to a qualified appliance professional.
Why this path and its safety boundary
Safety stop: No live electrical test, cabinet disassembly, element replacement, or safety-device bypass.
Helpful context
Understand the symptom
First decide whether the oven is unpowered or simply not producing heat
A dark display, a control that will not respond, and a cold oven point toward power, isolation, timer, or control state. A lit display with a fan or indicator but no temperature rise points toward a heat-selection issue or a fault in the heating circuit. DeLonghi sells different oven types and regional controls, so use the exact model manual for symbols, timer behavior, heating modes, and access limits rather than assuming every control layout is the same.
Remove heat blockers without touching hot parts
Check the oven base and racks only when the appliance is cool. Do not line the base with foil or place a tray directly on it unless the model manual explicitly permits it. A blocked vent, crowded cavity, or incorrect mode can change cooking results, but cleaning or moving a hot element is not a household diagnostic. Keep clear space around a countertop unit and never use a damaged cord or plug.
When a heat circuit needs professional diagnosis
If a correctly configured cycle runs but the oven remains cold, the failure may be an element, thermostat or temperature sensor, thermal protection, wiring, timer, or electronic control. Seeing one element glow does not prove that all selected functions are working, and an oven that heats slowly does not identify a specific replacement part. Record the function, temperature setting, indicator behavior, time to warm, and any alert or breaker response for a qualified technician.
Only after diagnosis
Potential parts
- oven heating element
Consider this category only when the correct function and supply are confirmed but the corresponding heat function remains cold and a professional diagnosis identifies the element circuit.
Confirm the complete model identifier, element position, electrical specification, and manufacturer's fit information before ordering. - oven thermostat or temperature sensor
Consider this category only when the oven heats inaccurately, cycles abnormally, or fails to reach temperature after control and cavity checks and service testing points to temperature sensing.
Sensor and thermostat designs vary by model; use the exact manual and professional diagnosis rather than appearance alone. - thermal cutoff or control component
Consider this category only after a repeated overheat or no-heat symptom is traced to protection or control circuitry by a qualified technician.
Do not reset, bridge, or substitute a safety component without model-specific manufacturer information and professional testing.
When checks do not resolve it
Need a professional?
Arrange qualified appliance service when the DeLonghi oven remains cold after the power, timer, function, temperature, and cool cavity checks; heats only on one function; shows an alert; repeatedly trips protection; or cannot maintain temperature. Escalate urgently for smoke, gas odor, sparking, damaged wiring or cord, uncontrolled heat, or water near electrical parts.
Safety scope: A professional may need to test the heating elements, thermostat or sensor, thermal protection, wiring, timer, and electronic control using the model-specific procedure. This article does not authorize live electrical measurements, cabinet disassembly, gas-system work, or bypassing a safety device.
Have this ready
- The complete model identifier and region of purchase
- The selected function, temperature setting, timer state, and whether the display or indicator responds
- Whether the fan runs, whether any part of the cavity warms, and whether the symptom affects one or every function
- Any alert text, breaker response, smoke, burning odor, gas odor, or visible heat damage
- The result of the one supervised retest after correcting a switch, timer, mode, or loose cavity obstruction
Common questions
FAQ
Why is my DeLonghi oven on but not heating?
Confirm the selected function, temperature, and timer state first, then check the cool cavity for foil or a tray on the base and visible airflow blockage. If the display works but the oven remains cold after one supervised retest, arrange service rather than opening the cabinet; an element, sensor, thermal cutoff, wiring, or control fault may need model-specific testing.
Can a DeLonghi oven timer stop it from heating?
Yes. DeLonghi says a manual timer must be set to a time period or the manual position. Check the exact model's timer instructions and perform one supervised test after correcting the state.
Can foil on the bottom of a DeLonghi oven cause poor heating?
It can change the heat pattern and may damage the oven base. DeLonghi warns that foil or a tray on the base reflects heat back into the base and can prolong cooking, so remove it only when the oven is completely cool and the model instructions allow it.
Should I replace the DeLonghi oven heating element myself?
Do not assume the element is the fault or open the cabinet to test it. If power, timer, function, temperature, and cool cavity checks do not restore heat, provide the observations to qualified appliance service so the element, sensor, wiring, protection, and control system can be tested safely.
When should I stop using a DeLonghi oven that is not heating?
Stop for smoke, gas odor, sparking, a damaged cord, water near electrical parts, repeated breaker trips, an alert, uncontrolled temperature, or any need to bypass a safety device. Isolate power or gas only when safe and arrange appropriate qualified help.
Read the exact guide
Official sources
- Domande frequenti su De'Longhi OvensDeLonghi · DeLonghi oven support topics including slow heating, failure to reach temperature, timer operation, and service links.
- The oven won’t turn on.DeLonghi · DeLonghi ovens that do not power on or respond.
- Bottom of food not cooking on Convection setting.DeLonghi · DeLonghi convection ovens where food remains undercooked at the bottom or heating appears abnormal.
- Manual timer oven wont turn on.DeLonghi · DeLonghi ovens using a manual timer control.
Community feedback
Share a repair observation
Share a plain-text repair observation. Accepted observations are published automatically; this page may take a moment to update.