
On this page
Start here
Quick answer
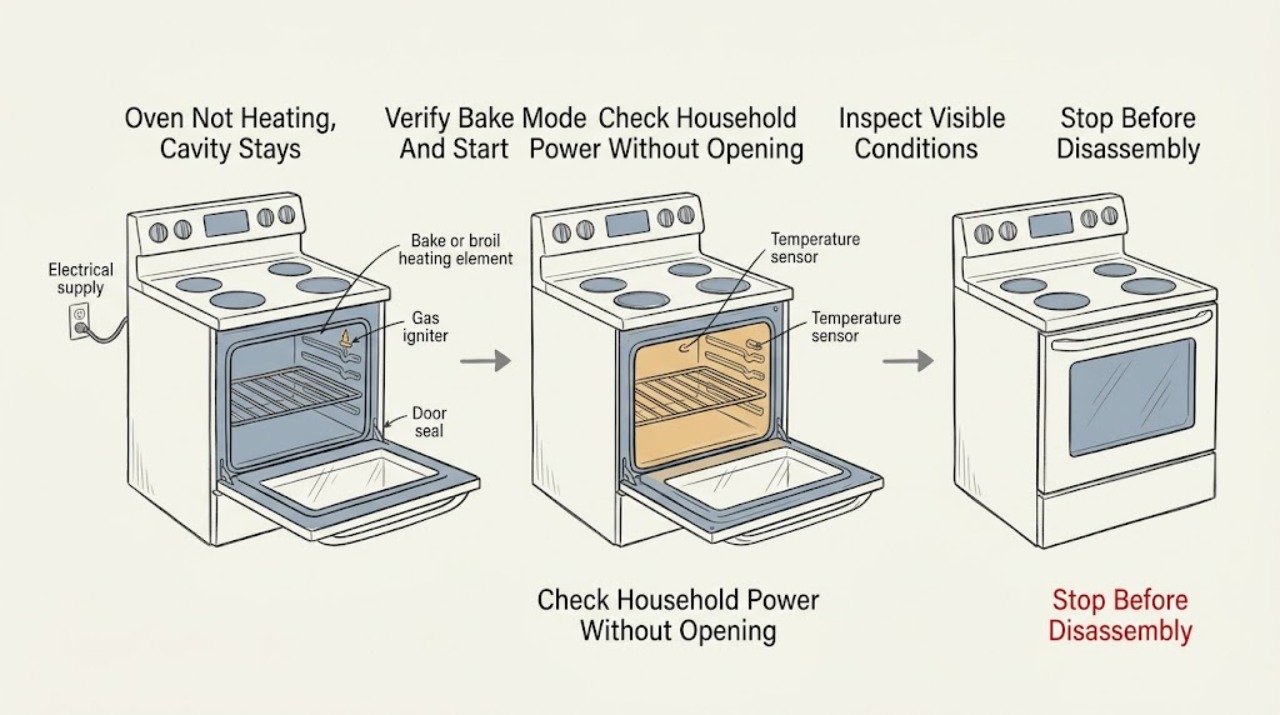
If an oven cavity stays cool, first confirm that a normal Bake or equivalent heating mode is selected, the temperature is set above the current cavity temperature, the door is fully closed, and a delayed-start, control-lock, demo, Sabbath, or twin-oven setting is not preventing heat. Check the household breaker or fuse only from a dry, safe position. With the oven cool, observe the exposed bake or broil element from outside the normal opening on an electric model, or whether a gas model begins its normal ignition sequence; a broken element, no ignition, repeated breaker trip, error code, gas odor, smoke, or sparking is a stop condition. A clean-looking element or working display does not rule out a failed sensor, relay, wiring, igniter, or control. Do not remove panels, test live voltage, work on gas connections, or replace a heating component unless the exact model instructions and your qualifications support it; arrange qualified appliance service when the cavity remains cool after the safe checks.
Work through in order
Diagnostic checks
Use only checks that match the exact appliance or system and its official guide.
-
Check 1
With the oven cool, cancel the current program and select the model's ordinary Bake mode at a temperature above room temperature. Confirm that the control is not locked, in demo or Sabbath mode, set for delayed start, or using a twin-oven/grill configuration that prevents the selected cavity from heating. Close the door fully and use the owner's manual if the control symbols are unclear.
Expected result: The preheat indicator or normal heating sequence begins, the display shows delayed start/demo/lock behavior, the wrong cavity or mode is selected, or the display accepts Bake but the cavity stays cool.
Next step: Correct only the user setting described by the model manual and run one short preheat test. If the control is correct and the cavity still stays cool, leave the oven off while checking the household supply and visible heating response.
Stop if: Do not defeat a door switch, bypass a control lock or safety feature, or keep restarting the oven when it displays an error, smells of gas, smokes, or sparks.
Why this matters
Why: A wrong mode, delayed start, lock/demo setting, door state, or twin-oven configuration can prevent a heat request without a failed heating part. If a valid Bake request is accepted but there is no warming, continue to the power and heating observations rather than repeatedly changing settings.
-
Check 2
From a dry, safe position, check whether the oven or range breaker is tripped or a fuse has opened. If the appliance is newly installed or the receptacle shows scorching, looseness, or damage, stop and arrange qualified electrical help; do not remove the range, terminal cover, or wall-oven wiring. After a single safe reset allowed by the home panel and the owner's instructions, start Bake once and observe whether the oven begins heating.
Expected result: The breaker is tripped, trips again, the display or light is dead, the display works but the oven does not heat, or the supply appears normal.
Next step: Do not reset a breaker repeatedly. If the breaker trips again, the supply is uncertain, or wiring/receptacle damage is visible, leave the appliance off and call a qualified electrician or appliance technician. If supply is stable, continue only with the external heating-response check.
Stop if: Do not open electrical covers, measure live voltage, handle exposed conductors, move a hard-wired wall oven, or work near wet or scorched connections.
Why this matters
Why: A tripped breaker or missing supply can explain a cool cavity, but a repeat trip indicates an electrical fault rather than a setting issue. A working display with no heat means some power is present but does not prove the high-power heating circuit, relay, element, or igniter is healthy.
-
Check 3
After canceling the cycle and allowing the oven to cool, use only the normal viewing opening to observe one heating attempt from a safe distance. On an electric model, look for the exposed bake element to heat normally without a visible break, blister, smoke, or arcing. On a gas model, observe only the normal manufacturer-described ignition sequence; do not remove panels, bypass the igniter, or manually light the burner.
Expected result: An electric element remains cold or visibly cracked, a gas igniter does not produce the normal ignition sequence, the element cycles normally but the cavity remains cool, or there is smoke, sparking, a burning odor, or gas odor.
Next step: Stop using the oven for a failed or damaged element, abnormal gas ignition, smoke, or sparking and arrange qualified appliance service. If there is a gas odor, leave the area and follow local gas-emergency guidance. Do not order a part from appearance alone; use the exact model diagnosis and manual.
Stop if: Do not scrape, bend, disconnect, or replace an element or igniter while energized; do not test gas components, open the burner compartment, or continue operation after arcing, smoke, or gas odor.
Why this matters
Why: A visibly damaged or non-heating electric element, or a failed gas ignition sequence, makes a heating-component or control fault more likely. Normal visible activity with a cool cavity can point to the wrong element/mode, sensor or control feedback, door leakage, or an internal fault that cannot be confirmed by sight alone. Smoke, arcing, or gas odor is a safety event, not a part-identification exercise.
-
Check 4
With the oven fully cool and not running, check that the door closes squarely and that the visible gasket is seated rather than torn, pulled out, or trapped in the opening. Look at the temperature sensor only from the normal cavity opening for an obvious bend or displacement described in the model manual; do not remove it or reach behind the rear wall.
Expected result: The door does not close fully, the gasket is damaged or displaced, the sensor is visibly out of position, or the door and visible sensor appear normal.
Next step: Use the model manual for a user-level gasket reseating instruction only if it requires no disassembly. Otherwise keep the oven off and arrange service, especially if the sensor, latch, hinge, or gasket requires removal or adjustment.
Stop if: Do not force the hinge or latch, remove the gasket or sensor, enter the rear of the cavity, or use the oven if the door glass, latch, or seal is damaged enough to create a burn or heat-escape hazard.
Why this matters
Why: A door that cannot seal can let heat escape, while a displaced sensor can report the wrong cavity condition and alter heating. These observations do not prove a control-board, wiring, sensor, or calibration fault; a normal-looking door and sensor with a cool cavity makes an internal heating or control diagnosis more likely.
-
Check 5
Record whether the cavity is completely cold or merely slow, whether Bake and Broil behave differently, whether surface burners work, whether an error code appears, and whether the symptom returns after one normal cool-down. Note the model number and the exact mode, display message, sounds, odor, and visible element or igniter response for service.
Expected result: Only Bake is cold, both Bake and Broil are cold, the surface burners work while the oven does not, the oven heats intermittently, or an error/safety symptom accompanies the failure.
Next step: Stop testing and give the technician the recorded pattern when the cavity remains cool after the settings and supply checks. Arrange electrical help for supply faults and qualified appliance service for elements, igniters, sensors, relays, wiring, controls, or gas-system work.
Stop if: Do not continue cooking to compensate for a cavity that cannot maintain heat, repeatedly cycle power, or open the control, burner, or rear panels to locate the fault.
Why this matters
Why: One cold mode can narrow the issue toward that mode's element, igniter, relay, or wiring; both modes being cold makes shared power, control, or safety circuitry more likely. Working surface burners show that some range functions have power but do not clear the oven heating circuit. Intermittent heat or an error needs measured diagnosis rather than repeated resets.
Use your observations
Decision map
Find the observation that best matches what you see, then follow the next safe action.
-
PATH 01Next step
What you see
Bake starts warming after a delayed-start, lock/demo, door, or twin-oven setting is corrected.
Do this next
Leave the corrected setting in place and use the exact model manual if the setting returns. If the cavity becomes cool again with a valid Bake request, treat it as a fault and arrange service.
Why this path and its safety boundary
Why it matters: The symptom was more consistent with a control state or operating configuration than a failed heating component.
-
PATH 02Next step
What you see
The display may work, but both heating modes remain cold, the breaker trips, or the oven has an abnormal electrical symptom.
Do this next
Leave the oven off. Use a qualified electrician for a tripping or damaged supply and qualified appliance service for internal controls, wiring, relays, or safety devices.
Why this path and its safety boundary
Why it matters: A supply, shared control, wiring, relay, or safety-circuit fault is more likely than a simple temperature-setting mistake. Working surface burners do not clear the oven's separate heating circuit.
-
PATH 03Next step
What you see
One mode stays cold and its exposed element is visibly broken or does not show the normal heating/ignition response, while another mode works.
Do this next
Stop using the affected mode and arrange model-specific appliance service. Do not replace the component from a generic appearance match or work inside the oven without the required qualification and instructions.
Why this path and its safety boundary
Why it matters: The affected mode's element, igniter, wiring, or control path is more likely, but visual observation cannot establish safe part compatibility or the complete electrical/gas fault.
-
PATH 04Next step
What you see
The oven produces some normal heating activity but the cavity stays cool or loses heat, and the door seal or visible sensor is damaged or displaced.
Do this next
Use only a no-disassembly manual instruction for a simple user-level correction; otherwise stop and arrange service for the gasket, latch, sensor, calibration, or control diagnosis.
Why this path and its safety boundary
Why it matters: Heat loss or incorrect temperature feedback is more likely, although a control or heating-circuit fault can coexist.
-
PATH 05Next step
What you see
Gas odor, smoke, arcing, burning odor, repeated breaker trips, damaged wiring, or an unexplained error accompanies the cool cavity.
Do this next
Stop operating the oven, leave the area for gas odor as appropriate, and follow local emergency or utility guidance. Arrange qualified electrical or appliance service; do not attempt to reproduce the symptom.
Why this path and its safety boundary
Why it matters: This is beyond a routine user check and may involve immediate fire, shock, or gas safety risk.
Helpful context
Understand the symptom
Separate a cool cavity from a slow or inaccurate bake
A cavity that never becomes warm is different from an oven that heats slowly, cycles normally, or bakes at the wrong temperature. Start by checking whether the selected mode actually calls for heat and whether a preheat indicator or normal heating activity appears. If the display works but the cavity remains cool, power and control faults are still possible; a working clock or light does not prove that the heating circuit is healthy. If the oven warms but food remains undercooked, use the model manual's temperature and rack guidance instead of treating it as a total no-heat failure.
Electric and gas ovens show different clues
On an electric oven, the exposed bake element may show a visible break or fail to glow during a heating cycle. On a gas oven, the igniter must initiate the burner sequence, but a homeowner should not bypass safety controls or manually light a modern oven. The exact appearance and sequence vary by model, so use the owner's manual for the normal indication and keep any observation external and brief.
Only after diagnosis
Potential parts
- oven bake or broil heating element
Only consider this category after diagnosis confirms that the affected electric heating element is visibly damaged or fails the model-specific heating test; a cool cavity alone does not identify the part.
Element shape, voltage, wattage, terminals, and mounting vary by model. Confirm the exact model and installation instructions, and use qualified service when replacement requires electrical access. - gas oven igniter
Only consider this category when a qualified diagnosis confirms that the gas oven's ignition sequence or igniter has failed after safe controls and supply checks.
Igniter type, current characteristics, mounting, and gas-safety system are model-specific; do not select or install one from appearance alone. - oven temperature sensor
Only consider this category when model-specific diagnosis confirms incorrect temperature feedback or a sensor fault rather than a setting, element, igniter, or power problem.
Sensor fit and control calibration are model-specific, and sensor access may expose wiring or hot surfaces; confirm the model and service procedure first.
When checks do not resolve it
Need a professional?
Arrange qualified appliance service when the cavity remains cool after one careful settings and supply check; a bake or broil element is damaged or remains cold; a gas igniter does not complete its normal sequence; the breaker trips again; an error code persists; the door, latch, gasket, sensor, wiring, relay, control, or gas connection needs removal or testing; or the oven heats intermittently. Stop immediately for gas odor, smoke, sparking, arcing, burning-plastic odor, damaged wiring, or a wet electrical area. Do not open panels, test live voltage, bypass door or gas safety controls, manually ignite a modern gas oven, repeatedly reset protection devices, or keep operating the oven to reproduce a fault.
Common questions
FAQ
Why is my oven cavity staying cool even though the display works?
A working display proves only that some power reaches the appliance. Confirm Bake and temperature settings, then check for a tripped breaker and observe whether the correct electric element or gas ignition sequence begins. If the cavity remains cool, an element, igniter, sensor, relay, wiring, or control fault may need qualified diagnosis.
Can a tripped breaker cause an oven not to heat?
Yes. Check the oven or range breaker or fuse from a dry, safe position. Do not reset it repeatedly: if it trips again, the supply or appliance may have a fault and should remain off until qualified electrical or appliance service checks it.
How can I tell whether an electric oven bake element is bad?
With the oven cool and the cycle observed only from the normal opening, an element that stays cold or has a visible crack or blister is a useful clue. It is not a complete electrical test. Isolate power as required by the exact model instructions, do not open panels or test live voltage, and arrange service for replacement or confirmation.
What should I do if a gas oven will not ignite or I smell gas?
Do not manually light the burner, bypass the igniter, or keep trying cycles. Stop using the oven; if you smell gas, leave the area and follow local gas-emergency or utility guidance. A qualified appliance professional should diagnose the igniter, gas-safety controls, and supply.
Could the door or temperature sensor make an oven seem not to heat?
Yes. A door that cannot close or a damaged gasket can let heat escape, and a displaced temperature sensor can produce incorrect feedback. Check only for obvious visible damage with the oven cool and use the model manual for any no-disassembly adjustment; removal, testing, or latch and sensor work belongs to qualified service.
Read the exact guide
Official sources
- Range & Wall Oven - Oven Heating Element FailureGE Appliances · Visible electric oven element failure, breaker or fuse response, abnormal odor or sparking, and not using the oven after element failure
- Oven Not Heating - Powering On - ElectricWhirlpool Product Help · Electric oven door closure, new-installation power, control lock, demo mode, delayed start, and service escalation
- Why is my oven not heating up?Whirlpool · General oven no-heat troubleshooting, breaker, outlet, electric heating element, door seal, temperature sensor, gas igniter, and professional-service boundaries
- Samsung Oven FAQsSamsung Canada · Oven power, breaker, cooling, door closure, twin-oven settings, temperature behavior, and service escalation
- Electric Range - Oven Doesn't Heat But Burners Do HeatGE Appliances · Electric range controls, self-clean latch, bake element inspection after power isolation, and service when burners work but oven does not heat
Community feedback
Share a repair observation
Share a plain-text repair observation. Accepted observations are published automatically; this page may take a moment to update.