
On this page
Start here
Quick answer
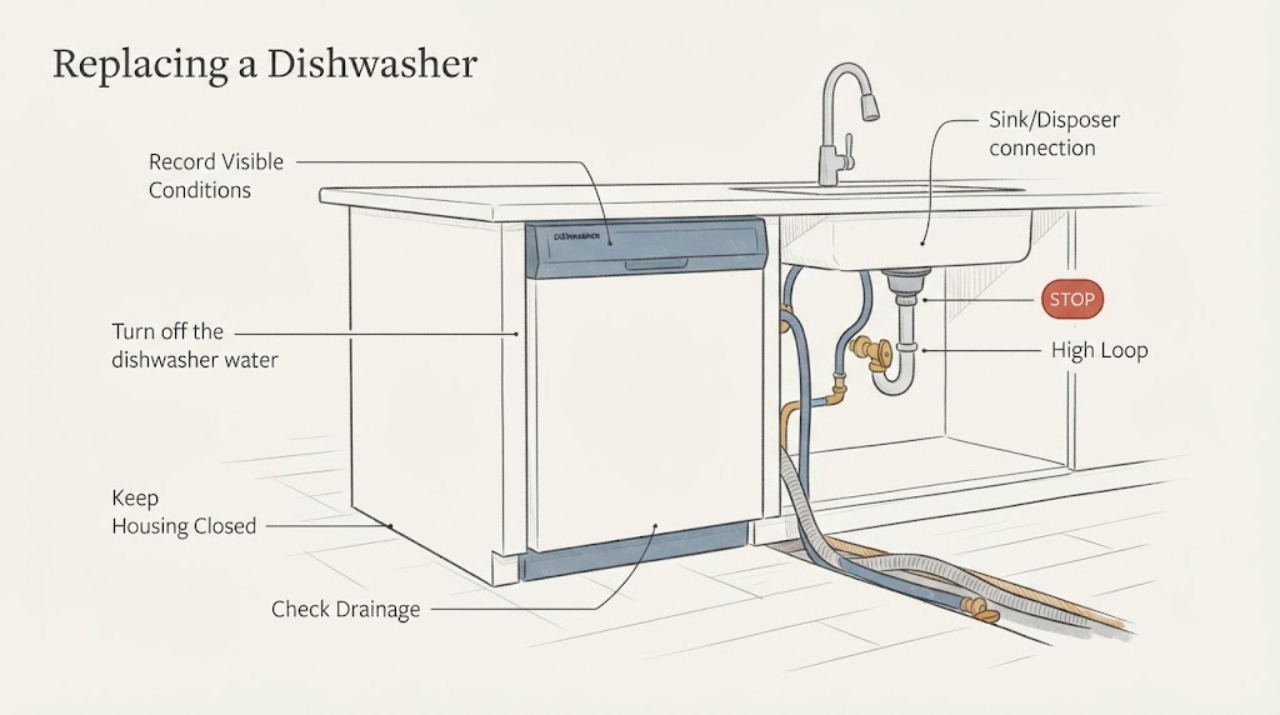
You do not automatically have to tear up the floor to replace every hidden dishwasher line, but you also should not assume an old under-floor drain hose or water line is reusable. The exact dishwasher installation manual controls the connector type, line material, maximum routing, high-loop or air-gap arrangement and whether a new installation kit is required. KitchenAid's official guidance says to turn off water and power, inspect existing lines for wear or damage, keep the drain route free of sharp bends or kinks, use a high loop to limit siphoning/backflow, and test for leaks after connection. GE's installation requirements show why a new connection kit and accessible shutoff/drain may be required in some installation programs, but that is GE-specific rather than a universal rule. Before pulling the old dishwasher, identify the new model, inspect both accessible ends and any basement/crawlspace section, verify the drain termination and shutoff, and hire a plumber or installer if the hidden run cannot be inspected or the island route does not meet the new manual and local code.
Work through in order
Diagnostic checks
Use only checks that match the exact appliance or system and its official guide.
-
Check 1
Record the exact replacement dishwasher model and open its installation instructions before disconnecting the old unit. Note the inlet fitting, approved water-line material, drain connection, maximum hose/routing guidance, high-loop or air-gap requirement and any required installation kit.
Expected result: The new manual specifies a compatible line and connection arrangement, or the model/manual is unavailable or conflicts with the existing island route.
Next step: If the manual and existing route do not match, plan the correct new line/adapter or obtain installer/plumber review before removing the old appliance. Do not force an old compression fitting onto a different inlet.
Why this matters
Why: A hidden line can be reused only when its material, fittings, routing and condition satisfy the replacement appliance's instructions and local requirements. A generic dishwasher guide cannot prove compatibility for an unidentified unit.
-
Check 2
Turn off the dishwasher water shutoff and electrical supply before disconnecting anything. Inspect the appliance-end water connection, shutoff valve, drain connection, clamps, visible tubing and any under-floor section accessible from a basement, crawlspace or service opening.
Expected result: The line is dry, flexible or otherwise approved by the manual, with sound fittings and a working shutoff; or it shows corrosion, cracking, kinks, abrasion, staining, a seized valve or an inaccessible section.
Next step: Replace or professionally inspect damaged/unknown sections before installing the new dishwasher. Do not turn water back on to test a suspect connection while the appliance is still pulled out or the leak path is hidden.
Why this matters
Why: A sound accessible line is a candidate for reuse only after manual compatibility is confirmed. Corrosion, damage, a defective shutoff or an uninspectable run creates a leak and serviceability risk that an appliance swap cannot resolve.
-
Check 3
Trace the drain route from the dishwasher to the sink, disposer or waste tee. Confirm that the hose has the model-required high loop or air-gap arrangement, no sharp bends or kinks, and a secure connection at both ends; do not substitute a separate under-floor drain scheme without checking local plumbing requirements.
Expected result: The route is smooth and supported with the required high loop/air gap, or it drops into a low point, is sharply bent, lacks the required backflow protection, or terminates at an unknown connection.
Next step: Correct the route according to the replacement manual and local code before closing the island. If the hidden route cannot be changed without floor access or its termination is unknown, use a qualified plumber/installer.
Why this matters
Why: KitchenAid and Whirlpool explain that a high loop helps prevent siphoning/backflow and that bends or poor connections can obstruct drainage, leave residual water and contribute to leaks. The exact height, air-gap rule and allowable length remain model- and jurisdiction-specific.
-
Check 4
After connections are secured and the dishwasher is still accessible, restore utilities and run the model-approved short fill/drain or test cycle while watching every accessible connection and the floor/under-floor area.
Expected result: The dishwasher fills and drains without leaks/backflow, or water appears at the inlet, drain connection, under-floor route, sink/disposer connection or cabinet/floor.
Next step: Stop the cycle, shut off water and power, and correct the connection or obtain service. Do not seal the floor, reinstall the kickplate or leave the dishwasher unattended until the complete route passes the manual's test.
Why this matters
Why: A dry test supports the installation at the observed points but does not prove an inaccessible line is sound. Any moisture, drain-backflow, residual water or unusual pump behavior means the installation is not ready to close up.
-
Check 5
Decide reuse versus replacement only after documenting the old line material, age/condition, fittings, routing, accessible shutoff and test result. Keep the appliance pulled out until the decision is verified against the exact manual and local code.
Expected result: The existing line is compatible, undamaged, fully inspectable and passes the test; or any of those conditions is unknown or fails.
Next step: Use a new model-approved kit/line when required. For a hidden run that cannot be fished or inspected without opening the floor, engage a licensed plumber or qualified installer before finalizing the replacement.
Why this matters
Why: Reuse is a conditional installation decision, not a default. A failed or inaccessible condition means the hidden line may need replacement or a plumbing access plan, even if the old dishwasher previously operated.
Use your observations
Decision map
Find the observation that best matches what you see, then follow the next safe action.
-
PATH 01Next step
What you see
The replacement manual accepts the existing line material and fitting, the full route is inspectable, the shutoff works, and the line has no damage or kinks.
Do this next
Reconnect using the manual's approved fittings and clamps, preserve the required drain high loop/air gap, and complete a supervised fill/drain leak test before closing the island.
Why this path and its safety boundary
Why it matters: The old line may be reusable, subject to the exact manual and local plumbing requirements; age alone does not prove failure.
-
PATH 02Next step
What you see
The supply line is cracked, corroded, abraded, made from a material the manual excludes, or connected to a shutoff that will not fully close.
Do this next
Keep water off and replace the affected line/shutoff with model- and code-compliant parts through a qualified installer or plumber. Do not install the dishwasher and hope the line stays dry.
Why this path and its safety boundary
Why it matters: The water connection is not a safe reuse candidate; the new appliance can expose or worsen the weak connection.
-
PATH 03Next step
What you see
The drain route has a low loop, sharp bend, unknown termination, missing required high loop/air gap, or inaccessible section that cannot be inspected.
Do this next
Do not close the island. Have a qualified plumber/installer verify the route and local code, then modify or replace the hidden run as required by the new dishwasher manual.
Why this path and its safety boundary
Why it matters: Drainage, siphoning/backflow and hidden-leak risk remain unresolved; a visible appliance-end connection does not prove the under-floor system is correct.
-
PATH 04Next step
What you see
Water appears during the supervised fill/drain test, residual water remains in the tub, or backflow enters the dishwasher.
Do this next
Stop the cycle, shut off water and power, document the leak location, and correct the installation before any further run. Escalate hidden leaks or under-floor moisture to a plumber/installer.
Why this path and its safety boundary
Why it matters: The connection or drain geometry is not ready for service, and continued testing can damage the floor or cabinets.
Helpful context
Understand the symptom
The under-floor route changes the inspection decision
A dishwasher in a kitchen island can have a long drain and water-supply run that is hidden below the floor. The question is not simply whether the old hose looks usable at the appliance end: the full run, both termination points, shutoff, fittings, material, kinks, and drain geometry must be compatible with the replacement dishwasher. If the run cannot be seen from a basement, crawlspace or accessible service opening, do not certify it by appearance at the island cabinet.
Treat manufacturer installation kits as model requirements
Official installation guidance is not interchangeable across brands. GE's delivery requirements say its existing dishwasher connection parts will not be reused and require a new connection kit, while KitchenAid's water guidance discusses inspecting existing lines and following the owner's manual. These are useful decision boundaries, not permission to apply GE's kit rule to an unidentified dishwasher. Retrieve the replacement model's manual and compare its inlet fitting, approved line material, drain length/routing and connection arrangement before deciding what can stay.
Test the complete system before closing the island
KitchenAid and Whirlpool installation guidance both call for a smooth drain route, secure clamps/connections and a short-cycle leak check. Leave the dishwasher accessible while it fills and drains. Inspect the inlet connection, the appliance-side drain connection, the sink/disposer or waste-tee connection and any accessible under-floor section. A leak or drain-backflow symptom means shut off water and power and correct the installation before reinstalling panels or sealing the floor.
When checks do not resolve it
Need a professional?
Use a qualified dishwasher installer or plumber when the replacement manual conflicts with the existing lines, the shutoff is inaccessible or defective, the under-floor route cannot be inspected, the drain high loop/air gap or termination is unknown, local code is uncertain, or any water/backflow appears during testing. Keep water and power off until the route is verified.
Common questions
FAQ
Do I always have to replace the drain hose and water line when replacing a dishwasher?
No universal answer applies. Reuse is conditional on the new model's manual, approved materials and fittings, sound condition, inspectable routing, working shutoff and a leak-free test. Some manufacturer installation programs require a new connection kit, so check the exact replacement documentation rather than treating the old line as automatically reusable.
Can a dishwasher drain hose run under a kitchen floor?
An island route needs the replacement manual and local plumbing requirements to be checked. The drain must reach an approved termination with the required high loop or air-gap arrangement, avoid sharp bends and kinks, and pass a supervised drain/leak test. An unseen route that cannot be inspected should be reviewed by a plumber or installer before the island is closed.
What should I check before closing the floor or cabinet?
Confirm the model-specific supply fitting and line material, working shutoff, drain high loop/air gap, smooth routing, secure clamps, accessible connections and a short fill/drain test with no leaks or backflow. Keep the dishwasher accessible until those checks pass.
Read the exact guide
Official sources
- Dishwasher Water Supply ConnectionKitchenAid Product Help · Official KitchenAid guidance used for model-manual priority, shutoff, inspection of existing lines, connection fit and leak checking. Material and pressure details are KitchenAid-specific and are not generalized as universal requirements for an unnamed dishwasher.
- Appliance Delivery, Installation & RemovalGE Appliances · Official GE installation-program requirements used only to show that some manufacturers require a new dishwasher connection kit, an accessible shutoff/drain and model-specific opening requirements. GE's no-reuse policy is explicitly not generalized to every dishwasher brand.
- Drain Line InstallationKitchenAid Product Help · Official KitchenAid guidance used for general installation decision points: shut off water/power, avoid sharp bends/kinks, use the required high loop, secure connections and test for leaks. It is not used to claim that every unnamed dishwasher has identical height, length or code requirements.
- Drain Line InstallationWhirlpool Product Help · Official Whirlpool guide used as a second manufacturer example for smooth drain routing, water/power shutoff, secure connections, high-loop/backflow prevention and short-cycle leak testing. Whirlpool-specific dimensions and components are not transferred to the unnamed task appliance.
Community feedback
Share a repair observation
Share a plain-text repair observation. Accepted observations are published automatically; this page may take a moment to update.