
On this page
Start here
Quick answer
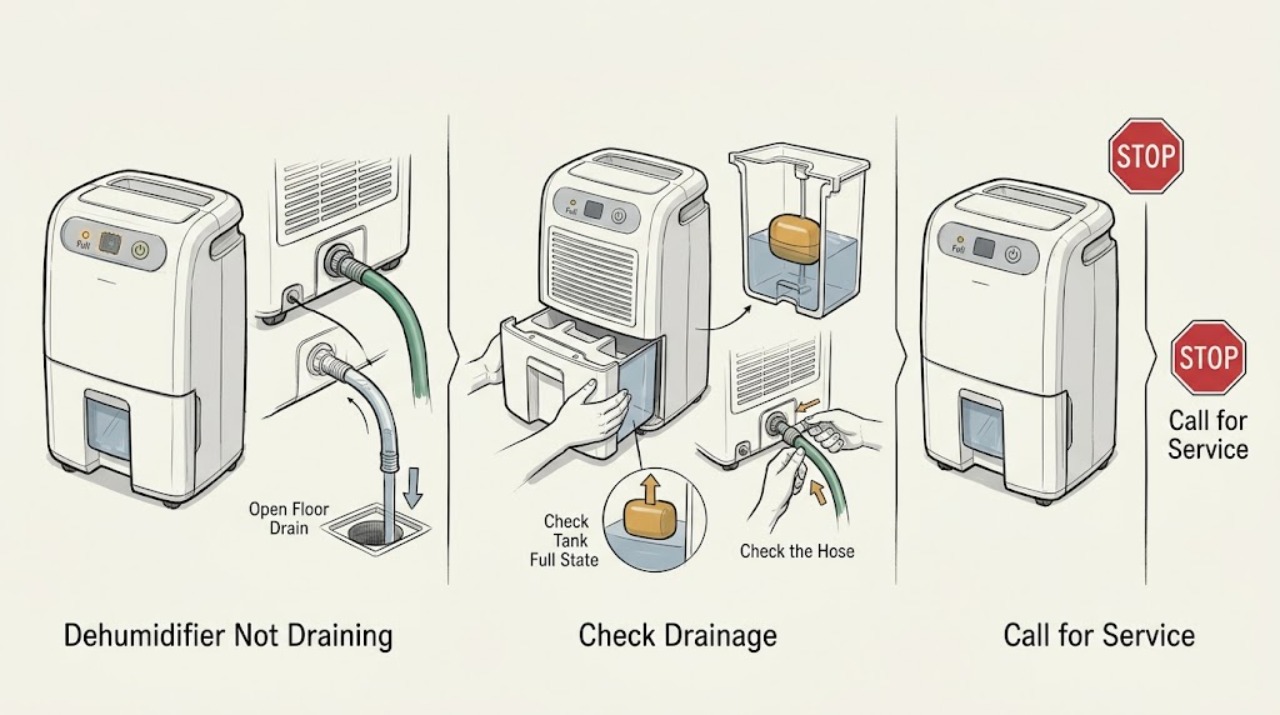
First identify the complete Electrolux model because drainage architecture is not universal. Electrolux’s ED2171WA product page documents continuous drainage and a full-tank auto-stop, while the EDH10TRBW1 manual documents a water-tank mode and a gravity continuous-drain hose that must be fully seated, leak-free, free of kinks or rises, and directed to a drain lower than the unit. Empty and gently reseat the tank only as the exact manual shows; do not touch inside the appliance or treat tank water as drinking water. If your model has a Pump button or indicator, use only that model’s instructions—do not infer a pump from a continuous-drain outlet or borrow a different model’s settings. If a documented pump mode still will not move water, the hose leaks or freezes, water reaches electrical parts, or the internal pump, pump filter, float, sensor, or wiring would need access, unplug the dehumidifier and arrange Electrolux or qualified service.
Before you begin
Safety first
- The user may identify the model, empty and reseat a documented tank, inspect the visible hose and receiving drain, and select a documented user-level mode with the unit dry. Qualified service personnel must handle internal pump/pickup, float, sensor, wiring, control, cabinet access, and live testing.
Work through in order
Diagnostic checks
Use only checks that match the exact appliance or system and its official guide.
-
Check 1
Read the complete Electrolux model number from the side or rear label and open that model’s manual. Determine whether the unit supports bucket mode, gravity continuous drainage, a documented pump mode, or only some of these. Compare the control panel with the manual rather than assuming that a Pump button or indicator exists.
Expected result: The model documentation identifies gravity continuous drainage only, explicitly documents a pump function, documents bucket mode only, or the model and drainage architecture cannot be confirmed.
Next step: Use the documented mode only. If the model cannot be identified, remain in safe bucket mode only as the manual permits and contact Electrolux support for the correct manual; do not connect or configure an unverified pump system.
Stop if: Do not infer pump capability from a similar-looking Electrolux unit, an aftermarket hose, or an online listing, and do not open the cabinet to identify the pump.
Why this matters
Why: A continuous-drain outlet does not by itself prove a pump. A gravity hose must run downhill; a pump arrangement, if documented, has model-specific controls and limits. An unconfirmed architecture makes another model’s procedure unsafe to apply.
-
Check 2
Turn the unit off and keep the plug and floor dry. If the exact manual uses a tank, remove it by the documented handles, empty the collected water into a suitable drain, inspect only the accessible tank and full-level indicator/float, and gently push the empty tank fully back into place. Do not touch parts inside the opening.
Expected result: The tank is full, the full-tank indicator is active, the tank/float is visibly obstructed or not seated, the unit is in continuous-drain mode with an empty tank, or the tank condition is normal.
Next step: Empty and reseat the tank gently as the exact manual shows. If the tank will not seat, the float is loose/damaged, or the full indicator remains active, stop and arrange service. If the tank is normal, continue with the visible hose route.
Stop if: Do not reach into the appliance, force the tank, bypass the float, or operate with water on the cord, plug, or electrical base.
Why this matters
Why: A full or incorrectly seated tank can stop dehumidification or prevent the unit from resuming. In a documented continuous-drain mode, water should use the hose path; a full tank then suggests a drainage problem or a model-specific fallback condition rather than proving a failed pump.
-
Check 3
With the unit off and the hose connection cool and dry, inspect the visible continuous-drain hose from the rear outlet to the receiving drain. Confirm that the outlet plug/cap was removed only as the exact manual directs, the hose is fully seated and sealed, the route has no kink, crush, twist, freeze point, or upward elevation, and the drain end is lower than the unit for a gravity path.
Expected result: The hose is loose or leaking, kinked/crushed/twisted, frozen, routed uphill or with an elevation, the drain end is blocked, or the visible gravity route is correct.
Next step: Correct only a clearly accessible hose position or seating issue described by the manual, keeping the drain end secure and lower than the unit. If the hose, connector, or drain is damaged/blocked, stop and use qualified service or plumbing help; do not pull apart a wet connection.
Stop if: Do not lift the unit to force a slope, extend the hose beyond the manual’s limit, disconnect a water-filled connector, or run the unit while a leak reaches electrics.
Why this matters
Why: A poor seal or restricted/elevated hose can stop gravity flow and send water into the tank or onto the floor. A correct visible route does not rule out a hidden blockage or internal pump/valve/sensor issue.
-
Check 4
If and only if the exact Electrolux manual names a pump function, check the documented pump indicator/setting and the model-specific pump-hose connection while the unit is safely off. Confirm that the hose is fully seated, the tank is installed as required, and the receiving drain is suitable. If the manual does not document a pump function, do not press or search for one; evaluate the unit as a gravity-drain model.
Expected result: A pump function is documented and off, the pump indicator reports a fault, the model has no documented pump function, or the documented pump mode and visible hose/tank conditions are normal but water still does not move.
Next step: Enable or reset the documented pump function only as the exact manual permits, then stop if it leaks, trips, overheats, or remains unable to move water. For a gravity-only model, lower and clear the hose path rather than attempting a pump configuration; call service for a persistent fault.
Stop if: Do not borrow a pump procedure from another Electrolux model, remove a pump filter, probe wiring, or test the pump while energized.
Why this matters
Why: A disabled or faulted documented pump setting can explain no lift, while a gravity-only model cannot be made to lift water by changing a setting. Persistent no-flow with a documented pump enabled and an unobstructed visible path makes an internal pump, pump filter, float, sensor, or control issue more likely.
-
Check 5
Record the exact model/serial number, selected bucket or continuous/pump mode, tank/full indicator state, hose connection and slope, leak or backflow, receiving-drain condition, and whether the unit is silent, hums, or stops with an error. Give this record to Electrolux support or a qualified dehumidifier technician; do not remove panels or perform a live test.
Expected result: Drainage returns after tank or hose correction, water keeps entering the tank in a documented continuous mode, a documented pump runs but does not move water, the full indicator stays on, or water reaches electrical parts.
Next step: Unplug the unit and arrange model-specific Electrolux or qualified service. If the receiving drain or building plumbing is blocked, use a plumber; do not continue operating against a leak or electrical hazard.
Stop if: Do not open the cabinet, remove the internal pump/plate or sensor, probe wiring, bypass a full-level switch, or replace a part from the symptom alone.
Why this matters
Why: Recovery after a tank, setting, connection, or gravity-route correction supports that external condition as the immediate cause. Persistent failure makes an internal pump, pickup/plate, float, sensor, valve, or wiring/control fault more likely, but sound or indicator alone cannot identify a safe replacement part.
Use your observations
Decision map
Find the observation that best matches what you see, then follow the next safe action.
-
PATH 01Safety boundary
What you see
The complete model cannot be read, or the unit has a Pump label/indicator that the available manual does not confirm.
Do this next
Use the model/serial information to obtain the exact Electrolux manual and keep the appliance in the documented tank mode until then. Do not configure an unverified pump or use another model’s settings.
Why this path and its safety boundary
Why it matters: A continuous-drain outlet alone does not establish an integrated pump, hose lift capability, or pump-setting procedure.
Safety stop: Do not open the cabinet or rely on a generic pump manual.
-
PATH 02Safety boundary
What you see
The tank is full, the full indicator is on, the tank is not seated, or an accessible float condition is abnormal.
Do this next
Empty and gently reseat the tank as the exact manual shows. If the indicator stays on, the tank will not seat, or the float is damaged, unplug and arrange service.
Why this path and its safety boundary
Why it matters: The unit may be correctly stopping to prevent overflow, or it may be unable to recognize a correctly seated empty tank; this does not prove a failed pump.
Safety stop: Do not bypass the float or reach inside the tank opening.
-
PATH 03Safety boundary
What you see
The model uses documented gravity drainage, but the hose is loose, leaking, kinked/crushed/twisted/frozen, elevated, or the drain end is above the unit or blocked.
Do this next
Correct only the visible hose seating or downhill route allowed by the manual. Stop for a damaged connector, hidden blockage, or leak near electrics and arrange service/plumbing help.
Why this path and its safety boundary
Why it matters: The visible gravity path is more likely than an internal pump fault because water cannot flow correctly through a restricted, uphill, or leaking hose.
Safety stop: Do not lift the unit to create a slope, disconnect wet tubing, or run with a leak.
-
PATH 04Safety boundary
What you see
The exact model documents a pump, its setting is enabled, the tank and hose are correctly installed, and the receiving drain is suitable, but water still does not move or the pump indicator faults.
Do this next
Stop operation, unplug, and arrange model-specific Electrolux or qualified service. Provide the pump indicator, hose, tank, leak, and sound observations.
Why this path and its safety boundary
Why it matters: An internal pump, pump filter/pickup, float, sensor, valve, or control issue is more likely; the pump setting alone does not identify a replacement part.
Safety stop: Do not remove the pump filter/plate, open the cabinet, probe wiring, or perform a live pump test.
-
PATH 05Safety boundary
What you see
Water reaches the cord, plug, electrical base, or floor, or the external tank, hose, mode, and receiving-drain checks are normal but the unit still will not drain.
Do this next
Isolate power from a dry location, do not move or restart the appliance, and arrange qualified Electrolux service. Use plumbing help only for a clearly separate receiving-drain issue.
Why this path and its safety boundary
Why it matters: This is an electrical/water hazard or a likely hidden pump, pickup, sensor, wiring, or control fault beyond safe user troubleshooting.
Safety stop: Do not wipe inside the cabinet, splash water to flush a passage, bypass safety sensors, or continue operating to compare sounds.
Helpful context
Understand the symptom
Confirm the drainage architecture before troubleshooting
Electrolux sells several dehumidifier families. The ED2171WA page lists continuous drainage, while the EDH10TRBW1 manual shows a rear drainage outlet, tank mode, and gravity hose route. Those documents do not prove that every Electrolux dehumidifier has an integrated pump or a Pump button. Read the model number from the side or rear label and use its manual. A hose connected to a gravity outlet will not lift water uphill just because the product is advertised as having continuous drainage.
Check the tank and visible hose without making a water hazard
A full tank or a tank that is not seated can stop collection. Empty it as the manual directs, keep the water away from the power cord, and push the tank gently fully into place. For continuous drainage, the hose must be firmly connected, sealed, and routed without kinks or elevations to a drain lower than the unit on the applicable model. Do not remove the tank and reach inside to clear a hidden pickup or pump filter.
Treat a pump indicator as model-specific
A Pump indicator, if present, is a different decision from a gravity-drain outlet. Confirm that the exact manual names a pump mode and its permitted hose arrangement before changing settings. If the pump mode is documented but water still does not move after the external hose and tank checks, a pump, internal filter, float, sensor, or control fault is possible. Keep the appliance unplugged and dry; pump access, electrical diagnosis, and any internal repair belong to a qualified technician.
Safety boundary
Stop conditions
- Stop and isolate power from a dry location for water near the cord, plug, or electrical base, an active leak, smoke, burning odor, damaged cable, sparks, or repeated protection trips.
- Do not touch inside the appliance when removing the tank, probe wiring, open the cabinet, remove a pump/plate/filter, or perform a live electrical or pump test.
- Do not force the tank or float, bypass a full-level sensor, splash water onto the unit, or operate without the filter or other model-required safety parts.
- Do not treat a gravity continuous-drain outlet as proof of a pump, use a hose with kinks/elevations, direct water uphill without documented pump support, or borrow another model’s pump setting.
- If tank, hose, documented mode, slope, and receiving-drain checks are normal but water still will not drain, unplug the unit and arrange Electrolux or qualified dehumidifier service.
Only after diagnosis
Potential parts
- Dehumidifier drain pump
Consider this only if the exact model documents an internal pump and a qualified diagnosis confirms pump failure after the tank, hose, mode, and receiving-drain checks; no-drain symptoms alone do not justify ordering one.
Electrolux dehumidifier drainage architecture and pump fitment are model-specific. Confirm the complete model/PNC and manufacturer or authorized-service fit information before ordering; do not add a pump to a gravity-only model.
When checks do not resolve it
Need a professional?
Safety scope: The user may identify the model, empty and reseat a documented tank, inspect the visible hose and receiving drain, and select a documented user-level mode with the unit dry. Qualified service personnel must handle internal pump/pickup, float, sensor, wiring, control, cabinet access, and live testing.
Common questions
FAQ
Why is my Electrolux dehumidifier not draining continuously?
Confirm the exact model’s drainage architecture first. For the EDH10TRBW1 gravity example, the hose must be fully seated and leak-free, without kinks or elevations, and directed to a lower drain. A documented pump model may need its own pump setting; do not assume a continuous-drain outlet includes a pump.
Can a full or poorly seated tank stop an Electrolux dehumidifier?
Yes. Electrolux documents full-tank automatic stop on ED2171WA, and the EDH10TRBW1 manual says the tank must be restored correctly for operation. Empty and gently reseat the tank as the exact manual shows; do not touch inside the opening or bypass the float.
Does every Electrolux dehumidifier have a drain pump?
The available official documents do not support that assumption. ED2171WA and EDH10TRBW1 document continuous drainage, while the EDH10TRBW1 instructions describe a gravity hose route. Confirm a Pump function in the exact model manual before using any pump procedure or ordering a pump.
What should I do if the hose is connected but water still goes into the tank?
With the unit off and dry, check the documented outlet plug/cap, hose seating and seal, kinks, twists, freeze points, elevations, and whether the drain end is lower than the unit. If the visible gravity path is correct, a hidden blockage or model-specific pump, float, sensor, or control fault needs service.
When should I call Electrolux service for a dehumidifier drainage problem?
Call when water reaches electrical parts, the tank/float will not seat, the hose or connector leaks or needs disconnection, a documented pump does not move water, or the unit will not drain after the exact tank, mode, hose, slope, and receiving-drain checks. Internal pump, pickup, sensor, wiring, and control work is not a user-level repair.
Read the exact guide
Official sources
- 21L 極適家居600除濕機 除濕適用27坪空間 (流光白) - ED2171WAElectrolux Taiwan · Directly confirms a concrete Electrolux dehumidifier model with continuous drainage, tank capacity, and full-tank automatic stop; do not generalize its controls or pump architecture to other models.
- EDH10TRBW1 Dehumidifier User ManualElectrolux · Directly applicable to EDH10TRBW1. It is used as a concrete model example for tank seating, gravity hose connection, no-kink/no-elevation routing, and electrical safety; exact model documentation governs other Electrolux units.
- 保固服務 | 伊萊克斯Electrolux Taiwan · Supports obtaining model-specific manuals and arranging service for Electrolux dehumidifiers; it is not a drainage repair procedure.
Community feedback
Share a repair observation
Share a plain-text repair observation. Accepted observations are published automatically; this page may take a moment to update.