
On this page
Start here
Quick answer
First identify the drainage method: a bucket-only unit should stop when its bucket is full and needs a correctly seated empty bucket; a continuous-drain setup relies on gravity and needs the correct cap removal, hose connection, and a hose that stays below the unit connection without kinks; a pump model needs its pump hose connected and free of blockage, kinks, or freezing. Frigidaire says small-diameter hoses can clog easily, and a blocked gravity hose can make the Full Bucket light appear because water backs up into the bucket. The PU error is specifically described as a failure to pump out the bucket, so do not apply that diagnosis to a model without a pump. Turn the unit off and unplug it before cleaning a bucket, hose, or filter, keep water away from controls and the outlet, and arrange service for a persistent pump failure, internal blockage, leak, damaged cord, burning smell, or water near electrical parts.
Before you begin
Safety first
- The user may identify the model, empty and refit an intact bucket, inspect visible hose routing and connectors, clean an accessible hose or bucket only with power disconnected and as the manual permits, and observe external leaks. Qualified personnel must handle internal pumps, trays, floats, controls, wiring, sealed systems, live testing, and any wet or damaged appliance.
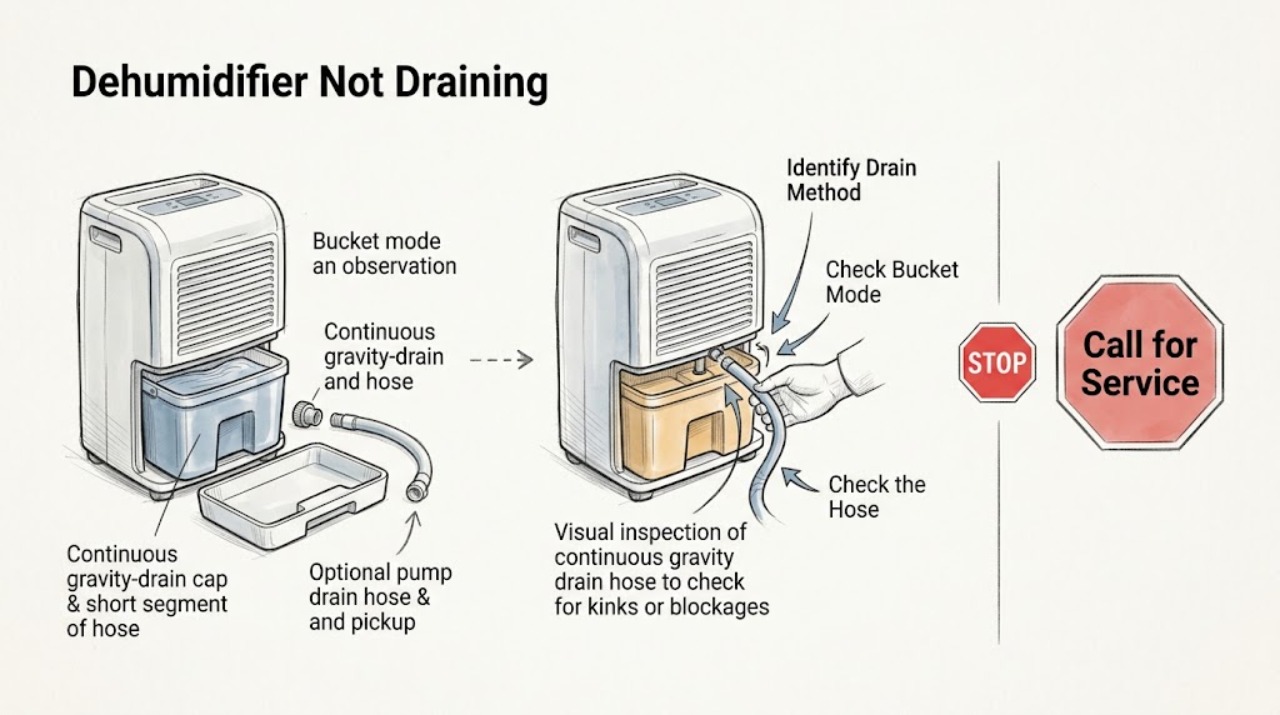
Work through in order
Diagnostic checks
Use only checks that match the exact appliance or system and its official guide.
-
Check 1
Turn the dehumidifier off, disconnect it from power, and identify whether it is being used with only its water bucket, a continuous gravity-drain hose, or a model-specific pump-drain hose. Record whether a Full Bucket light or a code such as PU is displayed, without assuming the code applies to every model.
Expected result: The unit has no drain hose, a hose that runs downhill by gravity, a pump hose and pump controls, or an unknown arrangement; the bucket is full, or a pump-related code is displayed.
Next step: Follow the bucket, gravity, or pump branch that matches the exact model and installation. If the model's drain capability is unclear, use its manual before changing caps or hoses.
Stop if: Do not add a pump hose to a non-pump model, remove a panel to search for a pump, or handle a wet plug, outlet, or control area.
Why this matters
Why: The drainage architecture determines the next check. A bucket-only or gravity unit cannot be diagnosed as a pump failure, while PU is meaningful only where the model has the pump-out function.
-
Check 2
For bucket operation, empty the bucket from a dry, stable position, inspect it for cracks or distortion, and refit it exactly as the owner's manual shows so its seating or float can be sensed. Do not pour water over the control panel or reach into a powered unit.
Expected result: The bucket was full; it was not seated correctly; the bucket is cracked or tilted; or an empty, correctly seated bucket still leaves the Full Bucket indication or no drainage response.
Next step: Correct only the bucket condition and make one normal collection observation. If the indication persists or water escapes around the bucket, stop and arrange service.
Stop if: Do not bypass the bucket sensor or float, operate with a cracked bucket, or open the cabinet to reach the tray or controls.
Why this matters
Why: A full or mis-seated bucket can stop normal operation. A crack or tilt can cause leaks. An empty, correctly seated bucket with a persistent indication may involve a float, sensor, tray, or control issue rather than a drain hose.
-
Check 3
For a model that supports continuous gravity drainage, verify that the continuous-drain cap and hose are installed exactly as the manual shows, that the hose is below the unit connection, and that it lies flat and as straight as practical without kinks. Check the visible connector, washer, and drain destination for leakage or blockage; disconnect and flush the hose with clean water only after power is off and the model procedure permits it.
Expected result: The cap or hose is wrong, the hose rises above the connection, a kink or small-diameter restriction is visible, sludge or algae is present, the connector leaks, or the path is clear and downhill but water still does not flow.
Next step: Correct only the documented hose routing or accessible blockage, then make one normal drainage observation. If drainage still fails or water backs into the bucket, use the exact model service path.
Stop if: Do not drill, enlarge, or modify the drain port, disconnect a pressurized water line, run the unit with a leaking connector, or use a hose path that can discharge onto electrical parts.
Why this matters
Why: The first four results support a gravity-flow restriction or connection leak. A clear, correctly sloped path with no flow may indicate an internal tray, outlet, installation, or model-specific problem; it does not prove a pump exists.
-
Check 4
Only for a model documented as pump-equipped or showing the model's PU pump-out indication, check the pump drain hose for a secure connection, visible kink, blockage, or freezing. With power disconnected, follow the owner's manual for emptying the bucket and checking the accessible bucket pickup for dirt or algae; do not disassemble the pump.
Expected result: The pump hose is loose, blocked, kinked, or frozen; the bucket pickup has accessible dirt or algae; the hose and pickup appear clear; or the model has no pump function.
Next step: Correct only the documented external hose or pickup condition, then turn the unit on and make one normal pump observation. If PU returns or the pump does not move water, stop and arrange service.
Stop if: Do not energize an open or wet unit, bridge a pump or float switch, use a different model's hose connection, or open the pump housing.
Why this matters
Why: A pump hose or pickup restriction can explain a pump-out failure. A clear path with recurring PU makes an internal pump, sensor, control, or wiring fault more likely. A non-pump unit requires the bucket or gravity branch instead.
-
Check 5
After the safe external drainage checks, inspect the floor and visible bucket or hose connector for ongoing water, and check the accessible cord and plug for moisture, heat, discoloration, or damage. Keep the unit level and keep water away from controls and the outlet.
Expected result: The leak is from a cracked or tilted bucket, a continuous-drain connector or washer, the base, or an unknown location; the cord or plug is damaged or hot; or there is no visible hazard but drainage still fails.
Next step: Stop using the unit for a base or unknown leak, electrical damage, odor, heat, or repeated failure and arrange qualified service. For a clearly cracked bucket or connector washer, use only exact-model-compatible parts after the diagnosis and manual confirm fit.
Stop if: Do not operate or charge near standing water, touch wet electrical parts, open the cabinet, or continue after burning smell, smoke, sparking, abnormal heat, or a repeated trip.
Why this matters
Why: Bucket and connector leaks may be visible user-level conditions, while a base leak, electrical damage, or persistent no-drain symptom can involve internal components or frost/collection-path faults.
Use your observations
Decision map
Find the observation that best matches what you see, then follow the next safe action.
-
PATH 01Safety boundary
What you see
The unit is in bucket mode and the bucket is full, not seated correctly, cracked, or tilted; normal collection resumes after emptying and correct refitting, or water leaks from the bucket.
Do this next
Use the exact manual's bucket seating procedure and make one normal collection observation. Replace only a confirmed damaged bucket with exact-model fitment; arrange service if the Full Bucket indication persists when empty.
Why this path and its safety boundary
Why it matters: A full or mis-seated bucket is more likely than a drain-hose or pump fault. A crack or tilt is a leak condition rather than proof of a blocked internal drain.
Safety stop: Do not bypass the bucket sensor, run with a cracked bucket, or open the cabinet to alter the float.
-
PATH 02Safety boundary
What you see
The model uses continuous gravity drainage and the hose is small, kinked, routed uphill, blocked with sludge or algae, disconnected, or leaking at the connector.
Do this next
With power off, restore the documented cap and hose arrangement, keep the hose below the connection and as straight as practical, and flush an accessible hose only as the manual permits. Make one normal drainage observation.
Why this path and its safety boundary
Why it matters: A gravity-flow or connection problem is more likely than a pump failure. A blocked hose can back water into the bucket and trigger the Full Bucket light.
Safety stop: Do not modify the port, use a hose path that discharges near electricity, or keep operating a leaking connector.
-
PATH 03Safety boundary
What you see
The exact model is pump-equipped and displays PU or shows a pump-out failure; the pump hose or bucket pickup is blocked, kinked, frozen, loose, or contaminated.
Do this next
Follow the pump model's external hose and bucket-pickup checks, power the unit normally once, and arrange service if PU returns or water still does not move.
Why this path and its safety boundary
Why it matters: Frigidaire defines PU as failure to pump out the bucket. The hose or pickup restriction is the supported user-level branch; the same code must not be applied to a non-pump model.
Safety stop: Do not open the pump, bridge a float switch, or use a pump procedure on a model that lacks the documented pump feature.
-
PATH 04Safety boundary
What you see
The bucket is correctly seated, the documented gravity or pump path is clear, and the unit still does not drain, repeatedly shows a fault, leaks from the base, or stops with abnormal sound or heat.
Do this next
Leave the unit unplugged if water or electrical symptoms are present and arrange Frigidaire service. Provide the model, drain method, code, hose routing, bucket result, and whether the failure was continuous or intermittent.
Why this path and its safety boundary
Why it matters: An internal tray, float, pump, valve, sensor, control, frost, or wiring issue is possible, but the external checks cannot identify the failed component safely.
Safety stop: Do not remove panels, access the pump or controls, perform live testing, or keep restarting a wet, hot, smoking, sparking, or damaged unit.
Helpful context
Understand the symptom
Start with the drainage architecture
“Not draining” can mean a full bucket that has not been emptied, a gravity hose that has no downhill path, or a pump-equipped model that cannot push water through its pump hose. A bucket-only unit has no pump path to troubleshoot. Confirm the model's drain options and whether a pump hose or pump control is actually present before interpreting a light or error.
Gravity drainage needs slope and a clear hose
Frigidaire describes water being directed from the collection tray to a gravity drain when the continuous-drain cap is removed and a hose is fitted. The hose must remain below the connection, lie as flat and straight as possible, and avoid small diameters, kinks, sludge, algae, or a blocked destination. A hose blockage can send water back to the bucket and make the Full Bucket light come on even though the hose is connected.
Pump drainage is a separate, model-dependent path
Frigidaire's PU article applies to a dehumidifier with a pump-out function. It calls PU a failure to pump out the bucket and directs the owner to inspect the pump drain hose and bucket pickup for a blockage, kink, or freezing. Frigidaire's care page likewise refers to pump blockage only for pump models. Do not install a pump hose, expect a pump error, or open the cabinet simply because a non-pump unit is not draining.
Water and electricity change the stopping point
Disconnect power before cleaning the bucket, hose, filter, or cabinet. Frigidaire warns that excess water around controls or vents can damage the unit, and a leaking bucket or continuous-drain connector needs a level floor, an intact bucket, and a sound washer. Do not keep operating a unit that leaks toward the outlet, has a damaged cord, smells burned, overheats, or repeatedly trips power.
Safety boundary
Stop conditions
- Stop using the dehumidifier for water near the outlet or controls, a base leak, damaged or hot cord or plug, burning odor, smoke, sparking, abnormal heat, or a repeated electrical trip.
- Do not assume every Frigidaire dehumidifier has a pump; do not apply PU troubleshooting, pump hoses, or pump parts to a model without that documented feature.
- Do not open the cabinet, pump, tray, control, wiring, sealed refrigeration circuit, or float switch, and do not perform live electrical testing.
- Do not run the unit with a cracked bucket, leaking connector, unsafe hose discharge, or recurring Full Bucket/PU indication after the exact model's external checks.
When checks do not resolve it
Need a professional?
Arrange Frigidaire service when a correctly seated bucket still shows Full Bucket, a correctly routed gravity hose does not drain, PU returns on a documented pump model, water leaks from the base or an unknown location, or any electrical, heat, odor, smoke, or repeated-failure symptom is present.
Safety scope: The user may identify the model, empty and refit an intact bucket, inspect visible hose routing and connectors, clean an accessible hose or bucket only with power disconnected and as the manual permits, and observe external leaks. Qualified personnel must handle internal pumps, trays, floats, controls, wiring, sealed systems, live testing, and any wet or damaged appliance.
Common questions
FAQ
Why is my Frigidaire dehumidifier not draining into the hose?
First confirm that the model supports continuous gravity drainage and that the cap and hose are installed as the manual shows. The hose must stay below the unit connection, lie flat and as straight as practical, and be free of kinks, sludge, algae, and a blocked destination. A blockage can back water into the bucket and turn on Full Bucket.
Do all Frigidaire dehumidifiers have a drain pump?
No. Frigidaire's support material distinguishes ordinary bucket and continuous gravity drainage from pump-model troubleshooting. Confirm the exact model's documented pump feature before using a pump hose or interpreting PU.
What does PU mean on a Frigidaire dehumidifier?
On an applicable pump-equipped model, Frigidaire defines PU as failure to pump out the bucket. Check the pump hose for connection, blockage, kink, or freezing and the accessible bucket pickup for dirt or algae, then follow the model's normal restart instruction. Do not apply PU to a model without a pump.
Why does Full Bucket stay on when my drain hose is connected?
A full or mis-seated bucket can trigger the light, and Frigidaire also says a blocked continuous-drain hose can cause water to back up into the bucket. Check the bucket seating and the gravity hose's size, downhill routing, kinks, and visible blockage with power disconnected.
When should I stop using a Frigidaire dehumidifier that will not drain?
Stop for a base or unknown leak, water near controls or the outlet, a damaged or hot cord or plug, burning odor, smoke, sparking, abnormal heat, or a recurring Full Bucket or PU condition after the model-appropriate external checks. Unplug it safely and arrange service rather than opening the cabinet.
Read the exact guide
Official sources
- Dehumidifier - Clean and CareFrigidaire · Supports power disconnection before cleaning, careful wiping around controls and vents, bucket cleaning, and the explicit limitation that pump blockage is relevant to pump models.
- Dehumidifier Error Code PUFrigidaire · Supports only the pump-equipped dehumidifier path: PU means failure to pump out the bucket, with checks for pump-hose connection, blockage, kink, freezing, and bucket pickup contamination. It must not be applied to non-pump models.
- Dehumidifier - Not DrainingFrigidaire · Supports bucket-mode and continuous gravity-drain checks across the Frigidaire dehumidifier support topic: full bucket, cap/hose arrangement, hose size, hose level/routing, and sludge or algae blockage. It does not establish that every model has a pump.
- DehumidifiersFrigidaire · Supports that Frigidaire maintains separate model/topic paths for not draining, PU, leaks, frost, no power, and other dehumidifier symptoms; it is not a substitute for an exact model manual.
- Dehumidifier - Water Leaking IssuesFrigidaire · Supports visible bucket, connector/washer, level-floor, and base-leak branches; it does not identify internal drain components or authorize cabinet disassembly.
Community feedback
Share a repair observation
Share a plain-text repair observation. Accepted observations are published automatically; this page may take a moment to update.