
On this page
Start here
Quick answer
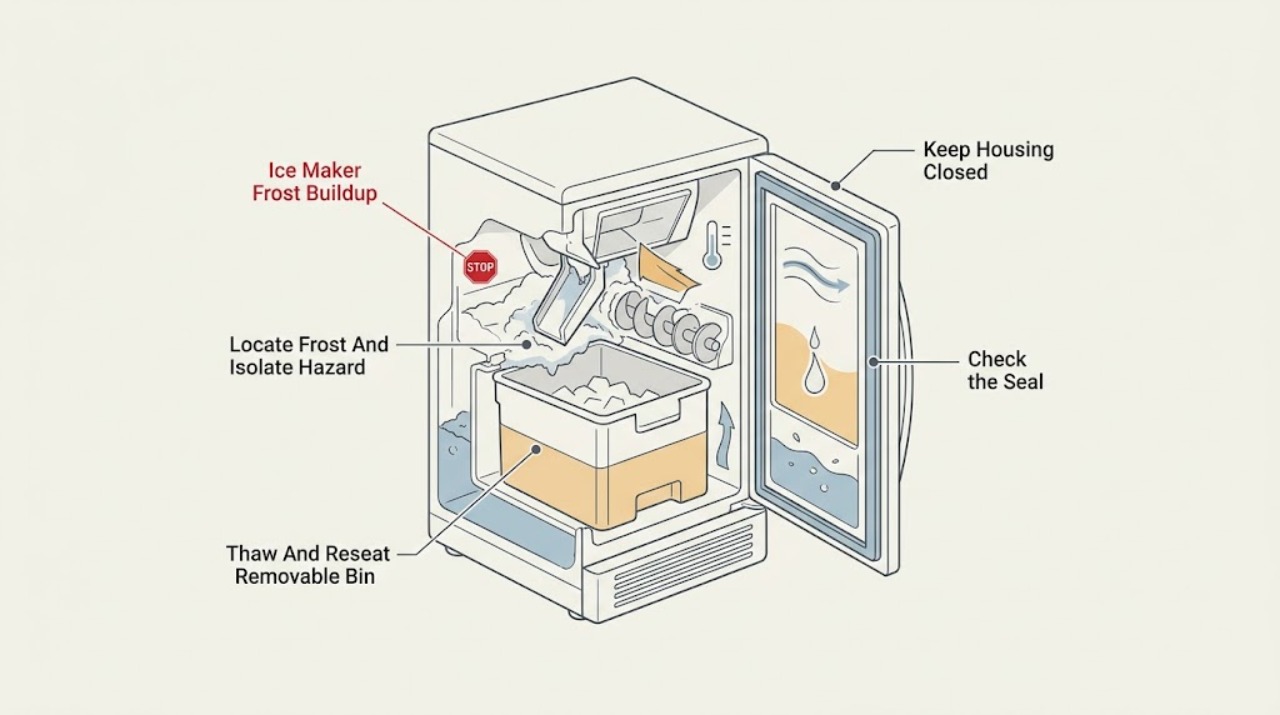
First locate the frost: in the removable ice bin, around the dispenser chute/flap, on the ice maker or water-fill area, or across the freezer compartment. Electrolux says frost forms when warm moist air meets a below-freezing surface; an incompletely sealed door, a warped gasket, a chute flap that does not close, very cold settings, or blocked airflow can contribute. If ice has melted and refrozen around the auger or jams the chute, remove the ice bin, let the removable bin thaw safely away from the appliance, empty it, wipe it dry, and reinstall it as the model directs. Do not chip frost with a knife, screwdriver, or other sharp tool, and do not use a heat gun, hair dryer, or forced hot air. Check that the door closes and seals, the chute closes fully, vents are clear, and the water supply/filter and ice-maker setting are correct for the model. A frozen water line, recurring frost after a good seal, or frost concentrated around internal heater, fan, valve, or ice-maker parts needs qualified diagnosis. Stop for water near electrical parts, a damaged gasket or liner, smoke, sparks, burning odor, or a leak that cannot be contained.
Before you begin
Safety first
- The user may turn off the ice maker, inspect door/gasket/chute closure, remove and safely thaw a removable bin as the exact manual permits, wipe it dry, check visible vents and settings, and inspect visible water/filter/valve conditions without disturbing pressure. Internal water lines, fill valves, ice-maker drives, heaters, fans, defrost systems, controls, wiring, live tests, forced thawing, and panel removal are for qualified personnel.
Work through in order
Diagnostic checks
Use only checks that match the exact appliance or system and its official guide.
-
Check 1
From a dry position, photograph or note where frost is visible: removable ice bin/auger, dispenser chute or flap, ice-maker mold and fill area, water-line area, door edge/gasket, vents, or a broad freezer surface. Look for water near electrical parts, a damaged liner or gasket, smoke, sparks, burning/electrical odor, or a hot/damaged cord. Turn the ice maker off through the documented control if frost blocks movement; do not touch frozen mechanisms.
Expected result: Frost is confined to clumped bin/chute ice, sits at a door or chute seal, surrounds a water-fill area, blocks a vent, covers a broad compartment, or a safety hazard is present.
Next step: For a hazard, stop the ice maker and refrigerator functions as safely possible and arrange service. Otherwise continue with the matching visible checks, keeping the frost intact until its location is recorded.
Stop if: Do not chip, pry, puncture, or heat the frost; do not touch wet electrical parts or keep operating after smoke, sparks, burning odor, or a damaged liner appears.
Why this matters
Why: A confined bin/chute pattern makes melt-and-refreeze or flap closure more likely; a door-edge or broad pattern makes warm-air entry, temperature, or airflow more likely; a water-fill pattern raises a frozen line or internal valve/defrost question. A hazard overrides all further checks.
-
Check 2
If the model has a removable ice bin and frost or wet clumped ice is around the auger or inside the bin, turn off dispensing and remove the bin only as the exact manual directs. Let the bin thaw at room temperature away from electrical parts, empty it, clean and wipe it completely dry, and reinstall it fully. Do not rotate or force the auger, and do not use a knife, screwdriver, hair dryer, heat gun, boiling water, or other forced heat.
Expected result: The bin contains melted-and-refrozen clumps or an auger jam, the bin was not seated fully, the chute remains blocked, or the bin is clean, dry, and correctly fitted but frost returns.
Next step: Reinstall the dry bin and verify the chute flap closes fully before one normal dispensing test. If the bin will not seat, the auger will not move without force, or frost returns, stop dispensing and arrange service.
Stop if: Never chip ice, apply forced heat, reach into the auger or ice-maker mechanism, or operate with a cracked bin, damaged chute, or door that cannot close.
Why this matters
Why: Electrolux identifies infrequent use, temperature fluctuations, and power outages as conditions that can melt ice and refreeze it around the auger or chute. A clean, dry, correctly seated bin that refrosts shifts attention to door/chute sealing, temperature, airflow, water-line, or internal ice-maker causes.
-
Check 3
Inspect the freezer door or drawer and the dispenser opening without removing trim. Make sure no package holds the door open, the gasket contacts the cabinet evenly and is not visibly warped, dirty, torn, or detached, and the ice chute flap closes completely rather than resting on a cube. Minimize door openings while observing whether humid room air or condensation is entering.
Expected result: A door/gasket gap, warped seal, trapped ice at the chute flap, frequent/prolonged door opening, or a normal continuous seal is present.
Next step: Remove only a visible obstruction and clean/dry the accessible seal contact area as the exact manual permits. Arrange service for a damaged gasket, door, flap, alignment, or liner; do not bend, glue, or heat the seal.
Stop if: Do not remove the door or dispenser, force the flap, chip ice from the seal, or run the appliance with a visible gap that allows water toward electrical parts.
Why this matters
Why: Electrolux identifies a door or gasket that does not seal and an ice-chute flap that does not close as frost sources. Persistent frost with a good visible seal makes airflow, temperature, water-line, defrost, heater, fan, or control causes more likely.
-
Check 4
Using the exact model manual, check that food is not blocking freezer vents, the temperature is not set colder than recommended, and the ice maker is enabled only when the water supply is connected. Check the visible water valve position, filter seating, and supply line for an obvious kink or disconnection without pulling the refrigerator or disturbing a pressurized connection. Note any frost or ice around the fill tube.
Expected result: A vent is blocked, the setting is unusually cold, the ice maker is on without a connected water supply, the visible line/filter/valve state is abnormal, or airflow and settings are normal but frost persists.
Next step: Restore only the documented airflow, temperature, filter, water-valve, or ice-maker control condition once. If frost surrounds an inaccessible fill path or the water connection is damaged, keep the ice maker off and arrange service.
Stop if: Do not pull out a built-in refrigerator, thaw a water line with heat, loosen a pressurized fitting, puncture tubing, or bypass the ice-maker water valve.
Why this matters
Why: Electrolux identifies blocked airflow and very low temperature as frost contributors. Its ice-maker guidance warns that an enabled maker without water can make the fill valve chatter and requires secure plumbing and an open valve. Normal visible conditions make an internal frozen line, valve, defrost, heater, fan, sensor, or control issue more likely.
-
Check 5
After a safe bin/chute, seal, airflow, temperature, and visible water-supply correction, monitor the exact location and timing of frost without forced thawing. Record whether it returns around the same chute, door edge, fill area, ice-maker mold, or broad freezer surface; also note ice production, dispenser operation, freezer temperature, water drips, fan sounds, and any alarm or code.
Expected result: Frost stops after a dry-bin or seal correction, returns at the chute/door, returns at an inaccessible fill area or ice-maker mechanism, spreads across the compartment, or is accompanied by poor ice production, leaks, abnormal fan/compressor behavior, or a code.
Next step: Keep the ice maker off for a recurring internal or leak pattern and arrange qualified diagnosis. Provide the frost location, photos, model, temperature, water/filter status, door/chute condition, and timing.
Stop if: Do not continue cycles to force a diagnosis, scrape the evaporator or fill tube, remove internal covers, or work around the heater, fan, valve, or wiring.
Why this matters
Why: A stopped recurrence supports a removable-bin, chute, door-seal, moisture, airflow, or setting condition. Repeated localized frost at an internal water or ice-maker area, spreading frost, water leakage, or performance loss raises the likelihood of a water-line, valve, defrost, heater, fan, sensor, or control fault.
-
Check 6
If frost persists after the visible checks, keep the ice maker off and leave the refrigerator in its safest stable state. Record the exact model, frost location and thickness, door/chute seal condition, bin/auger status, freezer temperature, ice and water production, supply/filter observations, and any leak, fan, compressor, heater, alarm, odor, or electrical event. Do not open panels or attempt a forced defrost.
Expected result: The frost returns at an internal line or ice-maker assembly, the dispenser or water path leaks, the freezer has a broad or recurring frost pattern, a fan/heater/defrost behavior is abnormal, or any electrical/water hazard appears.
Next step: Stop using the affected ice-maker function and arrange qualified Electrolux/appliance service; isolate water or power only when safe and without touching wet electrics. Give the technician the model and diagnostic record.
Stop if: Do not remove panels, bypass a thermostat or door switch, puncture the liner or tubing, use hot air, perform live tests, or replace internal parts based on frost location alone.
Why this matters
Why: The likely scope has moved beyond a removable-bin or visible-seal correction. An internal water line, fill valve, ice-maker mechanism, defrost heater/system, fan, sensor, control, wiring, or door/liner problem may be involved, and frost location cannot select a part. A hazard requires stop-use handling.
Use your observations
Decision map
Find the observation that best matches what you see, then follow the next safe action.
-
PATH 01Next step
What you see
Frost or wet clumped ice is confined to the removable ice bin, auger, or dispenser chute after infrequent use, temperature fluctuation, power interruption, or a cube preventing the chute/flap from closing.
Do this next
Remove the bin only as directed, thaw it safely at room temperature, empty and wipe it dry, clear only loose ice, and reinstall it fully. Do not use sharp tools or forced heat; service is needed if it will not seat or refreezes.
Why this path and its safety boundary
Why it matters: Melt-and-refreeze or a chute closure problem is more likely than an internal defrost failure. Electrolux describes ice refreezing around the auger or jamming the chute in this pattern.
-
PATH 02Next step
What you see
Frost is concentrated at the freezer door edge, gasket, or chute perimeter, and the door/gasket has a gap, warping, dirt, damage, or a flap held open by ice.
Do this next
Remove visible obstructions and clean/dry the accessible seal contact as the manual permits. Arrange service for a damaged gasket, door, chute flap, or liner; do not heat or reshape the seal.
Why this path and its safety boundary
Why it matters: Warm humid air entering through the door or chute is more likely. Electrolux identifies gasket/door sealing and a chute flap that does not close as frost sources.
-
PATH 03Next step
What you see
Vents are blocked, the temperature is colder than the model recommends, the ice maker is enabled without water, or the visible water/filter/valve state is kinked, disconnected, or abnormal.
Do this next
Correct only the documented vent, temperature, filter, valve, or ice-maker control condition once. Keep the ice maker off and arrange service for an inaccessible or recurring water-path frost.
Why this path and its safety boundary
Why it matters: Blocked airflow, over-cold operation, or an ice-maker water-supply condition can contribute to frost, poor ice production, or valve chatter. A visible normal supply does not rule out a frozen internal line or valve.
-
PATH 04Safety boundary
What you see
Frost repeatedly returns around the fill area, ice-maker assembly, evaporator/vent area, or broad freezer compartment after the door, chute, bin, airflow, temperature, and visible water checks are normal.
Do this next
Turn off the ice maker, preserve the frost location and photos, and arrange qualified Electrolux/appliance diagnosis. Do not attempt internal thawing, panel removal, or part replacement.
Why this path and its safety boundary
Why it matters: An internal water line, fill valve, ice-maker mechanism, defrost heater/system, fan, sensor, control, or door/liner issue is more likely. Frost location cannot identify which component failed.
Safety stop: Do not use a heat gun or hair dryer, puncture tubing or liner, scrape coils, bypass controls, or perform live tests.
-
PATH 05Safety boundary
What you see
Frost meltwater or a supply leak reaches electrical parts, or there is smoke, sparks, burning odor, a hot/damaged cord, damaged liner, uncontrolled water, or repeated electrical trips.
Do this next
Stop ice making and isolate water or power only from a dry safe position. Keep people away from the area and arrange qualified service; do not restart to test.
Why this path and its safety boundary
Why it matters: This is a stop-use safety condition, not a frost-removal task. Water, energized parts, defrost heaters, valves, and wiring can create shock, fire, or further appliance damage.
Safety stop: Do not touch wet electrical parts, reset a breaker repeatedly, remove panels, or attempt to contain an internal water or electrical fault.
Helpful context
Understand the symptom
Map the frost before trying to remove it
Frost in an ice bin or chute is not the same as frost around a water-fill tube or across the freezer. A bin with wet, clumped ice points toward melt-and-refreeze or temperature fluctuations; frost at the chute flap points toward warm air entering through an incomplete closure. Frost on a door edge or broad freezer area points toward a gasket, door, temperature, or airflow condition. Photograph the location and keep the ice maker off if the frost is blocking movement; never scrape it with a sharp tool.
Check the bin, auger, chute, and door seal
Remove only a removable ice bin that the exact manual says the user may remove. Let it thaw safely, empty it, wipe it dry, and reinstall it without forcing the auger. Check that the bin sits fully back, the chute flap closes flush, and the freezer door or drawer closes without a package interfering. A dirty, warped, or damaged gasket can admit humid air; a chute flap held open by ice can do the same.
Rule out airflow, temperature, and water-supply conditions
Electrolux identifies blocked vents, extremely low temperature settings, and poor door sealing as frost contributors. Keep food from blocking vents and use the exact model's recommended temperature. For the ice maker, check only the visible water connection, valve-open state, filter seating, and ice-maker on/off control; do not pull the refrigerator or disturb a pressurized line. A frozen internal fill line or valve requires service rather than a forceful thaw.
Defrost and internal ice-maker components stay behind the service boundary
If frost returns after a sound seal, clear chute, correct airflow, and properly seated bin, the source may be an internal water line, fill valve, heater, fan, defrost system, sensor, control, or ice-maker mechanism. Frost location can guide a technician but cannot prove a part. Do not use a heat gun or hair dryer, puncture a liner or tube, bypass a thermostat or door switch, or open panels.
Safety boundary
Stop conditions
- Stop immediately for water near electrical parts, smoke, sparks, burning/electrical odor, a hot or damaged cord, a damaged liner or gasket, uncontrolled water, or repeated breaker trips.
- Do not chip or pry frost with knives, screwdrivers, picks, or other sharp tools, and do not use a heat gun, hair dryer, boiling water, or forced hot air to thaw the ice maker, chute, liner, or water line.
- Do not reach into the auger, ice-maker mechanism, fill tube, fan, or defrost area; do not remove internal covers, puncture tubing/liner, or bypass a door switch, thermostat, heater, valve, or control.
- Turn off the ice maker and keep the refrigerator stable if frost blocks movement, the bin will not seat, the door/chute will not close, or a water line is leaking.
- Use the exact model manual for bin removal, temperature, filter, water-supply, and ice-maker controls; do not pull out a built-in refrigerator or disturb a pressurized connection.
- Arrange qualified service for recurring frost after visible checks, frost at an inaccessible fill or internal assembly, poor ice/water production, broad freezer frost, abnormal fan/defrost behavior, or any water/electrical hazard.
When checks do not resolve it
Need a professional?
Arrange qualified Electrolux/appliance service when frost returns after the bin/chute, door/gasket, airflow, temperature, filter, and visible water-supply checks; when the frost is at an inaccessible fill line, ice-maker assembly, evaporator, heater, fan, or defrost area; or when ice/water production becomes abnormal. Stop immediately for water near electrical parts, smoke, sparks, burning odor, a hot/damaged cord, damaged liner, uncontrolled water, or repeated electrical trips. Do not use sharp tools or forced heat and do not remove panels or bypass internal controls.
Safety scope: The user may turn off the ice maker, inspect door/gasket/chute closure, remove and safely thaw a removable bin as the exact manual permits, wipe it dry, check visible vents and settings, and inspect visible water/filter/valve conditions without disturbing pressure. Internal water lines, fill valves, ice-maker drives, heaters, fans, defrost systems, controls, wiring, live tests, forced thawing, and panel removal are for qualified personnel.
Common questions
FAQ
Why is my Electrolux ice maker frosting up?
First identify whether frost is in the ice bin, around the dispenser chute, at the door gasket, around the fill area, or across the freezer. Electrolux identifies warm-air entry through a poor door/gasket or chute seal, very low settings, and blocked airflow as frost causes. A recurring internal fill-area pattern needs service diagnosis.
How do I safely clear frost from an Electrolux ice bin or chute?
Turn off dispensing and remove the removable bin only as the exact manual permits. Let it thaw safely at room temperature away from electrical parts, empty it, wipe it dry, and reinstall it fully. Electrolux describes this approach for an ice jam. Do not use a knife, screwdriver, hair dryer, heat gun, boiling water, or forced heat, and do not force the auger or flap.
Can the ice-chute flap or door gasket cause frost around an Electrolux ice maker?
Yes. Electrolux identifies a door/gasket that does not seal and an ice-chute flap that does not close as frost sources because warm humid air can enter the below-freezing compartment. Check for a cube blocking the flap and visible gasket damage or gaps; arrange service for a damaged seal, door, flap, or liner.
Could a frozen water line cause Electrolux ice-maker frost?
Frost concentrated around the fill area or an ice maker that stops filling can indicate a water-path condition, but frost alone cannot identify a frozen line or valve. Check only the visible water valve, supply connection, filter seating, and ice-maker setting. Keep the ice maker off for a recurring or inaccessible fill-area problem and arrange qualified service; do not heat or puncture the line.
Why does frost return after I clean the Electrolux ice bin?
A dry, correctly seated bin that refrosts can mean the chute flap or door gasket is admitting moist air, the freezer airflow or temperature is wrong, or an internal water, ice-maker, defrost, heater, fan, or control issue remains. Check only visible seals, vents, settings, and water connections. Recurring frost at an internal area needs service rather than repeated thawing.
When should I stop troubleshooting Electrolux ice-maker frost?
Stop for water near electrical parts, smoke, sparks, burning odor, a hot or damaged cord, a damaged liner or gasket, uncontrolled water, or repeated electrical trips. Also stop if frost is inaccessible, returns after visible checks, blocks the ice-maker mechanism, or is paired with leaks or abnormal cooling. Do not use sharp tools or forced heat, remove panels, bypass controls, or work on the water line, valve, heater, fan, or defrost system.
Read the exact guide
Official sources
- My refrigerator was just installed and the ice maker is not working, how do I fix it?Electrolux · Model-family guidance for ice-maker on/off state, priming, water supply, valve chatter without water, initial cooling/production, and model-specific setup.
- Refrigerator Error Code DI SP or DISP - Ice JamElectrolux · Model-specific ice-bin/chute guidance for melt-and-refreeze, auger jams, bin thawing, drying, and reset; other models may use different controls.
- Refrigerators - How do I use my ice maker in my Top-Freezer refrigerator?Electrolux · Model-family guidance for secure plumbing, open water valve, bin placement, signal arm, and valve chattering without water; other ice-maker designs differ.
- Refrigerators / Freezer - Frost Build UpElectrolux · General Electrolux refrigerator guidance for warm-air frost formation, door/gasket sealing, ice-chute closure, temperature, and airflow; exact refrigerator and ice-maker models differ.
Community feedback
Share a repair observation
Share a plain-text repair observation. Accepted observations are published automatically; this page may take a moment to update.