
On this page
Start here
Quick answer
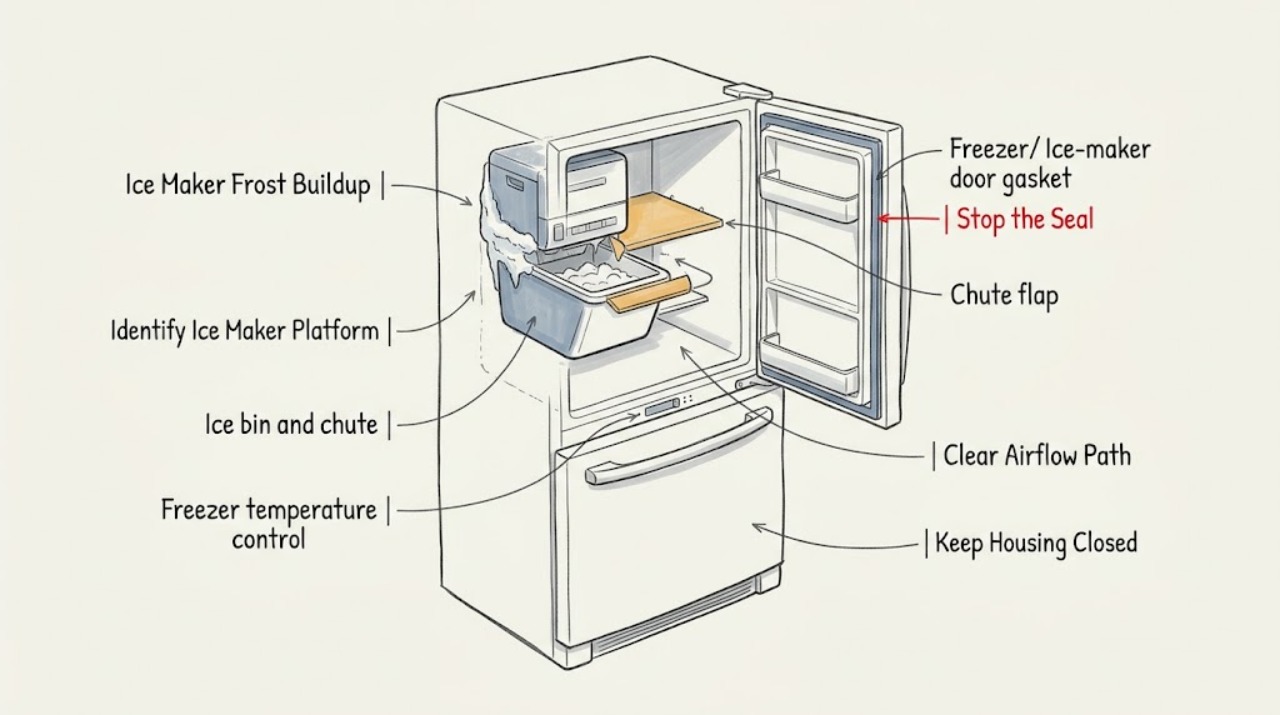
First locate the frost before assuming the ice maker itself is defective. Frost only on the ice bin or dispenser chute is often an accessible air-seal or ice-path issue: check that the ice chute flap closes, the door or freezer gasket seals, and no ice or food prevents closure. Frost on the maker compartment or across the freezer points more toward warm-air entry, a temperature or airflow problem, or a hidden evaporator/defrost issue. Frigidaire's automatic-ice-maker guidance applies to refrigerators with ice makers, including French Door, Side-by-Side, and Top Freezer platforms, but the switch, bin, and controls are model-specific. With power and water left safe, remove only loose, visible ice as the exact manual permits; never use a knife, pick, hair dryer, heat gun, boiling water, or force on the mold, chute, or fan. If frost returns quickly, blocks a door or fan, affects the whole freezer, causes leakage, or requires panels or internal testing, turn the ice maker off if the model allows and arrange qualified appliance service.
Before you begin
Safety first
- The user may identify the automatic-ice-maker model and frost location, inspect visible bin/chute/gasket/vent conditions, use normal temperature and maker controls, and follow model-authorized filter or priming instructions. Qualified personnel must handle bonded frost behind covers, evaporators, defrost heaters, fans, water valves, ice-maker mechanisms, sensors, controls, wiring, live testing, and any wet or electrically damaged appliance.
Work through in order
Diagnostic checks
Use only checks that match the exact appliance or system and its official guide.
-
Check 1
Identify the exact Frigidaire refrigerator model and confirm that it has an automatic ice maker. Without removing panels, note whether the frost is on the ice bin, the dispenser chute, the ice-maker body, the freezer wall or ceiling, the door gasket, or the vents; also record whether the ice maker is in a French Door, Side-by-Side, or Top Freezer layout.
Expected result: Only the chute or bin has frost; the maker compartment is frosted; the entire freezer or rear wall is frosted; vents are iced; or the appliance has no automatic ice maker.
Next step: Use the localized branch or whole-freezer branch that matches the observation. Keep the exact model manual available because the maker switch, bin release, chute construction, and permitted cleaning vary by platform.
Stop if: Do not pull a built-in ice maker, remove a door or evaporator cover, or use a tool to probe through frost while identifying the location.
Why this matters
Why: A localized chute/bin pattern makes an air seal, chute flap, bin seating, or ice clump more likely. Frost across the maker housing, vents, or freezer points toward a wider temperature, airflow, evaporator, or defrost path. A manual tray or different appliance is outside this page's scope.
-
Check 2
For frost limited to the bin or chute, inspect the visible ice container, chute opening, flap, and door or freezer gasket with the refrigerator closed and stable. Check whether an ice clump, bin edge, food item, or gasket deformation prevents the flap or door from closing fully. Clean a visibly dirty gasket only by the model-approved method and do not force the flap.
Expected result: Ice is wedged in the chute; the flap does not sit closed; the bin is not seated; the gasket has a visible gap or dirt; or the chute, bin, and gasket appear to close normally.
Next step: Remove only a loose, accessible ice obstruction if the exact manual permits, seat the bin normally, clean the gasket, and make one observation after the compartment is closed. Arrange service if the flap or gasket remains damaged or frost returns.
Stop if: Do not pry the flap, chip bonded ice, bend the gasket, remove the chute, or reach into an operating auger or fan.
Why this matters
Why: Frigidaire states that an ice chute flap that does not close and a door gasket that fails to seal can admit warm air and create frost. A normal flap and gasket make a hidden air leak, temperature, or internal frost issue more likely than a loose surface ice cube.
-
Check 3
Check the normal freezer temperature setting and visible airflow without opening internal panels. For electronic controls, Frigidaire's general guidance lists 0°F as the factory-suggested freezer setting; compare the display with the exact model manual rather than setting it colder to force ice production. Confirm food is not touching vents and the door closes without obstruction.
Expected result: The freezer is set unusually cold; vents are blocked; the door has been left open; the freezer temperature is unstable or warm; or the setting, vents, and closure appear normal.
Next step: Restore only the documented temperature setting, clear visible food blockage, and close the door fully. Allow the appliance to stabilize as the manual directs; if frost covers the vents or returns, stop trying to adjust the control and arrange service.
Stop if: Do not lower the control repeatedly, cover or scrape vents, remove an evaporator cover, or continue using the appliance if food safety or cooling is clearly compromised.
Why this matters
Why: Frigidaire says temperatures below the recommended 0°F can over-freeze products and contribute to frost, while blocked airflow and a door that does not seal can also accumulate frost. A warm or unstable freezer is not an ice-maker-only symptom and may require broader cooling service.
-
Check 4
Check only the normal user controls for the automatic ice maker and the visible water/filter condition described by the exact model guide. Confirm the maker is enabled if the model has an On/Off control, the filter is not overdue or visibly leaking, and the water supply line is not visibly kinked. A newly installed unit or newly changed filter may need the model's documented priming procedure.
Expected result: The maker is off, the filter is overdue or cracked, water is slow or absent, the supply line is kinked, the unit is newly installed, or the maker is enabled and water access appears normal.
Next step: Use only the exact model instructions to enable the maker, replace a compatible filter, correct a visible line position without pulling the appliance dangerously, or prime a new water system. If frost or a no-ice symptom remains, record it and arrange service.
Stop if: Do not disconnect water lines, open a valve, bypass an ice-maker switch, force a frozen ejector, or order a filter or part without model fit confirmation.
Why this matters
Why: Frigidaire links ice production to the maker's enabled state, filter condition, water flow, supply line, installation/priming, and freezer temperature. These checks can explain poor ice production but do not prove that frost on the maker is caused by a valve or mold assembly.
-
Check 5
With the ice maker and dispenser stopped, inspect the visible frost pattern and any water below the ice bin or chute. Look for a small loose surface layer, an ice bridge or clump, repeated wetness, frost around a door opening, or a solid mass extending behind a cover. Do not remove a cover to see farther into the maker or freezer.
Expected result: A loose surface piece is present; a chute is packed with ice; water has leaked from melting ice; frost is bonded behind a cover; or frost is spreading across the freezer and vents.
Next step: Follow the exact manual for any permitted bin/chute cleanup. If the frost is bonded, recurring, leaking, or widespread, leave the maker off if the model permits and arrange qualified appliance service.
Stop if: Do not use a knife, screwdriver, pick, hair dryer, heat gun, flame, boiling water, or other heat source; do not wipe water near electrical parts while energized.
Why this matters
Why: A small accessible clump can obstruct the chute, while frost accompanied by water can reflect melting ice or air leakage. Bonded frost behind a cover or frost across the freezer suggests an internal airflow, evaporator, defrost, fan, or seal issue that cannot be safely cleared by force.
-
Check 6
After one safe, model-authorized correction—such as closing the chute, seating the bin, clearing a visible vent obstruction, restoring the documented temperature setting, or correcting a filter state—observe the next normal ice-making period without repeatedly opening the door or changing several settings at once. Record whether the frost clears, stays localized, returns quickly, or spreads.
Expected result: Frost does not return after the air-path correction; a small localized layer returns; frost returns quickly at the same seal or chute; or frost spreads to the maker housing, wall, vents, or whole freezer.
Next step: Use the appliance only if it is cooling normally and no hazard or leak is present. For recurring or widespread frost, stop the ice maker if allowed and provide the exact model and pattern to qualified service.
Stop if: Do not keep cycling the maker, repeatedly reset controls, remove covers, or continue operation with a blocked fan, leaking water, damaged gasket, or electrical hazard.
Why this matters
Why: A stable result after a visible correction supports an air-path, loading, or control-state cause. Quick recurrence or spreading frost points toward a continuing seal, temperature, airflow, defrost, fan, water, or refrigeration issue rather than an ordinary ice clump.
-
Check 7
Prepare a service record with the exact model, refrigerator platform, ice-maker location, frost location and depth as visible, door/chute/gasket result, temperature setting, vent condition, maker On/Off state, filter and water observations, and whether the frost returned after one documented correction.
Expected result: The issue resolved after a visible correction; frost remains localized but recurs; frost covers an internal or inaccessible area; ice production stopped; or cooling, leakage, or electrical symptoms are present.
Next step: Leave the ice maker off when the model permits and arrange Frigidaire or qualified appliance service for recurring, bonded, widespread, leaking, or cooling-related frost. Give the technician the pattern and photographs if safely taken from outside.
Stop if: Do not dismantle the ice maker, remove evaporator or door panels, test live circuits, pierce tubing, or order an ice-maker assembly based only on frost.
Why this matters
Why: A one-time loose clump or closure obstruction is different from recurring frost or widespread freezer icing. Persistent frost can involve a seal, defrost system, fan, evaporator, water valve, maker, or control, and the frost pattern alone cannot select a safe part.
Use your observations
Decision map
Find the observation that best matches what you see, then follow the next safe action.
-
PATH 01Safety boundary
What you see
Frost is limited to the dispenser chute, flap, or the outside surface of the ice bin, while the rest of the freezer is clear and cold.
Do this next
Check visible closure and seating, remove only loose ice the exact manual permits, and observe one normal period. Arrange service if the flap or gasket cannot close or frost rapidly returns.
Why this path and its safety boundary
Why it matters: A chute flap that is not closing, a bin that is not seated, an ice clump, or warm-air entry at the door is more likely than a whole-freezer defrost failure. Frigidaire specifically identifies an incompletely closed chute as a frost source.
Safety stop: Do not pry or heat the flap, disassemble the chute, or reach into an auger or fan.
-
PATH 02Safety boundary
What you see
Frost surrounds the automatic maker or appears behind an ice-maker cover rather than only on loose bin ice.
Do this next
Check only the visible door/gasket, temperature, and vent conditions. Do not remove the maker cover; stop the maker if the model allows and arrange service for bonded or recurring frost.
Why this path and its safety boundary
Why it matters: The frost may reflect warm-air entry, a temperature or airflow condition, or an internal evaporator/defrost/fan problem. The visible housing does not establish that the ice-maker motor, valve, or mold is the failed part.
Safety stop: Do not chip the housing, use heat, force an ejector, or access the evaporator, fan, wiring, or controls.
-
PATH 03Safety boundary
What you see
Frost covers the freezer wall, ceiling, vents, or multiple food areas, or it reduces airflow and door closure.
Do this next
Check visible door closure, gasket, setting, and food clearance once. If the frost is bonded, widespread, or returns, protect food as appropriate and arrange appliance service instead of attempting a manual heat defrost.
Why this path and its safety boundary
Why it matters: This is a refrigerator/freezer frost or cooling pattern rather than an ice-maker-only defect. A gasket, open door, blocked airflow, temperature setting, evaporator, defrost system, or fan may be involved.
Safety stop: Do not remove freezer panels, scrape the evaporator, heat the liner, or continue operation if a fan is blocked or water reaches electrical areas.
-
PATH 04Safety boundary
What you see
Frost is concentrated near a door edge, ice chute, or gasket, and the door has been left open, is obstructed, or does not seal evenly.
Do this next
Close the door fully, remove only visible obstructions, clean the gasket by the model-approved method, and confirm the chute flap closes. Arrange service for a torn, warped, loose, or persistently leaking seal.
Why this path and its safety boundary
Why it matters: Warm humid air entering a below-freezing compartment can condense and freeze. Frigidaire lists a warped gasket/door, an incompletely closed chute, and an obstructed door as frost causes.
Safety stop: Do not glue, heat, bend, or remove the gasket or chute assembly.
-
PATH 05Safety boundary
What you see
Frost is accompanied by low ice production, a warm or unstable freezer, an overdue filter, slow water, or a recently installed/re-filtered refrigerator.
Do this next
Check the maker state, documented temperature, visible filter and supply condition, and model-specific priming instructions. Escalate if water, cooling, or frost remains abnormal.
Why this path and its safety boundary
Why it matters: Frigidaire connects ice production to freezer temperature, filter and water flow, the maker's enabled state, and installation/priming. These facts do not prove that the frost itself is a water-valve or ice-maker-part failure.
Safety stop: Do not disconnect water tubing, open a valve, bypass the maker, or adjust the freezer colder as a substitute for service.
-
PATH 06Safety boundary
What you see
Frost is bonded behind a cover, returns quickly after a safe visible correction, blocks a fan or chute, causes water to leak, or is near exposed electrical parts.
Do this next
Stop the ice maker if the model allows, keep doors closed as practical, disconnect power only from a safe accessible control when necessary, and arrange qualified appliance service.
Why this path and its safety boundary
Why it matters: A continuing seal, airflow, evaporator, defrost, fan, water, or control issue is possible. Forceful removal can puncture the liner or damage hidden components, and water near energized parts is a stop-use condition.
Safety stop: Do not use sharp objects, heat sources, boiling water, live meters, or internal disassembly, and do not continue using the appliance with smoke, burning odor, sparks, or water near electrical parts.
Helpful context
Understand the symptom
Confirm this is an automatic ice-maker problem
This page is for frost or ice around an automatic ice maker in a Frigidaire refrigerator. It does not apply to a manual ice tray or to a standalone ice machine. Frigidaire publishes guidance for French Door, Side-by-Side, and Top Freezer refrigerators, but the ice maker may sit in the freezer, in a door, or in another model-specific compartment. Record the exact model and whether the frost is on the bin, chute, ice-maker housing, freezer wall, or across the vents before using a button sequence from a manual.
Localized chute frost and whole-freezer frost are different clues
Frost at the dispenser chute or around the ice bin usually directs attention to an air path, chute flap, bin seating, or repeated warm-air entry. Frigidaire says warm and cold air meeting below freezing forms frost, and specifically calls out a door gasket, ice-chute flap, low temperature setting, and blocked vents. Frost on the rear wall, around hidden surfaces, or throughout the freezer is broader and can involve airflow, evaporator, defrost, fan, or sealed refrigeration systems that cannot be safely diagnosed from the visible ice alone.
Do not melt or chip frost with tools
A refrigerator freezer contains concealed wiring, liners, sensors, fans, and refrigerant tubing. Keep frost removal within the exact Owner's Guide: use normal controls, remove a loose accessible piece only when it cannot damage the liner or mechanism, and keep water away from electrical parts. Do not use a sharp object, open flame, hair dryer, heat gun, boiling water, or improvised probe. If the ice is bonded, returns quickly, or blocks a fan, chute, door, or evaporator area, stop and arrange service.
Safety boundary
Stop conditions
- Stop the ice maker or refrigerator use for water near electrical parts, smoke, burning odor, sparks, a hot or damaged cord, repeated electrical trips, a blocked fan, or an appliance with exposed or damaged panels.
- Do not use a knife, screwdriver, pick, scraper, hair dryer, heat gun, flame, boiling water, or other heat source to remove ice or frost.
- Do not pry the chute flap, force a frozen ejector or bin, remove an evaporator or ice-maker cover, disconnect water tubing, or bypass an ice-maker switch or interlock.
- Keep the diagnosis limited to the automatic-ice-maker model identity, visible bin/chute/gasket, normal temperature and maker controls, visible vents, and model-authorized filter or priming checks.
- Frost that is bonded, widespread, recurrent, leaking, cooling-related, or inaccessible requires qualified appliance service rather than a guessed ice-maker or defrost part.
When checks do not resolve it
Need a professional?
Safety scope: The user may identify the automatic-ice-maker model and frost location, inspect visible bin/chute/gasket/vent conditions, use normal temperature and maker controls, and follow model-authorized filter or priming instructions. Qualified personnel must handle bonded frost behind covers, evaporators, defrost heaters, fans, water valves, ice-maker mechanisms, sensors, controls, wiring, live testing, and any wet or electrically damaged appliance.
Common questions
FAQ
Why is frost building up around my Frigidaire ice maker?
First identify whether frost is only on the bin or chute or is spread across the ice-maker compartment and freezer. Frigidaire lists a door gasket or chute flap that does not seal, very low temperature, and blocked airflow as frost causes. A bonded or recurring pattern can involve hidden airflow, evaporator, defrost, fan, or control systems and needs service rather than forceful removal.
Does this apply to every Frigidaire ice maker?
No. The official guidance covers refrigerators with automatic ice makers, including French Door, Side-by-Side, and Top Freezer models, but the maker location, bin, chute, switch, temperature controls, and permitted maintenance vary. Confirm the exact model before using a button sequence or removing a component. Manual ice trays and standalone ice machines are outside this page.
Can I scrape or melt the frost off the Frigidaire ice maker?
Do not scrape, chip, pry, or heat bonded frost. Never use a knife, pick, screwdriver, hair dryer, heat gun, flame, or boiling water. Follow only the exact model guide for loose, accessible bin or chute ice; frost behind a cover, around a fan, or across the freezer requires qualified service.
Should I turn the Frigidaire ice maker off when it is frosted?
If the exact model has a normal On/Off control, turning the automatic maker off can stop further cycles while you arrange service for bonded, recurring, leaking, or widespread frost. Do not bypass the switch or use an unknown diagnostic mode, and do not assume the frost proves the maker itself is the failed part.
Can a freezer temperature or water problem cause ice-maker frost?
It can contribute to an ice-making symptom, but it is not the only explanation. Frigidaire connects ice production to freezer temperature, filter and water flow, maker state, and installation/priming, while its frost guidance separately identifies seals, chute closure, low temperature, and airflow. Check only normal controls and visible conditions; persistent frost or abnormal cooling needs service.
Read the exact guide
Official sources
- Refrigerators | FrigidaireFrigidaire · Supports the existence of separate French Door, Side-by-Side, Top Freezer, ice-maker, dispenser, frost, cooling, and temperature guidance; it is not a substitute for the exact model manual.
- Refrigerator Too ColdFrigidaire · Supports the documented 37°F refrigerator/0°F freezer suggested settings, acceptable temperature ranges, and clearing food from vents; it does not authorize internal refrigeration work.
- Refrigerator Water LeaksFrigidaire · Supports distinguishing chute frost/ice and melting-ice leakage from broader water issues and the safety boundary around water and electrical components.
- Refrigerators / Freezer - Frost Build UpFrigidaire · Supports frost formation from warm/cold air, door gasket and door closure, ice-chute flap, low temperature setting, blocked airflow, and visible user checks; it does not authorize internal defrost work.
- How To Use The Ice Maker In Your Top Freezer RefrigeratorFrigidaire · Confirms a Top Freezer automatic-ice-maker support path exists but provides no universal button sequence; the exact Top Freezer model guide controls operation and permitted cleaning.
- What should I do if my ice maker is not making enough ice in my refrigerator?Frigidaire · Applies to refrigerators, French Door, Side-by-Side, and Top Freezer refrigerators; supports maker state, filter, water line, door traffic, Quick Freeze where equipped, and freezer-temperature checks, not a universal ice-maker layout.
Community feedback
Share a repair observation
Share a plain-text repair observation. Accepted observations are published automatically; this page may take a moment to update.