
On this page
Start here
Quick answer
This guidance applies only to an Electrolux refrigerator that has an external or in-door ice-and-water dispenser; a standalone ice maker without a dispenser has a different problem. First confirm the display is not locked, the ice maker/dispenser is enabled, the refrigerator doors are fully closed, and the bin actually contains ice. Release the dispenser paddle if it was held for an extended time, then inspect the removable bin and visible chute for melted-and-refrozen clumps, a bin that is not fully seated, or ice between the ice maker and bin. Follow the exact model manual for removing, drying, and reseating the bin, and do not rotate or force the auger. If the bin and chute are clear and correctly seated but the dispenser only clicks, grinds, or stays silent, stop testing and arrange service for the internal auger, motor, actuator, interlock, or door wiring.
Before you begin
Safety first
- This article covers only ordinary-access controls, door closure, bin, visible chute, cleaning, drying, and seating checks allowed by the exact manual. Internal auger, motor, actuator, interlock, control, wiring, and dispenser-panel work belongs to qualified service.
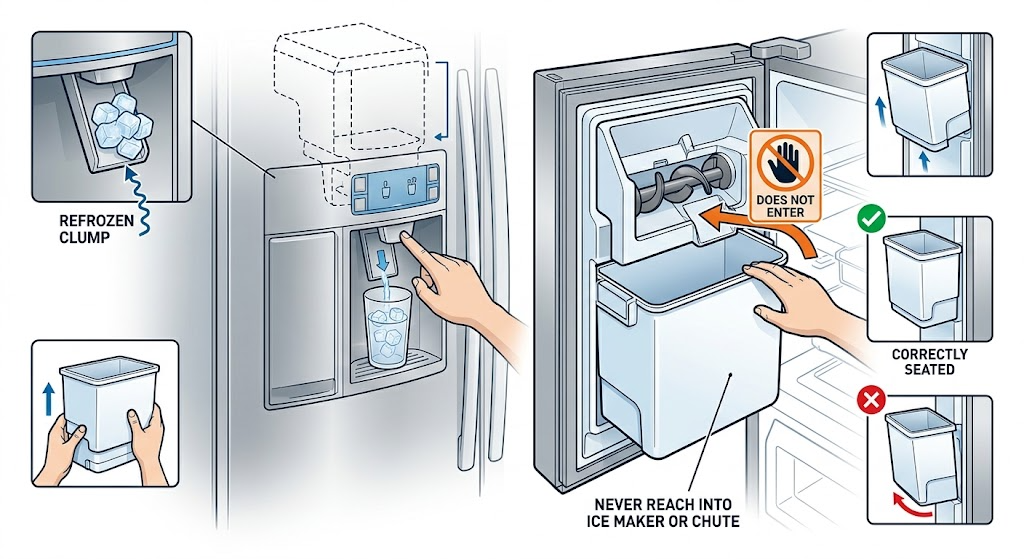
Work through in order
Diagnostic checks
Use only checks that match the exact appliance or system and its official guide.
-
Check 1
Confirm that the Electrolux refrigerator has an external or in-door ice dispenser and place a stable cup under the chute. Stop the ice-making or dispensing request from the normal control before any bin inspection, and keep hands away from the moving chute and auger area.
Expected result: The appliance has a door dispenser and no visible leak, broken plastic, exposed wiring, smoke, burning smell, or uncontrolled movement; or it is a standalone ice maker or an immediate hazard is present.
Next step: For a matching, safe model, continue with the control and door checks. For a standalone unit, use its exact manual. For an immediate hazard, stop using the refrigerator and arrange qualified service from a safe location.
Stop if: Do not place fingers, utensils, or tools in the chute, crusher, or auger path, and do not continue after a leak reaches electrical parts or plastic has broken.
Why this matters
Why: Only the first condition matches this dispenser article. A standalone ice maker needs a different diagnostic path, while a leak or electrical/mechanical hazard is a stop-use condition.
-
Check 2
From the display and outside of the refrigerator, check that the control lock is off, the ice maker/dispenser feature is enabled for the model, and every refrigerator door is completely closed. Release the dispenser paddle if it was held continuously, then wait for the documented overload recovery before one brief retry.
Expected result: The lock icon or disabled ice feature clears and ice dispenses; a door is not fully closed; the paddle had been held for an extended time; or the controls appear enabled but dispensing remains absent.
Next step: Use only the exact model manual for changing a lock or ice-maker setting. After one normal retry, stop repeated activation and inspect the bin if the controls and doors are correct.
Stop if: Do not bypass the door or bin interlock, hold the paddle continuously, or remove a control panel to test it.
Why this matters
Why: A lock, disabled feature, open door, or temporary motor overload can imitate a mechanical failure. If those states are absent or corrected without restoring dispensing, move to the ice-bin and chute path rather than repeatedly pressing the paddle.
-
Check 3
If the exact model manual permits it, remove the ice bin by the documented path without twisting the auger, and check whether it contains loose ice, a solid clump, broken pieces, or no ice. Clean the removable bin only with the manual-approved mild method, let it dry completely, and reseat it fully in its drive position.
Expected result: The bin is empty; ice has melted and refrozen around the auger or crusher; cubes are jammed between the ice maker and the rear of the bin; the bin does not seat normally; or the bin is clean, dry, and fully seated.
Next step: Discard or safely thaw the clumped contents only as the manual allows, dry the bin completely, and reinstall it without turning the auger. If the bin will not seat or alignment is uncertain, stop and provide the model information to service.
Stop if: Do not force the bin, rotate the auger to make it fit, chip ice with a sharp object, use heat near plastic or wiring, or reach into a hidden drive mechanism.
Why this matters
Why: An empty bin is an ice-production or supply issue rather than a dispensing-drive fault. A refrozen clump, rear jam, or incorrect seating can block the path. A clean, dry, correctly seated bin shifts attention to the chute and the dispenser drive.
-
Check 4
With the bin removed only as the manual permits, inspect the visible chute and its opening for a loose cube, wet refrozen ice, a flap held open, or a spill path. Remove only loose ice that is accessible without tools, then wipe and dry the accessible surface before returning the bin.
Expected result: A visible cube or clump blocks the chute; the chute is wet and refreezing; the flap cannot close because of ice; or the visible path is clear but dispensing still fails.
Next step: Clear and dry only the ordinary-access obstruction, reseat the bin, and make one brief normal test. If the chute is clear or the flap remains damaged or stuck, stop and arrange qualified service.
Stop if: Do not probe the chute, pry the flap, force frozen parts, disassemble the dispenser door, or direct water or steam into the dispenser.
Why this matters
Why: A visible chute obstruction can stop ice even when the bin contains loose cubes. A clear chute with no dispensing response makes an internal auger, motor, actuator, interlock, or wiring issue more likely, especially if the bin is correctly seated.
-
Check 5
After the controls, bin, and visible chute are correct, close the refrigerator doors and perform one brief normal dispense attempt with a cup in place. Observe from outside without opening a panel, holding the paddle continuously, or reaching toward the auger.
Expected result: Loose ice dispenses normally; the dispenser clicks or hums but no ice moves; it grinds or stalls; it remains silent; or ice dispenses only after the bin is moved or the door is pressed.
Next step: Stop after this single observation if dispensing is not normal. Record the sound, display state, bin position, and whether water dispensing works, then arrange model-specific service.
Stop if: Do not repeat a grinding or stalled test, bypass a door switch, or continue if ice or water is being forced into an unusual path.
Why this matters
Why: Normal dispensing after clearing supports an ice-path or seating issue. Repeated noise without movement, a stall, silence with enabled controls, or sensitivity to bin/door position suggests an actuator, auger drive, motor, interlock, or wiring condition that cannot be identified safely from outside.
-
Check 6
If the lock, door, ice-maker setting, bin, auger alignment, and visible chute are correct but ice still will not dispense, stop owner-level troubleshooting and prepare the exact model and symptom record for qualified service.
Expected result: The fault persists with a full loose-ice bin and clear, dry chute, or the auger, actuator, motor, interlock, control, or door wiring would need access to continue.
Next step: Arrange Electrolux-authorized or qualified refrigerator service and report whether the motor was silent, clicked, hummed, or ground; whether water dispensing works; and whether the bin was recently removed.
Stop if: Do not remove the door or inner dispenser panel, disconnect wiring, test energized components, bypass an interlock, or replace the auger drive without qualified diagnosis.
Why this matters
Why: The remaining possibilities are inside the dispenser or door system and cannot be separated safely by repeated paddle tests or by ordering a generic part.
Use your observations
Decision map
Find the observation that best matches what you see, then follow the next safe action.
-
PATH 01Safety boundary
What you see
The appliance has no door dispenser, the display is locked, the ice feature is disabled, or a refrigerator door is not completely closed.
Do this next
Use the exact model manual to enable the feature or clear the lock and close the doors. If the unit is a standalone ice maker, use its own manual and do not continue with dispenser-bin steps.
Why this path and its safety boundary
Why it matters: This is a scope or control-state path, not evidence that the auger motor has failed.
Safety stop: Do not bypass a lock or door interlock.
-
PATH 02Safety boundary
What you see
The controls are enabled but the bin is empty or has too little loose ice to dispense.
Do this next
Use the model's ice-production and water-supply guidance. Do not diagnose the auger drive until loose ice is actually present in the correctly seated bin.
Why this path and its safety boundary
Why it matters: The immediate problem is ice availability or production, not a confirmed dispensing-path jam.
Safety stop: Stop for a water leak, abnormal valve noise, or a need to access plumbing or internal electrical parts.
-
PATH 03Safety boundary
What you see
Ice is melted and refrozen around the auger or crusher, jammed between the ice maker and bin, or visibly blocking the chute or flap.
Do this next
Follow the exact manual to remove, thaw or empty, clean, dry, and reseat the bin; clear only ordinary-access loose ice from the chute. Make one normal retest after the path is dry.
Why this path and its safety boundary
Why it matters: A frozen ice-path obstruction is more likely than an internal electrical failure, particularly after infrequent use, temperature fluctuation, or a power event.
Safety stop: Do not chip ice with sharp tools, force the auger, pry the flap, or use steam or high heat.
-
PATH 04Safety boundary
What you see
The bin was recently removed, will not fit fully, the auger was accidentally turned, or dispensing changes when the bin is reseated.
Do this next
Stop and follow the exact product manual's bin/auger alignment procedure or have qualified service perform it. Do not improvise repeated rotations.
Why this path and its safety boundary
Why it matters: Incorrect bin seating or auger alignment can interrupt the drive connection and may also affect refrigerator-door closure; it is not a reason to force the bin into place.
Safety stop: Do not force the bin, rotate the auger without the model procedure, or pull apart the drive interface.
-
PATH 05Safety boundary
What you see
The controls and doors are correct, the bin is full, dry, aligned, and seated, the visible chute is clear, but the motor is silent, grinds, stalls, or responds only to door/bin pressure.
Do this next
Leave the dispenser out of service and arrange qualified refrigerator service. Provide the model, sound pattern, display state, bin history, and whether water dispensing still works.
Why this path and its safety boundary
Why it matters: The symptom makes an auger motor, actuator, interlock, control, or door harness issue more likely than an owner-accessible ice clump.
Safety stop: Do not open the dispenser door, test wiring, bypass an interlock, or install an unverified motor or actuator.
Helpful context
Understand the symptom
Confirm that this is a door-dispenser problem
The relevant symptom is ice present or expected in a refrigerator's door or external dispenser but not reaching the cup. Electrolux's support scope covers French Door, QuadDoor, and other ice-and-water models. A freezer ice maker that is not producing cubes at all needs a water, temperature, or ice-production path instead; do not apply the dispenser steps to a model that has no dispenser.
Separate settings and bin conditions from an internal drive fault
A lock icon, an open refrigerator door, a switched-off ice maker, an empty or poorly seated bin, or a clump around the auger can all prevent dispensing without proving that the motor has failed. Electrolux also notes that holding the paddle too long can activate the dispenser motor's overload protection. Change one external condition at a time and record whether the response changes.
Use the bin and chute boundary carefully
If the exact manual permits the bin to be removed, empty and dry it before reseating it fully. Electrolux warns not to rotate the auger during removal or replacement; incorrect alignment can prevent dispensing and can affect door closure. Clear only loose, visible ice from ordinary access. Do not put fingers or tools into the chute, force a jammed auger, bypass a door or bin interlock, or open the door panel to reach the drive.
Safety boundary
Stop conditions
- Stop using the dispenser for a leak near electrical parts, exposed wiring, broken plastic, smoke, burning smell, repeated grinding, or an uncontrolled moving mechanism.
- Do not put fingers or tools into the chute, crusher, auger, or flap; do not force or chip frozen ice, use steam or high heat, or hold the paddle continuously.
- Door or bin interlock bypass, auger-motor or actuator work, wiring and control diagnosis, dispenser-panel access, and any energized test require qualified service for the exact model.
Only after diagnosis
Potential parts
- ice bin or auger assembly
Consider this only if the bin is cracked, cannot seat, or qualified diagnosis identifies a damaged auger or bin drive after the ice path is clear.
Confirm the complete refrigerator model and the exact manual or service diagnosis; bin and auger geometry varies by dispenser design. - dispenser chute flap or actuator
Consider this only when a clear, dry chute has a damaged or non-operating flap or actuator and qualified service isolates that component.
Match the exact model and dispenser architecture; do not substitute a generic actuator or pry the flap open. - auger motor or drive
Consider this only after the controls, doors, bin seating, auger alignment, and chute are correct and qualified diagnosis finds no drive movement or abnormal drive noise.
Internal drive replacement is professional work and must be matched to the exact model and drive interface. - dispenser interlock or door harness
Consider this only when the bin and chute are clear but dispensing responds to door position or qualified diagnosis isolates an interlock or harness fault.
Verify the exact model and diagnostic result; never bypass an interlock or select a generic electrical part.
When checks do not resolve it
Need a professional?
Arrange qualified Electrolux or refrigerator service when the bin is full, dry, correctly aligned and seated, the chute is clear, and one normal dispense attempt still produces no ice or only clicking, grinding, or silence. Call sooner for a leak, broken plastic, exposed wiring, or any risk from moving parts.
Safety scope: This article covers only ordinary-access controls, door closure, bin, visible chute, cleaning, drying, and seating checks allowed by the exact manual. Internal auger, motor, actuator, interlock, control, wiring, and dispenser-panel work belongs to qualified service.
Common questions
FAQ
Does this apply to every Electrolux ice maker?
No. This page is for an Electrolux refrigerator with an external or in-door ice-and-water dispenser. A standalone ice maker with no dispenser has a different water, freezing, and harvest path; use that exact model's manual instead.
Why does my Electrolux dispenser have ice but not dispense it?
Check the display lock, ice-maker setting, closed refrigerator doors, bin seating, and visible chute first. Melted-and-refrozen ice, a jam between the ice maker and bin, or an auger that was turned during bin removal can stop dispensing even when the bin contains ice.
Can I rotate the auger to make the ice bin fit?
Do not rotate or force it as a general fix. Electrolux warns against rotating the auger during bin removal or replacement; if it was accidentally turned, use only the exact product manual's alignment procedure or arrange service.
What does DI SP or DISP mean on an Electrolux refrigerator?
Electrolux describes DI SP or DISP as an ice jam indication. The documented path is to remove the bin as the model allows, thaw and empty the contents, clean and dry it, clear loose ice, and replace it properly; persistent failure needs service.
When does a non-dispensing Electrolux ice maker need service?
Arrange service when the controls and doors are correct, the bin is full, dry, aligned and seated, and the visible chute is clear but the dispenser is silent, clicks, grinds, stalls, or responds only to door or bin pressure. Internal auger, motor, actuator, interlock, control, and wiring work is not an ordinary bin-cleaning task.
Read the exact guide
Official sources
- Ice & Water Dispenser - not dispensing iceElectrolux Australia · Electrolux Australia support guidance for French Door, QuadDoor, and all ice-and-water models.
- Refrigerator Error Code DI SP or DISP - Ice JamElectrolux · Electrolux owner support guidance for refrigerators showing DI SP or DISP and for ice jams.
- USER MANUAL - REFRIGERATION - Side by SideElectrolux Australia · Electrolux-hosted side-by-side refrigeration manual; use only where the appliance's construction matches the manual and otherwise follow the exact product manual.
- All about the Use & Care of your RefrigeratorElectrolux media / refrigerator owner guide · Electrolux-hosted refrigerator owner guide; the exact model manual controls when a different design or instruction applies.
- Refrigerators - Auger FixElectrolux · Electrolux owner support guidance for refrigerator auger-related low or absent ice flow.
Community feedback
Share a repair observation
Share a plain-text repair observation. Accepted observations are published automatically; this page may take a moment to update.