
On this page
Start here
Quick answer
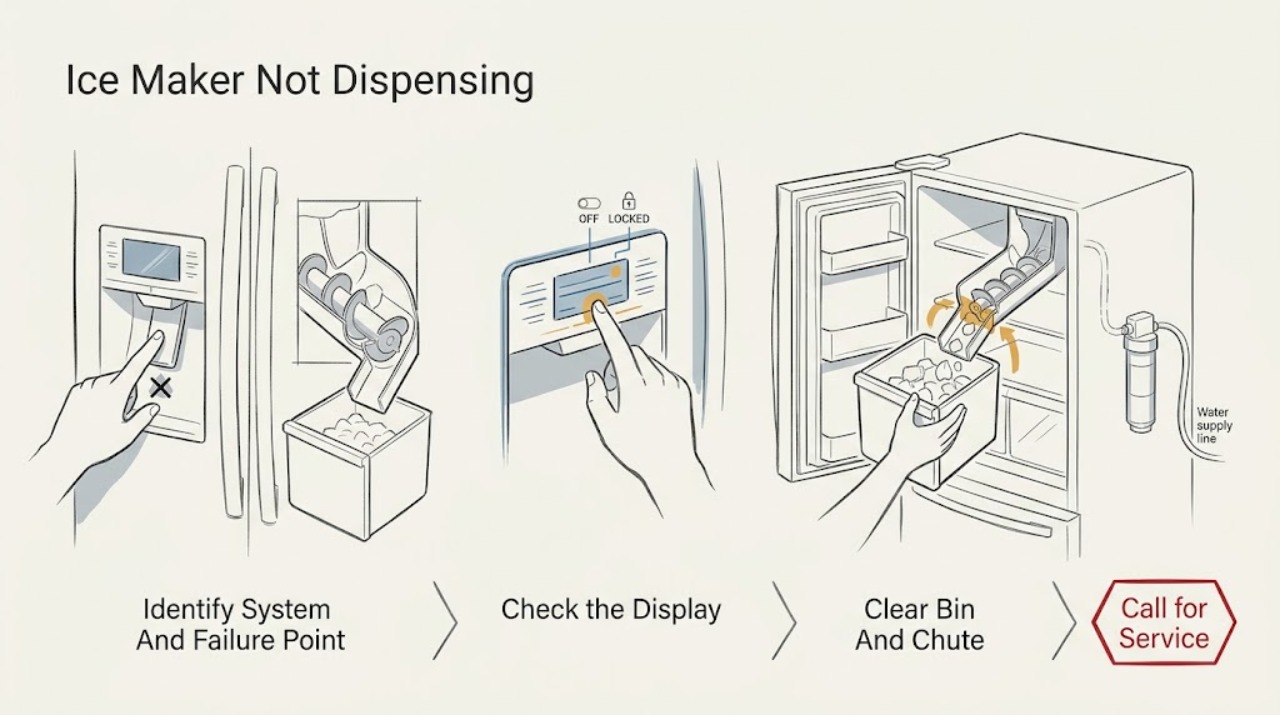
First identify whether this is a freestanding KitchenAid ice maker, a refrigerator ice maker, or a refrigerator door dispenser. A freestanding unit may only harvest ice into its bin; it does not use the refrigerator paddle-and-chute path. For a refrigerator, check whether the ice maker is making and dumping ice before diagnosing the dispenser. If ice is in the bin, check the model's Control Lock or Dispenser Lock, Sabbath mode where present, door and bin seating, paddle engagement, clumped ice, and a blocked chute. If the maker is not producing or dumping ice, use the exact model's water, temperature, on/off, filter, and reset guidance. Use only a plastic utensil for an accessible ice jam, never a sharp tool, and stop for leaks, exposed electrical damage, repeated breaker trips, or any diagnosis requiring panels or sealed-system access.
Before you begin
Safety first
- Owner checks stop at model identification, control and paddle observation, accessible bin and chute cleaning, plastic-utensil jam clearing, model-approved external water/filter/drain checks, and one documented reset. Electrical, sealed-system, motor, auger, valve, pump, module, and interlock work requires authorized service.
Work through in order
Diagnostic checks
Use only checks that match the exact appliance or system and its official guide.
-
Check 1
Record the complete KitchenAid model and classify the product as a freestanding ice maker, a refrigerator with an internal ice bin, or a refrigerator with a door dispenser. State whether ice is not being made, not being dumped into the bin, or not leaving the chute.
Expected result: There is no door dispenser, the refrigerator bin is empty, ice is present in the bin, or the configuration cannot be confirmed.
Next step: Use the freestanding path for a confirmed standalone unit. For a refrigerator, use the production check when the bin is empty and the dispenser path when ice is present.
Stop if: Do not reproduce the symptom for smoke, sparking, a leak near electrical parts, exposed wiring, a damaged cord, repeated breaker trips, or an unstable appliance.
Why this matters
Why: The same phrase can describe production, harvest, bin, auger, chute, paddle, or control problems. KitchenAid publishes different checks for these configurations.
-
Check 2
For a refrigerator with ice in the bin, select ice if required, verify Control Lock or Dispenser Lock is off, check Sabbath mode and door requirements according to the model manual, and press a sturdy glass firmly against the dispenser paddle or pad.
Expected result: A lock or mode is active, a required door is open, the wrong dispense mode is selected, the paddle does not engage, or the paddle engages but no ice exits.
Next step: Correct an obvious documented mode or engagement issue and try once. If the paddle engages but ice does not move, inspect the bin and chute without forcing the mechanism.
Stop if: Do not hold the paddle down continuously, insert fingers or tools into the chute, bypass a door switch, or remove dispenser panels.
Why this matters
Why: KitchenAid says these model-dependent states can deactivate dispensing without proving a failed ice maker, auger, or motor.
-
Check 3
With dispensing stopped, check that the ice bin is fully seated and look for clumped ice or visible chute buildup. Empty and clean the bin and chute with a warm, damp cloth, dry them, and use only a plastic utensil to break up clumps.
Expected result: The bin was not seated, ice is fused together, the chute is blocked, or the bin and chute are clear but no ice moves.
Next step: Reseat the bin per the exact manual and try one dispense test. If the path is clear but delivery fails, arrange service rather than opening the auger or ice door.
Stop if: Never use a sharp tool, do not run with a cracked bin, and do not force the auger or ice door.
Why this matters
Why: KitchenAid identifies bin seating, clumped ice, and chute blockage as refrigerator dispenser causes. A clear path shifts the concern toward controls or the delivery mechanism, not necessarily the ice maker.
-
Check 4
For a refrigerator with an empty bin, check whether the ice maker is producing and dumping ice. If it produces but does not dump, use the exact model's reset procedure; where KitchenAid documents it, unplug the refrigerator for one minute and then wait the documented period before checking the bin.
Expected result: Ice is produced and dumped, ice is produced but not dumped, no ice is produced, or production does not return after the documented reset.
Next step: If no ice is produced, follow the model's water, freezer-temperature, on/off, and filter checks. If ice is not dumped after the model reset, stop and arrange service.
Stop if: Do not force the ejector arm, remove the ice-maker module, bypass a thermostat, or repeatedly power-cycle the refrigerator.
Why this matters
Why: KitchenAid distinguishes upstream production or harvest from downstream dispenser delivery. A reset may clear a transient state but does not diagnose a failed module or motor.
-
Check 5
For a confirmed freestanding KitchenAid ice maker, verify that it is on, inspect the accessible ejector arm for a jam, and check only the model-approved water supply, filter, drain hose or cap, condenser, and room-temperature conditions. Clear an accessible jam with a plastic utensil after stopping the unit.
Expected result: The unit is off, the ejector arm is jammed, water or filter flow is restricted, a drain is kinked or incorrectly capped, airflow is blocked, or the room condition is outside the model guidance.
Next step: Correct only an obvious external condition permitted by the exact manual and run one normal cycle. If harvest remains absent, arrange service.
Stop if: Do not move a built-in unit without installation guidance, open the refrigeration system, or use sharp tools on the ejector arm.
Why this matters
Why: KitchenAid links these conditions to low or no ice production and, for some models, intermittent operation or buzzing. They do not establish a compatible replacement part.
-
Check 6
Stop owner troubleshooting and arrange authorized KitchenAid service when the configuration checks do not restore dispensing, the maker will not produce or dump ice, the bin or chute is damaged, or diagnosis would require an auger, ice door, valve, pump, module, wiring, or sealed-system access.
Expected result: The dispenser remains inactive with ice present, the bin stays empty or jammed, a reset only helps temporarily, or a hazard is present.
Next step: Leave the affected system off if a hazard exists and use KitchenAid's model-specific support or authorized service route with the recorded observations.
Stop if: Do not bypass interlocks, open electrical or sealed-system panels, live-test components, or repeatedly run a jammed dispenser.
Why this matters
Why: KitchenAid routes unresolved ice and dispenser concerns to service and relies on the exact model manual for controls and procedures. A symptom alone cannot select a safe compatible part.
Use your observations
Decision map
Find the observation that best matches what you see, then follow the next safe action.
-
PATH 01Safety boundary
What you see
A refrigerator has ice in the bin, but a correctly selected and engaged dispenser produces no ice.
Do this next
Check the model-specific controls, reseat the bin, and clean clumps or chute buildup safely with a plastic utensil or warm damp cloth.
Why this path and its safety boundary
Why it matters: The production path has made stored ice, so lock or mode, door, paddle, bin seating, clumping, and chute blockage are the first documented checks.
Safety stop: Do not insert sharp objects or remove the auger or ice-door mechanism.
-
PATH 02Safety boundary
What you see
The refrigerator bin is empty because ice is not being made or dumped.
Do this next
Check the model's water supply, freezer temperature, on/off state, filter, and documented reset, then arrange service if ice still is not produced or dumped.
Why this path and its safety boundary
Why it matters: This is an upstream production or harvest concern, not proof of a dispenser motor failure.
Safety stop: Do not replace an auger or dispenser motor when the bin is empty or force the ejector arm.
-
PATH 03Safety boundary
What you see
The product is a freestanding KitchenAid ice maker and it is not harvesting ice into its storage bin.
Do this next
Follow the exact freestanding model path for accessible external checks and arrange service if harvest remains absent.
Why this path and its safety boundary
Why it matters: Freestanding guidance focuses on on/off state, ejector-arm jams, water and filter conditions, drain setup, condenser airflow, and room temperature, not refrigerator door-dispenser controls.
Safety stop: Do not assume a refrigerator paddle, auger, or dispenser-lock diagnosis applies.
-
PATH 04Safety boundary
What you see
There is a leak near electrical parts, smoke, sparking, exposed wiring, repeated breaker trips, damaged hardware, or a need to access motors, valves, pumps, controls, or sealed refrigeration.
Do this next
Stop use, isolate power or water only from a safe accessible position, and arrange qualified KitchenAid service.
Why this path and its safety boundary
Why it matters: The issue is outside safe owner-level dispensing checks and cannot be narrowed to a compatible part from the symptom alone.
Safety stop: Do not restore power, bypass an interlock, open panels, live-test, or keep operating.
Helpful context
Understand the symptom
Define what “not dispensing” means
KitchenAid uses separate paths for a freestanding ice maker, a refrigerator's ice-making module, and a refrigerator door dispenser. A freestanding unit may harvest into its own bin without a glass-and-paddle dispenser. In a refrigerator, ice must be produced and dumped into the bin before the auger and chute can deliver it. Record the complete model and whether the failure is no production, no dump into the bin, or no delivery through the door.
When ice is in the refrigerator bin
KitchenAid says to select ice when the display requires it, firmly engage the dispenser paddle or pad with a sturdy glass, and check that a Control Lock or Dispenser Lock is not disabling the controls. Some models require doors to be closed, and Sabbath mode can disable ice and water dispensing. Confirm the bin is fully seated before blaming the auger or ice-door mechanism.
Clear clumps and the chute safely
KitchenAid explains that humidity can clump stored ice and block the delivery chute. Empty the bin when needed, clean the chute and the area beneath the bin with a warm, damp cloth, dry it, and discard clumped ice. Use only a plastic utensil to break up ice; do not use a knife, screwdriver, or other sharp tool. If the bin is empty, return to ice-production checks instead of repeating chute cleaning.
Check production, harvest, and freestanding conditions separately
If a refrigerator makes no ice, KitchenAid points to water supply, freezer temperature, on/off state, and filter installation. If it makes ice but does not dump it into the bin, some refrigerator guidance documents a one-minute power reset followed by a waiting period before checking the bin. For a freestanding unit, KitchenAid's checks include on/off state, ejector-arm jams, water and filter conditions, drain setup, condenser airflow, and room temperature. These checks do not select a compatible motor, valve, module, pump, or control.
Stop before internal service work
A clear bin and chute with no delivery can involve the auger, ice door, controls, or wiring; no production can involve the ice-making or water system. KitchenAid routes unresolved concerns to service and directs owners to model-specific manuals. Record whether water dispenses, whether ice is made and dumped, the lock or mode state, bin and chute condition, any jam or sound, and the result of one documented reset.
Safety boundary
Stop conditions
- Stop and isolate the appliance from a safe accessible position for smoke, burning odor, sparking, exposed wiring, a damaged cord, a leak near electrical parts, or repeated breaker trips.
- Use only a plastic utensil for accessible ice jams; never use a knife, screwdriver, metal pick, or other sharp tool in an ejector arm, bin, or chute.
- Do not force the paddle, auger, ice door, ejector arm, bin, or interlock, and do not run with a cracked or badly seated bin.
- Do not open electrical or sealed-system panels, bypass controls, live-test components, or select a valve, motor, pump, module, or other part from the symptom alone.
When checks do not resolve it
Need a professional?
Arrange KitchenAid-authorized service when ice is being made but will not dump or dispense after the exact model's documented reset and safe bin, chute, paddle, or jam checks; when the maker remains unable to produce ice after its water, temperature, on/off, and filter checks; when a bin, chute, ejector, auger, or ice door is damaged; or whenever diagnosis requires wiring, motors, valves, pumps, controls, or sealed refrigeration. Provide the complete model, system type, whether water dispenses, whether ice is produced and dumped, lock or mode state, bin and chute condition, any jam, and any reset result.
Safety scope: Owner checks stop at model identification, control and paddle observation, accessible bin and chute cleaning, plastic-utensil jam clearing, model-approved external water/filter/drain checks, and one documented reset. Electrical, sealed-system, motor, auger, valve, pump, module, and interlock work requires authorized service.
Common questions
FAQ
Why is my KitchenAid refrigerator making ice but not dispensing it?
Check the downstream path: Control or Dispenser Lock, Sabbath mode where applicable, door closure, paddle engagement, bin seating, clumped ice, and a blocked chute. If the bin is empty, troubleshoot ice production or dumping instead of the dispenser motor.
How do I clear a KitchenAid ice-maker jam?
Stop the appliance and use only a plastic utensil to clear accessible ice from the ejector arm or break up clumped ice. KitchenAid warns against sharp tools because they can damage the bin or dispenser mechanism. Do not force the ejector arm or remove the module.
Does a freestanding KitchenAid ice maker use refrigerator dispenser checks?
No. A freestanding unit may harvest into its own bin without a refrigerator paddle or chute. KitchenAid's freestanding guidance covers on/off state, ejector jams, water and filter conditions, drain setup, and production conditions. Confirm the exact model before applying refrigerator-dispenser steps.
Should I replace the KitchenAid ice-maker motor or valve?
Not from the symptom alone. Production, harvest, dispenser, water, filter, control, and bin problems can look similar. Use the exact model's external checks and arrange service when the documented path does not restore operation; do not select an internal part by appearance.
Read the exact guide
Official sources
- Not Powering On - Freestanding Ice MakerKitchenAid Product Help · Freestanding ice-maker Product Help path; pressure and drain limits vary by model and installation.
- How to Troubleshoot the Freestanding Ice MakerKitchenAid Product Help · Freestanding ice-maker guidance; verify the exact product and manual because the page also carries refrigerator-related tags.
- Not Dispensing Ice - Side by Side RefrigeratorKitchenAid Product Help · Side-by-side refrigerator family; doors, modes, bins, and controls vary by model.
- Ice Maker Not Working - TroubleshootingKitchenAid Product Help · KitchenAid refrigerator ice-maker guidance; exact temperature, controls, and reset vary by model.
- Where is my Model and Serial Number Located?KitchenAid Product Help · KitchenAid appliance identification; complete model remains required for controls and service.
- Not Dispensing Ice - Built-In RefrigeratorKitchenAid Product Help · Built-in refrigerator dispenser systems; exact bin, chute, and control design varies by model.
- Not Dispensing Ice - RefrigeratorKitchenAid Product Help · French-door/bottom-freezer refrigerator family; controls and bin design vary by model.
Community feedback
Share a repair observation
Share a plain-text repair observation. Accepted observations are published automatically; this page may take a moment to update.