
On this page
Start here
Quick answer
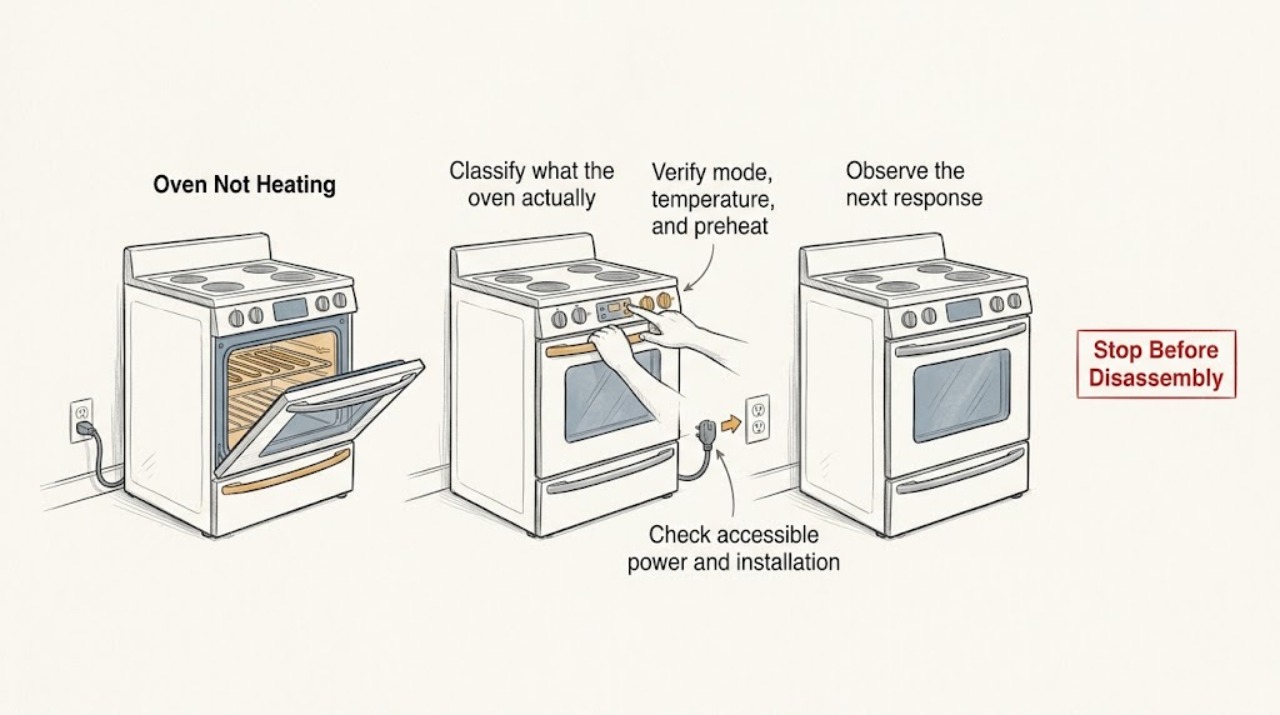
Confirm that a cooking mode and temperature were selected and that the oven is actually being preheated with the door closed. Then note whether the display and other functions have power, whether the oven reaches any warmth, and whether a code is shown. Electrolux identifies incomplete electrical supply and a damaged door gasket as causes of an oven that cannot reach temperature; calibration may be model-specific. If an error code returns after the documented reset, a breaker trips again, wiring is damaged, or there is smoke or a gas odor, stop using the oven and arrange qualified service. [Source: electrolux-not-hot-enough; electrolux-error-guide; electrolux-preheat]
Work through in order
Diagnostic checks
Use only checks that match the exact appliance or system and its official guide.
-
Classify what the oven actually does
With the oven empty, select a normal baking mode and a temperature from the model guide, start preheat, and keep the door closed. Observe whether the display responds, the indicator or preheat status changes, the cavity becomes warm, and the oven reaches or holds the selected temperature.
Expected result: No controls respond; the oven responds but stays cold; it warms slowly or loses heat; or it reaches temperature but cooks inconsistently.
Next step: Follow the power and setting checks for no response, the gasket and installation checks for poor preheat, and the error/calibration branch if the display reports a fault or temperature remains inconsistent.
Why this matters
Why: No response points toward power, controls, or a lock condition. Some heat with poor preheat points toward supply, heat loss, or regulation. Reaching the set temperature but producing uneven results is not the same as a no-heat failure.
-
Verify mode, temperature, and preheat sequence
Confirm that a cooking function—not light, keep-warm, defrost, or another model-specific non-baking function—is selected, enter the intended temperature, and press Start if the controls require it. Leave the cavity empty and the door closed during preheat; place food in only after the oven indicates preheat is complete.
Expected result: The oven begins heating after the correct function or Start action, or it remains cold despite a confirmed cooking mode and temperature.
Next step: If the correct sequence restores heat, use the model guide for rack and bakeware settings. If it remains cold, continue with power and door-seal checks without opening the cabinet.
Why this matters
Why: A mode or start-sequence mismatch can look like a heater failure. Electrolux notes that proper preheating and a closed, empty oven are important for reaching and maintaining the expected temperature.
-
Check accessible power and installation conditions
Check whether the display, interior light, and other oven functions have power. Inspect the visible plug, cord, outlet, or breaker only from a safe position; if a breaker has tripped, reset it once when safe and do not increase fuse capacity. For a recently installed oven, preserve the symptom and have the installer or a qualified electrician check the installation.
Expected result: The oven is fully dead, a breaker resets and the controls return, the breaker trips again, or the display works but the oven still provides no heat.
Next step: Stop for a repeat trip, damaged cord, heat at the outlet, or visible wiring damage and call a qualified electrician or authorized appliance service. Otherwise continue with the gasket and code checks.
Why this matters
Why: A dead oven or incomplete supply can prevent preheating. A repeat trip or installation concern is an electrical fault boundary, not a reason to keep resetting the circuit. A powered display with no heat points toward the selected mode or internal heating/control system.
-
Inspect the door gasket without disturbing it
When the oven is cool, look around the entire door seal for a tear, gap, detached section, or missing section. Close the door normally and do not rub, pull, stretch, or tuck the gasket into place.
Expected result: The gasket is visibly damaged or the door does not close evenly; or the gasket is intact and the door closes normally.
Next step: If the seal is damaged, stop using temperature-sensitive cooking until the model-appropriate seal is assessed or replaced by qualified service. If it is intact, continue to error-code and controlled preheat checks.
Why this matters
Why: A compromised gasket can let heat escape and cause poor preheat or temperature maintenance. An intact seal makes heat loss less likely but does not rule out a supply or internal heating fault.
-
Record and clear a displayed error only as documented
Photograph or write down any displayed code before changing anything. If the model guide and Electrolux error guide support a reset, disconnect power using the normal plug or breaker method for the documented short interval, restore power once, and run one supervised preheat test. Do not repeat resets if the code returns.
Expected result: The code clears and the oven heats normally, the code returns, the display is locked, or the oven shows a thermal or door-lock condition.
Next step: For a returning code, thermal warning, locked door, or inability to complete the documented reset, leave the oven off and provide the exact code to authorized service. Do not bypass a lock or thermal protection.
Why this matters
Why: A one-time reset can clear a transient control state, but a returning code is evidence that the underlying condition remains. Electrolux treats thermal runaway and door-lock codes as safety or access conditions requiring the model guide and support when persistent.
-
Use calibration only when the symptom is mild and model-specific
If the oven heats but the measured cooking result is consistently too cool or too hot, compare the result only with the model guide’s approved temperature-check method and calibration range. Do not infer an internal part failure from one recipe or open the oven to test components.
Expected result: The oven reaches a stable temperature but needs a documented calibration adjustment, or it cannot reach/hold temperature at all.
Next step: Apply a calibration adjustment only if the exact guide supports it. If the oven cannot heat, repeatedly loses heat, or the adjustment does not help, request authorized service.
Why this matters
Why: Calibration can address a controlled temperature offset, while failure to heat or maintain temperature can involve power, gasket, heating, sensor, or control components. The same remedy is not appropriate for both.
Use your observations
Decision map
Find the observation that best matches what you see, then follow the next safe action.
-
PATH 01Safety boundary
What you see
The display and other oven functions are completely dead.
Do this next
Check only the accessible circuit or connection once. If the breaker trips again or the installation is suspect, stop and use a qualified electrician or authorized appliance service.
Why this path and its safety boundary
Safety stop: Continue with mode, preheat, gasket, and code checks.
-
PATH 02Safety boundary
What you see
The oven responds but does not become warm in a confirmed cooking mode.
Do this next
Confirm Start and the selected mode, then perform the single documented reset only if the model guidance permits. Persistent no-heat needs service; do not test internal heating parts.
Why this path and its safety boundary
Safety stop: Continue with preheat and temperature-maintenance checks.
-
PATH 03Safety boundary
What you see
The oven warms but cannot reach or maintain the selected temperature.
Do this next
Inspect the cool door gasket for visible damage and preserve the installation/power symptom for service. Calibration is model-specific and should be considered only after basic checks.
Why this path and its safety boundary
Safety stop: If it reaches temperature but cooking is inconsistent, follow the model guide for bakeware, rack position, and calibration.
-
PATH 04Safety boundary
What you see
A code, thermal warning, or door-lock condition returns after the documented reset.
Do this next
Leave the oven off and contact authorized service with the exact code; do not bypass the lock or thermal protection.
Why this path and its safety boundary
Safety stop: Perform one supervised preheat test and stop if the symptom returns.
-
PATH 05Safety boundary
What you see
There is smoke, a burning smell, arcing, hot or damaged wiring, a gas odor, or a breaker that trips again.
Do this next
Stop the oven immediately, keep clear of smoke or gas, and use the appropriate emergency, gas, electrical, or appliance-service channel. Do not restart to collect more observations.
Why this path and its safety boundary
Safety stop: Continue only with the external checks above; persistent no-heat symptoms require service.
Helpful context
Understand the symptom
“Not heating” can mean no response at all, slow preheating, a cavity that becomes warm but never reaches the set temperature, or a mode that is working differently from expected. Those symptoms do not identify a failed element by themselves.
This guide keeps the owner checks outside the cabinet: settings, display, door seal, one safe reset when the model guidance supports it, and visible installation conditions. Do not remove panels, defeat a safety device, or work on energized wiring or a gas system.
Use the exact Use & Care guide for the model when a control label, calibration procedure, error code, or installation arrangement differs. Record the model, selected mode, set temperature, preheat behavior, and any code before requesting service.
Safety boundary
Stop conditions
- Stop immediately for smoke, a burning odor, arcing, exposed or hot wiring, a gas odor, an uncontrolled temperature rise, or a breaker that trips again.
- Do not remove the oven cabinet, defeat a door lock or thermal device, or work on electrical or gas components.
- Do not keep resetting a returning error code or continue using an oven with a damaged door gasket until it is assessed.
- Keep the oven door closed during preheat and follow the exact model guide for any calibration or reset procedure.
When checks do not resolve it
Need a professional?
Request authorized Electrolux appliance service when the oven stays cold in a confirmed cooking mode, cannot reach or hold temperature after the accessible mode, power, and gasket checks, a code returns after the documented reset, or calibration does not correct a consistent temperature problem. Use a qualified electrician for recurring breaker, outlet, or installation concerns and a qualified gas professional for gas-supply concerns.
Have this ready
- Exact Electrolux model and serial from the appliance label
- Range oven or wall-oven installation type
- Selected cooking mode, set temperature, preheat behavior, and whether any warmth is produced
- Whether the display, light, and other functions have power
- Any exact error code, thermal warning, door-lock condition, or repeat breaker trip
- Visible gasket condition, installation date, and what single reset or calibration step was attempted
Common questions
FAQ
Why is my Electrolux oven not heating?
Confirm the cooking mode and preheat sequence, then check accessible power and the cool door gasket. If the oven remains cold or a code returns, stop and request model-specific service.
Can a damaged Electrolux oven gasket cause poor heating?
Yes. Electrolux identifies a torn, detached, worn, or missing gasket as a way heat can escape. Inspect it while cool without pulling or rubbing it, then arrange the correct model-specific repair if damaged.
Should I keep resetting an Electrolux oven that shows an error?
No. Use the documented reset once, record the exact code, and stop if it returns—especially for thermal or door-lock conditions. Provide the code to authorized service.
Read the exact guide
Official sources
- Oven - Is Not Hot EnoughElectrolux · Electrolux electric range ovens and electric wall ovens; poor preheat, power, gasket, calibration, and service guidance
- Oven Error Codes and Alarms GuideElectrolux · Electrolux range ovens and wall ovens displaying codes or thermal/door-lock alarms
- Ovens - How do I use Quick Preheat or Preheat?Electrolux · Electrolux ovens; preheat sequence and start-control guidance
- Ranges - No HeatingElectrolux · Electrolux ranges; manufacturer no-heating and installation/service escalation guidance
Community feedback
Share a repair observation
Share a plain-text repair observation. Accepted observations are published automatically; this page may take a moment to update.