
On this page
Start here
Quick answer
First protect the floor and electricity, then locate whether water is coming from a rear supply connection, the filter area, the dispenser/chute, the ice-maker area, a door edge, or underneath the cabinet. Do not touch a wet plug, outlet, control, or cord. Electrolux's guidance separates loose water connections, filter fitment or cracks, dispenser ice/frost, and doors left open long enough to create evaporator ice and bottom water. Check that the refrigerator is level and that its water shut-off valve and supply line are appropriate for the installed model; inspect and reseat only an accessible filter or connection as the owner's manual allows. If the leak is internal or underneath, returns after external checks, reaches electrical parts, or is accompanied by a high-temperature alarm, damaged line, or uncontrolled flow, close the water valve if it is safe to reach, isolate power only from a dry safe point, and arrange qualified service.
Before you begin
Safety first
- The owner may make the area safe, close an accessible water valve, observe the external line, inspect/reseat a model-approved filter, inspect the dispenser/chute and gasket, and clean visible surfaces with minimal moisture. Qualified service must handle internal valves, tubing, drain pans, defrost paths, ice-maker assemblies, wiring, refrigeration components, and live diagnosis.
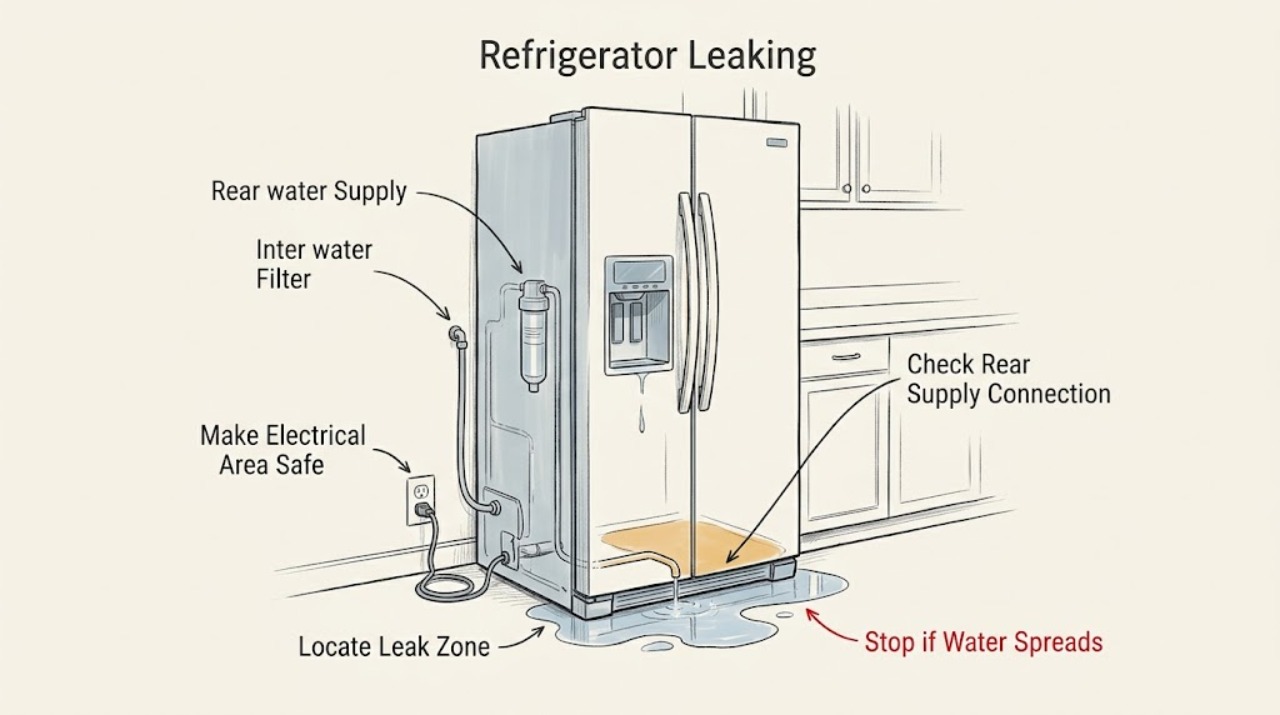
Work through in order
Diagnostic checks
Use only checks that match the exact appliance or system and its official guide.
-
Check 1
From a dry position, look at the floor, plug, cord, outlet, controls, and refrigerator base. If water is near any electrical part, do not touch the wet connection or walk through water to unplug it; close the water shut-off valve only if it is safely accessible and isolate power from a dry upstream point.
Expected result: Water is confined away from electricity, water is around the plug/outlet/control, the cord or connection is damaged, or smoke, heat, arcing, or a burning odor is present.
Next step: Keep people away and arrange qualified appliance/electrical service; do not restore power until the wet or damaged area is assessed. If no electrical hazard is present, continue with a dry external leak-location check.
Stop if: Do not handle a wet plug, cord, outlet, or control panel, use the refrigerator while water reaches electrical parts, or spray cleaner onto controls.
Why this matters
Why: A dry localized leak can be traced after the appliance is made safe. Water or fire symptoms near electricity override all routine filter, dispenser, or drain checks.
-
Check 2
After power and water are safely isolated as needed, dry only the visible exterior and note where fresh water reappears: rear supply line/valve, filter housing, dispenser tip or chute, ice-maker/door area, door edge, or underneath the cabinet. Do not pull a built-in refrigerator out if doing so would strain the line or expose wet electricity.
Expected result: The leak is rear-mounted, front/dispenser-mounted, around the filter or ice maker, along a door edge, or from underneath/inside the cabinet.
Next step: Proceed only with the external check for the identified zone. For an internal/under-cabinet leak or an inaccessible built-in connection, keep the unit off and schedule service.
Stop if: Do not tilt the refrigerator, remove the base or rear cover, or perform a powered leak-reproduction test.
Why this matters
Why: The location narrows the safe branch: rear water connections, filter/dispenser components, door/evaporator icing, and internal pan/drain paths have different likely causes. A bottom or internal source cannot be identified safely by watching the unit run.
-
Check 3
For a rear leak that can be viewed without moving the refrigerator, inspect the visible supply line, shut-off valve, and connection for a kink, wet coupling, crack, or line pulled tight against the wall. Confirm the shut-off valve is appropriate for the model and can be closed safely; do not loosen the connection.
Expected result: A visible line or coupling is wet/damaged, the line is kinked or under strain, the shut-off valve is closed, or the external connection is dry and intact.
Next step: Close the accessible valve and arrange service for a wet/damaged line or coupling. If the external path is dry but the refrigerator still leaks, do not move on to internal fittings; request qualified diagnosis.
Stop if: Do not tighten pressurized fittings, splice tubing, remove a water valve, or pull the appliance out across a wet floor.
Why this matters
Why: A rear wet connection or damaged line is more likely than a filter or dispenser leak. A dry, intact external line does not rule out an internal valve or water path, especially if water continues to appear under the cabinet.
-
Check 4
If the water is at the filter housing or dispenser, use the model manual to inspect an accessible filter for correct seating, visible cracks, age, or a filter-status prompt. Look at the dispenser tip and chute for droplets, ice, or frost; do not force the filter or reach into a powered auger.
Expected result: The filter is loose, cracked, overdue, or the wrong type; the dispenser tip is wet; ice/frost blocks the chute; or the filter and dispenser area are dry and correctly assembled.
Next step: With power and water safe, reseat or replace the filter only with the exact model/type and follow the manual's purge instructions. Clear only accessible chute ice as documented; if the leak returns or the housing is damaged, arrange service.
Stop if: Do not force a filter, use an unapproved filter, chip ice with a sharp tool, or disassemble the dispenser or auger.
Why this matters
Why: Electrolux links filter fitment/cracks to water leakage and slow/no water, and identifies ice or frost in the chute as a possible dispenser leak path. A dry, correct filter and clear chute make an internal water path or another zone more likely.
-
Check 5
Check that refrigerator and freezer doors close fully without an obstruction and that the gaskets are clean and continuous. Read any high-temperature or door-ajar alarm and note whether water is appearing below the ice-maker/evaporator area after a door was left open.
Expected result: A door is not sealing, a gasket is dirty/damaged, a high-temperature or door-ajar alarm is active, or the doors seal and the temperature/alarm state is normal.
Next step: Remove only a visible door obstruction and wipe the gasket with a soft cloth as Electrolux recommends. If the gasket, hinge, door alignment, temperature, or leak remains abnormal, keep the refrigerator closed and schedule service.
Stop if: Do not bend the gasket, adjust hinges, chip evaporator ice, or continue using the refrigerator with a persistent high-temperature alarm and active leak.
Why this matters
Why: An open or poorly sealed door can allow air leakage and, according to Electrolux's leak guidance, can contribute to evaporator icing and later bottom water. A high-temperature alarm also raises food-safety and cooling concerns beyond the leak itself.
-
Check 6
Record the leak zone, timing, water-valve/filter/dispenser/door observations, alarm state, and whether water reaches the floor or electrical area. If the leak is underneath or inside, returns after the external correction, or cannot be located without restoring power, keep the refrigerator off and request qualified service.
Expected result: The leak stops after a documented external correction, continues from underneath/inside, returns at the filter/dispenser/rear line, or is accompanied by electrical, temperature, or uncontrolled-flow symptoms.
Next step: Keep the water supply closed if safe and arrange Electrolux or qualified appliance service. Provide the model, leak location, photos from a dry unpowered position, water-valve state, filter details, alarms, and food-safety concerns.
Stop if: Do not remove panels, open internal water or defrost paths, perform live tests, or restart the refrigerator merely to reproduce an internal leak.
Why this matters
Why: A one-time external correction supports a filter, chute, gasket, or visible connection condition. A persistent, internal, or hazardous leak can involve a valve, drain pan, defrost path, tubing, ice-maker assembly, or control and cannot be distinguished safely by the owner.
Use your observations
Decision map
Find the observation that best matches what you see, then follow the next safe action.
-
PATH 01Next step
What you see
Fresh water appears at a visible rear supply line, shut-off valve, or coupling, especially when the ice maker or dispenser requests water.
Do this next
Close the accessible water valve and arrange service for a wet, cracked, kinked, or strained line or connection. Do not loosen or repair pressurized tubing.
Why this path and its safety boundary
Why it matters: An external water-line or connection problem is more likely than a filter or defrost leak. The installation must have a working shut-off valve and model-appropriate line.
-
PATH 02Next step
What you see
Water collects around the filter housing or dispenser tip, the filter is loose/cracked/overdue, or ice/frost is visible in the dispenser chute.
Do this next
With the appliance safe, reseat or replace only the exact model's filter and clear accessible chute ice as documented. If the housing leaks again or is damaged, arrange service.
Why this path and its safety boundary
Why it matters: The filter/dispenser path is more likely. Electrolux links filter fitment and cracks with leakage and identifies ice or frost in the chute as a front leak path.
-
PATH 03Next step
What you see
Water appears below the ice-maker/evaporator area after a door was left open, and a door-ajar or high-temperature indication or poor gasket seal is present.
Do this next
Close the door, remove only visible obstructions, and clean the gasket gently. If the alarm, frost, temperature, or leak persists, keep food and appliance safety in view and arrange service.
Why this path and its safety boundary
Why it matters: Door air leakage and evaporator icing are more likely than a rear water connection. The active temperature alarm also means the cooling compartment needs attention.
-
PATH 04Next step
What you see
Water comes from underneath or inside the cabinet, persists after filter/door/external-line checks, reaches electrical parts, or cannot be traced without moving or opening the refrigerator.
Do this next
Close the water supply if safely accessible, isolate power only from a dry safe point, keep the refrigerator off, and arrange qualified Electrolux service. Do not perform a powered confirmation test.
Why this path and its safety boundary
Why it matters: An internal drain pan, defrost path, valve, tubing, ice-maker, or other component is more likely, and electrical exposure makes continued operation unsafe.
Helpful context
Understand the symptom
Find the leak path before changing a part
A puddle at the front can originate at the dispenser, filter housing, ice-maker area, or a door/defrost path; a puddle at the rear is more suggestive of a supply line, valve, or connection. Dry the visible exterior and place a towel under the suspected area without moving a water-filled or unstable refrigerator. Watch only from a safe, dry position. Water near a plug, outlet, cord, control, or light is an electrical stop condition, not a filter adjustment.
Filter and dispenser leaks are different from defrost water
A filter that is not seated or is cracked can leak and can also reduce water flow. A wet dispenser tip or ice/frost in the chute can send water down the front. By contrast, a door left open for an extended period can let the evaporator ice up and later release water near the bottom of the ice-maker area. These patterns call for different checks, so do not replace a filter to solve a leak that starts underneath or at a rear hose.
Keep the water connection model-specific
Electrolux installation guidance calls for a working shut-off valve and a model-appropriate water line for an ice maker or dispenser. Do not assume that a fitting, filter, tubing route, or valve from another refrigerator will fit. An owner can visually check a dry external line and close an accessible shut-off valve; loosening pressurized tubing, reaching a valve, or tracing an internal line belongs to qualified service.
Temperature alarms raise the priority
A leak accompanied by a high-temperature or door-ajar alarm can indicate that a door is not sealing or that the cooling compartment has been affected. Electrolux notes that alarms vary by model and directs owners to the matching manual. Keep perishable food safety separate from leak diagnosis, and arrange service promptly if the refrigerator cannot return to a normal temperature or water continues to enter the cabinet.
Safety boundary
Stop conditions
- Do not touch a wet plug, cord, outlet, control, or light; isolate power only from a dry safe point and keep water away from electricity.
- Do not loosen pressurized water fittings, remove rear/base panels, open internal tubing or drain paths, or tilt or pull a wet/built-in refrigerator.
- Do not force a filter, chip chute ice with a sharp tool, reach into a powered auger or ice-maker assembly, or defeat a door or water sensor.
- Do not continue operating with a bottom/internal leak, uncontrolled flow, damaged water line, smoke, burning odor, repeated alarm, or high-temperature condition.
- Do not transfer filter, line, dispenser, ice-maker, door, or reset instructions from another Electrolux model.
Only after diagnosis
Potential parts
- refrigerator water filter
Consider this category only when the exact model's filter is visibly cracked, leaking, incorrectly seated, overdue, or the filter-status prompt and leak location support a filter cause.
Confirm the complete refrigerator model and use the same filter type currently installed or the type specified by Electrolux; filter fit is not universal. - refrigerator water supply line or connection
Consider this category only when a visible rear line or coupling is cracked, kinked, strained, or leaking and the exact model's installation documentation confirms the required connection.
Confirm model, connection specification, and installation requirements before ordering; do not substitute tubing or fittings based only on appearance.
When checks do not resolve it
Need a professional?
Arrange qualified Electrolux service for a leak from underneath or inside the cabinet, a rear line or valve that is wet/damaged, a filter housing or dispenser that leaks after correct model-specific care, a persistent door/defrost leak, or any high-temperature alarm that does not clear. Stop immediately for water near electricity, smoke, burning odor, arcing, uncontrolled flow, or a damaged cord, and do not restart until assessed.
Safety scope: The owner may make the area safe, close an accessible water valve, observe the external line, inspect/reseat a model-approved filter, inspect the dispenser/chute and gasket, and clean visible surfaces with minimal moisture. Qualified service must handle internal valves, tubing, drain pans, defrost paths, ice-maker assemblies, wiring, refrigeration components, and live diagnosis.
Common questions
FAQ
Where does an Electrolux refrigerator leak most often?
First locate the path: rear supply line/valve, filter housing, dispenser tip or chute, ice-maker/door area, door edge, or underneath. Electrolux gives different checks for connections, filters, dispenser ice/frost, and door-open evaporator icing, so location matters more than the puddle size.
Can a cracked or loose Electrolux water filter cause a refrigerator leak?
Yes. Electrolux identifies filter installation and cracks as causes of cabinet leaks and slow or absent water. Use the exact model's filter procedure and match the replacement type; if the housing still leaks, arrange service.
Why is water leaking from the bottom of my Electrolux refrigerator?
A door left open can allow evaporator icing and later water near the bottom of the ice-maker area, but water from underneath can also indicate an internal drain, valve, pan, tubing, or ice-maker issue. Check door sealing and alarms without opening panels; a persistent bottom leak needs service.
What should I do if water is near my Electrolux refrigerator plug or outlet?
Do not touch the wet connection or walk through water to unplug it. Isolate power only from a dry safe upstream point if possible, keep the refrigerator off, and arrange qualified electrical/appliance service before restoring power.
When should I call for Electrolux refrigerator leak service?
Call for a leak from underneath or inside, a damaged rear line or valve, a filter housing or dispenser that leaks after correct model-specific care, persistent door/defrost water, a returning high-temperature alarm, or water near electricity. Do not remove panels or run the refrigerator to reproduce an internal leak.
Read the exact guide
Official sources
- Delivery and Installation Guide - RefrigeratorElectrolux Owner Support · Opened official Electrolux installation guide; its water-line and shut-off-valve requirements apply to refrigerators with an ice maker and/or ice-and-water dispenser.
- Refrigerator Water LeaksElectrolux Owner Support · Official Electrolux refrigerator leak guidance located during live research; it covers rear water connections, filter fitment/cracks, door-open evaporator icing, and dispenser ice/frost or droplets.
- Refrigerator Clean and Care GuideElectrolux Owner Support · Opened official Electrolux care guide; it gives low-moisture cleaning boundaries relevant to safe leak observation and gasket care.
- What do the alarms or error messages mean on my Four-Door refrigerator?Electrolux Owner Support · Opened official Electrolux alarm guide; it covers listed refrigerator families and warns that alarm behavior varies by model.
- Refrigerators - How often should I change my water filter?Electrolux Owner Support · Opened official Electrolux filter-care article; it applies across listed refrigerator families and says to use the same filter type currently installed.
Community feedback
Share a repair observation
Share a plain-text repair observation. Accepted observations are published automatically; this page may take a moment to update.