
On this page
Start here
Quick answer
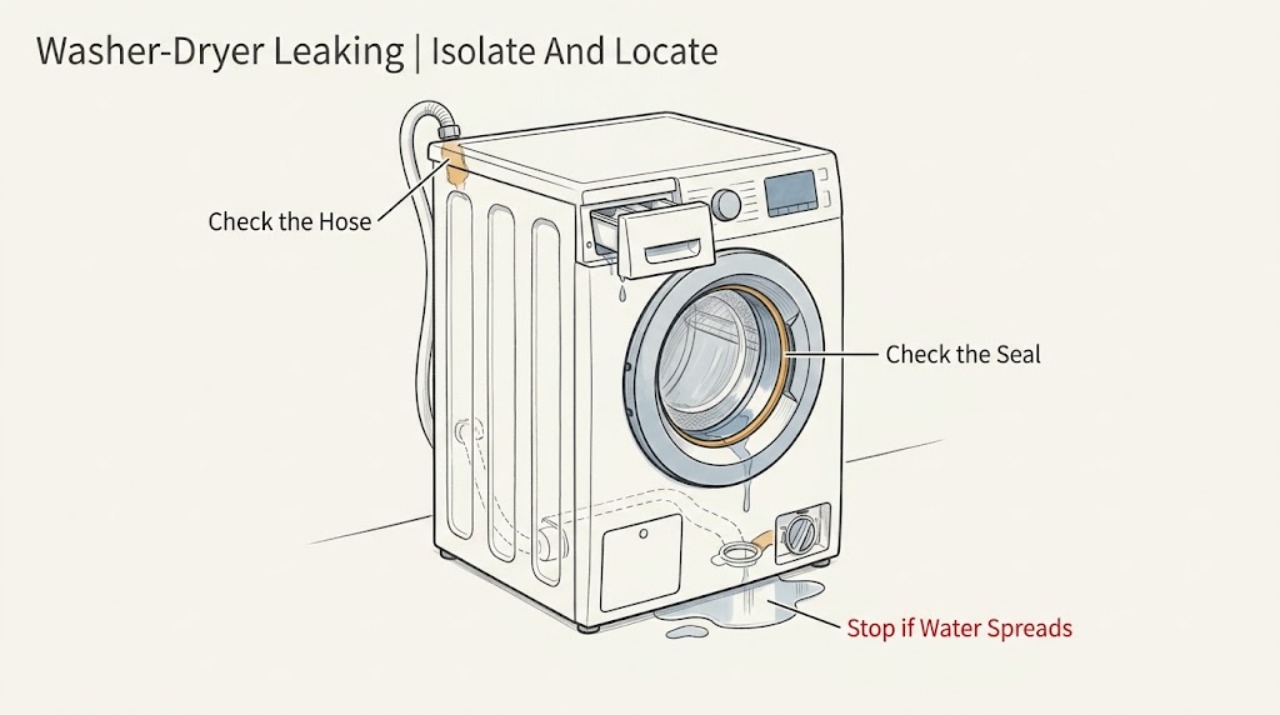
If an Electrolux washer-dryer is leaking, stop the cycle, disconnect power, and turn off the water supply before checking where the water starts. Inspect the inlet hose and tap connections, the door seal, detergent drawer, drain hose or filter, and—if the leak occurs only during drying—the condensate path. Tighten water connections by hand only and clean or refit user-accessible parts as described in the model manual. Do not use the appliance if a hose or door seal is damaged, water is coming from inside the cabinet, or the leak continues after these checks; arrange qualified service.
Work through in order
Diagnostic checks
Use only checks that match the exact appliance or system and its official guide.
-
Check 1
Stop the programme. If safe to reach, disconnect the washer-dryer from power and close the water tap before touching hoses or wiping up water. Do not move the appliance through a puddle or open a panel. Note where the first water appears and whether it happens during filling, washing, draining, spinning, or drying.
Expected result: The leak begins at the tap or rear inlet, front door, detergent drawer, drain area or underside, or only after a drying cycle.
Next step: Follow the matching branch below and keep water and power isolated while inspecting the relevant accessible area.
Stop if: Stop immediately for water near an electrical connection, a damaged power cord, smoke, burning odor, or water escaping from inside the cabinet.
Why this matters
Why: The stage and location identify which external water path to check first; a leak from inside the cabinet is not a user repair check.
-
Check 2
With the water tap closed, inspect the inlet hose at the wall tap and at the washer-dryer for a split, crack, displaced seal, or loose-looking connection. Check the tap body itself for a separate leak. If the connection is sound, tighten it by hand only.
Expected result: Water starts at the tap or either inlet connection, or the hose is cracked, separated, or otherwise damaged.
Next step: Keep the water supply closed. If the hose is damaged or the leak returns, arrange authorized or qualified service; if the connection was only loose, dry it and monitor one short programme only after the area is safe and the manual permits it.
Stop if: Do not use pliers or another tool on the water connection, and do not run the appliance with a cracked or separated hose.
Why this matters
Why: A loose or damaged inlet hose can leak during filling. A damaged hose is not made safe by tightening and should not be used.
-
Check 3
Open the door only after the appliance is isolated. Inspect the rubber door seal and the glass for clothing, lint, or another object trapped across the sealing surface, then look for tears, cracks, or holes.
Expected result: A trapped item or residue is present, or the seal is visibly damaged; the wet trail runs down from the door area.
Next step: Remove only a loose trapped item and clean the accessible surface. If the seal is damaged or the front leak returns, stop using the machine and arrange service.
Stop if: Do not stretch, glue, cut, or remove the door seal, and do not operate the washer-dryer with a damaged seal.
Why this matters
Why: A trapped item can prevent sealing, while a torn or holed seal can let wash water escape at the front. A damaged seal requires replacement by a service engineer.
-
Check 4
If water comes from the detergent drawer, remove the drawer only as described in the user manual. Rinse away detergent residue or limescale, make sure the compartments are seated correctly, and use the detergent amount specified for the load and water hardness.
Expected result: The drawer has buildup, a compartment is not seated, or excessive foam is present; after cleaning, water no longer spills from the drawer.
Next step: Refit the drawer and monitor only after the machine is dry and reconnected safely. If the drawer still overflows or leaks appear elsewhere, stop and request service.
Stop if: Do not force the drawer, dismantle the dispenser plumbing, or keep running cycles while the drawer is overflowing.
Why this matters
Why: Residue can restrict dispenser flow, and excessive detergent can create foam that contributes to leaking. A clean, correctly fitted drawer should direct water into the drum.
-
Check 5
If the leak appears while draining or underneath the machine, check the visible drain hose for a kink, loose positioning, or damage and check that the user-accessible drain filter is fitted correctly, following the model manual. Keep the water and power supplies isolated while opening any filter access described by the manual.
Expected result: The drain hose is kinked or damaged, the filter is not seated, or water is coming from behind the cabinet or an inaccessible underside.
Next step: Correct only a simple external hose position or hand-refit a user-accessible filter as the manual directs. For damage, an internal leak, or a repeat leak, leave the appliance off and arrange service.
Stop if: Do not reach behind panels, dismantle the pump, or run repeated cycles to locate an underside leak.
Why this matters
Why: A restricted or incorrectly fitted drain path can release water during pumping. Water from an inaccessible area can indicate an internal hose, pump, valve, or other fault.
-
Check 6
If the washer-dryer stays dry during washing but leaks after drying, inspect only the accessible condensate container, drain hose if directly connected, lint filters, and door or access-flap seals described in the manual. Confirm the appliance is stable and level without pulling it out of its installation space.
Expected result: The condensate container is not collecting expected water, a direct-drain hose is kinked, filters are blocked, or the leak persists despite a clear accessible path.
Next step: Clean or reposition only the accessible items covered by the manual. If water still appears under the dryer section or the condensate path is inaccessible, stop drying and arrange service.
Stop if: Do not open the drying circuit or cabinet, and do not continue drying when water is reaching the floor or electrical areas.
Why this matters
Why: Electrolux identifies blocked filters, a kinked outlet hose, poor level, or seal contamination as possible dryer-side causes; a persistent under-dryer leak can require support service.
-
Check 7
After the safe external checks, record the model number or PNC, serial number, exact leak location, cycle stage, any displayed code or beeps, and whether the leak began after installation or movement. Do not repeat a full cycle just to reproduce an active leak.
Expected result: The leak is persistent, comes from inside the cabinet, follows a damaged seal or hose, or recurs after the external path was cleaned and fitted correctly.
Next step: Keep the water supply closed and power disconnected, then arrange qualified appliance service. Give the technician the recorded timing and location so the inspection starts at the right water path.
Stop if: Do not remove covers or attempt internal component replacement without the model-specific service procedure and appropriate qualification.
Why this matters
Why: Electrolux treats repeated leaks, damaged seals, internal cabinet water, and unresolved external checks as service conditions involving components such as hoses, pumps, valves, or dispensers.
Use your observations
Decision map
Find the observation that best matches what you see, then follow the next safe action.
-
PATH 01Next step
What you see
The first water appears at the tap, inlet adapter, or rear inlet connection during filling.
Do this next
Close the water tap, inspect for damage, hand-tighten a sound connection, and request service for a cracked hose or recurring leak.
Why this path and its safety boundary
Why it matters: The inlet hose, sealing washer, connection, or tap is the first place to investigate.
-
PATH 02Next step
What you see
Water runs from the front of the door during washing.
Do this next
With power and water isolated, remove a loose trapped item and clean the accessible seal. Do not use the machine if the seal is torn or holed.
Why this path and its safety boundary
Why it matters: A trapped item or damaged door seal can prevent the door from sealing.
-
PATH 03Next step
What you see
Water or foam spills from the detergent drawer.
Do this next
Clean and refit the drawer as the manual directs, use the recommended detergent amount, and request service if overflow returns.
Why this path and its safety boundary
Why it matters: Residue, limescale, an incorrectly seated drawer, or too much detergent can restrict the dispenser path.
-
PATH 04Next step
What you see
The leak starts during draining or appears from the rear or underside.
Do this next
Check only the external hose and user-accessible filter described in the manual. Leave the appliance off for damage, inaccessible water, or a repeat leak.
Why this path and its safety boundary
Why it matters: A kinked or damaged drain hose, incorrectly fitted filter, blocked path, or internal pump or hose fault is possible.
-
PATH 05Next step
What you see
Washing completes without a leak but water appears after drying.
Do this next
Clean or reposition only the accessible items covered by the manual; stop drying and request service if the under-dryer leak persists.
Why this path and its safety boundary
Why it matters: The dryer-side condensate container, direct-drain hose, filter, level, or seal path needs an accessible check.
-
PATH 06Next step
What you see
The leak remains after external hoses, drawer, filter, and seal checks, or water is inside the cabinet.
Do this next
Keep water and power isolated and arrange qualified appliance service.
Why this path and its safety boundary
Why it matters: An internal hose, valve, pump, dispenser, or other component may be involved and the appliance is not safe for further user testing.
Helpful context
Understand the symptom
A washer-dryer can leak from more than one water path, so the first useful clue is where the first wet spot appears and at what stage it begins. Water during filling points toward the tap or inlet hose; water at the front points toward the door seal or a trapped item; water from a drawer points toward residue or restricted dispenser flow; water during draining points toward the drain path. A leak that appears only after drying needs a separate condensate check.
Electrolux's washer-dryer guidance starts with isolating the appliance and water supply, then checking external connections, the door seal, and accessible filters or drawers. Inspect and clean only parts identified in the model's user manual. A cracked hose, damaged seal, water inside the cabinet, or a leak that remains across cycles is a service condition rather than a reason to keep running test programmes.
Use the leak location to give the technician a precise handoff: filling, washing, draining, spinning, or drying; front, back, drawer, underside, or cabinet; and any E30, C3, or beep indication. Keep the machine out of service when water could reach electrical parts, and never remove panels to chase an internal hose, pump, valve, or heater leak.
Safety boundary
Stop conditions
- Disconnect power and close the water supply before checking hoses, filters, or the door seal.
- Do not use pliers or tools to tighten inlet-hose connections; hand-tighten only.
- Do not run repeated cycles to reproduce an active leak.
- Do not remove panels or work on internal hoses, pumps, valves, wiring, or drying components.
- Stop for water near electrical parts, a damaged cord, smoke, burning odor, a cracked hose, or a damaged door seal.
Only after diagnosis
Potential parts
- inlet water hose
Consider this only if the inlet hose is visibly cracked, split, or separated and the water leak is confirmed at that hose.
Confirm the exact model or PNC and the manufacturer's fit information before selecting any hose. - door seal
Consider this only if the front leak is traced to a torn, cracked, or holed door seal; do not use the appliance until repaired.
Door-seal fit varies by model; verify the exact model or PNC and use qualified service when replacement is required. - drain pump or drain filter assembly
Consider this only after a qualified diagnosis finds an internal drain fault; a kinked hose or incorrectly fitted user-accessible filter is not proof that a pump is bad.
Confirm model-specific compatibility and have internal replacement performed by a qualified technician.
When checks do not resolve it
Need a professional?
Arrange qualified appliance service if the washer-dryer leaks from inside the cabinet, a hose or door seal is cracked or separated, the leak recurs after the external checks, water reaches an electrical area, or an error such as E30 or C3 returns. Stop using the appliance until repaired when a door seal is damaged or the leak is active.
Have this ready
- Electrolux model number or PNC, serial number, exact water location, cycle stage, displayed code or beep pattern, recent installation or movement history, and safely visible external damage.
Common questions
FAQ
Where should I look first when my Electrolux washer-dryer leaks?
First isolate power and water, then identify where the first wet spot appears and at what cycle stage. Check the inlet path for filling leaks, the door seal for front leaks, the drawer for overflow, the drain path for underside leaks, and the condensate path for leaks that happen only during drying.
Can I tighten a leaking washer-dryer inlet hose?
Close the water tap first. If the hose and seals are intact, a loose connection may be hand-tightened only. Do not use pliers, and stop using the machine if the hose is cracked, separated, or still leaks.
What if the leak is coming from the door?
With power and water isolated, check for clothing or debris trapped between the glass and seal. A torn, cracked, or holed door seal requires service, and Electrolux advises not using the appliance until it is repaired.
What do E30 or C3 mean on an Electrolux washer-dryer?
Electrolux describes E30 or C3 with three beeps as an indication of water at the bottom or inside the machine. Check the supply hose, door seal, and accessible drainage items as directed; if the indication or leak returns, request service.
Why does it leak only during drying?
The drying section may be sending condensate through a container or direct-drain hose. Check only the accessible container, hose, filters, level, and seals described in the manual; stop drying and arrange service if water still reaches the floor.
Read the exact guide
Official sources
- Washing machine repair serviceElectrolux Support · Electrolux professional repair preparation and leak-related service escalation
- Tumble dryer is leakingElectrolux Support · Electrolux condenser and heat-pump dryer water leaks relevant to the drying section of a washer-dryer
- Electrolux Washing Machine Leaking Water – Causes and SolutionsElectrolux Support · Electrolux washing machines and washer dryers: common leak locations, external checks, and service boundary
- Washer - dryer inlet hose is leakingElectrolux Support · Electrolux washer-dryer inlet hose and tap connections
- Washer dryer displays error message E30, C3 or emits 3 beepsElectrolux Support · Electrolux washer dryers with water in the base or inside the appliance and E30/C3 indication
Community feedback
Share a repair observation
Share a plain-text repair observation. Accepted observations are published automatically; this page may take a moment to update.