
On this page
Start here
Quick answer
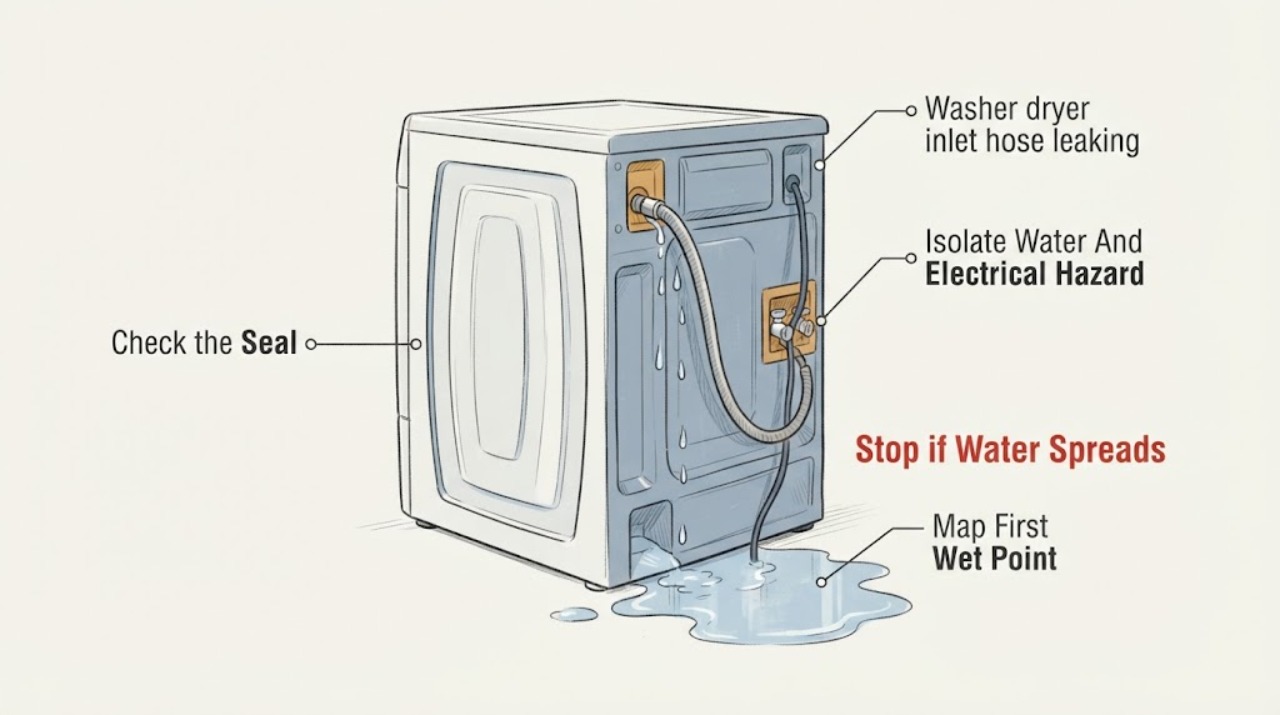
Close the hot and cold laundry water valves, and the dryer steam water valve if your combo or steam dryer has one, before tracing a leak. Dry the area from a safe position and identify whether water starts along the hose, at the wall faucet, at the washer inlet valve, or at a steam-dryer Y-connector or inlet. A wet threaded joint often points to a missing, damaged, misaligned, or worn rubber washer or a cross-threaded connection; a split, bulged, kinked, corroded, or rubbing hose should be replaced with the exact approved type. Do not overtighten fittings, open the appliance cabinet, or continue a wash or steam cycle to test an active leak. If the wall valve, appliance inlet valve, concealed plumbing, or a connection that remains wet after a correct external hose check is involved, leave the water off and call a qualified appliance technician or plumber.
Work through in order
Diagnostic checks
Use only checks that match the exact appliance or system and its official guide.
-
Check 1
Stop the washer or dryer cycle and close the accessible hot and cold water valves, including the steam-dryer water valve when present; keep clear of any water near the power cord, receptacle, or controls.
Expected result: Record a slow drip, active stream or spray, water reaching electrical equipment, a damaged wall valve, flooding, or no safe access to the shutoff valves.
Next step: If water is near electrical equipment, keep clear and use appropriate electrical or emergency help; otherwise place a towel or container to catch residual water without moving the appliance yet.
Stop if: Do not touch wet electrical equipment, move a stacked appliance alone, restart a cycle, or continue if water is spraying or flooding.
Why this matters
Why: A contained leak may leave room for safe external inspection, while flooding, electrical exposure, or an inaccessible shutoff requires the water to remain off and professional help.
-
Check 2
From an accessible position, dry and inspect the full inlet-hose lengths and both ends: the household water valves, washer inlet ports, and any steam-dryer Y-connector or dryer fill-valve connection.
Expected result: Record water along the hose, moisture only at a threaded end, moisture at the wall valve, a wet washer or dryer inlet valve, a wet Y-connector, or a leak with no visible first point.
Next step: Photograph or mark the first wet point and keep the supply off while selecting the hose, faucet, dryer-water-line, or appliance-service branch.
Stop if: Do not remove the appliance back panel, reach behind an inaccessible stacked unit, or test a concealed leak by reopening the water.
Why this matters
Why: A wet hose length suggests hose damage; an end-only leak makes the washer, connector, seal, or threading relevant; a wall or internal valve source needs plumbing or appliance diagnosis.
-
Check 3
With the water supply off and the hose drained into a container if needed, follow the exact installation instructions to inspect an accessible hose fitting for its rubber or screen washer, cross-threading, visible misalignment, or damage.
Expected result: Record a missing, flattened, torn, or displaced washer; a visibly misaligned or cross-threaded fitting; an intact correctly seated washer; or no safe way to access the fitting.
Next step: Use a new washer or the model-approved hose only when the installation instructions support it; seat the fitting correctly without force, then stop for a technician if the joint or valve is damaged.
Stop if: Do not use sealant as a substitute for a washer, cross-thread the connector, overtighten, or work on a valve that is damaged or cannot be shut off.
Why this matters
Why: A damaged or missing seal can prevent the joint from sealing, while cross-threading or a damaged valve can keep leaking after a washer change; an intact joint shifts suspicion to the hose or valve.
-
Check 4
Inspect the accessible hose body and routing for cracks, punctures, bulges, cuts, corrosion, kinks, stretching, sharp-edge contact, or rubbing against the appliance; note the hose age or replacement date if known.
Expected result: Record any visible hose damage or stress, an old or unknown-age hose, a kink or sharp-edge contact, or a hose that looks intact but still leaks at one point.
Next step: Leave the water off and obtain the exact model-approved replacement hose when damage is visible. Have a professional evaluate a sound-looking hose that still leaks or a hose route that cannot be safely corrected.
Stop if: Do not patch an inlet hose, straighten it by pulling on the fittings, use an old hose for a temporary pressurized repair, or operate with a bulged or cracked hose.
Why this matters
Why: Body damage or repeated stress supports replacing the hose with the approved type; an intact hose with an end leak keeps the seal, valve, and threading in consideration.
-
Check 5
If the dryer has a steam function or the pair uses a shared supply, inspect the cold-water faucet, Y-connector, washer hose, added dryer hose, and dryer fill-valve area separately from the washer's hot and cold hoses.
Expected result: Record a leak at the faucet, Y-connector, shared hose, dryer hose, dryer fill valve, or no separate dryer water connection.
Next step: Keep the cold-water supply off and arrange qualified appliance or plumbing service for a Y-connector, faucet, dryer-valve, or inaccessible connection that remains wet.
Stop if: Do not disconnect a shared line while pressurized, move a stacked pair alone, or open the dryer cabinet or fill-valve assembly.
Why this matters
Why: A steam dryer's water line can create a leak behind a washer-dryer pair even when the washer's inlet hoses are dry; a dryer fill-valve or concealed source needs appliance service.
-
Check 6
Record the washer-dryer brand and model, washer versus dryer connection, hot or cold side, first wet point, hose condition and age, washer location, recent installation or movement, and whether water reached electrical equipment.
Expected result: Confirm that the handoff contains labels and external observations only, with the water supply off and no cabinet, panel, valve, or electrical component opened.
Next step: Contact a qualified appliance technician for an appliance-side or steam-line source, or a plumber for a wall valve or household-piping source, and provide the photos and model information.
Stop if: Stop homeowner troubleshooting when the source is internal, the shutoff valve is defective, the leak persists after a correct external check, or diagnosis requires pressure, cabinet, panel, or electrical work.
Why this matters
Why: The connection identity and leak timing help a technician distinguish a hose or seal from a wall faucet, appliance inlet valve, steam-dryer water line, or concealed plumbing issue.
Use your observations
Decision map
Find the observation that best matches what you see, then follow the next safe action.
-
PATH 01Safety boundary
What you see
Water appears along the inlet-hose body, or the hose has a crack, puncture, bulge, cut, corrosion, severe kink, or sharp-edge wear.
Do this next
Keep the water valve closed and replace the hose with the exact appliance-approved type and new washer where specified, or have a qualified technician install it.
Why this path and its safety boundary
Why it matters: The hose itself is the leading leak source, and continued pressurized use can cause water damage.
Safety stop: Do not patch the hose, use it as a temporary repair, or reopen the supply while the hose remains damaged.
-
PATH 02Next step
What you see
The hose body is dry but a threaded end at the wall faucet, washer inlet, Y-connector, or dryer inlet is wet.
Do this next
With water off, follow the exact installation instructions to inspect the seal and reconnect without cross-threading or overtightening. If it still leaks, leave the water off and call an appliance technician or plumber according to the wet component.
Why this path and its safety boundary
Why it matters: A washer, seating, alignment, or damaged fitting is more likely than a split in the hose body; a wall valve may also be the source.
-
PATH 03Next step
What you see
The leak begins at the household water valve, supply stub, or nearby wall plumbing rather than at the hose fitting.
Do this next
Keep the affected water supply off and call a qualified plumber; do not force the valve or attempt to repair concealed plumbing behind the appliance.
Why this path and its safety boundary
Why it matters: The appliance hose may be intact, while a faucet, valve, pressure, or household-piping problem needs plumbing assessment.
-
PATH 04Safety boundary
What you see
The hose and visible seals are dry, but water appears at the washer inlet valve, inside the cabinet, at the dryer fill valve, or at an inaccessible connection on a steam setup.
Do this next
Leave the water supply off and request appliance service; include whether the leak occurs during filling or steam operation and which side is affected.
Why this path and its safety boundary
Why it matters: An appliance valve, internal hose, connector, or concealed line is possible and cannot be safely confirmed from outside.
Safety stop: Do not remove panels, access the inlet valve, or run a cycle with the source unresolved.
-
PATH 05Safety boundary
What you see
Water is spraying or flooding, reaches an electrical receptacle or control, the shutoff cannot close, the appliance is unstable, or a breaker trips after the leak.
Do this next
Keep clear, do not touch wet electrical equipment or move the appliance, and use appropriate emergency, electrical, plumbing, or appliance help from a safe location.
Why this path and its safety boundary
Why it matters: The immediate risk is water damage, electric shock, fire, or a falling appliance rather than identifying a replacement hose.
Safety stop: Do not restore water or power to test the leak and do not enter standing water around electrical equipment.
Helpful context
Understand the symptom
Shut off water before moving or disconnecting anything
Stop the appliance and close the accessible hot and cold water valves. If the dryer has a steam function, close its cold-water supply as well. Keep the appliance unplugged if water has reached the power cord, receptacle, or controls, and do not touch wet electrical equipment. Use towels or a shallow container only to protect the floor from residual water; do not pull a heavy stacked unit forward by yourself. An active spray, flooding, damaged wall valve, or water behind the appliance is a reason to leave the supply off and call for help.
Find the first wet point, not just the puddle
With the water off, dry the accessible exterior of each hose and fitting. Look at both ends of the washer's hot and cold inlet hoses, the full hose length, the wall valves, and the back of the appliance. For a steam dryer, also inspect the cold-water faucet, Y-connector, shared hose, and dryer fill-valve connection. A wet end with a dry hose often makes the seal or threading relevant; a wet spot along the hose points toward hose damage; water that begins inside the cabinet or at the wall valve needs a professional diagnosis.
Check seals and hose condition without forcing fittings
Only after the supply is off and residual water is controlled, follow the appliance's installation instructions to examine an accessible connector for its rubber washer or screen washer. Do not cross-thread the fitting or use force; overtightening can damage a valve or coupling. Replace a hose that is cracked, punctured, bulged, corroded, cut, kinked, overstretched, or rubbing a sharp edge, and use new washers where the instructions call for them. Do not substitute a hose based only on appearance or length; match the appliance and connection requirements.
Separate a hose leak from an appliance or plumbing leak
After an approved hose or washer check, keep the water supply off until the connection is stable and the area is dry. If the hose itself is damaged, replacement is the appropriate path; if the leak remains at the household faucet, the faucet or water pressure may need plumbing service. If the leak appears at the washer's inlet valve, inside the cabinet, or at a steam dryer's fill valve, stop at external observation and arrange appliance service. A leak that returns only during filling can still be a pressurized connection problem even when the floor is dry between cycles.
Safety boundary
Stop conditions
- Stop immediately for spraying or flooding water, water near electrical equipment, a shutoff valve that will not close, a damaged wall valve, an unstable stacked unit, or a breaker that trips after the leak.
- Keep the affected water supply off when a hose is cracked, bulged, cut, corroded, kinked, leaking at an unresolved connection, or leaking from an appliance valve or concealed pipe.
- Do not patch a pressurized hose, overtighten or cross-thread fittings, open appliance cabinets or panels, disconnect a shared steam line while pressurized, or move a heavy washer-dryer pair alone.
Only after diagnosis
Potential parts
- washer or steam-dryer inlet hose
Consider this only when the hose body is cracked, punctured, bulged, corroded, cut, kinked, or otherwise confirmed as the leak source.
Match the exact appliance model, hot or cold use, connector type, length, pressure rating, and installation instructions; use new washers where specified. - rubber or screen hose washer
Consider this only when an accessible connection is wet and its washer is missing, displaced, flattened, torn, or otherwise damaged.
Use the seal specified for the hose and appliance connection. A washer cannot correct a damaged valve, cross-threaded fitting, or split hose. - Y-connector or steam-dryer water-line component
Consider this only when a steam dryer is present and the leak is localized to the shared cold-water connector or added dryer line.
Match the exact dryer installation instructions and connection arrangement; have a technician handle an inaccessible or damaged fill-valve connection.
When checks do not resolve it
Need a professional?
Call a qualified appliance technician for a leak at the washer inlet valve, dryer steam fill valve, internal hose, cabinet, or an inaccessible appliance connection, or when an external hose and seal check does not stop the leak. Call a qualified plumber for a household faucet, shutoff valve, supply stub, pressure, or concealed-piping source. Use appropriate emergency or electrical help for flooding, water near energized equipment, an uncontrollable shutoff, or a recurring breaker trip.
Have this ready
- Provide the appliance brand and model, washer versus dryer connection, hot or cold side, first wet point, hose age and condition, photos of visible connections, recent installation or movement, leak timing during fill or steam operation, and any electrical or flooding warning.
Common questions
FAQ
Why is my washer-dryer inlet hose leaking at the connection?
A missing, damaged, displaced, or misaligned rubber washer, cross-threaded fitting, loose connection, damaged valve, or excessive tightening can cause an end leak. Close the water supply, inspect the accessible seal according to the appliance instructions, and call a plumber or appliance technician if the connection remains wet.
Can I use a washer-dryer with a cracked or bulging inlet hose?
No. Keep the affected water valve closed and replace a cracked, punctured, bulged, cut, corroded, kinked, or leaking hose with the exact approved type, or have a qualified technician do it. Do not patch a pressurized inlet hose.
Could the leak behind a washer-dryer come from the dryer?
Yes, if the dryer has a steam function. Its cold-water hose, shared Y-connector, faucet, or dryer fill-valve connection can leak separately from the washer's hot and cold hoses. Keep the cold-water supply off and identify the first wet point before arranging appliance or plumbing service.
When should I call a plumber instead of replacing the inlet hose?
Call a plumber when the household faucet, shutoff valve, supply stub, pressure, or concealed wall plumbing is the wet source, or when the valve will not close. Call an appliance technician for a washer inlet valve, dryer fill valve, internal hose, cabinet, or connection that remains inaccessible or wet after a correct external hose check.
Read the exact guide
Official sources
- How to Install a Washing MachineWhirlpool · Whirlpool's manufacturer installation guide supports general washer inlet-hose inspection and sealing principles; the installed appliance manual controls model-specific steps.
- GE Profile UltraFast Combo Washer/Dryer - Installing Inlet Water Supply HosesGE Appliances · GE's official combo-appliance instructions support general connection and inspection logic for washer-dryer units; model-specific instructions control the exact hardware.
- LG Washer - Why is My Front Load Washing Machine Leaking?LG Electronics · LG's official support page provides manufacturer troubleshooting context for common washer inlet-hose leaks; the installed brand and model manual govern the appliance.
- Leaking from Behind - WasherWhirlpool · Whirlpool's official product-help page supports distinguishing inlet-hose connections, washers, ports, drain paths, and household plumbing; exact model instructions remain controlling.
- Installation of Water Line - DryerWhirlpool · Whirlpool's official steam-dryer water-line page supports the separate dryer-water-line branch; only models equipped for steam use this arrangement.
Community feedback
Share a repair observation
Share a plain-text repair observation. Accepted observations are published automatically; this page may take a moment to update.