
On this page
Start here
Quick answer
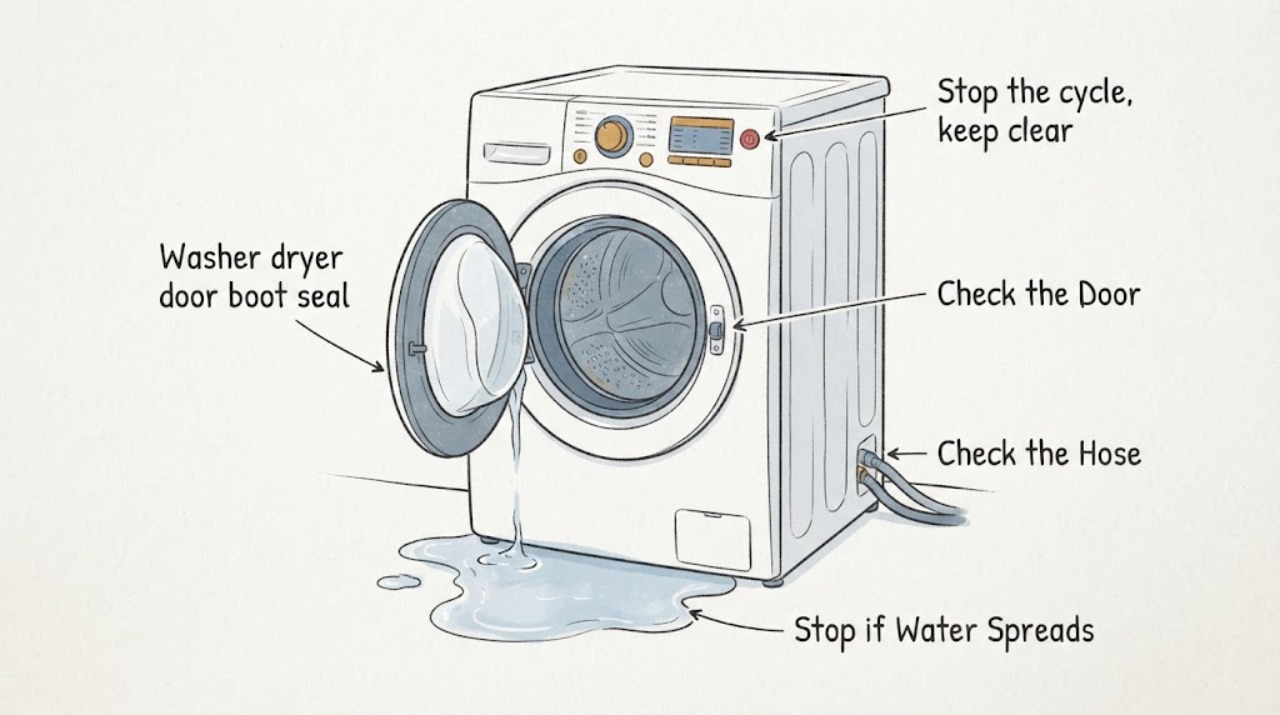
A leaking front-load washer or washer-dryer door boot seal is often caused by hair, lint, fabric, or detergent residue caught between the rubber seal and door glass. It can also result from a torn or displaced boot, a door or hinge that no longer aligns, excess suds, or a leak elsewhere that is running toward the door. Stop the cycle, turn off water and power when safe, inspect the fold and glass, remove only visible debris, and wipe the surfaces with a soft cloth. If the boot is torn, the leak persists with a clean seal, water is entering from the rear or bottom, or the appliance cannot be safely drained, leave it out of service and arrange qualified appliance repair.
Before you begin
Safety first
- A technician can safely remove and fit the model-specific boot and retaining hardware, check door and hinge alignment, inspect the tub, pump, hoses, drain path, and cabinet, and verify leaks under controlled operation. Keep homeowner work to stopping the cycle, tracing visible moisture, gentle accessible cleaning, and documented manual procedures.
Work through in order
Diagnostic checks
Use only checks that match the exact appliance or system and its official guide.
-
Check 1
Stop the cycle, keep clear of the drum, and turn off the home's washer water supplies and appliance power as the owner's manual permits; protect the floor from spreading water.
Expected result: The leak stops when the appliance is idle, water continues to enter, the drum is still moving or hot, or water is near an outlet or electrical connection.
Next step: Leave the door closed if water or heat makes opening unsafe, and arrange qualified appliance service for uncontrolled flow, water near electrical parts, or a cycle that will not stop normally. Otherwise continue only when the drum is stopped and the area is safe.
Why this matters
Why: Stopping operation limits water and movement hazards. Continued filling, heat, motion, or water near electrical equipment means the appliance is not ready for hands-on inspection.
-
Check 2
Trace the first wet point with the appliance stopped: inspect the lower door edge, boot fold, door glass, detergent drawer area, inlet connections, drain-filter access, drain hose, and floor beneath the cabinet.
Expected result: The first moisture is at the boot or glass, at the filter or residual-water hose, at the dispenser or rear hoses, or cannot be located.
Next step: Photograph the first wet point and do not move the machine or remove panels to chase an unknown leak. Follow the manual's source-specific check, or arrange service if the location is not clear.
Why this matters
Why: Moisture at the boot or glass supports a door-seal path. Moisture at another component means replacing the boot may not address the leak. An unknown source requires a controlled model-specific test rather than guessing.
-
Check 3
With the door open and the drum empty, gently inspect the accessible boot folds, especially the bottom, and wipe the inner door glass and rubber with a soft cloth as the manual allows.
Expected result: Hair, lint, threads, coins, detergent film, or a fabric edge is trapped; the boot and glass are clean; or the boot has a cut, hole, loose edge, or displaced section.
Next step: Remove only loose debris and wipe gently; do not use a blade, abrasive tool, undiluted chemical, or force the rubber back into a hidden clamp. Treat damage or displacement as a repair condition.
Why this matters
Why: Foreign material can prevent a continuous seal between rubber and glass. A clean intact boot makes a hidden source, alignment issue, excessive suds, or internal leak more likely. A tear or displaced boot can directly explain water at the door.
-
Check 4
Check the door glass rim, hinge side, latch side, and door alignment for a visible gap, rubbing, sag, or fabric caught between the door and the boot; do not lift the door or adjust hinge hardware.
Expected result: The door closes evenly with no trapped fabric, fabric is caught at the seal, the door is visibly misaligned, or the latch and glass look normal.
Next step: Remove accessible fabric and close the door normally for a later controlled test. Stop and arrange service for sagging, hinge or latch damage, a persistent gap, or any need to remove the boot retaining ring.
Why this matters
Why: A trapped item or misalignment can interrupt the seal even when the rubber is not torn. A normal-looking door does not rule out a boot leak, but it shifts the decision toward residue, another source, or an internal fault.
-
Check 5
Note when the leak appears in relation to filling, tumbling, rinsing, draining, or drying, and whether it occurs with an empty rinse or only with a loaded or sudsy cycle.
Expected result: The leak starts as water enters, during tumbling at the door, during drain, only with heavy suds or a large load, or also during an empty rinse.
Next step: Do not run repeated tests with a damaged boot or active puddle. If a single empty, model-permitted rinse is used to locate the source, stay present and stop immediately if water escapes; persistent leakage needs service.
Why this matters
Why: A leak during tumbling at a clean door supports a boot, door, or alignment problem. A drain-only puddle points toward the drain filter, hose, standpipe, or backflow. A load- or suds-dependent leak can involve trapped fabric, overloading, or detergent behavior; an empty-rinse leak indicates a machine condition that needs closer diagnosis.
-
Check 6
If water appears below the door or during drain, inspect the visible drain-filter cover, residual-water hose cap, drain hose, and standpipe from outside; only drain trapped water using the exact manual procedure and a suitable container.
Expected result: The filter cap or residual-water hose cap is loose, the drain hose is cracked or displaced, the standpipe backs up, or the drain area is dry while the boot still leaks.
Next step: Close only accessible caps or reposition a visibly displaced hose as the manual directs, without overtightening. Do not remove a filter with water uncontrolled; call a plumber or appliance technician for a blocked drain, damaged hose, or persistent leak.
Why this matters
Why: A loose filter closure, damaged hose, or drain backflow can create a floor leak that resembles a door-boot leak. A dry drain area with water at the door keeps the boot, glass, door alignment, or internal tub path in focus.
-
Check 7
After loose debris is removed and the door and boot are dry and intact, perform at most one attended, model-permitted empty rinse or leak check while watching the door edge and cabinet from a safe distance.
Expected result: No leak occurs, the same door-edge leak returns, water appears at another location, or the boot opens or shifts during operation.
Next step: Stop testing after the first recurrence. Leave the appliance out of service for a torn, displaced, or persistently leaking boot and arrange qualified appliance repair with the source and cycle timing documented.
Why this matters
Why: No leak in a controlled empty test makes trapped laundry, load placement, or residue more likely, but it does not prove the boot is sound under every condition. A repeat door leak or shifting boot indicates a seal, alignment, retaining, or tub-related fault; another wet point changes the repair path.
Use your observations
Decision map
Find the observation that best matches what you see, then follow the next safe action.
-
PATH 01Next step
What you see
The boot is intact, but hair, lint, fabric, or detergent residue is trapped between the rubber and the door glass and the leak stops after gentle cleaning.
Do this next
Keep the door glass and boot clean and check the fold before future loads. If the leak returns with a clean, correctly closed door, arrange service rather than continuing to wipe only the visible edge.
Why this path and its safety boundary
Why it matters: A temporary sealing obstruction is more likely than a failed boot, although recurring buildup can indicate cleaning, loading, or detergent habits that need correction.
-
PATH 02Next step
What you see
The boot is torn, punctured, displaced, or unable to stay seated, or the door is visibly sagging or misaligned.
Do this next
Stop using the appliance and arrange qualified repair for the exact boot, retaining arrangement, hinge, latch, or door alignment. Do not stretch the boot, remove retaining rings, or tape over a tear.
Why this path and its safety boundary
Why it matters: A mechanical seal or door-alignment fault is more likely and cannot be reliably corrected by detergent changes or surface cleaning.
-
PATH 03Next step
What you see
Water appears only with a large or sudsy load, but the empty attended test does not leak and the boot and glass are intact.
Do this next
Use the manual's load and detergent guidance, keep fabric away from the gasket, and monitor one normal load. Any recurrence with normal loading or heavy water loss needs service.
Why this path and its safety boundary
Why it matters: Trapped fabric, overloading, or excess suds is more likely than a constant boot failure, but a marginal seal can still be exposed by load movement.
-
PATH 04Next step
What you see
The puddle appears during drain, near the filter or residual-water hose, at the rear, or at the standpipe rather than first at the door.
Do this next
Follow the model's source-specific drain or hose check, without opening water-filled parts uncontrolled. Use a plumber for standpipe backflow and an appliance technician for a machine-side hose or filter fault.
Why this path and its safety boundary
Why it matters: A drain-filter closure, drain hose, standpipe backflow, inlet connection, or another non-boot source is more likely.
-
PATH 05Next step
What you see
The boot and glass are clean but the door-edge leak persists, the source cannot be located, water reaches electrical areas, or the appliance leaks during an empty cycle.
Do this next
Keep water and power isolated as the manual permits and arrange qualified appliance repair. Provide photographs, cycle timing, and the first wet point; do not remove panels or run repeated tests.
Why this path and its safety boundary
Why it matters: A concealed tub, door, retaining, pump, hose, or cabinet fault is more likely than accessible residue, and continued operation can worsen water damage.
Helpful context
Understand the symptom
Confirm that the door boot is actually the source
Water at the lower front edge is a useful clue, not proof that the boot itself has failed. A loose drain-filter cap, drain hose, inlet hose, dispenser overflow, or excessive suds can send water down the cabinet and make it appear to come from the door. Stop the cycle and dry the outside enough to trace the first wet point. Do not run the appliance unattended while a leak is active.
Inspect the fold where leaks hide
Open the door only after the drum has stopped and the manual permits it. Pull the accessible lip of the rubber boot back gently and look around the lower fold, drain openings, door glass, and latch side for coins, hair, lint, threads, or detergent film. A small object can hold the rubber away from the glass and create a channel for water. Remove only loose material; do not stretch the boot or use a sharp tool.
A damaged boot is a service decision
A pinhole, split, loose edge, displaced retaining ring, or permanently distorted sealing surface can let water escape even when the glass is clean. The boot also has model-specific folds and connections, so a generic-looking replacement may not fit or seal. Manufacturer guidance directs repair when the rubber gasket is torn or damaged or when cleaning does not stop the leak.
Use detergent and load clues
Fabric caught between the door and boot, an overfilled drum, or heavy suds can push water past an otherwise intact seal. Note whether the leak happens only with a large load, only during a high-suds cycle, or even during an empty rinse. Use only the detergent and quantity specified for the appliance and product; do not mask a mechanical leak by simply adding less detergent.
Water below the door may come from somewhere else
If the leak appears during drain, inspect from a safe position for water around the drain filter, residual-water hose, drain hose, or drain standpipe. A clogged or incorrectly reassembled drain path can cause backflow or a floor puddle. Do not open a filter or hose with uncontrolled water inside the machine; follow the manual's drain procedure or call service.
Safety boundary
Stop conditions
- Stop the cycle and isolate water and power as the owner's manual permits if water reaches an outlet or electrical area, the appliance will not stop, the drum is moving or hot, or the leak is rapidly spreading.
- Do not use a blade, screwdriver, abrasive tool, undiluted bleach, tape, or adhesive to repair or reshape the boot. Do not remove retaining rings, panels, pumps, or hoses as an ordinary homeowner check.
- Do not open a drain filter or residual-water hose with water uncontrolled, and do not force the door, hinge, latch, or rubber seal. Standing water may be present even when it is not visible through the glass.
- Arrange qualified appliance service for a torn or displaced boot, persistent leak after gentle cleaning, a leak during an empty attended test, an unknown source, cabinet or tub damage, or water near electrical equipment.
Only after diagnosis
Potential parts
- washer or washer-dryer door boot gasket
Consider this only when the boot is torn, punctured, displaced, or confirmed by diagnosis as the leak source; hair or residue on an intact seal should be cleaned first.
Match the exact appliance model, boot fold, drain or circulation connections, and retaining arrangement. Replacement may require panel or ring removal by a qualified technician. - door hinge, latch, or strike
Consider this only when the door sags, fails to align, or the latch or hinge is visibly damaged and prevents a uniform seal.
Confirm door style, hinge orientation, mounting points, and exact model fit before selecting a part; do not bend the door to compensate. - drain hose, filter cap, or residual-water hose closure
Consider this only when tracing shows the leak starts at the drain path or during drain, not at the boot or door glass.
Match the exact appliance and connection type, and use service when water must be drained from the cabinet or a pump assembly must be accessed.
When checks do not resolve it
Need a professional?
Safety scope: A technician can safely remove and fit the model-specific boot and retaining hardware, check door and hinge alignment, inspect the tub, pump, hoses, drain path, and cabinet, and verify leaks under controlled operation. Keep homeowner work to stopping the cycle, tracing visible moisture, gentle accessible cleaning, and documented manual procedures.
Common questions
FAQ
Why is my washer dryer leaking from the bottom of the door?
Hair, lint, fabric, or detergent residue may be holding the boot away from the door glass, or the boot may be torn or displaced. A drain filter, hose, dispenser, or rear leak can also run toward the floor and mimic a door leak. Trace the first wet point before replacing the boot.
Can I clean a leaking washer door boot seal myself?
You can generally remove visible loose debris and wipe the accessible boot and door glass with a soft cloth when the appliance is stopped and the manual permits it. Do not use sharp tools or undiluted chemicals, stretch the rubber, or remove retaining hardware. A torn boot needs service.
How do I know whether the washer boot is torn?
With the drum stopped, inspect the folds for a cut, pinhole, split, loose edge, or displaced section. If the gasket is damaged or the clean door and boot still leak, stop using the appliance and arrange repair rather than patching the rubber.
Why does the washer leak only with a full load?
Laundry can be trapped between the glass and boot, a crowded drum can disturb the seal, or excess suds can carry water past the door. Check loading and detergent guidance, but if the leak repeats with a normal load or an empty attended test, have the boot and door alignment inspected.
When should I call for washer dryer leak repair?
Call when the boot is torn or displaced, water leaks during an empty cycle, the source is at the cabinet or electrical area, the drain path backs up, the door or hinge is misaligned, or gentle cleaning does not stop the door leak. Isolate water and power as the manual permits and do not remove panels.
Read the exact guide
Official sources
- LG Washer - Troubleshooting Leaks on A Front Load WasherLG USA Support · LG front-load washers and washer-dryer combos; exact gasket and drain access vary by model
- LG Front Load Washer: Water leaks to the floorLG USA Support · LG front-load washers and washer-dryer combos; source locations and drain access vary by model
- LG Washer – Why is My Front Load Washing Machine Leaking?LG USA Support · LG front-load washers and washer-dryer combos; instructions and access differ by model
Community feedback
Share a repair observation
Share a plain-text repair observation. Accepted observations are published automatically; this page may take a moment to update.