
On this page
Start here
Quick answer
Treat a suspected cracked water intake valve on an Electrolux front-load washer as a leak-control problem first, not a parts-ordering question. Turn off the hot and cold washer supply valves, wipe up water, and disconnect power only if it is safe to do so. Electrolux says to identify where the water enters or leaves, inspect hose connections and O-ring washers, and look for cracks in the visible blue/red unit connector; a cracked or broken unit connector should go to service. A leak from an internal inlet-valve assembly cannot be safely identified or matched to a replacement part without the complete model, and the washer should not be run to test a cracked or wet area.
Before you begin
Safety first
- Owner checks are limited to closing accessible water valves, wiping water, tracing the first visible wet point, inspecting external hose/O-ring/connector condition and recording the model label. Do not open the cabinet, remove the intake valve, glue or clamp a cracked fitting, probe live wiring, bypass a water valve, or substitute a part without exact model fitment.
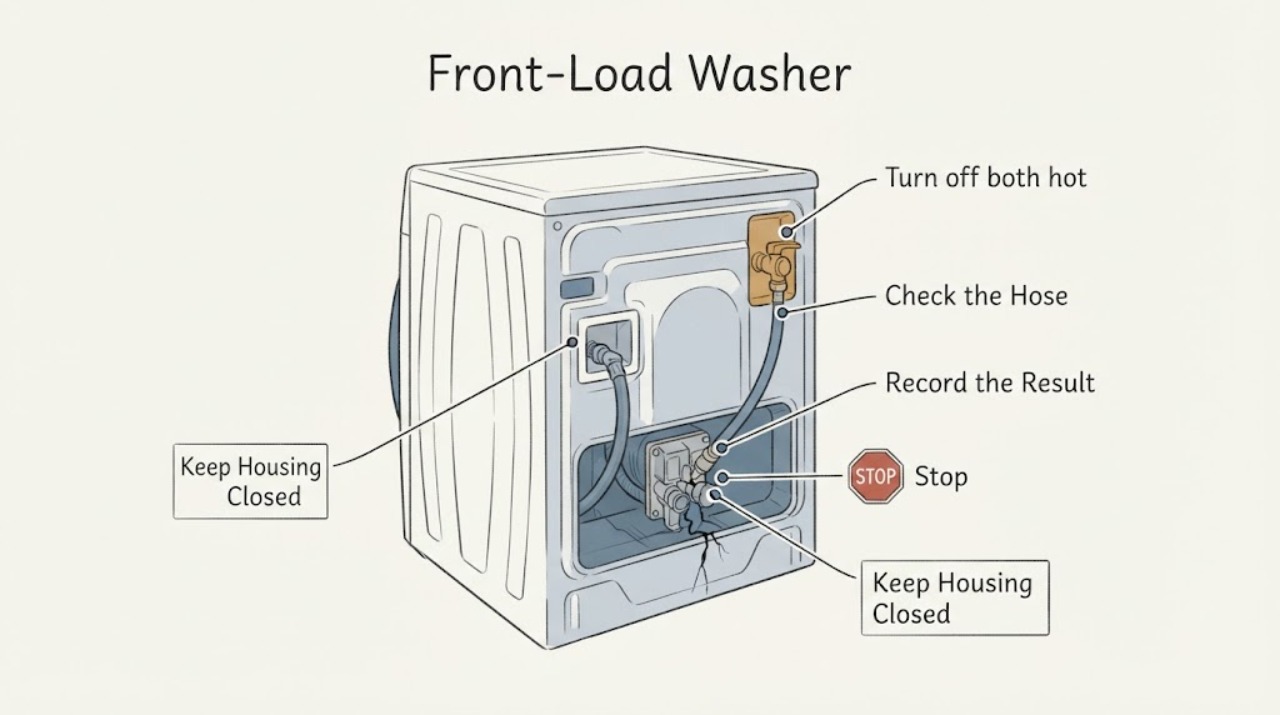
Work through in order
Diagnostic checks
Use only checks that match the exact appliance or system and its official guide.
-
Check 1
Turn off both hot and cold washer supply valves, stop the cycle, and wipe up standing water. Disconnect the washer plug only if you can do so without touching wet electrical parts or standing in water.
Expected result: Water stops after the supply valves are closed, or water continues/has reached the outlet, cord or other electrical area.
Next step: If water reached electrical areas or cannot be controlled, keep the washer off and obtain qualified appliance/electrical help. Do not restore water to a visibly cracked connection.
Why this matters
Why: A stopped leak can be residual water or a pressurized supply-side leak that has been isolated. Continued water or electrical exposure is a safety condition, not a reason to run another cycle.
-
Check 2
With water isolated, trace the first wet point without removing the washer cabinet: faucet, hose end, hose body, visible washer connector, rear panel, drain hose, dispenser area, door seal, or floor underneath.
Expected result: The first wet point is an inlet connection, a visible unit connector, the drain/dispenser/door area, or a concealed rear/under-cabinet area.
Next step: Follow the matching external check only for an accessible hose or connection. For a cracked unit connector or concealed/internal source, leave the supply off and schedule service.
Why this matters
Why: Electrolux says the next step depends on where the water is leaking. A leak outside the inlet path does not prove that the intake valve is cracked; a concealed or internal source cannot be safely diagnosed from the front.
-
Check 3
For an accessible inlet-hose leak, inspect the hose body, threaded connection and rubber O-ring washer for a kink, hole, cross-threading, missing washer or damage. Do not force a nut or straighten a damaged hose under pressure.
Expected result: The hose or O-ring is damaged/missing, the connection is loose or cross-threaded, or the hose and sealing washer look intact.
Next step: If the hose or washer is visibly damaged, keep water off and use the exact compatible hose/washer through the appropriate service or installation route. If the visible hose path is sound, do not keep tightening; continue to the unit-connector/service decision.
Why this matters
Why: Electrolux identifies hose damage, poor seating and connection problems as separate from a cracked unit connector. A correct-looking hose does not rule out an internal valve leak.
-
Check 4
Inspect only the visible blue/red washer-side connector and nearby hose entrance for a crack or break, without opening the cabinet or removing the inlet valve.
Expected result: A crack/break is visible, or no visible connector damage is found but water came from behind the panel or the valve body.
Next step: Leave the supply valves off and schedule authorized/qualified appliance service. Do not glue, clamp, bypass or replace an unidentified valve assembly.
Why this matters
Why: Electrolux says a cracked or broken visible unit connector should be handled by service and notes over-tightening as a normal cause. No visible crack does not clear an internal inlet-valve assembly or another leak path.
-
Check 5
Record the complete model and serial label, which supply line was affected, whether the leak occurs with the washer unplugged, the first wet point, and whether water reached the floor or electrical areas. Photograph the isolated external connection rather than opening the cabinet.
Expected result: The model is complete and the leak point is documented, or the label/source remains uncertain.
Next step: Give the record to Electrolux or qualified service and keep water off until the source is repaired. If the label is incomplete, do not order a valve from a visual match or a neighboring model.
Why this matters
Why: Model identity is needed for any service or fitment decision; the symptom alone does not establish a universal Electrolux valve or compatible substitute.
Use your observations
Decision map
Find the observation that best matches what you see, then follow the next safe action.
-
PATH 01Next step
What you see
The leak is at the faucet or hose connection and the hose/O-ring is visibly damaged, missing or cross-threaded.
Do this next
Keep water off, correct the connection or use an exact suitable hose/washer through the installation/service route, then check for leaks only according to safe manufacturer guidance. Do not over-tighten.
Why this path and its safety boundary
Why it matters: The visible supply connection is a more direct explanation than an unverified internal valve failure.
-
PATH 02Next step
What you see
A crack or break is visible in the washer-side connector, or water appears from the rear/inside the cabinet while the supply is on.
Do this next
Keep both supply valves closed and schedule authorized or qualified appliance service. Do not glue, clamp, open the cabinet or order a valve without the complete model.
Why this path and its safety boundary
Why it matters: Electrolux treats a cracked/broken unit connector as a service issue; a concealed source is outside the safe external checks and cannot be mapped to a universal valve part.
-
PATH 03Next step
What you see
The first wet point is the drain hose, dispenser, door seal or floor under the washer rather than the water inlet path.
Do this next
Keep the washer off until the applicable visible path is corrected or service identifies the source; do not replace the inlet valve based only on water on the floor.
Why this path and its safety boundary
Why it matters: The leak location does not support the assigned cracked-inlet-valve conclusion. Electrolux lists separate checks for drain, door and dispenser leaks.
-
PATH 04Next step
What you see
Water reaches electrical parts, continues after the valves are closed, or the source cannot be seen without removing panels.
Do this next
Keep power and water isolated when safe, protect the floor, and obtain qualified appliance/electrical help. Do not run another cycle or test the suspected valve.
Why this path and its safety boundary
Why it matters: The event has exceeded safe owner-level leak isolation and may involve residual water, a hidden supply leak or electrical exposure.
Helpful context
Understand the symptom
Stop the water before deciding that the valve is cracked
A wet rear panel, a drip at the hose connection and a leak from an internal inlet-valve assembly can look similar from the front. Electrolux's front-load leak guidance starts by locating the leak, turning off the water and wiping up the excess. Because the task has no complete model number, the safe answer is limited to visible connections and the service boundary; it does not identify a replacement valve or claim that all Electrolux front-loaders use the same assembly.
Use the visible connection checks only when the water is isolated
With both washer supply valves off, inspect the faucet side, hose ends and the visible washer connector for a loose, cross-threaded or damaged connection. Electrolux says to check the O-ring washer, avoid over-tightening and look for cracks or breaks in the blue/red connector on the unit. A cracked connector or an internal leak behind the cabinet is a service condition; do not re-pressurize it to see how much it leaks.
Do not choose an intake valve by appearance
Electrolux's general water-supply guide discusses hose routing, inlet screens and the need to match hot and cold connections, but it does not make a universal inlet-valve replacement claim. Record the complete rating-label model and photographs of the leak point for authorized service. Keep the washer out of use if water reached electrical areas, the connector is cracked, or the source is concealed.
When checks do not resolve it
Need a professional?
Arrange Electrolux-authorized or qualified appliance service when the washer-side connector is cracked, the leak is behind/inside the cabinet, water reaches electrical areas, the supply cannot be shut off, or the visible hose/O-ring checks do not identify and stop the leak.
Safety scope: Owner checks are limited to closing accessible water valves, wiping water, tracing the first visible wet point, inspecting external hose/O-ring/connector condition and recording the model label. Do not open the cabinet, remove the intake valve, glue or clamp a cracked fitting, probe live wiring, bypass a water valve, or substitute a part without exact model fitment.
Have this ready
- Provide the complete Electrolux model and serial, photos of the first wet point and visible connector, hot/cold line identification, whether the leak occurs while unplugged, whether water reached electrical areas, and whether the faucet/hose/O-ring was recently installed or tightened.
Common questions
FAQ
Can I keep using the Electrolux washer if the water intake valve is cracked?
No. Turn off both washer supply valves and keep the machine off until the leak source is identified and repaired. Electrolux directs service for a cracked or broken washer-side connector, and an internal valve cannot be safely confirmed or repaired from the symptom alone.
Is a leak at the back always a failed inlet valve?
No. Electrolux separates faucet and hose leaks, washer-side connector cracks, drain leaks, dispenser leaks and door leaks. Trace the first wet point with the water isolated before assigning the cause to an internal valve.
Can I replace the Electrolux inlet valve without the model number?
Do not choose a valve by appearance. The task has no complete model, and the official family guidance does not establish universal valve compatibility or an owner-safe internal replacement procedure. Record the rating-label model and use authorized or qualified service.
What should I do if the washer-side plastic connector is cracked?
Keep the water valves closed, wipe up water and schedule service. Electrolux specifically says a cracked or broken blue/red connector on the unit is a service condition and warns that over-tightening can cause cracks or breaks.
Read the exact guide
Official sources
- Front Load washing machine inlet hose is leakingElectrolux Australia · Official Electrolux Australia support for front-load washers and washer-dryers. It supports external hose, tap, washer, thread and hose-position checks and recommends an authorized service centre when they do not resolve the leak; it is not used for internal valve fitment.
- Laundry front loading washer is leaking water.Electrolux · Official Electrolux owner support for front-loading laundry washers. It distinguishes inlet-hose, drain, door, dispenser and washer-side connector leaks and directs service for a cracked/broken unit connector; it does not identify an internal valve part for an unidentified model.
- Laundry Water Supply GuideElectrolux · Official Electrolux water-supply guide applying to front-loading washers. It supports external hot/cold hose, inlet-connector filter, routing and pressure checks; it does not support a universal internal valve replacement.
Community feedback
Share a repair observation
Share a plain-text repair observation. Accepted observations are published automatically; this page may take a moment to update.