
On this page
Start here
Quick answer
Stop the cycle safely, note the first wet point and when it appears, and keep hands away from water near the plug, outlet, controls, or damaged wiring. Electrolux's leak guidance separates inlet-hose connections, drain hose or standpipe, door seal and glass, and the adaptive dispenser; each needs a different check. A leak during fill points first to hot or cold supply hoses, connectors, or an inlet path. A leak at the door points to debris or damage at the seal or glass. A leak during draining points to the drain hose, standpipe, blockage, or pump path. Check only visible, accessible items and close water valves when a supply hose is visibly leaking if you can do so without reaching through water. Arrange service for a split hose, cracked connector, damaged seal, cabinet or tub leak, persistent leak, or any repair requiring appliance movement, panel removal, pressurized plumbing, or electrical access.
Before you begin
Safety first
- This article supports first-wet-point observation and ordinary-access checks of visible hoses, seals, dispenser seating, and drain routing only. It does not authorize hot or pressurized hose disconnection, panel or pump access, appliance movement, live electrical testing, or operation after water reaches electrical parts.
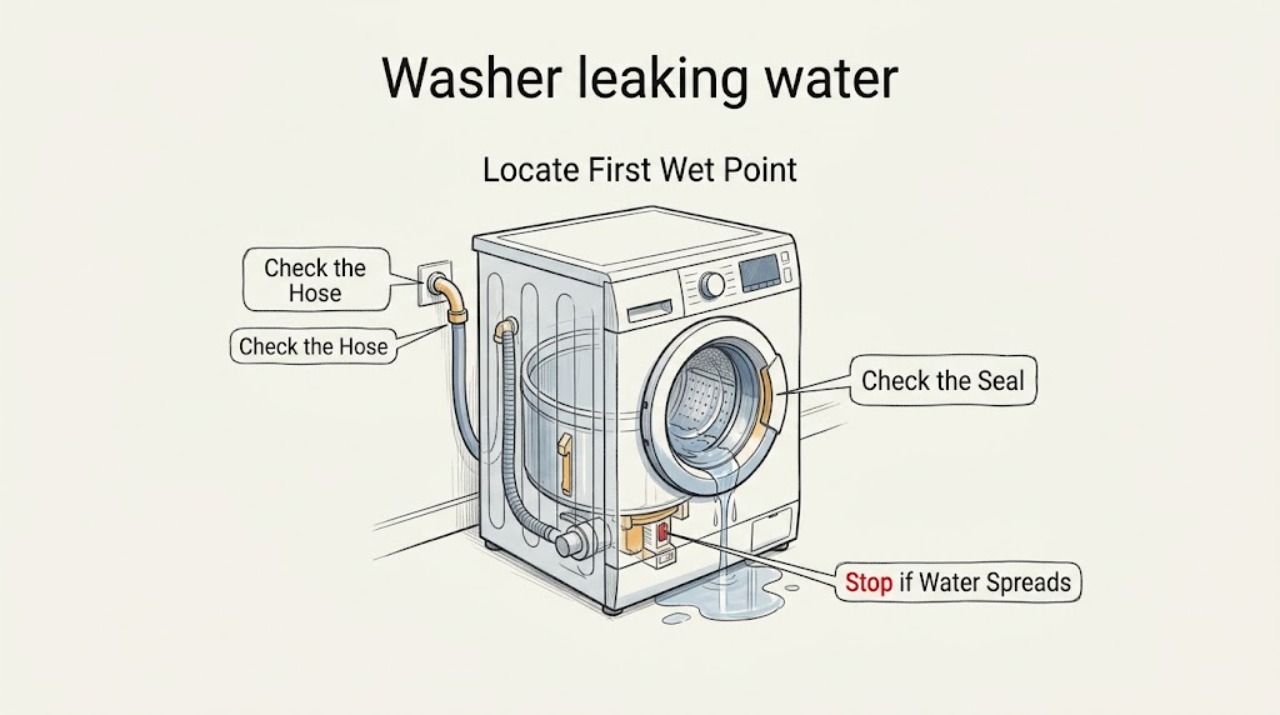
Work through in order
Diagnostic checks
Use only checks that match the exact appliance or system and its official guide.
-
Check 1
Stop the cycle normally if safe, keep the washer still, and use a dry cloth or paper towel from a safe position to trace the first wet point without reaching behind the machine or under a wet control area.
Expected result: Record whether water first appears at the hot or cold inlet hose, door or lid edge, dispenser, bottom or rear drain hose, standpipe, or underneath the cabinet; record whether it began during fill, wash, spin, or drain.
Next step: Photograph the first wet point and leave the washer out of service until the matching visible check is complete; use service when the source is underneath, inside the cabinet, or unclear.
Stop if: Stop immediately for water near an outlet, plug, controls, or wiring; a damaged cord; smoke, sparking, a hot electrical smell; or water hot enough to burn.
Why this matters
Why: The first wet point and cycle stage narrow the path to supply, door or dispenser, or drain. Water found only on the floor after it has traveled does not identify the failed component.
-
Check 2
If the leak begins during fill or is at the hot or cold supply, inspect the visible hoses, faucet ends, washer inlet connectors, and sealing washers for kinks, holes, cross-threading, cracks, or a connection that is visibly loose; close the water valves from a dry location if a hose is actively leaking.
Expected result: Record whether the hot or cold side is affected, whether water leaks at the faucet or washer connection, whether the hose is pinched or damaged, and whether the sealing washer is visible and seated without disconnecting a pressurized hose.
Next step: Use the exact Electrolux installation instructions for any safe, water-isolated hose correction; replace a damaged hose or seal only with model-appropriate guidance, and request service for cracks, cross-threading, hot-water exposure, or a recurring leak.
Stop if: Do not disconnect hot or cold hoses while pressurized, handle hot water without cooling time, force or over-tighten connections, or work through standing water.
Why this matters
Why: A leak at one supply connection supports a hose, washer, connector, or sealing-washer problem. A cracked connector, split hose, or leak that continues with the washer off is not a tightening experiment and needs replacement or service.
-
Check 3
If water appears at the door during wash, inspect the visible rubber seal and glass with the washer stopped for hair, lint, clothing, debris, tears, distortion, or a door that is not closing evenly; do not force the door or reach into a locked drum.
Expected result: Record debris trapped between the seal and glass, a damaged or displaced seal, a scratched or cracked glass surface, a door that does not sit evenly, or a clean intact seal with water still escaping.
Next step: Remove only loose visible debris with the approved care method, dry the area, and request service if the seal or glass is damaged, the door is misaligned, or the leak returns.
Stop if: Do not use the washer with a torn seal, cracked glass, door that will not latch, water spraying toward controls, or any need to remove the door or front panel.
Why this matters
Why: Electrolux says debris at the rubber door seal or glass can cause a door leak. A clean but leaking seal, cracked glass, or uneven door points to a sealing, hinge, door, or tub issue that cannot be confirmed by wiping alone.
-
Check 4
If water starts at the dispenser or runs down the front during fill, inspect that the drawer and compartments are seated on their guide rails and closed flush, and look for visible buildup or excessive suds without pulling the assembly apart.
Expected result: Record a drawer that is open, mis-seated, cracked, blocked with buildup, overfilled, or producing unusual foam; note whether water is actually emerging from the dispenser rather than the inlet hose or door.
Next step: Clean and reseat the drawer only as the exact owner manual allows, use the model's recommended detergent quantity, and arrange service when the drawer, housing, or internal feed path is cracked or still leaks.
Stop if: Do not force the drawer, add chemicals to counter suds, change water pressure at an unknown valve, or operate with water running into controls or the floor.
Why this matters
Why: Electrolux identifies incorrect dispenser seating, buildup, pressure, and excess suds as possible dispenser-leak paths. A leak from the cabinet behind the dispenser or a persistent leak after correct seating needs service rather than more detergent or pressure adjustment.
-
Check 5
If the leak starts during drain or spin, inspect the visible drain hose, its securing bracket or tie, the standpipe or laundry tub, and any accessible blockage without moving the washer or sealing the hose into the drain.
Expected result: Record a loose hose that misses the drain, kink, split, wet hose connection, water backing up in the standpipe, a blocked laundry drain, or water appearing from beneath the cabinet instead of the hose.
Next step: Correct only an obvious visible hose placement issue using the installation guide; stop and request appliance or plumbing service for a blockage, damaged hose, internal leak, or any work requiring the appliance to be pulled out.
Stop if: Do not tape or seal the hose, pour chemicals into a blocked drain, disconnect plumbing under pressure, reach into a pump, or move a water-filled washer alone.
Why this matters
Why: Electrolux says an unsecured drain hose can let water miss the drain and that a clogged standpipe can return water. A damaged hose needs service or exact replacement; water from under the cabinet suggests a pump, tub, internal hose, or seal diagnosis.
-
Check 6
If the washer was installed, relocated, or reconnected recently, compare the hose routing and connections with the exact installation instructions from a dry, accessible position before operating another cycle.
Expected result: Record a hose connected to the wrong inlet, a hot and cold reversal, crossed threads, missing or displaced sealing washers, a drain hose that is kinked, unsecured, too tightly sealed, or placed outside the manual's permitted routing.
Next step: Have the installer correct a recent-installation issue when possible; otherwise arrange model-specific service and provide the installation date, model, hose photos, and first-wet-point record.
Stop if: Do not force mismatched threads, disconnect a hot line while pressurized, open panels, or operate while a hose or drain connection is actively leaking.
Why this matters
Why: Installation or relocation can introduce a connection or drain-routing error that looks like an appliance failure. A correct visible installation with continued leakage makes a damaged component more likely.
-
Check 7
After one safe visible correction, do not repeatedly run cycles; document whether the leak is gone, reduced, or returns and provide the technician with the first wet point, cycle stage, model, and photos.
Expected result: Classify the result as no leak, leak at the same point, leak at a new point, water under the cabinet, or unsafe to retry; note whether the water was cold, warm, or hot if this could be observed without contact.
Next step: Keep the washer off and arrange qualified Electrolux appliance service, or plumbing service when the standpipe or household drain is the source; do not order parts from the puddle location alone.
Stop if: Do not restart after a leak reaches electrical parts, the floor remains wet, the cord or plug is damaged, the door or tub is cracked, or the source is inside the cabinet.
Why this matters
Why: A recurring leak after a correct hose, seal, dispenser, or drain observation suggests an internal hose, pump, tub, door, valve, or control-related diagnosis. A leak that migrates or appears underneath cannot be assigned to the last part touched without inspection.
Use your observations
Decision map
Find the observation that best matches what you see, then follow the next safe action.
-
PATH 01Safety boundary
What you see
Water appears during fill at a hot or cold faucet, inlet hose, washer connector, or nearby rear connection.
Do this next
Close the water valves from a dry safe location if actively leaking, compare visible connections with the exact installation guide, and request service for a split hose, cracked connector, cross-threading, persistent leak, or pressurized work.
Why this path and its safety boundary
Why it matters: A supply hose, sealing washer, threaded connection, inlet connector, or water valve path is more likely than a door or drain fault; hot-water exposure adds a burn risk.
Safety stop: Do not touch water near electricity, disconnect a pressurized or hot hose, force connections, or run another fill to test the leak.
-
PATH 02Safety boundary
What you see
Water appears at the front during wash and the first wet point is the door seal or glass, or the dispenser drawer and its surrounding panel.
Do this next
Clean only visible debris or the dispenser as the manual allows, verify normal seating without force, and arrange service when the seal, glass, drawer, housing, or cabinet is damaged or the leak returns.
Why this path and its safety boundary
Why it matters: Debris, seal or glass damage, a mis-seated drawer, buildup, excess suds, or a door or dispenser alignment problem is more likely than a rear drain leak.
Safety stop: Do not operate with a torn seal, cracked glass, door-latch problem, water aimed at controls, or a need to remove the front panel.
-
PATH 03Safety boundary
What you see
Water appears during drain or spin at the drain hose, standpipe, or laundry tub, or water backs up and spills while the washer pumps out.
Do this next
Correct only a visible hose-placement issue with the installation guide; use plumbing service for a blocked standpipe and appliance service for a damaged hose, pump, internal leak, or concealed access.
Why this path and its safety boundary
Why it matters: A loose, kinked, damaged, or badly routed drain hose or a blocked household standpipe is more likely than an inlet leak; water under the cabinet shifts concern to the internal drain path.
Safety stop: Do not seal the hose, pour chemicals into the drain, open the pump, disconnect plumbing, or move the washer while water remains inside.
-
PATH 04Safety boundary
What you see
The first wet point is underneath the cabinet, behind an inaccessible panel, at a cracked tub or internal hose, or cannot be located without moving the washer.
Do this next
Keep water and power isolated from a dry safe location, do not move or open the appliance, and arrange qualified service with photos and the cycle stage.
Why this path and its safety boundary
Why it matters: An internal hose, pump, tub, seal, valve, or cabinet fault is possible, and the floor puddle cannot identify the failed part safely.
Safety stop: Stop for water near electrical parts, a damaged cord or plug, a wet floor that prevents safe access, abnormal heat, smoke, or a door or tub crack.
-
PATH 05Safety boundary
What you see
The leak began within the recent installation or relocation period, and a visible hose connection or drain route differs from the exact installation instructions.
Do this next
Have the installer correct the connection when appropriate; otherwise request model-specific service and provide the installation date, model, hose routing, and first-wet-point record.
Why this path and its safety boundary
Why it matters: Installation error, cross-threading, missing sealing washer, reversed supply, or drain routing can explain the leak before an internal component failure is assumed.
Safety stop: Do not force threads, loosen a pressurized hot line, tape a drain hose shut, or operate while water is actively escaping.
Helpful context
Understand the symptom
Find the first wet point before tightening anything
Water can travel across the floor or cabinet, so the puddle is not necessarily the source. Note whether the first water appears at a hot or cold hose connection during fill, under the door during wash, at the dispenser, or at the drain hose or standpipe during drain. Check the stage with a short observation only when there is no electrical or hot-water hazard; do not run repeated cycles to reproduce an active leak.
Separate supply, wash, and drain leaks
Electrolux identifies hose kinks, holes, loose or cross-threaded connections, damaged sealing washers, door-seal or glass debris, dispenser seating or buildup, and drain-hose or standpipe problems as different paths. A front-load door leak and a top-load fill leak do not use the same parts or access procedure. The exact model's installation and use-and-care instructions control any hose, seal, or dispenser work.
Water and electricity change the stop boundary
If water is near the receptacle, plug, controls, or wiring, do not touch the appliance or reach through the water. Isolate water or power only from a dry, safe location and only when doing so does not require moving the machine or handling a damaged cord. A hot-water hose can burn; let hot parts and water cool before any ordinary-access inspection. Panel removal, pump access, tub repair, and electrical testing belong to qualified service.
Safety boundary
Stop conditions
- Stop using the washer when water is near the plug, outlet, controls, wiring, or a damaged cord; isolate power only from a dry safe location and do not touch wet electrical parts.
- Close water valves from a dry safe location for an active supply leak, but do not disconnect hot or cold hoses while pressurized or hot.
- Do not open panels, reach into a pump, test live wiring, move a water-filled washer alone, or repair a tub, valve, seal, or internal hose without qualified service.
- Do not tape or seal the drain hose, pour chemicals into a blocked drain, force threaded hose connections, or use repeated cycles to reproduce an active leak.
- Stop for a cracked door or tub, torn seal, water under the cabinet, smoke, sparking, abnormal heat, a hot electrical smell, or a leak that returns after the visible correction.
Only after diagnosis
Potential parts
- washer inlet hose or sealing washer
Consider this category only when the first wet point is a supply connection and inspection confirms a split hose, damaged sealing washer, or failed connection after water is safely isolated.
Confirm the full Electrolux model, hose length and connection type, temperature use, and manufacturer's fit information; do not force or over-tighten a mismatch. - washer door gasket or glass
Consider this category only when a front-load leak is localized to a damaged or distorted seal or cracked glass after loose debris and door seating have been checked.
Match the full Electrolux model and seal or glass geometry; installation may require a qualified technician and a cracked door or seal should not be operated. - dispenser drawer or housing
Consider this category only when the leak begins at the dispenser and the drawer is correctly seated and clean but remains cracked, warped, or leaking.
Confirm exact model, drawer compartments, guide rails, and housing fit; residue or excess suds alone does not prove the assembly needs replacement. - drain hose or drain pump
Consider this category only when drain-stage observations show a damaged hose, incomplete pumping, or an internal drain fault after visible routing and household drain checks.
Confirm the full model, hose routing and pump configuration, and manufacturer fit information; do not access or replace a pump based on a floor puddle alone.
When checks do not resolve it
Need a professional?
Arrange qualified Electrolux appliance service when the leak source is under the cabinet or inaccessible, a hose, connector, door seal, glass, dispenser housing, pump, valve, tub, or internal hose is damaged, the leak persists after one visible model-approved correction, or diagnosis would require moving the machine, disconnecting pressurized or hot plumbing, opening panels, or electrical testing. Contact a plumber when the household standpipe or laundry drain backs up. Treat water near electrical parts, a damaged cord, smoke, sparking, abnormal heat, or a cracked door or tub as stop-use conditions.
Safety scope: This article supports first-wet-point observation and ordinary-access checks of visible hoses, seals, dispenser seating, and drain routing only. It does not authorize hot or pressurized hose disconnection, panel or pump access, appliance movement, live electrical testing, or operation after water reaches electrical parts.
Common questions
FAQ
How do I find where my Electrolux washer is leaking?
Stop the cycle safely and trace the first wet point from a dry position, rather than using the floor puddle as the source. Record whether it begins at an inlet hose during fill, the door or dispenser during wash, or the drain hose or standpipe during drain. Keep power and water away from wet electrical areas.
What should I check if an Electrolux washer leaks during fill?
Inspect visible hot and cold hoses, faucet and washer connections, kinks, holes, cross-threading, cracks, and sealing washers without disconnecting a pressurized or hot hose. Close the water valves from a dry safe location for an active leak and arrange service for damaged hoses, connectors, or a recurring leak.
Why does my Electrolux front-load washer leak from the door?
Electrolux directs users to inspect the visible rubber door seal and glass for hair, lint, clothing, or debris. If the seal and glass are clean but water still escapes, or either is torn or cracked, stop using the washer and arrange service rather than forcing the door or removing the panel.
What if water backs up at the Electrolux washer drain?
Look only for a loose, kinked, damaged, or badly routed visible drain hose and a standpipe or laundry-tub blockage. Electrolux notes that drainage problems can involve hose routing or a blocked drain; use the exact installation guide and contact a plumber or appliance technician when the blockage or pump path is not safely accessible.
Can I keep running an Electrolux washer that is leaking?
Do not keep running an active leak, especially when water is near the plug, outlet, controls, or wiring, the floor is wet, the door or tub is cracked, or the source is under the cabinet. Isolate water or power only from a dry safe location and arrange qualified service.
Read the exact guide
Official sources
- What should I do if my washer is draining slowly?Electrolux · Official Electrolux Owner Support article for washer drainage; its example references a Frigidaire top-load washer, so apply the routing principles only with the exact model installation guide.
- Laundry front loading washer is leaking water.Electrolux · Official Electrolux Owner Support article for front-loading laundry washers; exact model instructions control top-load or other configurations.
- Laundry Water Supply GuideElectrolux · Official Electrolux water-supply guide for front-loading and top-loading laundry washers; exact installation instructions govern a particular model.
Community feedback
Share a repair observation
Share a plain-text repair observation. Accepted observations are published automatically; this page may take a moment to update.