
On this page
Start here
Quick answer
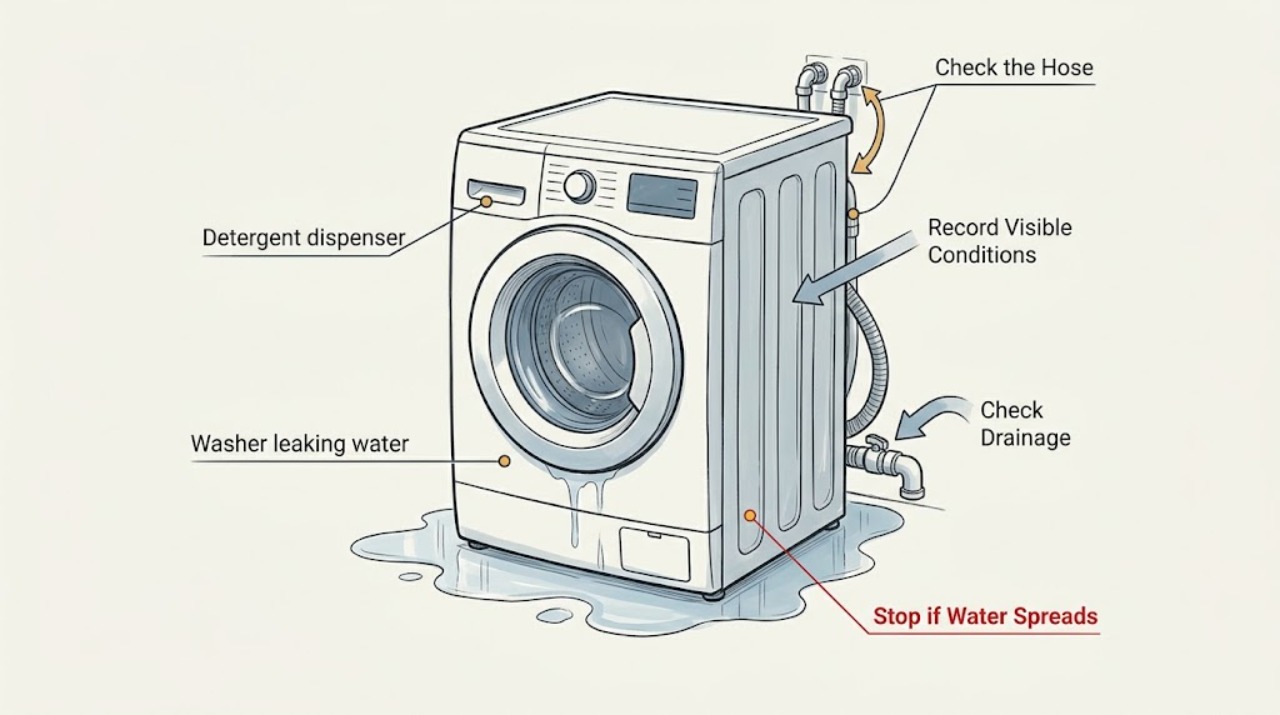
Stop the Kenmore washer and identify where and when water appears before running another cycle. Water at the rear during fill points first to an inlet-hose connection or supply issue; water at the front of a front-load model points to the door seal, trapped clothing, dispenser, excess suds, or overloading; water during pump-out points to the drain hose, household drain, or an internal pump path; water underneath can require service for a tub, hose, pump, or seal. Turn off both water supplies and disconnect power only from a dry, safe location before any inspection, and never reach into a moving tub or open the cabinet. Kenmore models and their underlying washer platforms vary, so use the exact model manual from Kenmore for hose routing, access, and repair instructions. Keep the washer out of use for a continuing leak, water near electrical parts, a damaged cord or outlet, smoke, burning odor, repeated breaker trips, or an internal leak, and arrange qualified appliance or plumbing service.
Before you begin
Safety first
- Keep the washer off for active leaks, water near electrics, smoke, burning odor, sparks, overheating, repeated breaker trips, trapped water, a damaged cord or hose, violent movement, or a source beneath the cabinet. Do not open the cabinet or bypass an interlock.
Work through in order
Diagnostic checks
Use only checks that match the exact appliance or system and its official guide.
-
Check 1
Stop the cycle, keep hands away from a moving tub, and note the first wet location from a safe position: rear supply area, front door or dispenser, drain connection, side, or underneath. Record whether the leak starts during fill, wash, drain, spin, or while the washer is off.
Expected result: Water appears at a hose connection, door or dispenser, drain path, underside, or continues with the washer off; or the source cannot be seen safely.
Next step: Keep clear and stop immediately for water near electrical parts, smoke, burning odor, sparks, a hot plug, repeated breaker trips, or a tub that will not stop. Otherwise close the water valves if safely reachable, isolate power from a dry location, and continue only with a visible external check.
Why this matters
Why: Leak location and cycle timing narrow the path to supply, front seal or dispensing, drain or plumbing, overflow, or an internal component. A leak while off can indicate a supply valve or connection that must be isolated before further use.
-
Check 2
With the washer off and the floor dry, inspect both ends of the hot and cold inlet hoses and the visible drain hose. Look for a loose connection, missing or displaced washer, cracked hose, kink, loose drain connection, or household drain backing up; do not disconnect a pressurized hose or reach behind a machine on a wet floor.
Expected result: An inlet connection drips during fill, a hose is damaged or kinked, the drain connection backs up during pump-out, or the visible connections are dry and secure.
Next step: Close the water valves and arrange hose or plumbing service for a damaged connection, backup, or hose that cannot be safely corrected. Do not run the washer with a cracked hose or an active backup; if external paths are dry, keep the washer off and inspect the appropriate front or load path.
Why this matters
Why: A supply connection can leak at fill, while a drain hose or household plumbing restriction can send water back onto the floor during pump-out. Dry external connections make an internal leak or front path more likely.
-
Check 3
For a front-load Kenmore, inspect the door glass, rubber boot, drainage openings, and dispenser drawer without forcing the door or removing the boot. For a top-load model, inspect the lid area and the visible tub rim. Look for trapped clothing, lint, residue, a torn seal, a cracked drawer, or water escaping above the normal level.
Expected result: Debris prevents the door from sealing, the boot or drawer is damaged, clothes are outside the basket, the washer is over-sudsing, or the front and lid areas look intact.
Next step: Remove only loose, visible debris with the appliance off and follow the exact Kenmore manual for cleaning. Stop using a torn seal, cracked drawer, uncontrolled sudsing, or recurring leak; do not remove panels or replace a boot without model-specific instructions and safe isolation.
Why this matters
Why: Official front-load guidance links seal debris, trapped clothing, dispenser blockage, excessive suds, overloading, and an unlevel washer with leaks. An intact visible seal does not rule out an internal tub or pump leak.
-
Check 4
Check the load and installation without moving the washer: note whether the basket was tightly packed, clothing was added after the cycle started, the washer rocks, or the leak appears only with a high water level or spin. Do not reach into a moving basket or keep adding water to reproduce the condition.
Expected result: The load is overfilled or outside the basket, the cabinet is unlevel, the washer vibrates heavily, or the leak persists with a suitable load and stable installation.
Next step: Wait for motion to stop, remove excess items, and use only the exact manual's leveling procedure if the floor is dry and the washer can remain connected safely. Do not run another load if the leak returns, the cabinet walks, or an internal source is suspected; arrange service.
Why this matters
Why: Overloading, clothing outside the basket, or an unlevel machine can push water past a seal or allow water to spill underneath. Persistence with a correct load and stable cabinet points toward a hose, pump, tub, or water-level fault.
-
Check 5
Identify whether the leak begins during fill, when detergent enters, during pump-out, or from beneath the cabinet after the tub moves. Read any exact error or indicator from the model manual, and do not substitute a procedure from another Kenmore platform or a similar-looking washer.
Expected result: The leak is tied to fill, dispenser flow, drain, spin, a water-level or overflow indication, or it appears at an otherwise unexplained point.
Next step: Give service the model, leak location, cycle stage, water level, error text, and recent installation or load change. Keep the washer off for a recurring or internal leak and do not open the cabinet or test live components.
Why this matters
Why: Timing distinguishes inlet or dispenser flow from drain, load, seal, pump, tub, pressure-sensing, or control paths. An unexplained underside leak cannot be safely diagnosed by an external test alone.
-
Check 6
After water is isolated and the appliance is dry, compare the model manual's maintenance and service instructions with the observed leak. Perform only a model-authorized visible correction, such as removing loose debris from a seal or drawer; do not remove the pump, tub, door boot, cabinet, or water-level parts as a first check.
Expected result: A visible obstruction is cleared and the washer remains dry, the leak returns, the source is internal or inaccessible, or power or water cannot be isolated safely.
Next step: Keep the washer out of use and arrange qualified Kenmore appliance service; use a plumber for a household drain or supply-line problem. Do not run repeated test cycles or install a generic seal, hose, pump, or valve.
Why this matters
Why: A small visible obstruction may explain a front leak, but a returning leak or inaccessible source requires model-specific diagnosis. Unsafe isolation is itself a reason to stop rather than improvise.
Use your observations
Decision map
Find the observation that best matches what you see, then follow the next safe action.
-
PATH 01Next step
What you see
Water first appears at the rear inlet connection during fill, and the hose or connection is visibly loose, damaged, or missing a washer.
Do this next
Turn off both supply valves and arrange safe hose or connection correction. Do not run the washer with a cracked hose or active drip, and do not work from a wet floor.
Why this path and its safety boundary
Why it matters: The external supply connection is a likely leak path; a floor puddle does not prove an internal washer failure.
-
PATH 02Next step
What you see
Water appears at the front of a front-load model while filling or washing, with debris at the door seal, clothing outside the basket, a damaged boot, a clogged dispenser, or excessive suds.
Do this next
Remove only loose visible debris, follow the exact manual for dispenser care, and stop using a torn boot, cracked drawer, or recurring leak. Do not force the door or dismantle the seal.
Why this path and its safety boundary
Why it matters: The door or dispensing path may be allowing water past the seal or overflowing; the visible cause may be correctable only when the appliance is off and safe.
-
PATH 03Next step
What you see
Water appears during pump-out or at the drain connection, the household drain backs up, or the drain hose is loose, kinked, or incorrectly routed.
Do this next
Keep the washer off, correct only visible routing that the manual authorizes, and arrange plumbing help for a backed-up drain. Stop for a damaged hose, trapped water, or a leak near electrical parts.
Why this path and its safety boundary
Why it matters: The drain or household plumbing path is a likely source of overflow or water returning around the washer.
-
PATH 04Next step
What you see
The leak appears underneath after the tub moves, with a suitable load and dry, secure external hoses, or the source cannot be seen without removing a panel.
Do this next
Leave the washer off, close the water valves, isolate power from a dry safe location, and arrange qualified appliance service. Do not tip the washer, open the cabinet, or keep running cycles to locate the drip.
Why this path and its safety boundary
Why it matters: An internal hose, pump, tub seal, water-level, or overflow component is possible and cannot be confirmed safely by a user-level visual check.
-
PATH 05Next step
What you see
The leak appears only with an overloaded basket, clothes outside the basket, an unlevel cabinet, or a high-water load, and there is no damaged seal or electrical symptom.
Do this next
Wait for all motion to stop, correct the load or model-authorized leveling condition, and try no further cycle if water returns. A recurring leak needs service rather than a larger or smaller load experiment.
Why this path and its safety boundary
Why it matters: Load placement, packing, or leveling may be allowing water to escape even when hoses are intact.
-
PATH 06Next step
What you see
Water continues to enter while the washer is off, or the washer overfills, leaks from an unknown point, or shows a returning water-level or control indication.
Do this next
Close the household water valves, keep the washer off, and arrange qualified appliance service. Do not test or replace a valve or sensor with the cabinet energized.
Why this path and its safety boundary
Why it matters: A supply valve, pressure-sensing, overflow, or control fault may be allowing water beyond the intended level.
-
PATH 07Next step
What you see
Smoke, burning odor, sparking, a hot plug or outlet, repeated breaker trips, a leak near electrical parts, or violent movement occurs.
Do this next
Stop immediately, keep clear, close water valves only if safely reachable, and isolate power only from a dry safe location. Do not restart or open the washer; obtain qualified or emergency help as appropriate.
Why this path and its safety boundary
Why it matters: Continued operation could create shock, fire, water, or injury risk; this is not an ordinary hose or load adjustment.
Helpful context
Understand the symptom
Location and timing are the first diagnostic split
Dry the floor only if it is safe, then observe where the first wet spot appears and whether it starts during fill, wash, drain, or spin. Water that travels across a floor can make the visible puddle misleading. A rear leak during fill differs from a front leak at the door, and water under the cabinet may be an internal hose, pump, tub seal, or overflow issue. Do not pull the machine forward across a wet floor or keep running it to reproduce the leak.
Kenmore model and platform details matter
Kenmore washers have been made in different designs, including top-load and front-load models. Door seals, lids, dispensers, drain filters, hose routing, water-level systems, and access panels are not universal. Use the model number to open the matching Kenmore manual before attempting any reset, filter access, leveling, or replacement. A platform-specific manufacturer guide can illustrate a leak path, but it is not proof that the same internal part or procedure applies to an unidentified Kenmore model.
Separate an external connection from an internal leak
External inlet and drain connections can often be inspected visually without opening the appliance. A front-load door seal or dispenser can also be checked for visible debris, damage, or overflow signs. Water that begins only after the pump starts, appears from beneath the cabinet, or continues when the washer is off may involve an internal pump, tub, valve, or hose. Internal repair and any energized testing belong with qualified service.
Water and electricity require a hard stop
Stop for water near the outlet, cord, plug, or controls; a hot or damaged connection; smoke; burning odor; sparking; or repeated breaker trips. Keep people away and isolate power only from a dry, safe location. Turn off the water supply valves if they can be reached without standing in water or touching damaged equipment. Do not restart a washer with an active leak just to see whether a hose or pump is the cause.
Safety boundary
Stop conditions
- Stop immediately for water near electrical parts, smoke, burning odor, sparks, a hot plug or outlet, repeated breaker trips, or a damaged cord. Keep clear and isolate power only from a dry safe location; do not restart.
- Close both water supply valves and keep the washer off for a continuing leak, water entering while the washer is off, a burst or cracked hose, a backed-up drain, trapped water, or a leak that cannot be located safely.
- Do not reach into a moving tub, force a front door or lid, tip or pull the washer across a wet floor, open the cabinet, test energized components, or bypass a lid or door interlock.
- Do not install a generic hose, door boot, pump, tub seal, valve, or sensor based only on appearance. Use the exact Kenmore model manual and qualified diagnosis for internal repairs.
- Stop after one safe visible correction if the leak returns, the source is underneath or inaccessible, the washer walks or vibrates, or a water-level or control indication returns. Arrange appliance or plumbing service.
Only after diagnosis
Potential parts
- inlet or drain hose assembly
Consider this category only after inspection confirms a damaged or failed hose or connection and identifies the exact model and hose routing.
Hoses, seals, routing, and fittings vary by Kenmore washer design. Confirm the exact model and diagnosis before selecting a part. - door boot or tub seal
Consider this category only after qualified inspection confirms that a damaged front boot or tub seal causes the leak.
Door boots and tub seals are model-specific and may require substantial disassembly. Do not choose by appearance alone. - drain pump or water inlet valve
Consider this category only after qualified diagnosis links the leak to a pump or inlet valve rather than a hose, plumbing, dispenser, or load condition.
Pump and valve assemblies vary across Kenmore platforms and can involve water and electrical hazards. Confirm exact model and diagnosis first.
When checks do not resolve it
Need a professional?
Arrange qualified Kenmore appliance service when a leak persists after safe visible checks, comes from underneath, involves a door boot, tub, pump, valve, water-level system, or control, or returns with a code, vibration, or overflow. Use plumbing service for a backed-up household drain or leaking house supply. Treat water near electrical parts, smoke, burning odor, sparks, overheating, repeated breaker trips, or violent movement as immediate safety issues.
Safety scope: Keep the washer off for active leaks, water near electrics, smoke, burning odor, sparks, overheating, repeated breaker trips, trapped water, a damaged cord or hose, violent movement, or a source beneath the cabinet. Do not open the cabinet or bypass an interlock.
Common questions
FAQ
Where should I look first when a Kenmore washer leaks?
Record the first wet location and cycle stage. Rear water during fill points to inlet connections, front water on a front-load model points to the door seal or dispenser, and water during pump-out points to the drain hose or household plumbing. Water underneath or a leak that continues while off needs faster isolation and service.
Can a Kenmore washer door seal or detergent drawer cause a leak?
Yes, on applicable front-load designs. Debris or clothing at the seal, a damaged boot, a clogged or open dispenser, excessive suds, or clothing outside the basket can let water escape. Inspect only with the washer off and follow the exact Kenmore manual; do not dismantle a seal or keep using it if damaged.
What if the Kenmore washer leaks from underneath?
Check only safe visible inlet and drain connections, household drain backup, load placement, and leveling. If external paths are dry and the leak begins after the tub moves, an internal hose, pump, tub seal, valve, or water-level issue is possible. Keep the washer off and arrange qualified service rather than tipping or opening it.
Should I keep using a Kenmore washer with a small leak?
No. Even a small leak can reach electrical parts, worsen during fill or spin, or damage the floor. Close the water valves and isolate power only from a dry safe location. Do not run repeated cycles to find the source; arrange appliance or plumbing service based on where the water begins.
Does the exact Kenmore model matter for a washer leak repair?
Yes. Kenmore washers vary in load style, seals, dispensers, hose routing, pump access, and internal platforms. Use the model number to obtain the matching manual and do not select a hose, pump, valve, boot, or tub seal by appearance or a generic listing.
When is a leaking Kenmore washer an emergency?
Stop immediately for water near electrical parts, smoke, burning odor, sparks, a hot plug or outlet, repeated breaker trips, a burst hose, violent movement, or a tub that will not stop. Keep clear, isolate power only from a dry safe location, and obtain qualified or emergency help as appropriate.
Read the exact guide
Official sources
- Leaking Water Underneath - WasherWhirlpool Corporation · Whirlpool manufacturer guidance used as a general external-leak example only; do not transfer a platform-specific procedure to an unidentified Kenmore model.
- Leaking from Behind - WasherWhirlpool Corporation · Whirlpool manufacturer guidance used as an external leak-path example; exact Kenmore model manual and qualified service control.
- Leaking from Front - Front Load WasherWhirlpool Corporation · Whirlpool manufacturer guidance used as a platform example only; Kenmore model construction and manual control the actual procedure.
- Customer Care & Support | Kenmore AppliancesKenmore · Official Kenmore support page used for model and service escalation; it does not replace the matching washer manual.
- Find Your Manual | Kenmore Appliance Manuals & GuidesKenmore · Official Kenmore manual portal; enter the exact washer model before applying a control, access, hose, or repair procedure.
Community feedback
Share a repair observation
Share a plain-text repair observation. Accepted observations are published automatically; this page may take a moment to update.