
On this page
Start here
Quick answer
Do not assume the water filter is the source just because water is collecting under a Fisher & Paykel built-in refrigerator. First dry the floor and identify where fresh water appears: the filter area, an accessible water connection, the ice-maker path, or only the cabinet floor. Fisher & Paykel installation guidance says an incorrectly seated filter head can cause leaks, and its integrated-column instructions require the filter to be pushed fully into the casing, turned 90 degrees to lock, and checked for leaks after the water supply is on. Those instructions are family or model specific, so use the exact manual for the refrigerator's model. If the filter area is dry, a filter replacement is not a diagnosis; leave the cabinet closed, stop the accessible water supply if water is still flowing, and arrange qualified Fisher & Paykel service.
Before you begin
Safety first
- Do not pull a top-heavy built-in refrigerator from its cabinetry, remove panels, disconnect tubing, bypass the ice maker, or perform live electrical or internal water-system work. Keep the ice maker off and close an accessible water shutoff if safe while protecting the floor.
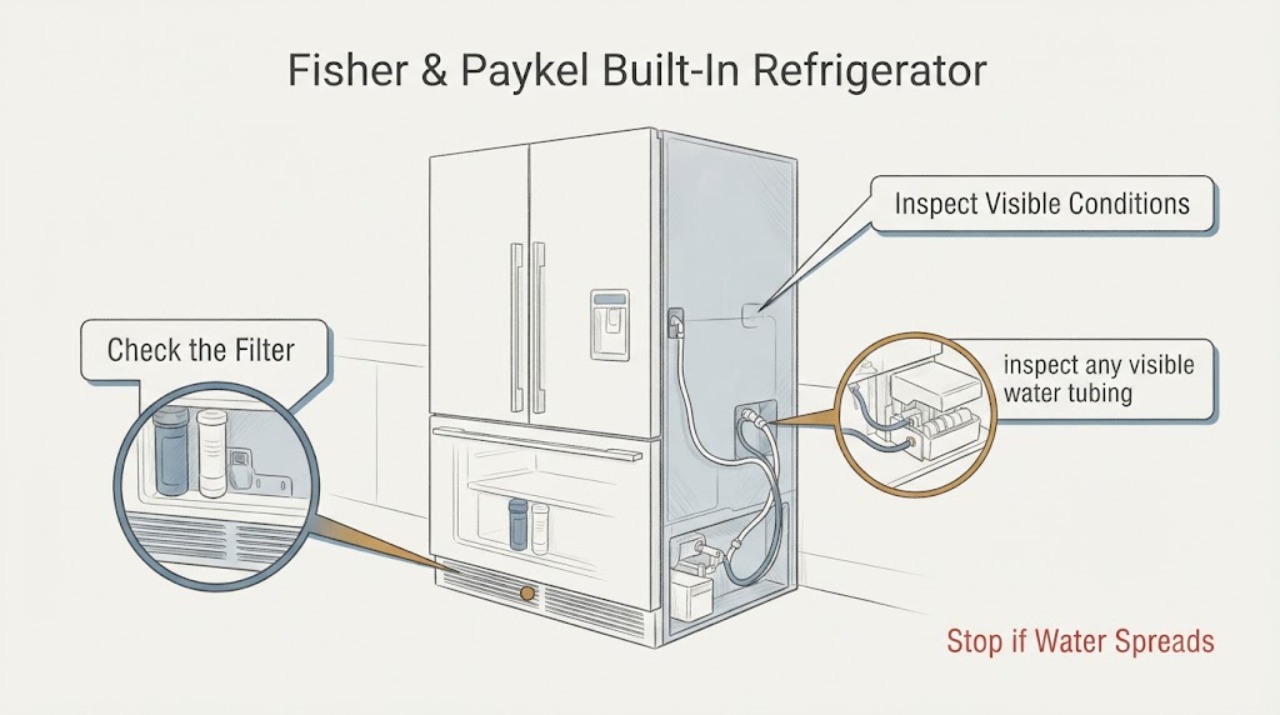
Work through in order
Diagnostic checks
Use only checks that match the exact appliance or system and its official guide.
-
Check 1
Dry the accessible floor and toe-kick area, place a dry towel beneath the front edge, and observe without pulling the built-in refrigerator from its cabinetry. Note when the next drop appears and whether the filter access area, a visible water connection, the freezer/ice-maker area, or only the floor becomes wet.
Expected result: Water reappears at a filter or connection area, appears after an ice-making event, or collects only at the cabinet floor with no visible first wet point.
Next step: Continue only with the matching external check below. If water is flowing continuously, is near electrical components, or cannot be localized without moving the appliance, stop use, close an accessible water shutoff if safe, and arrange qualified service.
Why this matters
Why: The collection point is not automatically the entry point. A repeatable first wet point narrows the next check; a floor-only puddle leaves the source unresolved.
-
Check 2
If the leak began after a filter change and the filter housing is accessible without removing panels, compare the cartridge position with the exact Fisher & Paykel manual: the cartridge should be fully inserted and the filter head should be secured or rotated to its documented lock position. Do not force a filter that will not align.
Expected result: The cartridge is visibly not fully seated or locked, or it is correctly seated and the filter area remains wet.
Next step: For a clearly mis-seated cartridge, use only the exact model instructions to reseat it, then perform the manual's leak check. If it is already locked, leaks again, or the housing is cracked, stop and request service rather than replacing parts by guesswork.
Why this matters
Why: Fisher & Paykel states that an incorrectly installed filter head can lead to water leaks. Correct seating makes an installation issue less likely, but it does not prove a failed cartridge or rule out another water path.
-
Check 3
From the outside, inspect any visible water tubing and connection near the toe kick or cabinet edge for a kink, squashed section, loose-looking fitting, or fresh drop. Do not pull the refrigerator forward, undo tubing, remove the grille, or open a panel.
Expected result: A visible connection or tube is wet, kinked, or dripping, or all visible connections are dry while water still collects below.
Next step: If a visible supply connection is dripping, close the accessible water shutoff and arrange a qualified plumber or Fisher & Paykel service. If all visible areas are dry, do not infer that the filter is at fault; continue only with the exact model guide or service.
Why this matters
Why: Fisher & Paykel installation material requires firm tubing connections, checks that connections are dry and free of drips, and warns against kinking or squashing the tube. A dry visible connection does not exclude a concealed leak.
-
Check 4
If there is no active leak and the filter has just been replaced, check the exact model guide for the ice-maker-only flushing method before enabling automatic ice making. Fisher & Paykel's general filter guidance says ice-maker-only models flush through the ice maker; do not apply dispenser volumes or button sequences to a no-dispenser model.
Expected result: The exact guide confirms an ice-maker-only flush and the filter is secure, or the model guide is unavailable or the leak remains active.
Next step: Perform only the matching documented flush when the system is dry and secure. If the guide does not match the appliance or water still appears, leave the ice maker off and arrange model-specific service.
Why this matters
Why: Flushing removes impurities or trapped air after a replacement; it is a commissioning step, not evidence that a leaking filter or water line has been repaired.
-
Check 5
Record the complete model and serial information from the appliance or paperwork, the filter-change date, whether the ice maker was running, and the first wet point. Keep the cabinet closed and do not remove the anti-tip hardware, internal covers, or water tubing.
Expected result: The leak stops after a documented filter reseat and remains dry, or it recurs, flows continuously, or cannot be localized externally.
Next step: Use the recorded identity to contact Fisher & Paykel or an authorized technician. Keep the water supply off when safe if the leak continues, protect flooring, and do not attempt an internal water-system repair.
Why this matters
Why: A dry result after the exact filter procedure supports an installation-related possibility only; recurrence or an unresolved source requires a model-specific diagnosis. Fisher & Paykel installation guidance treats water connections and top-heavy built-in installation as professional work.
Use your observations
Decision map
Find the observation that best matches what you see, then follow the next safe action.
-
PATH 01Next step
What you see
Water first appears at the filter head immediately after a filter change, and the cartridge is not fully inserted or locked.
Do this next
Use the exact model guide to reseat and lock the filter, then check for leaks. If it drips again or the housing is damaged, stop the water supply if safe and arrange service.
Why this path and its safety boundary
Why it matters: The pattern is consistent with a filter-installation leak path; Fisher & Paykel specifically warns that an incorrectly secured filter head can leak, but this does not prove the cartridge itself is faulty.
-
PATH 02Next step
What you see
The filter area is dry, but a visible supply connection or tube near the cabinet edge is wet or dripping.
Do this next
Do not undo the connection or pull the built-in unit forward. Close the accessible water shutoff and arrange a qualified plumber or Fisher & Paykel service.
Why this path and its safety boundary
Why it matters: The observed source is outside the filter housing; a kinked, squashed, or poorly seated connection is more relevant than replacing the filter.
-
PATH 03Next step
What you see
Water collects under the refrigerator while the filter and visible connections remain dry, or it appears only after the ice maker runs.
Do this next
Do not run repeated ice-making tests or remove panels. Keep the ice maker off, protect the floor, and give the technician the model, timing, and wet-point observations.
Why this path and its safety boundary
Why it matters: The source remains unresolved and may be concealed in the ice-maker water path or another appliance area; the opened sources do not support identifying a failed filter from this pattern.
-
PATH 04Next step
What you see
Water is flowing continuously, reaches electrical areas, or the refrigerator must be moved or dismantled to see the source.
Do this next
Stop using the refrigerator, close the accessible water shutoff if safe, avoid moving the top-heavy unit, and arrange Fisher & Paykel trained service or qualified plumbing help.
Why this path and its safety boundary
Why it matters: This exceeds a safe external filter check, and the built-in appliance may have a concealed water or installation fault.
Helpful context
Understand the symptom
Find the first wet point before blaming the filter
A puddle at the front or bottom of a built-in refrigerator shows where water collected, not where it entered. The assigned topic has no model number, and the opened Fisher & Paykel material covers several integrated families. Use a towel to dry the accessible floor and watch for the first new drop without pulling the built-in refrigerator out of its cabinetry. Record whether the filter housing, a visible connection, the freezer/ice-maker area, or the cabinet edge becomes wet first. Do not move a top-heavy built-in appliance or remove panels to trace a leak.
A recent filter change makes seating worth checking, not proven
Fisher & Paykel identifies the filter head as a possible leak point when it is not firmly pushed in and secured. The integrated-column procedure also requires the cartridge to be fully inserted and the head turned 90 degrees into the locked position before checking for leaks. This supports a careful model-matched seating check after a recent filter change; it does not prove that the cartridge itself is defective or that every Fisher & Paykel refrigerator uses the same location or turning direction.
Keep the ice-maker-only flush separate from leak diagnosis
Fisher & Paykel says an ice-maker-only model is flushed through the ice maker after filter installation, and the filter should be flushed before automatic ice making is enabled. Do not start an ice-making cycle merely to test an active leak. First secure the filter and confirm that the exact model guide permits the flush; if water continues to appear, stop at the service boundary.
Only after diagnosis
Potential parts
- water filter cartridge
Consider only if the exact model guide identifies the cartridge and the filter is due for replacement or remains defective after correct seating; a puddle alone does not establish filter failure.
Confirm the complete Fisher & Paykel model and the documented filter designation before ordering.
When checks do not resolve it
Need a professional?
Arrange Fisher & Paykel trained service or qualified plumbing help when the leak is continuous, the filter housing or connection is damaged, the visible filter and tubing remain dry while water collects below, the source requires moving or opening the built-in appliance, or the leak returns after the exact filter procedure.
Safety scope: Do not pull a top-heavy built-in refrigerator from its cabinetry, remove panels, disconnect tubing, bypass the ice maker, or perform live electrical or internal water-system work. Keep the ice maker off and close an accessible water shutoff if safe while protecting the floor.
Common questions
FAQ
Could the water filter be causing the leak?
It could be an installation-related source if water first appears at the filter head after replacement: Fisher & Paykel warns that an incorrectly secured filter head can leak. That does not establish a failed cartridge. If the filter area is dry, do not replace the filter solely because water is on the floor; trace the first wet point and use the exact model manual.
How should an ice-maker-only model be flushed after a filter change?
Fisher & Paykel says models with ice makers only must be flushed through the ice maker, and the exact user guide should supply the model-specific procedure. Do this only after the filter is secure and there is no active leak; do not reuse a dispenser procedure or run the ice maker to test a leak.
What if the filter and visible tubing are dry but water keeps collecting underneath?
The filter is not confirmed as the source. Keep the cabinet closed and avoid moving the built-in appliance or opening panels. If the leak continues, close the accessible water shutoff when safe and arrange Fisher & Paykel trained service or qualified plumbing help with the model and timing recorded.
Read the exact guide
Official sources
- Water Filter ReplacementFisher & Paykel Appliances · Official Fisher & Paykel support page with separate procedures for integrated columns and integrated French Door models. Used for the family-level warning, filter locking, ice-maker-only flush distinction, and safety/service boundary; it does not identify the unknown task model.
- ActiveSmart Integrated Refrigerator User Guide RS80, RS90 and RS91Fisher & Paykel Appliances · Official integrated-family user guide used only for shared external observations: bottom-front filter location in the covered family, water-supply/line/filter checks for ice-maker behavior, and service escalation. It is not proof of the unidentified refrigerator's exact model or leak source.
- ACTIVESMART™ Integrated French Door/Drawer Refrigerator RS36A72 Models Installation GuideFisher & Paykel Appliances · Exact official built-in family document. Used for the filter leak warning, external connection inspection, professional installation/safety boundary, and evidence that this family has a non-water-dispensing configuration; do not generalize its dimensions or model-only steps to an unidentified refrigerator.
- Integrated Columns RS1884FJ, RS2484FJ, RS3084FJ, RS2484S & RS3084S Models Installation GuideFisher & Paykel Appliances · Official integrated-column family document. Used only for the documented filter insertion, 90-degree lock, leak check, and pre-ice-maker flush sequence; exact model must be matched before applying the procedure.
Community feedback
Share a repair observation
Share a plain-text repair observation. Accepted observations are published automatically; this page may take a moment to update.