
On this page
Start here
Quick answer
Do not start by trying to pull the entire wire harness out of the freezer door. Whirlpool’s parts list for WRS571CIDM01 identifies the freezer door as an assembly that includes the dispenser front parts and separately lists the dispenser components, but it does not establish a user-replaceable door harness. First separate an ice-making problem from a dispensing problem: confirm the bin contains ice, the doors are closed, the dispenser is unlocked, the bin is seated, and the chute is not clumped. With power disconnected, you may visually check for damaged wiring at the lower freezer-door hinge without opening the door liner. If the wire insulation is cut, short, or unsafe to inspect, stop there and use Whirlpool service or an appliance technician; do not perform live tests, bypass the door interlock, or assume a replacement harness fits.
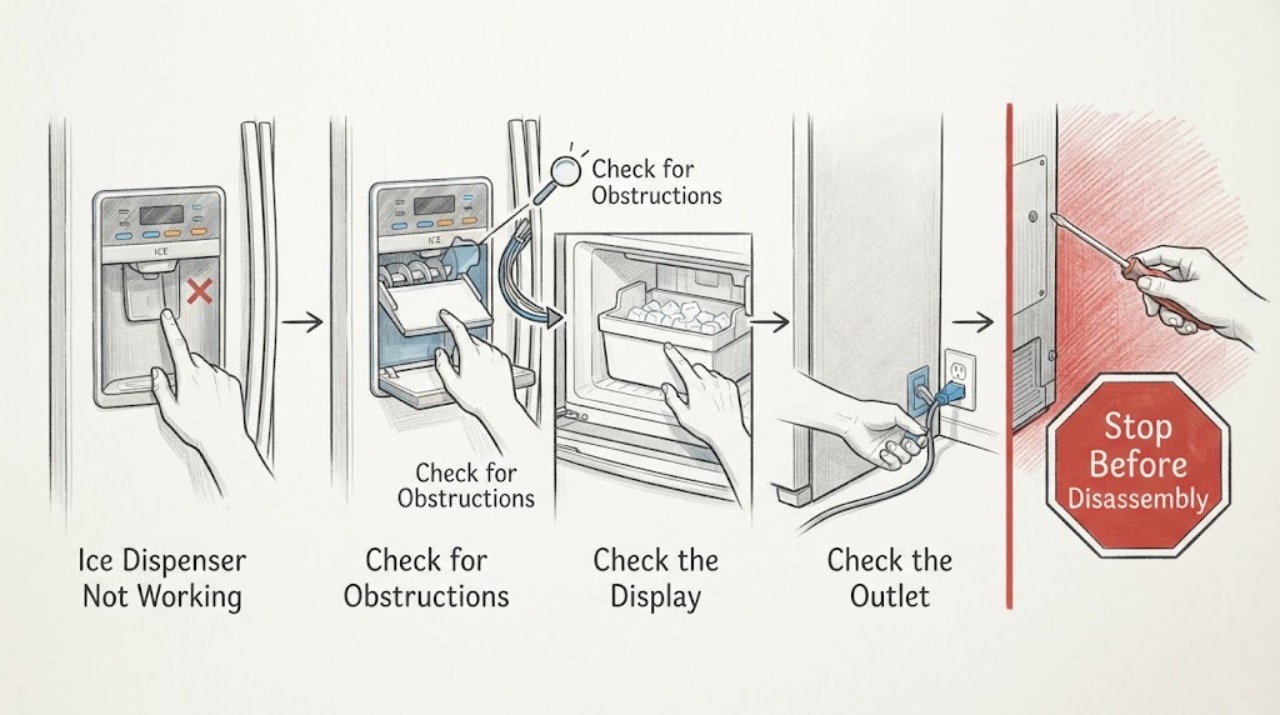
Work through in order
Diagnostic checks
Use only checks that match the exact appliance or system and its official guide.
-
Check 1
With both doors closed, select cubed ice and press a sturdy glass against the ice dispenser pad briefly. Note whether the display responds, the dispenser motor or auger can be heard, and any ice reaches the glass. Do not press hard or put fingers into the chute.
Expected result: The display responds and the motor runs but no ice exits; there is no response at all; or ice dispenses normally.
Next step: Continue with the bin, chute, lock and door checks. If the dispenser works, the no-dispense symptom is not currently reproducible; do not disassemble the door to chase an intermittent concern.
Why this matters
Why: A running dispenser with no output points first to clumped ice, a blocked chute or an incorrectly seated bin. No response can be a lock, door-closed, pad/control or wiring issue, but it does not identify which internal component failed.
-
Check 2
Check the external controls and seating: make sure the dispenser is unlocked, both doors close fully, the selected ice type is intentional, and the ice bin is pushed fully into its position. Use the exact user-guide bin instructions and do not force the shutoff arm or bin.
Expected result: The lock is on, a door is ajar, the bin is not fully seated, the shutoff control is off, or all of these conditions are correct.
Next step: Correct only the documented external condition, then make one brief dispensing check. If setup was already correct, inspect the ice and chute without opening the door.
Why this matters
Why: Whirlpool says the lock disables the dispenser controls, the system may require closed doors, and an incorrectly installed bin can prevent dispensing. A correct setup moves the problem toward the ice path or service boundary; it does not prove door-wiring failure.
-
Check 3
Remove the ice bin using the model guide, inspect the ice for a solid clump or pieces blocking the outlet, and clean the chute and bottom of the bin with a warm damp cloth. Use a plastic utensil only for loose ice; never use a knife or other sharp tool.
Expected result: Ice is clumped or blocking the outlet; the bin is empty even though the dispenser is selected; or the bin and chute are clear.
Next step: Clear only the documented external obstruction and reseat the bin. If the bin remains empty, follow the ice-production branch; if it is full and still will not dispense, continue to the power-off visual inspection and service boundary.
Why this matters
Why: Whirlpool identifies clumped or blocked ice as a direct dispensing cause. An empty bin indicates that ice production must be checked separately. A clear bin and chute leave the dispenser mechanism, controls, water/ice system or wiring unresolved; they do not justify ordering a harness by appearance.
-
Check 4
If the ice bin and chute are clear but dispensing still fails, unplug the refrigerator or disconnect power at the supply before looking at accessible wiring below the freezer door. Look only for obvious crushed, cut, or pulled insulation and take a photo for service; do not remove the door liner, cut conductors, probe a connector, or restore power with exposed damage.
Expected result: The lower-hinge wiring is visibly damaged or abnormally short/tight; the wiring looks intact; or the area cannot be inspected without door removal or panel access.
Next step: Keep the refrigerator disconnected if wiring is damaged or exposed and arrange Whirlpool-authorized or qualified appliance service. If no damage is visible, provide the exact model, symptom split, bin/chute result and photo to service instead of opening the door or performing a live test.
Why this matters
Why: Visible hinge-area damage can explain a door-mounted function loss, but an intact appearance does not clear conductors hidden in the door. The official parts list does not establish an easy removable complete harness, and Whirlpool treats wiring diagrams and component testing as service information.
-
Check 5
If the bin is empty, check only the model-guide external conditions: ice maker on, water supply valve open, supply line not kinked, filter correctly installed, and freezer/door condition suitable for ice production. Do not manually force an ejector or run service diagnostics unless a qualified technician is using the exact service sheet.
Expected result: The ice maker is off, the supply or filter condition is wrong, the line is kinked, or the external conditions are correct but no ice is produced.
Next step: Correct only the documented supply or setting issue and allow the guide’s production period before judging the result. If production remains absent, or if a water leak, exposed wiring or electrical hazard is present, stop and request service.
Why this matters
Why: An empty bin is not the same as a failed dispenser. Whirlpool’s side-by-side guidance links low or absent ice production to the ice-maker setting, doors, water pressure, supply line and filter; it does not identify a harness or valve from the symptom alone.
Use your observations
Decision map
Find the observation that best matches what you see, then follow the next safe action.
-
PATH 01Next step
What you see
The bin is full, the doors are closed, the dispenser is unlocked, the bin is seated, and the chute is clear, but the pad produces no response.
Do this next
Stop at the external checks, disconnect power before any visual inspection, and give service the model number, symptom split and lower-hinge photo. Do not open the door liner or buy a harness based on a similar model.
Why this path and its safety boundary
Why it matters: The documented external dispensing causes have been ruled out; a control, dispenser mechanism or door-wiring problem remains possible, but the evidence does not identify one component.
-
PATH 02Next step
What you see
The motor or auger can be heard, but no ice exits and the bin or chute contains a clump or obstruction.
Do this next
Remove the bin, clear the ice with the guide’s safe method, clean and dry the chute and bin, reseat the bin, and make one brief test. Escalate if the obstruction returns or the mechanism remains jammed.
Why this path and its safety boundary
Why it matters: The ice path is blocked or clumped, which is a documented dispensing cause and does not require a door-harness diagnosis.
-
PATH 03Next step
What you see
The bin is empty or the ice maker is not producing ice, even though the dispenser controls respond.
Do this next
Check the documented ice-maker setting, door closure, water supply, line, filter and freezer condition. If no ice returns after the model’s production period, arrange service rather than replacing dispenser wiring.
Why this path and its safety boundary
Why it matters: The immediate fault is ice production rather than proof that the dispenser door wiring has failed.
-
PATH 04Next step
What you see
The lower-hinge wires are cut, exposed, wet, hot, scorched or being pulled tight, or continuing requires removing the door liner, probing live wiring or bypassing a lock.
Do this next
Leave the refrigerator disconnected when safe, keep clear of exposed conductors, and arrange qualified appliance service. Do not splice, solder, bypass or power the refrigerator with damaged wiring unless the exact repair is being performed under appropriate service controls.
Why this path and its safety boundary
Why it matters: The situation exceeds the safe user-check boundary and may involve electrical, structural or door-support hazards.
Helpful context
Understand the symptom
What the exact model documents establish
Whirlpool’s parts list names WRS571CIDM01 as a side-by-side refrigerator and identifies the freezer-door assembly as including the dispenser front parts. The same list separately shows the ice dispenser and ice-maker components, but it does not present a complete freezer-door harness as a normal stand-alone user part. That is a parts-document boundary, not proof that every repair must use a new door. A technician should confirm the current serviceable configuration from the full model number and the observed damage before any order or repair decision.
Use the symptom to decide whether wiring is involved
A full ice bin with no delivery points first to the dispensing path: the selected ice type, lock state, closed doors, seated bin, clumped ice and blocked chute. An empty bin is a different ice-production problem. Water dispensing, the dispenser light and the ice-maker cycle can also differ, so do not treat one working function as proof that the whole door harness is sound.
Keep door and wiring work outside the user path
The exact user guide requires power disconnection before servicing and warns about dispensing hazards. Looking at the accessible lower hinge area with the refrigerator unplugged can document obvious insulation damage, but it does not authorize opening the foamed door, pulling conductors through the liner, cutting a wire, soldering, or making a live voltage or continuity test. Those decisions require model-specific service information and appropriate repair controls.
Common questions
FAQ
Can I easily pull the entire wire harness out of the WRS571CIDM01 freezer door?
The opened Whirlpool parts list does not show a complete removable freezer-door harness for this exact model; it identifies the freezer door as an assembly that includes the dispenser front parts. That does not prove the only remedy is a new door, but it does mean a user should not open the door liner or order a harness without model-specific service confirmation.
What should I check before blaming the door wiring?
Confirm that the bin contains ice, the doors are closed, the dispenser is unlocked, the bin is fully seated, and the ice is not clumped or blocking the chute. If the bin is empty, follow the separate ice-production checks for the ice-maker setting, water supply, line and filter.
Can I solder or test the wires myself?
Do not perform a live test, bypass a lock, or open the door liner based on this symptom. Disconnect power before any permitted visual check, and have qualified service evaluate exposed or damaged wiring and the complete door or harness decision.
Read the exact guide
Official sources
- Where Can I Find the Tech Sheet for My Appliance?Whirlpool Product Help · Opened Whirlpool’s official tech-sheet policy page. It says tech sheets may include wiring diagrams, component tests and service mode, and are intended for people with appliance trade experience; it supports keeping live electrical testing and internal wiring work out of this user-facing article.
- ECO Owner’s Manual / User Guide W10669500AWhirlpool · Opened the Whirlpool-hosted W10669500 condensed user guide referenced by the exact-model parts list. It supports the ice-dispenser sequence, lock, closed-door behavior, bin seating, chute/ice safety, water/filter checks and disconnect-power-before-servicing boundary.
- WRS571CIDM01 - Can I easily replace the ENTIRE wire harness in the freezer door?Reddit r/appliancerepair · Opened the exact Reddit post supplied as the research lead. The post identifies WRS571CIDM01, says previous wire repair at the door base restored some functions but dispensing still failed, and asks whether the door liner can be disassembled. It is used only to verify the input context, not as authority for a repair method or part fit.
- Not Dispensing Ice - RefrigeratorWhirlpool Product Help · Opened Whirlpool Product Help. The page supports the general dispensing checks used here: ice production, closed doors, lock, pad engagement, clumping, chute obstruction, bin seating and service escalation. It is not used to infer an internal part or exact harness fit.
- Repair Part List - W10784997 - Rev BWhirlpool · Opened Whirlpool’s exact-model parts PDF. The cover identifies WRS571CIDM01; the freezer-door section lists the door as including dispenser front parts, and the dispenser section lists the external dispenser components. The public list does not establish a standalone removable complete door harness or a guaranteed replacement method.
- Not Making Ice - Side by Side RefrigeratorWhirlpool Product Help · Opened Whirlpool Product Help for side-by-side refrigerators. It supports separating an empty-bin/no-production symptom from a dispenser symptom and checking ice-maker setting, door-area connection, temperature, water pressure, supply line and filter without diagnosing a specific component.
Community feedback
Share a repair observation
Share a plain-text repair observation. Accepted observations are published automatically; this page may take a moment to update.