
On this page
Start here
Quick answer
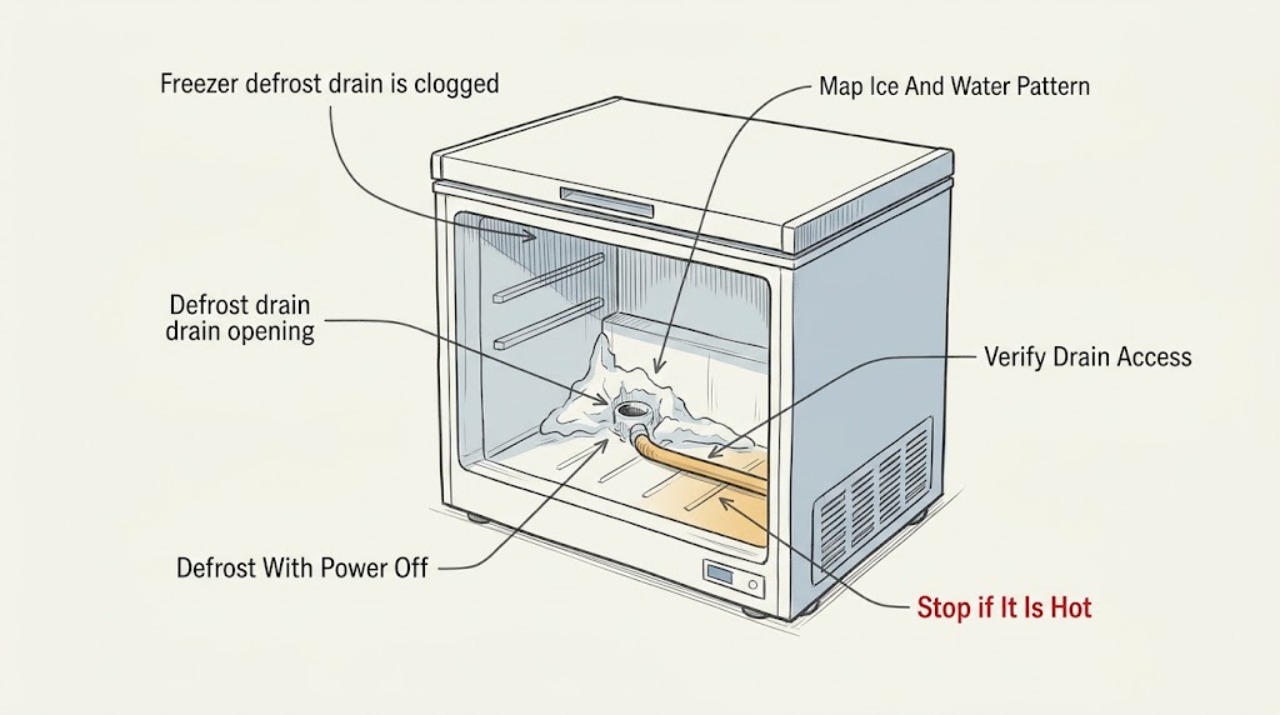
Ice around a freezer's defrost-drain opening usually means meltwater is not leaving the drain path, but the visible ice is not proof that every freezer uses the same accessible repair. First record whether water or ice is collecting on the freezer floor, whether the rear wall or vents are also iced, and whether the freezer is still holding temperature. Turn the appliance off or disconnect power only as the owner's instructions allow, protect the floor and food, and let the ice soften naturally. If the drain is visibly accessible and the model instructions permit cleaning, remove loose debris and use only the specified warm-water or flushing method; some GE models describe a bulb baster with hot tap water that is not boiling, while Samsung warns not to pour hot water directly into the drain. If the hole is behind a panel, the tube requires disassembly, water does not reach the drain pan, ice returns, or the rear wall is heavily frosted, stop and arrange model-specific appliance service.
Before you begin
Safety first
- This article supports observation, safe power-off thawing, ordinary-access inspection, and only a model-approved drain cleaning method. Do not access concealed components, apply improvised heat or pressure, use chemical cleaner, or bypass a control.
Work through in order
Diagnostic checks
Use only checks that match the exact appliance or system and its official guide.
-
Check 1
Without removing panels or chipping the ice, photograph and map where the ice and water are collecting: directly around the defrost-drain opening, across the freezer floor, under a lower basket or drawer, on the rear wall, or on the floor outside the appliance. Note whether the puddle appears after an automatic defrost period and whether the freezer is still cold.
Expected result: Classify the pattern as ice concentrated at the opening, ice or water spread across the freezer floor, water under a fresh-food drawer, a puddle in front of the appliance, heavy rear-wall or vent frost, or a leak whose source is not the freezer compartment.
Next step: Continue only with the drain-access and defrost steps that match the owner's manual; arrange service promptly for a warm freezer, food thawing, extensive rear-wall frost, or an unidentified external leak.
Stop if: Stop before moving panels, applying heat, or probing the opening if ice obscures the layout, the appliance has water near electrical parts, or food safety may be affected by a warm freezer.
Why this matters
Why: Ice or water on the freezer floor, water under a drawer, or a recurring puddle in front supports a drain-path restriction. Heavy rear-wall or vent frost makes an airflow, door-seal, or defrost-system problem more likely than a simple opening blockage. A leak that begins at a hose or connection is not established as a defrost-drain clog.
-
Check 2
Follow the owner's manual to turn the freezer off or disconnect it from power before cleaning, move food to a safe cold location, place towels around the appliance, and allow the ice around the opening to soften naturally. Keep the doors and panels in the position specified by the manual while the ice melts.
Expected result: Observe whether the ice releases without force and whether meltwater begins to collect in the intended drain area or instead pools on the freezer floor; note any water near wiring, lights, controls, or the appliance's external electrical connection.
Next step: Use towels to contain ordinary meltwater and proceed to identify the drain only after the opening is visible. Restore power only as the manual directs and only after the compartment is dry and the cause has been addressed.
Stop if: Do not chip ice with a knife, screwdriver, or other sharp object; do not use an open flame, heat gun, or improvised heater; do not pour hot water directly into the drain unless the exact manual expressly permits that method.
Why this matters
Why: Ice that melts safely but leaves water standing at the opening supports a remaining restriction. Water that reaches the pan indicates that the opening may be clearing. Water near electrical parts, an appliance that will not power down safely, or ice that will not soften without force requires service rather than more heat or prying.
-
Check 3
With the ice cleared enough to see the area, compare the freezer layout with the exact model instructions. Look only for a drain hole in the documented location, such as the back wall near where the floor slopes upward, or a documented access panel; do not remove a panel or evaporator cover unless the manual specifically provides that user procedure.
Expected result: Record whether the drain hole is plainly visible, visible only after a manual-approved cover is removed, hidden behind a panel that requires disassembly, or not identifiable from the available instructions.
Next step: If access is ordinary and documented, continue to the model-approved clearing method. If access requires disassembly, the drain is not visible, or the model instructions are unavailable, record the model number and arrange manufacturer or qualified appliance service.
Stop if: Do not expose the evaporator, heater, fan, wiring, or refrigerant tubing to reach the opening, and do not force a frozen panel or cut insulation.
Why this matters
Why: A visible opening can support a limited cleaning step if the manual permits it. A bottom-freezer tube or an opening requiring disassembly is a service boundary; GE specifically recommends service for bottom-freezer models needing access work. An unidentified opening means the ice may be over another component and should not be treated as a DIY drain.
-
Check 4
Only for a clearly accessible opening and only when the model's instructions permit it, remove loose debris from the surface without pushing it deeper, then use the specified flush tool and water temperature. GE describes a bulb baster with hot tap water that is not boiling for some side-by-side models; Samsung's guidance instead says to wait for the ice to melt and not pour hot water directly into the drain, so the appliance-specific instructions control.
Expected result: After the permitted step, observe whether water runs freely through the opening into the drain pan, backs up immediately, remains frozen, or leaks around an unexpected location. Do not infer success merely because surface ice disappeared.
Next step: If the manual-approved flush flows freely, dry the compartment and monitor the next defrost cycle for recurrence. If it does not flow, do not repeat increasingly forceful flushing; arrange service for the drain tube and defrost area.
Stop if: Do not use boiling water, pressurized air, wire, coat hanger, drill, chemical drain cleaner, or a sharp object; do not remove a heater or evaporator panel to chase a blockage.
Why this matters
Why: A free flow to the pan supports a cleared opening. Immediate backup suggests debris or ice remains deeper in the tube. Water that will not pass, returns to the freezer, or appears outside the intended pan indicates a deeper blockage, damaged drain path, pan issue, or model-specific fault.
-
Check 5
After the drain is dry and accessible components are restored, inspect ordinary external causes of excess frost: confirm the freezer door closes fully, check the gasket for gaps or escaping cold air, keep food and containers away from vents and the rear wall, and avoid putting hot food directly into the freezer.
Expected result: Record whether the door is obstructed, the seal has a visible gap or poor contact, vents are blocked, food touches the rear wall, or the freezer continues to build heavy frost despite clear airflow and a closed door.
Next step: Correct only the ordinary loading or door-obstruction issue allowed by the manual, then monitor. Request service for a damaged seal, persistent heavy frost, poor cooling, or recurrence after the documented drain procedure.
Stop if: Do not stretch, glue, cut, or improvise a gasket; do not block vents to redirect air; do not change temperature controls repeatedly to compensate for an unresolved frost problem.
Why this matters
Why: A door gap, blocked vent, or added moisture can increase frost and make a drain opening freeze again. If these checks are normal but rear-wall frost or drain ice returns, an automatic-defrost or sealed cooling problem becomes more likely and is not proven fixable by repeated drain flushing.
-
Check 6
After an approved cleaning and dry restart, monitor the freezer floor, drain opening, rear wall, and area in front of the appliance through the next normal operating and defrost periods. Keep the model number, photos, water location, and the exact cleaning method with the appliance record.
Expected result: Classify the result as no new ice and no leak, a small amount of frost with normal drainage, renewed ice around the opening, renewed water on the floor, worsening rear-wall frost, or loss of freezer temperature.
Next step: Stop repeated self-cleaning when the symptom returns and give the technician the observation record; use the appliance only as long as it remains safe, dry, and at the required food-storage temperature.
Stop if: Stop operation for water near electrical components, burning odor, damaged wiring, a sharp refrigerant-tube or panel hazard, food thawing, or any need to bypass a defrost or temperature control.
Why this matters
Why: A dry floor and free drainage support a resolved accessible blockage. Repeated ice at the opening suggests the restriction or freezing cause remains. A leak after the drain was proven clear points toward the pan, drain tube routing, leveling, a door-seal/defrost issue, or another water source. Cooling loss or extensive rear-wall ice needs appliance diagnosis.
Use your observations
Decision map
Find the observation that best matches what you see, then follow the next safe action.
-
PATH 01Safety boundary
What you see
Ice is concentrated around the visible defrost-drain opening and there is recurring ice or water on the freezer floor, under a lower drawer, or in front of the appliance.
Do this next
Turn off power as the manual directs, let the ice melt, and use the model-approved accessible cleaning or flush procedure. Verify actual flow to the pan before restarting normal operation.
Why this path and its safety boundary
Why it matters: A clogged or frozen drain path is plausible because defrost water is not reaching the pan. The pattern is stronger when it repeats after defrost, but it does not identify whether the restriction is at the opening or deeper in the tube.
Safety stop: Do not probe, drill, use chemical cleaner, or remove an evaporator panel to reach the tube; arrange service when the flow path is hidden or remains blocked.
-
PATH 02Safety boundary
What you see
The documented drain opening accepts the permitted flush and water reaches the pan, but ice returns around the opening or the rear wall and vents begin frosting again.
Do this next
Check door closure, gasket contact, food placement, and vent clearance without altering components; if those are normal or the ice returns, request model-specific appliance service for the defrost and drain system.
Why this path and its safety boundary
Why it matters: The opening was not the whole cause. Excess moisture from a poor door seal or blocked airflow, a recurring freeze in the tube, or an automatic-defrost fault is more likely than loose surface debris alone.
Safety stop: Do not repeat full manual defrosts indefinitely, reshape the gasket, cover vents, or bypass a defrost control.
-
PATH 03Safety boundary
What you see
The freezer is a bottom-freezer design, the drain tube is behind a cover, or reaching the opening requires disassembly not described as a user procedure.
Do this next
Record the model and the ice/water pattern, keep food safe, and arrange manufacturer or qualified appliance service. Do not assume a side-by-side flushing recipe applies to this layout.
Why this path and its safety boundary
Why it matters: The symptom can still be a clogged defrost drain, but the safe next step is service rather than forcing access. GE specifically notes that bottom-freezer drain tubes require some disassembly and recommends contacting service.
Safety stop: Do not remove the evaporator cover, heater, fan, wiring, or insulation merely to expose a drain tube.
-
PATH 04Safety boundary
What you see
Ice is mainly on the rear wall or vents, the freezer is warmer than expected, food is softening, or frost returns broadly instead of remaining at the drain opening.
Do this next
Check only door closure, seal contact, and vent clearance; if the freezer remains warm or heavily frosted, stop troubleshooting and request appliance service.
Why this path and its safety boundary
Why it matters: Airflow, door-seal moisture, or the automatic-defrost/cooling system is more likely than an isolated drain-opening clog. Clearing the opening may not restore cooling and repeated thawing can risk food.
Safety stop: Do not operate with food thawing, bypass temperature or defrost controls, or remove sealed-system components.
-
PATH 05Safety boundary
What you see
The drain accepts the approved flush and water reaches the pan, but water still appears outside, the pan is full or damaged, or the leak starts at a rear connection.
Do this next
Dry the area, avoid moving the appliance over a wet floor, and arrange service if the source is not plainly identified and safe to access. Follow the manual before adjusting leveling or removing any rear cover.
Why this path and its safety boundary
Why it matters: The drain opening is less likely to be the remaining restriction. The pan, tube routing, leveling, door moisture, or a separate water connection needs inspection; a clear opening alone does not prove the whole defrost-water system is sound.
Safety stop: Do not operate with water near electrical parts, do not loosen water-line fittings, and do not remove a rear metal cover without the model procedure.
Helpful context
Understand the symptom
What ice around the drain opening tells you
During automatic defrost, frost melts and should travel through the drain opening and tube to a pan under or behind the refrigerator. When the opening is blocked by ice or debris, the meltwater can freeze around the opening, spread onto the freezer floor, or eventually leak in front of the appliance. GE identifies ice or water on the freezer floor and water under a fresh-food drawer as possible signs of a clogged drain tube. That pattern is different from a little frost on an otherwise clear opening, an overflowing pan, or a leak from a water connection. The first useful check is therefore the location and timing of the water, not poking the ice with a sharp tool.
Access differs by freezer design
A drain hole may be visible at the back of a side-by-side freezer, while a bottom-freezer design may require removal of a panel or other disassembly. GE says some side-by-side models can be flushed when the hole is accessible, but says bottom-freezer drain tubes require some disassembly and recommends service. Do not remove a panel just because it appears removable, and do not continue if the opening cannot be identified from the owner's instructions. The exact model manual determines whether the task is ordinary cleaning or a service repair.
A clear drain does not explain every recurring ice problem
If the opening accepts the permitted flush and water reaches the pan, the immediate blockage may be gone. Ice can return if warm, humid air enters through a door that does not close or seal, food blocks freezer vents, hot food adds moisture, or the defrost system has a separate fault. Samsung recommends checking door closure and seals, keeping food clear of vents, and cooling hot food before storage. Rear-wall frost, a warm freezer, repeated heavy ice, or a blockage that returns after the approved cleaning points beyond a simple accessible opening and should be assessed by a qualified technician.
Safety boundary
Stop conditions
- Do not chip, drill, pierce, pry, or scrape ice near the drain, evaporator, heater, wiring, or refrigerant tubing.
- Do not pour boiling water, hot water not authorized by the exact model instructions, compressed air, chemical drain cleaner, or solvent into the defrost drain.
- Do not remove an evaporator cover, heater, fan, wiring, insulation, or rear panel merely to reach a drain tube; treat disassembly as a service boundary.
- Stop for water near electrical components, burning odor, damaged wiring, a refrigerant-tube concern, a freezer that is warming, or food that may no longer be safely frozen.
- Do not bypass, reset repeatedly, or alter temperature, defrost, fan, or safety controls to mask recurring ice; arrange model-specific appliance service.
Only after diagnosis
Potential parts
- defrost drain tube or drain grommet
Consider this category only if service confirms that the drain tube or its grommet is blocked, split, displaced, or otherwise damaged after the accessible opening and surrounding ice are addressed.
Confirm the exact freezer model, tube routing, grommet design, and manufacturer's fit information; do not substitute a generic tube or alter the drain path by guesswork. - freezer door gasket
Consider this category only if inspection or service confirms that the exact door seal is damaged or cannot close and the resulting moisture is contributing to recurring frost and drain ice.
Confirm the exact model and gasket profile with the manufacturer; do not stretch, glue, cut, or reshape a seal as a temporary repair. - automatic-defrost component
Consider this category only after service identifies a failed defrost heater, sensor, thermostat, control, or related component as the cause of repeated rear-wall frost or drain freezing.
The correct component depends on the exact model and diagnostic result; do not order or replace an electrical defrost part from symptom alone.
When checks do not resolve it
Need a professional?
Arrange manufacturer or qualified appliance service when the drain opening is hidden or requires disassembly, an approved thaw and cleaning does not restore flow, water does not reach the drain pan, ice returns, the rear wall or vents are heavily frosted, the freezer is warming, the pan or tube may be damaged, or the leak source is uncertain. Provide the exact model, freezer layout, photos, where ice and water appeared, whether the drain accepted water, and the precise method used.
Safety scope: This article supports observation, safe power-off thawing, ordinary-access inspection, and only a model-approved drain cleaning method. Do not access concealed components, apply improvised heat or pressure, use chemical cleaner, or bypass a control.
Common questions
FAQ
Why is there ice around my freezer's defrost-drain opening?
The opening or the tube below it may be blocked by ice or debris, so defrost water cannot reach the drain pan and freezes near the opening or spreads onto the floor. Confirm the ice-and-water pattern first; a rear-wall frost problem, poor door seal, or warm freezer can point to a broader cause.
Can I pour hot water into a frozen freezer drain?
Only follow the exact model instructions. GE describes hot tap water that is not boiling with a bulb baster for some accessible side-by-side designs, while Samsung warns not to pour hot water directly into the drain and recommends turning off power and waiting for the ice to melt. Do not improvise with boiling water, pressure, or a sharp tool.
How do I know whether the freezer drain is actually clear?
After the model-approved thaw or flush, water should move through the visible opening to the intended drain pan rather than backing up onto the freezer floor. Surface ice disappearing is not enough. If water will not pass, the drain is hidden, or the symptom returns, stop and arrange service.
Why does ice return after I clear the freezer drain?
Recurring ice can mean a deeper or refreezing tube restriction, excess moisture from a door that does not seal, blocked vents, hot food, or an automatic-defrost problem. Check only ordinary door closure, gasket contact, food placement, and vent clearance; repeated rear-wall frost or cooling loss needs model-specific diagnosis.
Does a bottom-freezer drain have a different repair boundary?
Often. GE notes that bottom-freezer drain tubes require some disassembly and recommends service, whereas some side-by-side models have an accessible back-wall opening. Do not apply a side-by-side flushing recipe to a hidden bottom-freezer tube or remove an evaporator cover just to reach it.
Read the exact guide
Official sources
- Bottom Freezer Refrigerator - Clogged Drain Tube, Ice on Freezer FloorGE Appliances · Official GE support guidance for bottom-freezer refrigerators; layout and access vary by model.
- What should I do if I suspect my Samsung fridge/freezer is leaking water?Samsung · Official Samsung UK support guidance used for general drain and leak patterns; exact access and repair instructions vary by model and region.
- Side-by-Side Refrigerator - Water on Floor, Repairing a Clogged Defrost DrainGE Appliances · Official GE guidance for certain side-by-side designs; it must not be generalized to a freezer whose drain requires disassembly.
- Why does my refrigerator have frost or a leak?Samsung · Official Samsung Hong Kong guidance; the page notes that models, sequences, and settings vary by location and product, so the exact manual controls.
Community feedback
Share a repair observation
Share a plain-text repair observation. Accepted observations are published automatically; this page may take a moment to update.