
On this page
Start here
Quick answer
Foam near the fill tube of a new freezer is not automatically a huge red flag, but do not pull, cut, or push it into the tube until the exact brand and model manual identifies it. Manufacturer installation instructions use different pieces for different purposes: one Whirlpool kit calls for removing a foam insert from a fill-tube hole and installing a round foam gasket around the tube, while another official instruction distinguishes model-specific tube extensions and alignment. With the brand and model still unknown, first photograph the foam and its location, verify that the ice maker is on and the water supply is open, and allow the model's documented startup period. If the material is loose, blocks the water path, leaks, is embedded in the cabinet, or ice production does not begin after the exact manual's checks, stop the installation and contact the manufacturer, installer, or qualified service. Do not treat a generic foam-removal step from another brand as permission to remove yours.
Before you begin
Safety first
- Do not remove unidentified foam, cut or pierce the cabinet, scrape or heat a frozen tube, pry off panels, disconnect wiring, or force the ice maker to cycle. Any installation step involving the rear panel, water valve, wiring, or ice-maker removal requires the exact model instructions and power/water isolation or qualified service.
Work through in order
Diagnostic checks
Use only checks that match the exact appliance or system and its official guide.
-
Check 1
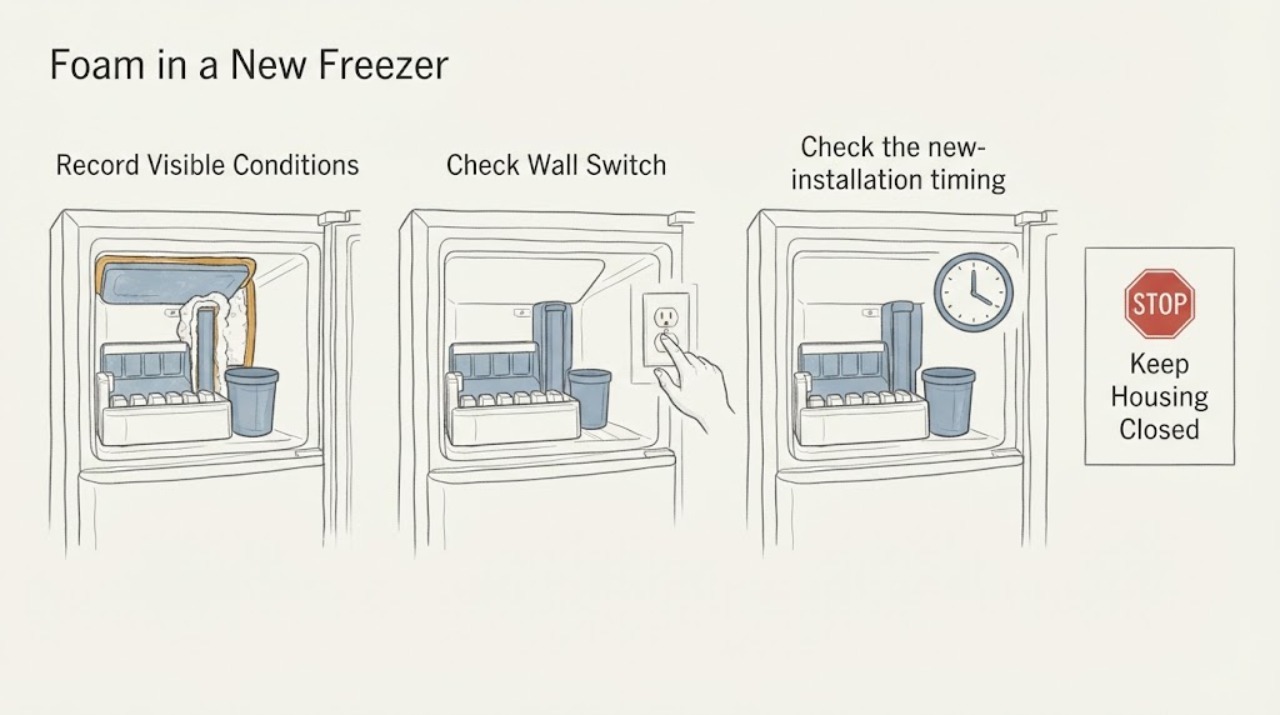
Before touching the material, take clear photos of the foam, the fill-tube opening, the ice-maker fill cup, the rear cabinet area, and the appliance model/serial label. Record whether the foam is a round seal around the tube, a plug in a cabinet hole, loose packing, or material inside the water passage.
Expected result: The label and the foam's position are clear, or the appliance identity or material position remains uncertain.
Next step: If the identity or location is uncertain, leave the material in place and contact the manufacturer or installer with the photos. Do not pull, cut, pierce, or push it into the tube.
Why this matters
Why: The same word—foam—can describe distinct installation pieces. The exact model and location are needed to match the manual; an uncertain material cannot be safely classified from appearance alone.
-
Check 2
Using only the exact owner manual for the identified freezer, verify the ice maker is plugged in or enabled, the shut-off arm or switch is in the ON position, the water valve is open, and the ice bin or bucket is seated. Do not remove a cover or panel to reach a connection unless that exact manual expressly permits it and gives a safe procedure.
Expected result: The ice maker is off, the water supply is closed, the bin is misplaced, or all external startup conditions are correct.
Next step: Correct only the clearly documented external condition. If the material still appears to block the tube or the ice maker remains inactive, stop and request manufacturer or installer guidance rather than using a generic foam-removal instruction.
Why this matters
Why: Official GE and Frigidaire guidance identifies power/on status, water connection, arm position, and bin placement as ordinary startup conditions. A foam-looking object is not established as the cause until these model-matched conditions are verified.
-
Check 3
Check the new-installation timing in the exact manual and note how long the freezer has been at operating temperature with the ice maker enabled. Do not pour water into the mold or force a harvest unless the model manual specifically instructs that procedure.
Expected result: The freezer is still inside the documented startup window, or the documented wait has passed with no fill or ice.
Next step: Within the exact manual's startup window, monitor without disturbing the foam. After the documented window, use only the model-specific no-ice checks and arrange service if the fill tube is suspected to be frozen or blocked.
Why this matters
Why: GE says a new ice maker may need at least 24 hours to reach operating temperature, and Frigidaire says the first 24 hours may produce little ice and the bin may take one to two days to fill. Those are not universal promises for an unidentified model.
-
Check 4
With power and water handled according to the exact manual, inspect only from the accessible freezer opening for a visible ice plug at the end of the fill tube, water leaking around the fill cup, a tube that is visibly misaligned, or foam protruding into the water path. Do not scrape, heat, drill, or remove the tube.
Expected result: The tube appears clear and aligned, or there is an ice plug, leakage, misalignment, or unidentified material in the water path.
Next step: Keep the appliance in its safe operating state only if the exact manual permits it and there is no leak. For an ice plug, obstruction, leak, or misalignment, stop at external observation and contact qualified service or the installer.
Why this matters
Why: A clear and aligned tube does not prove the valve or ice maker is working; a visible plug or water-path obstruction can prevent filling. GE says verifying a frozen fill tube requires removing the ice maker and should be checked by a service technician.
-
Check 5
Compare the foam against the exact installation illustration and wording before changing anything. Look specifically for the manual's terms such as foam gasket, foam insert, insulation, hole plug, fill-tube extension, or water-line cover; do not match by color or shape alone.
Expected result: The manual explicitly identifies the piece and says to remove it, retain it, install it around the tube, or leave it covered; or the manual does not identify it.
Next step: Follow only the exact model instruction and its electrical/water safety steps. If no exact instruction exists, leave the foam undisturbed and have the manufacturer or qualified installer identify it.
Why this matters
Why: A documented instruction tied to the exact model can establish the material's role. A similar-looking step from Whirlpool, GE, Frigidaire, or another appliance is not evidence for an unidentified freezer.
Use your observations
Decision map
Find the observation that best matches what you see, then follow the next safe action.
-
PATH 01Next step
What you see
The exact manual labels the material as a foam gasket around the fill tube or another retained insulation/sealing piece.
Do this next
Leave it in the documented position and continue only with the manual's startup checks; do not trim or pull it because it resembles packaging.
Why this path and its safety boundary
Why it matters: The foam may be an intentional part of the water-path or cabinet seal, so removing it could create leakage, air intrusion, or a fit problem.
-
PATH 02Next step
What you see
The exact installation kit explicitly identifies a foam insert or hole plug for removal, and the appliance model and location match that instruction.
Do this next
Use the complete matched installation procedure, including power disconnection and panel replacement instructions. If the model or kit does not match, do not remove the foam.
Why this path and its safety boundary
Why it matters: Some installation instructions do call for removing a specified insert before the fill tube is installed, but that conclusion belongs only to the matched kit and hole.
-
PATH 03Next step
What you see
The material is loose, wet, crushed into the tube, visibly blocking water, embedded in an unlisted location, or cannot be identified from the exact manual.
Do this next
Do not pull, cut, heat, drill, or push it inward. Stop the installation or ice-maker troubleshooting and contact the manufacturer, installer, or qualified service with the model label and photos.
Why this path and its safety boundary
Why it matters: The material identity and water-path risk are unresolved. Pulling it could damage the tube, cabinet seal, wiring, or insulation and could turn an installation question into a leak or cooling problem.
-
PATH 04Next step
What you see
The freezer is new, the ice maker is enabled and supplied with water, and the exact manual's startup window has not elapsed.
Do this next
Wait only for the model-documented period and monitor without disturbing the material. If the window passes with no fill, use the exact model's no-ice procedure or schedule service.
Why this path and its safety boundary
Why it matters: A temporary lack of ice can be normal while the freezer reaches operating temperature and air clears from new plumbing; the foam has not been shown to be the cause.
-
PATH 05Next step
What you see
No ice is produced after the model-specific startup period, or the fill tube is visibly frozen, leaking, or misaligned.
Do this next
Keep the suspected material intact, avoid forced thawing or disassembly, and arrange manufacturer or qualified service with the exact model and photos.
Why this path and its safety boundary
Why it matters: A water-supply, valve, frozen-tube, fill-cup, or ice-maker issue remains possible, but the available evidence does not identify which component failed. GE says frozen fill-tube verification should be handled by a service technician.
Helpful context
Understand the symptom
Foam is a material-identification question first
The task does not provide a brand, model, freezer layout, or a photo of the foam. That matters because foam can appear as a gasket around a fill tube, an insert in a cabinet opening, or packaging/insulation that must remain in place. An official Whirlpool installation document instructs removal of a foam insert from one fill-tube hole and separately describes a round foam gasket installed over the fill tube. Those are different pieces and do not authorize removing foam from an unidentified freezer.
A new ice maker may not produce ice immediately
The absence of ice on the first day is not enough to prove that the foam is blocking water. GE says a new ice maker must be plugged in, switched on, and cold enough to begin a cycle, and recommends waiting at least 24 hours in its installation guidance. Frigidaire says minimal production may occur in the first 24 hours and that filling the bin can take one to two days. These timing statements are brand-specific examples; use the exact freezer manual for the assigned appliance.
Keep the tube and cabinet intact
Do not pull foam from a hole, cut material around the tube, or pry off a cover just because another installation guide uses that step. If the foam is loose, wet, crushed into the water path, or attached to a tube that is not aligned with the ice-maker cup, stop and have the installer or manufacturer identify it. GE treats a frozen fill tube as a technician check, and Whirlpool installation instructions require model-specific tube alignment and component choices.
When checks do not resolve it
Need a professional?
Contact the manufacturer, installer, or qualified appliance service when the foam cannot be identified from the exact manual, is loose or embedded, obstructs the fill tube, is associated with a leak, or no ice is produced after the documented startup and external checks. Provide the complete model/serial label, installation date, photos, and whether the ice maker fills at all.
Safety scope: Do not remove unidentified foam, cut or pierce the cabinet, scrape or heat a frozen tube, pry off panels, disconnect wiring, or force the ice maker to cycle. Any installation step involving the rear panel, water valve, wiring, or ice-maker removal requires the exact model instructions and power/water isolation or qualified service.
Common questions
FAQ
Is foam around a new freezer ice-maker fill tube automatically a defect?
No. Official installation instructions show that foam can be a gasket around a fill tube or an insert at a cabinet opening, and those pieces have different instructions. Because the freezer brand and model are missing, identify the exact piece before removing anything.
How long should a new ice maker take to make ice?
The answer is model-specific. GE says a newly installed ice maker may need at least 24 hours to reach operating temperature, while Frigidaire says minimal ice may occur in the first 24 hours and the bin may take one to two days to fill. Use the exact freezer manual rather than applying either timing universally.
Can I pull the foam out of the fill-tube opening to see whether water flows?
Do not do that without a matched manual instruction. Some installation kits specify removing a particular foam insert, while other instructions use a foam gasket around the tube. If the piece is unidentified, leave it in place and ask the manufacturer or installer to identify it.
Read the exact guide
Official sources
- Installing the Ice MakerWhirlpool Corporation · Official Whirlpool installation document used only to show that fill-tube alignment and installation components vary by kit/model. It does not authorize work on the unidentified freezer.
- Icemaker - New Installation Tips & TroubleshootingGE Appliances · Official GE startup guidance used as a brand-specific example only; its 24-hour and temperature statements must not be generalized to an unidentified freezer.
- Refrigerator - Icemaker Doesn't Fill With WaterGE Appliances · Official GE support guidance used for family-level symptom interpretation only. It supports external power/arm checks and says frozen fill-tube verification should be done by a service technician; it does not identify the assigned freezer or foam.
- Installation InstructionsWhirlpool Corporation · Official Whirlpool installation document used as a scoped example that different foam pieces have different roles. It is not evidence that an unidentified freezer uses this kit or that its foam should be removed.
- Bottom Freezer Refrigerator - Not Making IceGE Appliances · Official GE bottom-freezer guidance used only for examples of external no-ice checks and the fact that optional ice-maker installations can have extra components. It does not establish foam identity or fit for the assigned freezer.
- Refrigerators - How do I use my ice maker in my Top-Freezer refrigerator?Frigidaire · Official Frigidaire guidance used as a brand-specific timing example only. It does not identify the assigned freezer or support removing any foam.
Community feedback
Share a repair observation
Share a plain-text repair observation. Accepted observations are published automatically; this page may take a moment to update.